Headfile !头文件的原理与实践编写。 摘自外网 -learn.cpp.com
来源:互联网 发布:搞怪照片软件下载 编辑:程序博客网 时间:2024/06/11 16:23
1.9 — Header files
Headers, and their purpose
As programs grow larger and larger (and include more files), it becomes increasingly tedious to have to forward declare every function you want to use that lives in a different file. Wouldn’t it be nice if you could put all your declarations in one place?
C++ code files (with a .cpp extension) are not the only files commonly seen in C++ programs. The other type of file is called aheader file, sometimes known as an include file. Header files usually have a .h extension, but you will sometimes see them with a .hpp extension or no extension at all. The purpose of a header file is to hold declarations for other files to use.
Using standard library header files
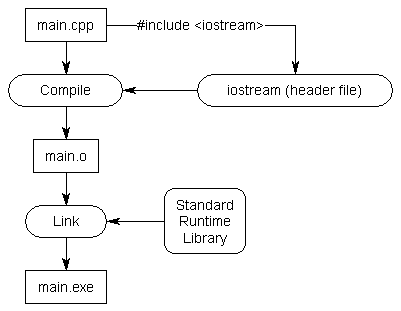
Consider the following program:
This program prints “Hello, world!” to the console using cout. However, this program never defines cout, so how does the compiler know what cout is? The answer is that cout has been declared in a header file called “iostream”. When we use the line#include <iostream>, we’re requesting that all of the content from the header file named “iostream” be copied into the including file. That makes the content from the header file available for use in our code file.
Keep in mind that header files typically only contain declarations. They do not define how something isimplemented. So if cout is only declared in the “iostream” header file, where is it actually defined? It is implemented in the C++ runtime support library, which is automatically linked into your program during the link phase.
Consider what would happen if the iostream header did not exist. Wherever you used std::cout, you would have to manually copy in all of the declarations related to std::cout into the top of each file that used it! This would require knowledge of what’s relevant and what’s not. It’s much easier to just #include iostream!
Writing your own header files
Now let’s go back to the example we were discussing in a previous lesson. When we left off, we had two files, add.cpp and main.cpp, that looked like this:
add.cpp:
main.cpp:
(If you’re recreating this example from scratch, don’t forget to add add.cpp to your project so it gets compiled in).
We used a forward declaration so that the compiler would know what “add” was when compiling main.cpp. As previously mentioned, writing forward declarations for every function you want to use that lives in another file can get tedious quickly.
Header files can relieve us of this burden. A header file only has to be written once, and it can be included in as many files as needed. This also helps with maintenance by minimizing the number of changes that need to be made if a function prototype ever changes (eg. by adding a new parameter).
Writing our own header files is surprisingly easy. Header files consist of two parts.
The first part is called a header guard, which is discussed in the next lesson (on thepreprocessor). Header guards prevent a given header file from being #included more than once in the same file.
The second part is the actual content of the .h file, which should be the declarations for all of the functions we want other files to be able to see. Our header files should all have a .h extension, so we’ll call our new header file add.h:
add.h:
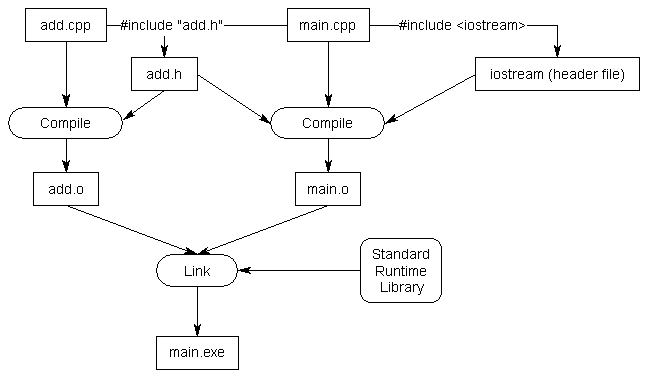
In order to use this header file in main.cpp, we have to include it.
main.cpp that includes add.h:
add.cpp stays the same:
When the compiler compiles the #include "add.h" line, it copies the contents of add.h into the current file at that point. Because our add.h contains a function prototype for add(), this prototype is now being used as a forward declaration of add()!
Consequently, our program will compile and link correctly.
Note: When you #include a file, the entire content of the included file is inserted at the point of inclusion.
If you get a compiler error about add.h not being found, make sure the file is really named add.h. Depending on how you created and named it, it’s possible the file could have been named something like “add” (no extension) or “add.h.txt” or “add.hpp”.
If you get a linker error about add() not being defined, make sure you’ve included add.cpp in your project so it compiles properly!
Angled brackets vs quotes
You’re probably curious why we use angled brackets for iostream, and double quotes for add.h. The answer is that angled brackets are used to tell the compiler that we are including a header file that was included with the compiler, so it should look for that header file in the system directories. The double-quotes tell the compiler that this is a header file we are supplying, so it should look for that header file in the current directory containing our source code first. If it doesn’t find the header file there, it will check any other include paths that you’ve specified as part of your compiler/IDE settings. That failing, it will fall back to checking the system directories.
Rule: Use angled brackets to include header files that come with the compiler. Use double quotes to include any other header files.
Header files may include other header files. However, you should never rely on this. Always #include all of the header files you need to use from each .cpp file.
Rule: Each .cpp file should explicitly #include all of the header files it needs to compile.
Why doesn’t iostream have a .h extension?
Another commonly asked question is “why doesn’t iostream (or any of the other standard library header files) have a .h extension?”. The answer is, because iostream.h is a different header file than iostream is! To explain requires a very short history lesson.
When C++ was first created, all of the files in the standard runtime library ended in .h. Life was consistent, and it was good. The original version of cout and cin lived in iostream.h. When the language was standardized by the ANSI committee, they decided to move all of the functions in the runtime library into the std namespace (which is generally a good idea). However, this presented a problem: if they moved all the functions into the std namespace, none of the old programs would work any more!
To try to get around this issue and provide backwards compatibility for older programs, a new set of header files was introduced that use the same names but lack the .h extension. These new header files have all their functionality inside the std namespace. This way, older programs that include #include <iostream.h> do not need to be rewritten, and newer programs can#include <iostream>.
When you include a header file from the standard library, make sure you use the non .h version if it exists. Otherwise you will be using a deprecated version of the header that is no longer supported.
In addition, many of the libraries inherited from C that were still useful in C++ were given a c prefix (e.g. stdlib.h became cstdlib). The functionality from these libraries was also moved into the std namespace to help avoid naming collisions.
However, when you write your own header files, you should give them all a .h extension, since you will not be putting your code in the std namespace.
Rule: use the non .h version of a library if it exists, and access the functionality through the std namespace. If the non .h version does not exist, or you are creating your own headers, use the .h version
Including header files from other directories
Another common question involves how to include header files from other directories.
One (bad) way to do this is to include a relative path to the header file you want to include as part of the #include line. For example:
The downside of this approach is that it requires you to reflect your directory structure in your code. If you ever update your directory structure, your code won’t work any more.
A better method is to tell your compiler or IDE that you have a bunch of header files in some other location, so that it will look there when it can’t find them in the current directory. This can generally be done by setting an “include path” or “search directory” in your IDE project settings.
In Visual Studio, you can right click on your project in the Solution Explorer, and choose “Properties”, then the “VC++ Directories” tab. From here, you will see a line called “Include Directories”. Add your include directories there.
In Code::Blocks, go to the Project menu and select “Build Options”, then the “Search directories” tab. Add your include directories there.
Using g++, you can use the -I option to specify an alternate include directory.
The nice thing about this approach is that if you ever change your directory structure, you only have to change a single compiler or IDE setting instead of every code file.
Can I put function or variable definitions in a header file?
You shouldn’t, as it may cause linker errors. We’ll explain why in the upcoming lesson on header guards.
Declarations are okay.
Header file best practices
Here are a few best practices for creating your own header files.
- Always include header guards.
- Do not define variables in header files unless they are constants. Header files should generally only be used for declarations.
- Do not define functions in header files.
- Each header file should have a specific job, and be as independent as possible. For example, you might put all your declarations related to functionality A in A.h and all your declarations related to functionality B in B.h. That way if you only care about A later, you can just include A.h and not get any of the stuff related to B.
- Give your header files the same name as the source files they’re associated with (e.g. grades.h goes with grades.cpp).
- Try to minimize the number of other header files you #include in your header files. Only #include what is necessary.
- Do not #include .cpp files.
- Headfile !头文件的原理与实践编写。 摘自外网 -learn.cpp.com
- c++头文件与cpp的关系
- c/c++头文件与cpp文件的切换实现
- 头文件的编写
- 头文件.h与源文件.cpp
- c++ cpp头文件与h头文件
- 【学习C++】两个源文件CPP(cpp与cpp) 或 头文件h与源文件cpp
- 网页文件上传的原理与实践
- 网页文件上传的原理与实践
- DLL头文件与源文件的基本编写格式
- 编写自己的头文件与C++中的c库
- 支持向量机原理与实践(二):scikit-learn中SVM的使用
- cpp头文件相关
- CPP头文件 库
- 编写自己的头文件
- 编写头文件的注意事项
- 编写自己的头文件
- 编写自己的头文件
- 个人总结42
- 链队列(C语言实现)学习记录
- 设计模式--简单工厂
- H5+JS+相对单位rem实现第三方支付页(输入金额+模拟数字键盘+自适应布局+大写金额)
- 最大子段-n个数求和最大且连续的子段-最简单的一维dp,动态规划入门教程,包听懂
- Headfile !头文件的原理与实践编写。 摘自外网 -learn.cpp.com
- C#语言的正则表达式(Regex)详解
- 文章标题
- 第一次写博文
- 数据结构与算法 学习摘要
- 博客小程序
- Quartz的具体实现
- UIAutomator2.0详解(UIDevice篇----performActionAndWait)
- 9CHexadecimal's Numbers