数据结构与算法之LinkedList源码分析
来源:互联网 发布:淘宝的聚划算怎么抢 编辑:程序博客网 时间:2024/06/04 19:13
1 LinkedList的基本结构
链表就和链子一样,每一环都要连接着后边的一环和前边的一环,这样,当我们需要找这根链子的某一环的时候,只要我们能找到链子的任意一环,都可以找到我们需要的那一环。如下图:
LinkedList在jdk1.6中的结构: 
LinkedList在jdk1.7中的结构: 
图片来源于:Java进阶之—-LinkedList源码分析
对比一下,知道区别在哪里了吧?在1.7中,去掉了环形结构,自然在代码中的也会有部分的改变。
2 LinkedList的基本结构
2.1 成员变量
//容器的size,存放当前链表有多少个节点 transient int size = 0; //指向链表的第一个节点的引用 transient Node<E> first; //指向链表的最后一个节点的引用 transient Node<E> last;2.2 构造函数
public LinkedList() {}public LinkedList(Collection<? extends E> c) { this(); addAll(c);}2.3 Node节点,LinkedList的内部私有类
private static class Node<E> { E item;//存储的数据 Node<E> next;//指向链表的下一个数据 Node<E> prev;//链表的前一个数据 Node(Node<E> prev, E element, Node<E> next) { this.item = element; this.next = next; this.prev = prev; }}3 主要方法分析
3.1 add()系列方法分析
3.1.1 准备—核心的元素插入方法
//将数据作为FirstNode插入链表 private void linkFirst(E e) { //取得链表第一个元素 final Node<E> f = first; //新建一个Node对象,该对象中数据为要插入的新数据 //该数据的前一个节点为null(它是首个节点),后一个节点是之前的first节点 final Node<E> newNode = new Node<>(null, e, f); //将新元素赋值为第一个元素 first = newNode; if (f == null) //如果之前的首个节点(现在应该是第二个)为空,说明执行该插入操作前链表为空 //新节点既是首节点,也是尾节点(因为现在链表元素size = 1) last = newNode; else //否则说明之前不是空链表 f.prev = newNode; size++; modCount++; }//将数据作为LastNode插入链表 void linkLast(E e) { final Node<E> l = last; final Node<E> newNode = new Node<>(l, e, null); last = newNode; if (l == null) first = newNode; else l.next = newNode; size++; modCount++; }//将数据插入到某个链表节点之前 void linkBefore(E e, Node<E> succ) { // assert succ != null; final Node<E> pred = succ.prev; final Node<E> newNode = new Node<>(pred, e, succ); succ.prev = newNode; if (pred == null) first = newNode; else pred.next = newNode; size++; modCount++; }3.1.2 理解任意一个核心方法,剩下两个方法也就不难理解了,以linkBefore为例
步骤1:执行linkBefore时,LinkedList的数据结构 
步骤2:执行final Node newNode = new Node<>(pred, e, succ); 
步骤3:执行pred.next = newNode;

3.1.3 add()方法分析
public boolean add(E e) { //其实只是执行linkLast方法将数据添加到链表末尾 linkLast(e); return true; }public void add(int index, E element) { checkPositionIndex(index); if (index == size) // 链表为空时,index = size = 0 linkLast(element); else linkBefore(element, node(index)); }//将Collection中元素插入LinkedList最后 public boolean addAll(Collection<? extends E> c) { return addAll(size, c); } public boolean addAll(int index, Collection<? extends E> c) { // 检查传入的索引值是否在合理范围内 checkPositionIndex(index); // 将给定的Collection对象转为Object数组 Object[] a = c.toArray(); int numNew = a.length; // 数组为空的话,直接返回false if (numNew == 0) return false; // 1.获取到插入位置 Node<E> pred, succ; if (index == size) { // 链表为空时,index = size = 0 succ = null;//succ: 索引位置从指定集合插入的第一个元素 pred = last;//pred: 插入数组的第一个元素节点 } else { // 链表非空时调用,node方法返回给定索引位置的节点对象 succ = node(index); pred = succ.prev; } // 2.遍历数组,将数组的对象插入到节点中 for (Object o : a) { @SuppressWarnings("unchecked") E e = (E) o; Node<E> newNode = new Node<>(pred, e, ); if (pred == null) first = newNode; else pred.next = newNode; pred = newNode; } // 3.将断开的部分连接上 if (succ == null) { last = pred; // 将当前链表最后一个节点赋值给last } else { // 链表非空时,将断开的部分连接上 pred.next = succ; succ.prev = pred; } // 记录当前节点个数 size += numNew; modCount++; return true; }public void addFirst(E e) { linkFirst(e);}public void addLast(E e) { linkLast(e);}3.2 remove系列方法分析
3.2.1 准备—remove相关的核心方法
//删除第一个节点private E unlinkFirst(Node<E> f) { final E element = f.item; final Node<E> next = f.next; f.item = null; f.next = null; // help GC first = next; if (next == null) last = null; else next.prev = null; size--; modCount++; return element;}//删除last节点private E unlinkLast(Node<E> l) { final E element = l.item; final Node<E> prev = l.prev; l.item = null; l.prev = null; // help GC last = prev; if (prev == null) first = null; else prev.next = null; size--; modCount++; return element;}//删除某个节点E unlink(Node<E> x) { // 临时保存移除对象的所有数据(prev和next指针以及存储数据) final E element = x.item; final Node<E> next = x.next; final Node<E> prev = x.prev; //prev指针为null,则说明该对象为头节点 if (prev == null) { first = next; } else { prev.next = next; x.prev = null; } //next指针为null,则说明该对象为尾节点 if (next == null) { last = prev; } else { next.prev = prev; x.next = null; } x.item = null; size--; modCount++; return element;}3.2.2 理解任意一个核心方法,剩下两个方法也就不难理解了,unlink(Node x)为例
(1)步骤1:执行remove操作前的数据结构 
步骤2:执行prev指针相关 
步骤3:执行next指针相关

3.2.3 remove代码分析
//按index删除节点很简单,node方法获取到对应的元素,然后unlink删除即可public E remove(int index) { checkElementIndex(index); return unlink(node(index));}//按对象删除,依次遍历链表,然后找到首个符合的元素,然后删除该元素public boolean remove(Object o) { if (o == null) { for (Node<E> x = first; x != null; x = x.next) { if (x.item == null) { unlink(x); return true; } } } else { for (Node<E> x = first; x != null; x = x.next) { if (o.equals(x.item)) { unlink(x); return true; } } } return false;}//同样没啥好说的,移除第一个Nodepublic E removeFirst() { final Node<E> f = first; if (f == null) throw new NoSuchElementException(); return unlinkFirst(f);}//移除最后一个Nodepublic E removeLast() { final Node<E> l = last; if (l == null) throw new NoSuchElementException(); return unlinkLast(l);}3.2.4 node(int index)–找到对应index的元素节点
类似于二分查找法,第一次查找根据index判断是从头部还是尾部获取对应元素,相对于数组结构,性能还是有所欠缺。
Node<E> node(int index) { if (index < (size >> 1)) { Node<E> x = first; for (int i = 0; i < index; i++) x = x.next; return x; } else { Node<E> x = last; for (int i = size - 1; i > index; i--) x = x.prev; return x; }}3.3 get方法分析
3.3.1 getFirst/getLast方法
public E getFirst() { final Node<E> f = first; if (f == ) throw new NoSuchElementException(); return f.item; } public E getLast() { final Node<E> l = last; if (l == ) throw new NoSuchElementException(); return l.item; } 3.3.2 get方法
public E get(int index) { // 校验给定的索引值是否在合理范围内 checkElementIndex(index); return node(index).item; } 4 LinkedList的其他实现
4.1 队列的方法—Queue
/** * Retrieves, but does not remove, the head (first element) of this list. * @return the head of this list, or {@code null} if this list is empty */ public E peek() { final Node<E> f = first; return (f == null) ? null : f.item; } /** * Retrieves, but does not remove, the head (first element) of this list. * @return the head of this list */ public E element() { return getFirst(); } /** * Retrieves and removes the head (first element) of this list. * @return the head of this list, or {@code null} if this list is empty */ public E poll() { final Node<E> f = first; return (f == null) ? null : unlinkFirst(f); } /** * Retrieves and removes the head (first element) of this list. * @return the head of this list */ public E remove() { return removeFirst(); } /** * Adds the specified element as the tail (last element) of this list. */ public boolean offer(E e) { return add(e); }4.2 双端队列—Deque
public boolean offer(E e) { throw new RuntimeException("Stub!"); } public boolean offerFirst(E e) { throw new RuntimeException("Stub!"); } public boolean offerLast(E e) { throw new RuntimeException("Stub!"); } public E peekFirst() { throw new RuntimeException("Stub!"); } public E peekLast() { throw new RuntimeException("Stub!"); } public E pollFirst() { throw new RuntimeException("Stub!"); } public E pollLast() { throw new RuntimeException("Stub!"); }4.3 栈的方法
public void push(E e) { throw new RuntimeException("Stub!"); } public E pop() { throw new RuntimeException("Stub!"); }5 实现例子
(1)采用链表实现的,因此在进行insert和remove动作时在效率上要比ArrayList要好得多!适合用来实现Stack(堆栈)与Queue(队列),前者先进后出,后者是先进先出。
public class StringStack { private LinkedList<String> linkedList = new LinkedList<String>(); /** * 将元素加入LinkedList容器 (即插入到链表的第一个位置) */ public void push(String name){ linkedList.addFirst(name); } /** * 取出堆栈中最上面的元素 (即取出链表linkedList的第一个元素) * @return */ public String getTop(){ return linkedList.getFirst(); } /** * 取出并删除最上面的元素 (即移出linkedList的第一个元素) * @return */ public String pop(){ return linkedList.removeFirst(); } /** * 获取元素个数 */ public int size(){ return linkedList.size(); } /** * 判断堆栈是否为空 (即判断 linkedList是否为空) * @return */ public boolean isEmpty(){ return linkedList.isEmpty(); } //测试 public static void main(String[] args) { StringStack stack = new StringStack(); stack.push("yulon"); stack.push("xiaoyun"); stack.push("羽龙共舞"); System.out.print("第一个元素是:\t"); System.out.println(stack.getTop()); System.out.println(); System.out.println("全部元素:"); while(!stack.isEmpty()){ System.out.println("\t"+stack.pop()); } } } 第一个元素是: 羽龙共舞 全部元素: 羽龙共舞 xiaoyun yulon (2)如果要使用队列的功能,由于LinkedList也实现了java.util.Queue接口,所以可以直接使用LinkedList的实例来实现。
public class QueueDemo { public static void main(String[] args) { //父类引用queue指向子类对象 Queue<String> queue = new LinkedList<String>(); //offer()方法是往队列加入元素 queue.offer("xiaoyun"); queue.offer("yulon"); queue.offer("羽龙共舞"); String element = ; while((element=queue.poll())!=){ System.out.println(element+"\t"); } } } xiaoyun yulon 羽龙共舞 6 总结
6.1 优点
(1)LinkedList没有大小限制
(2)没有浪费存储空间(Node节点的创建需要额外消耗少量空间)
(3)add,remove等操作的空间消耗是固定的,不会造成对元素进行额外的移动拷贝
6.2 缺点
(1)除了对首尾元素外,对其他节点,进行add,remove,set,get等操作,都需要进行遍历查找的,时间复杂度为O(n)。
6.3 应用场景
(1)查询操作少,存储大量数据,可以考虑使用LinkedList。
6.4 多线程下
(1)LinkedList和ArrayList一样,都不是线程安全的。
(2)在考虑线程安全的情况下,可以使用 ConcurrentLinkedQueue代替LinkedList,直接同步LinkedList对象,或者使用List list = Collections.synchronizedList(new LinkedList(…));
7 对比ArrayList
7.1 相同点
(1)两者均不是线程安全的。
(2)两者都支持null值。
(3)都实现了List接口。
7.2 不同点
(1)ArrayList是实现了基于动态数组的数据结构,LinkedList基于链表的数据结构。
(2)对于随机访问get和set,ArrayList优于LinkedList,因为LinkedList要移动指针遍历查找。
(3)对于新增和删除操作add和remove,LinedList比较占优势,因为ArrayList要移动数据。
7.3 演示
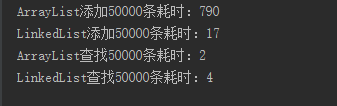
集合中装5万条数据,测试运行结果如上。因此,ArrayList更适合读取数据,linkedList更多的时候添加或删除数据。
7.4 原理
(1)ArrayList内部是使用可増长数组实现的,所以是用get和set方法是花费常数时间的,但是如果插入元素和删除元素,除非插入和删除的位置都在表末尾,否则代码开销会很大,因为里面需要数组的移动。
(2)LinkedList是使用双链表实现的,所以get会非常消耗资源,除非位置离头部很近。但是插入和删除元素花费常数时间。
8 参考链接
源码链接
Java8 LinkedList源码分析
Java进阶之—-LinkedList源码分析
深入理解ArrayList与LinkedList的区别
- 数据结构与算法之LinkedList源码分析
- LinkedList数据结构与源码分析
- Java数据结构与算法之LinkedList单链表
- 数据结构与算法学习(二)链式存储结构LinkedList源码分析
- 数据结构之链表(附:数组与链表对比、ArrayList/LinkedList源码分析)
- Java数据结构源码分析-LinkedList
- 源码分析之LinkedList
- 源码分析之LinkedList
- ArrayList与LinkedList源码分析
- LinkedList与Queue源码分析
- java源码分析之LinkedList
- java源码分析之LinkedList
- Java源码分析之LinkedList
- java源码分析之LinkedList
- java源码分析之LinkedList
- java源码分析之LinkedList
- Java源码分析之LinkedList
- jdk源码分析之LinkedList
- 文章标题
- tcp建立连接为什么需要三次握手
- iptables
- Linux awk使用示例
- 王一三学习笔记 | 理解Java垃圾回收
- 数据结构与算法之LinkedList源码分析
- LeetCode-008 String to Integer (atoi)
- 计算几何模板
- [AGC005F]Many Easy Problems-FFT-容斥原理
- 圆周率 π 的求法(二)
- websocket,无法建立到 ws://... 服务器的连接
- 大数据量查询优化——数据库设计、SQL语句、JAVA编码
- C/C++遇到的问题及分析
- order by与group by与时间同时存在问题