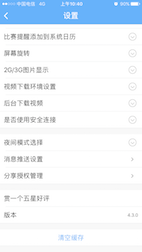
绝大多数应用中都存在着清楚缓存的功能,形形色色,各有千秋,现为大家介绍一种最基础的清除缓存的方法。清除缓存基本上都是在设置界面的某一个Cell,于是我们可以把清除缓存封装在某一个自定义Cell中,如下图所示:
具体步骤
使用注意:过程中需要用到第三方库,请提前安装好:SDWebImage、SVProgressHUD。
1. 创建自定义Cell,命名为GYLClearCacheCell
重写initWithStyle:(UITableViewCellStyle)style reuseIdentifier:(NSString *)reuseIdentifier方法,设置基本内容,如文字等等;主要代码如下:
?
1
2
3
4
5
6
7
8
9
10
11
12
13
- (instancetype)initWithStyle:(UITableViewCellStyle)style reuseIdentifier:(NSString *)reuseIdentifier
{
if(self = [superinitWithStyle:style reuseIdentifier:reuseIdentifier]) {
UIActivityIndicatorView *loadingView = [[UIActivityIndicatorView alloc] initWithActivityIndicatorStyle:UIActivityIndicatorViewStyleGray];
[loadingView startAnimating];
self.accessoryView = loadingView;
self.textLabel.text = @"清楚缓存";
self.detailTextLabel.text = @"正在计算";
}
returnself;
}
2. 计算缓存文件大小
缓存文件包括两部分,一部分是使用SDWebImage缓存的内容,其次可能存在自定义的文件夹中的内容(视频,音频等内容),于是计算要分两部分,主要代码如下:
?
1
2
3
4
5
6
7
8
9
10
11
12
13
14
15
unsignedlonglong size =
[NSSearchPathForDirectoriesInDomains(NSCachesDirectory, NSUserDomainMask, YES).lastObject stringByAppendingPathComponent:@"CustomFile"].fileSize;
size += [SDImageCache sharedImageCache].getSize;
NSString sizeText = nil;
if(size >= pow(10,9)) {
sizeText = [NSString stringWithFormat:@"%.2fGB", size / pow(10,9)];
}elseif (size >= pow(10,6)) {
sizeText = [NSString stringWithFormat:@"%.2fMB", size / pow(10,6)];
}elseif (size >= pow(10,3)) {
sizeText = [NSString stringWithFormat:@"%.2fKB", size / pow(10,3)];
}else{
sizeText = [NSString stringWithFormat:@"%zdB", size];
}
上述两个方法都是在主线程中完成的,如果缓存文件大小非常大的话,计算时间会比较长,会导致应用卡死,考虑到该问题,因此需要将上述代码放到子线程中完成。
3. 添加手势监听
对于监听点击Cell可以使用代理也可以使用手势监听,为了将完整的功能封装到自定义Cell中,于是我们使用手势监听的方法来监听点击Cell。
?
1
2
3
4
5
6
7
dispatch_async(dispatch_get_main_queue(), ^{
self.detailTextLabel.text = [NSString stringWithFormat:@"%@",sizeText];
self.accessoryView = nil;
self.accessoryType = UITableViewCellAccessoryDisclosureIndicator;
[self addGestureRecognizer:[[UITapGestureRecognizer alloc] initWithTarget:self action:@selector(clearCacheClick)]];
});
4. 清除缓存
清除缓存也是分为两部分,一是清除SDWebImage的缓存,二是清除自定义文件缓存,主要代码如下:
?
1
2
3
4
5
6
7
8
9
10
11
12
13
14
15
16
17
- (void)clearCacheClick
{
[SVProgressHUD showWithStatus:@"正在清除缓存···"];
[SVProgressHUD setDefaultMaskType:SVProgressHUDMaskTypeBlack];
[[SDImageCache sharedImageCache] clearDiskOnCompletion:^{
dispatch_async(dispatch_get_global_queue(0,0), ^{
NSFileManager *mgr = [NSFileManager defaultManager];
[mgr removeItemAtPath:GYLCustomFile error:nil];
[mgr createDirectoryAtPath:GYLCustomFile withIntermediateDirectories:YES attributes:nil error:nil];
dispatch_async(dispatch_get_main_queue(), ^{
[SVProgressHUD dismiss];
self.detailTextLabel.text = nil;
});
});
}];
}
注意点:SDWebImage清除缓存是在子线程中进行的,清除自定义文件内容应该也放在子线程中(删除大文件可能比较耗时),为了保证两者不冲突,可以将删除自定义文件内容放在SDWebImage缓存清除完毕之后进行,然后再回到主线程操作。
5. 其他注意点
a. 在计算文件大小过程中应该是不允许点击Cell的,如果有设置Cell的didSelectRowAtIndexPath方法,那么会导致手势监听不能使用。于是需要在计算时不能点击Cell。
b. 设置userInteractionEnabled=NO应放在设置文字之后,否则textLabel将显示为灰色。
c. 当计算文件大小没有结束的时,这个时候点击返回,自定义Cell不会被销毁,他会执行完剩下的代码,可以使用dealloc方法来验证,在此情况下,可以使用弱引用的self来解决。
d. 当设置界面的cell比较多时,如果还在计算缓存大小时,清除缓存的cell从视图中消失,那么加载视图动画就会被停止,当返回到清除缓存cell时,看不到加载动画。解决方案两种方法:一个是在cell创建的代理方法中重新开启动画;另一个是封装到layoutSubviews方法中。
6. 使用
创建GYLSettingViewController继承自UITableViewController;首先为自定义Cell注册;其次在数据源方法中使用自定义Cell;具体代码如下:
?
1
2
3
4
5
6
7
8
9
10
11
12
13
14
15
16
17
18
19
20
21
22
23
24
25
26
27
28
29
30
31
32
33
34
35
#import"GYLSettingViewController.h"
#import"GYLClearCacheCell.h"
@implementationGYLSettingViewController
staticNSString * constGYLClearCacheCellID = @"ClearCache";
staticNSString * constGYLSettingCellID = @"Setting";
- (instancetype)init
{
return[self initWithStyle:UITableViewStyleGrouped];
}
- (void)viewDidLoad
{
[superviewDidLoad];
self.view.backgroundColor = GYLBGColor;
self.navigationItem.title = @"设置";
[self.tableView registerClass:[GYLClearCacheCell class] forCellReuseIdentifier:GYLClearCacheCellID];
[self.tableView registerClass:[UITableViewCell class] forCellReuseIdentifier:GYLSettingCellID];
}
- (NSInteger)numberOfSectionsInTableView:(UITableView *)tableView
{
return3;
}
- (NSInteger)tableView:(UITableView *)tableView numberOfRowsInSection:(NSInteger)section
{
return1;
}
- (UITableViewCell *)tableView:(UITableView *)tableView cellForRowAtIndexPath:(NSIndexPath *)indexPath
{
if(indexPath.section == 0&& indexPath.row == 0) {
return[[GYLClearCacheCell alloc] initWithStyle:UITableViewCellStyleValue1 reuseIdentifier:GYLClearCacheCellID];
}
UITableViewCell *cell = [tableView dequeueReusableCellWithIdentifier:GYLSettingCellID];
cell.textLabel.text = [NSString stringWithFormat:@"section-%zd,row--%zd",indexPath.section,indexPath.row];
returncell;
}
@end
7. 效果
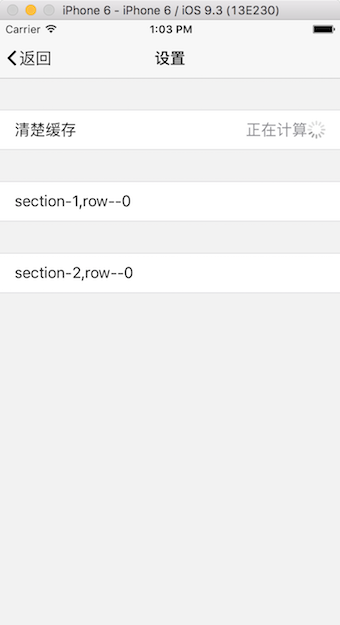
计算文件大小
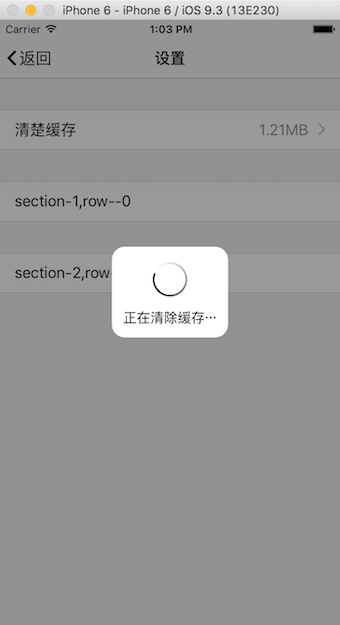
正在清除缓存

清除完毕
总结
以上所述是小编给大家介绍的iOS中设置清除缓存功能的实现方法,希望对大家有所帮助,如果大家有任何疑问请给我留言,小编会及时回复大家的。在此也非常感谢大家对脚本之家网站的支持!
原文链接:http://blog.csdn.net/wanglei0918/article/details/75557412