Asterisk WebRTC 搭建指南
来源:互联网 发布:板绘用什么软件 编辑:程序博客网 时间:2024/06/15 17:00
1.WebRTC简介
WEBRTC是一个开源项目,其宗旨是让WEB浏览器通过简单的JavaScript具备实时通信(Real-Time Communications (RTC) )的能力。
WEBRTC目前支持JS和HTML5,项目由Google、Mozilla和Opera支持。
其官方网址是:http://www.webrtc.org/
Asterisk 11 WebRTC 官方Wiki链接:
https://wiki.asterisk.org/wiki/display/AST/Asterisk+WebRTC+Support
2.系统环境及配置
Ubuntu 16.04 Asterisk-11.25.1
WebRTC要求用SRTP,而Asterisk的SRTP模块依赖于libsrtp,所以我们要先进行安装。
libsrtp的安装:
#wget http://sourceforge.net/projects/srtp/files/srtp/1.4.4/srtp-1.4.4.tgz
# tar vzxf srtp-1.4.4.tgz
# cd srtp
# ./configure
# make
# make install
3.安装Asterisk 11
#wget http://downloads.asterisk.org/pub/telephony/asterisk/asterisk-11-current.tar.gz
# tar vzxf asterisk-11-current.tar.gz
#cd asterisk-11.2.1/
#./configure

# make

# make install
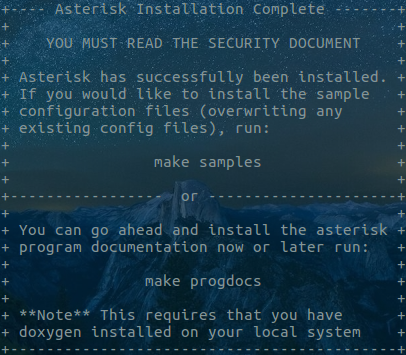
#make samples
#make menuselect查看res_http_websocket,res_crypto,chan_ip模块是否安装成功。
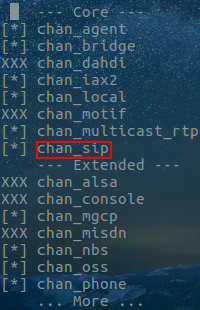
chan_sip
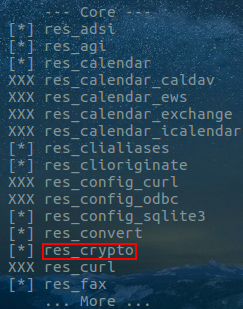

res_crypto res_http_websocket
4.Asterisk的配置
#cd /etc/asterisk/
首先将原有的sip.conf extensions.conf http.conf进行备份
然后编写新的sip.conf extensions.conf http.conf
sip.conf
[general]
port = 5060
bindaddr= 0.0.0.0
context = others
[1002]
type=friend
context=my-phones
secret=123456
host=dynamic
transport=udp,ws,wss
encryption=yes
avpf=yes
dtlsenable=yes
dtlscerfile=/etc/asterisk/keys/asterisk.pem
dtlscafile=/etc/asterisk/keys/ca.crt
dtlssetup=actpass
[1003]
type=friend
context=my-phones
secret=123456
host=dynamic
transport=udp,ws,wss
encryption=yes
avpf=yes
dtlsenable=yes
dtlscerfile=/etc/asterisk/keys/asterisk.pem
dtlscafile=/etc/asterisk/keys/ca.crt
dtlssetup=actpass
extensions.conf
[others]
[my-phones]
exten => 1001,1,Dial(SIP/1001,20)
exten => 1001,2,VoiceMail(1001,u)
exten => 1002,1,Dial(SIP/1002,20)
exten => 1002,2,VoiceMail(1002,u)
exten => 1003,1,Dial(SIP/1003,20)
exten => 1003,2,VoiceMail(1003,u)
http.conf
[general]
enabled=yes
bindaddr=0.0.0.0
配置完后,1002拨打1003 出错 提示ca.crt缺失

5.SRTP和TLS的配置
官方Wiki链接:
https://wiki.asterisk.org/wiki/display/AST/Secure+Calling+Tutorial
创建存在秘钥的文件夹
#mkdir /etc/asterisk/keys
打开Asterisk目录下的contrib/scripts使用”ast_tls_cert”脚本创建一个self-signed证书
#./ast_tls_cert -C pbx.mycompany.com -O "My Super Company" -d /etc/asterisk/keys
-C 代表使用的主机(域名/IP)
-O 代表组织的名称
-d 代表秘钥输出位置
中间会要求输入四次密码(输出一个记得住的即可)
#./ast_tls_cert -m client -c /etc/asterisk/keys/ca.crt -k /etc/asterisk/keys/ca.key -C phone1.mycompany.com -O "My Super Company" -d /etc/asterisk/keys -o malcolm
-m client 代表生成一个客户使用证书
"-c /etc/asterisk/keys/ca.crt"代表我们使用的认证授权
"-k /etc/asterisk/keys/ca.key"代表认证授权的秘钥
-C 代表客户端使用的主机(域名/IP)
-O 代表组织的名称
-d 代表秘钥输出位置
-o 代表输出秘钥名称
6.Apache2的搭建
使用WebRTC需要使用到http服务器,所以我们在Linux端使用Apache2搭建http服务器。
#apt-get install apache2
#/etc/init.d/apache2 restart
7.JsSIP安装配置
将JsSip.tgz解压到http服务器根目录下(e.g. /var/www/html)
#cd /var/www/html
#tar zxvf JsSip.tgz
打开chrome,输入web网址:
http://192.168.7.42/jssip-demos-master/tryit/index.html(下划线输入自己主机ip)
输入如图所示对应信息后,在任意一个输入框敲击回车
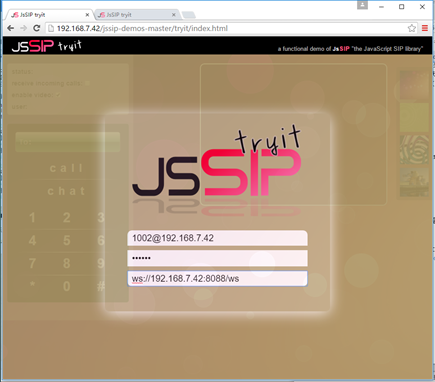
成功注册

1002给1003拨打电话

1003接收到1002的来电

注意事项:chrome要使用47版本之前的,因为47版本后使用麦克风需要证书,这方面还未进行研究。
WebRTC官方解释:
Starting with Chrome 47, getUserMedia() requests are only allowed from secure origins: HTTPS or localhost. You can setup a self signed ssl certificate for the local webserver and then you can access with https://192.168.0.103:<https port>
目前电话无法进行接听,接听时Asterisk就报错:
Called SIP/1002
-- Got SIP response 480 "Temporarily Unavailable" back from 192.168.7.12:3579
-- SIP/1002-00000001 is circuit-busy
== Everyone is busy/congested at this time (1:0/1/0)
-- Auto fallthrough, channel 'SIP/1003-00000000' status is 'CONGESTION'
或
-- Called SIP/1002
-- SIP/1002-00000005 is ringing
-- SIP/1002-00000005 is ringing
-- SIP/1002-00000005 is ringing
== Everyone is busy/congested at this time (1:0/0/1)
-- Auto fallthrough, channel 'SIP/1003-00000004' status is 'CHANUNAVAIL'
- Asterisk WebRTC 搭建指南
- Asterisk WEBRTC
- WebCallServer WebRTC with Asterisk
- Asterisk安装指南
- Asterisk模块编写指南
- Asterisk安装指南
- Asterisk 权威指南
- Asterisk权威指南/第二章 Asterisk架构
- Asterisk权威指南/第三章 安装Asterisk
- Asterisk权威指南/第二章 Asterisk架构
- Asterisk与zoiper搭建
- asterisk服务器搭建 入门教程
- 《webrtc权威指南》 资源
- Webrtc服务器搭建
- WebRtc 项目搭建
- WebRTC环境搭建
- Webrtc服务器搭建
- Webrtc服务器搭建
- 将十进制的一个数转换为n进制
- 成为CSP的9个理由
- ARM 处理器 ~ 中断与异常
- MFC进程通讯内存共享
- 微信浏览器缓存问题
- Asterisk WebRTC 搭建指南
- Logistic回归
- word2vec 中的数学原理背景知识详解(1)
- dql分页页面显示页码
- 第11周项目1-图的基本算法库
- xsd配置
- python3.x如何从互联网获取想要的文章,及转化为nltk可以处理的文本
- ubuntu14.04 图形化配置 静态IP
- 由参加领域驱动设计大会与自己所想的