Retrofit介绍案例
来源:互联网 发布:美国人口老龄化数据 编辑:程序博客网 时间:2024/05/17 02:30
Retrofit这东西我就不多做解释了,反正最近应用很广,基本都快和OkHttp一起成为安卓的事实网络访问标准框架了。
这么好的一个东西,官网文档实在是不算太好,说的不太清晰。按官网的经常会有“Could not locate ResponseBody converter for”问题。
反正折腾了一番,终于跑出来了一个例子。这里把正确的例子写出来,方便大家参考。
首先要注意的是Retrofit准确的说不是Anroid 的HttpClient,而是Java的HttpClient,所以用Java工程运行Demo的代码即可。
文中我自己搭建了一个spring 的rest服务,很简单,就是访问greeting/{name},会返回一个User对象,把name赋值给这个user对象。
1
2
3
4
5
6
7
8
9
10
11
12
13
14
15
16
17
18
19
20
21
22
23
24
25
26
27
28
public class User { int id; String name; public String getName() { return name; } public void setName(String name) { this.name = name; } public int getId() { return id; } public void setId(int id) { this.id = id; } @Override public String toString() { return "User{" + "id=" + id + ", name='" + name + '\'' + '}'; }}
1,依赖引入。
这个十分重要。。。这货升级了一下竟然改了包名,,,蛋疼。Maven,Gradle都行,Gradle的:
1
2
3
compile 'com.squareup.retrofit2:retrofit:2.0.0-beta3'compile 'com.squareup.retrofit2:converter-gson:2.0.0-beta3'compile 'com.google.code.gson:gson:2.3'Maven的:
1
2
3
4
5
6
7
8
9
10
11
12
13
14
15
<dependency> <groupId>com.squareup.retrofit2</groupId> <artifactId>retrofit</artifactId> <version>2.0.0-beta3</version> </dependency> <dependency> <groupId>com.squareup.retrofit2</groupId> <artifactId>converter-gson</artifactId> <version>2.0.0-beta3</version> </dependency> <dependency> <groupId>com.google.code.gson</groupId> <artifactId>gson</artifactId> <version>2.3</version> </dependency>
注意看,groupId是不一样的。如果想直接接收对象,那要引入gson和converter。不然就只能接收字符串。
2,写接口

import retrofit2.Call;import retrofit2.http.GET;import retrofit2.http.Path;/** * Created by csonezp on 16-1-29. */public interface GreetingServicce { @GET("/greeting/{name}") Call<User> getGreeting(@Path("name") String name);}
service里指定了访问的rest Api地址,路径变量,返回值。
3,构建Retrofit实例,访问网络。
这个自己随便建立个Java文件,将代码放进去就行。
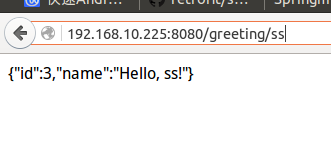
import com.google.gson.Gson;import retrofit2.Call;import retrofit2.GsonConverterFactory;import retrofit2.Response;import retrofit2.Retrofit;import java.io.IOException;/** * Created by csonezp on 16-1-29. */public class Test { public static void main(String[] args) throws IOException { Retrofit retrofit = new Retrofit.Builder().baseUrl("http://192.168.10.225:8080") .addConverterFactory(GsonConverterFactory.create(new Gson())).build(); GreetingServicce servicce = retrofit.create(GreetingServicce.class); Call<User> call = servicce.getGreeting("ss"); Response<User> response = call.execute(); System.out.print(response.body().toString()); }}
注意红色部分,如果想直接接收到对象,则需要添加这个。
文中是同步访问网络的方式,要想在Android中使用,则需单开线程或者是换成异步访问。
现在运行你的项目就可以了。
把Spring文件也发出来吧:
import com.example.bean.User;import org.springframework.boot.SpringApplication;import org.springframework.boot.autoconfigure.EnableAutoConfiguration;import org.springframework.web.bind.annotation.*;import java.util.concurrent.atomic.AtomicLong;/** * Created by csonezp on 16-1-21. */@RestController@EnableAutoConfigurationpublic class SimpleController { private final AtomicLong counter = new AtomicLong(); private static final String template = "Hello,%s!"; @RequestMapping("/") @ResponseBody String home() { return "Hello World!"; } @RequestMapping(value = "/greeting/{name}",method = RequestMethod.GET) public User greeting(@PathVariable String name) { return new User((int) counter.incrementAndGet(), String.format(template, name)); } public static void main(String[] args) throws Exception { SpringApplication.run(SimpleController.class, args); }}
阅读全文
0 0
- Retrofit介绍案例
- Retrofit的使用,及介绍,Retrofit中的各种方法的详细描述简单案例,三分钟学会Retrofit
- Retrofit介绍
- Retrofit 介绍
- Retrofit小案例
- Retrofit使用介绍
- Retrofit基本介绍
- Retrofit详细介绍
- RxJava介绍&&Retrofit
- Retrofit简要介绍
- retrofit的功能介绍
- Retrofit详细介绍
- 【Android】Retrofit的使用(1)-Retrofit介绍
- Retrofit 分析 - 经典设计模式案例
- 真实案例出发,再谈retrofit封装
- 从小案例入手RxJava+Retrofit+MVP
- Rxjava和Retrofit结合使用的案例
- Android MVP+RxJava+retrofit 小案例
- Tensorflow-googlenetV3.py
- 01.使用eclipse+maven形式创建Jfinal项目(特效版)
- R语言
- 使用列表推导式,制作所有99乘法表中的运算
- Java 抽象类abstract
- Retrofit介绍案例
- Python简单的小实验输出对应车站的中文简写(主要是为了解决汉字编码问题)
- Error:Execution failed for task ':app:mergeDebugResources'. > Crunching CrunCruncher Iicon_light.pn
- 存储模型2---虚拟存储技术
- 5.C++面向过程的方式写的推箱子游戏
- Qt悬浮气泡
- 论文阅读-XGBoost: A Scalable Tree Boosting System
- Java序谈之String类的成员方法以及使用方法
- form表单上传文件时,需要的配置