基于spring的shiro配置
来源:互联网 发布:东兴证券下载软件 编辑:程序博客网 时间:2024/05/21 03:16
shiro是一个特别简单,易用的框架,在此记录一下shiro的使用配置。
首先,创建四张表:user role user_role permission,分别为用户、角色、用户与角色关系表和权限表。
user表结构:
role表结构: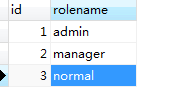
user_role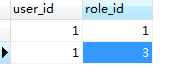
permission
当然,表结构如何设计是没有关系的,你可以根据自己偏好设计。
web.xml中加入shiro的过滤器:
<filter> <filter-name>shiroFilter</filter-name> <filter-class>org.springframework.web.filter.DelegatingFilterProxy</filter-class> </filter> <filter-mapping> <filter-name>shiroFilter</filter-name> <url-pattern>/*</url-pattern> </filter-mapping>
然后配置shiro,可以写在spring的配置文件中,也可以另起一个配置文件,配置内容如下:<!-- 配置权限管理器 --> <bean id="myShiro" class="com.itmayong.util.MyShrio"></bean> <bean id="securityManager" class="org.apache.shiro.web.mgt.DefaultWebSecurityManager"> <!-- 我们自定义的realm --> <property name="realm" ref="myShiro"/> <!-- 缓存管理器 --> <property name="cacheManager" ref="cacheManager"/> </bean> <bean id="shiroFilter" class="org.apache.shiro.spring.web.ShiroFilterFactoryBean"> <!-- 权限管理器 --> <property name="securityManager" ref="securityManager"/> <!-- 登录地址 --> <property name="loginUrl" value="/login.jsp"/> <!-- 登录后跳转到业务页面 --> <property name="successUrl" value="/main.jsp"/> <!-- 错误页面 --> <property name="unauthorizedUrl" value="/error.jsp"/> <!-- 权限配置 --> <property name="filterChainDefinitions"> <value> <!-- anon无权限访问请求,此处是登录页面和登录请求 --> /login.do = anon /static/**=anon <!-- 需要权限为add的用户才能访问此请求--> /user=perms[user:add] <!-- 需要管理员角色才能访问此页面 --> /user/add=roles[admin] <!--拦截非静态资源的所有请求--> /** = authc </value> </property> </bean> <bean id="cacheManager" class="org.apache.shiro.cache.MemoryConstrainedCacheManager" /> <bean id="lifecycleBeanPostProcessor" class="org.apache.shiro.spring.LifecycleBeanPostProcessor" />
上面的配置文件我们指定了自定义的realm,内容如下:public class MyShrio extends AuthorizingRealm{ @Autowired private UserServiceIf userService; /** * 权限认证,获取登录用户的权限 */ @Override protected AuthorizationInfo doGetAuthorizationInfo(PrincipalCollection principalCollection) { String loginName=(String) principalCollection.fromRealm(getName()).iterator().next(); //此处连库匹配了登录用户的数据,具体怎么做,需要根据个人需求而定 User user=userService.findByName(loginName); List<Role> list = user.getRoleList(); if(user!=null){ SimpleAuthorizationInfo info=new SimpleAuthorizationInfo(); //获取用户的角色名称 info.setRoles(user.getRolesName()); //获取用户的权限 List<Role> roleList=user.getRoleList(); for (Role role : roleList) { info.addStringPermissions(role.getPermissionsName()); } return info; } return null; } /** * 登录认证,创建用户的登录信息 */ @Override protected AuthenticationInfo doGetAuthenticationInfo( AuthenticationToken authenticationToken) throws AuthenticationException { UsernamePasswordToken token=(UsernamePasswordToken) authenticationToken; //判断用户登录状态 User user=userService.findByName(token.getUsername()); if(user!=null){ //保存用户登录信息到认证中 return new SimpleAuthenticationInfo(user.getUsername(), user.getPassword(), getName()); } return null; } }最后,你可以写一个页面和Controller进行测试了,当然也可以细分一下权限和角色,以应用到实际更复杂的场景中。
页面内容可以使用下边的方式对需要角色和权限控制的内容进行包裹,以达到权限控制的目的。
<shiro:hasRole name="admin">需要管理员角色</shiro:hasRole><shiro:hasPermission name="add">需要add权限</shiro:hasPermission>
阅读全文
0 0
- 基于spring的shiro配置
- 基于spring的shiro配置
- 基于Spring框架的Shiro配置
- 基于Spring框架的Shiro配置
- 基于Spring框架的Shiro配置
- 基于Spring框架的Shiro配置
- 基于Spring框架的Shiro配置
- 基于Spring框架的Shiro配置
- 基于Spring框架的Shiro配置
- 基于Spring框架的Shiro配置
- 基于Spring框架的Shiro配置
- 基于Spring框架的Shiro配置
- 基于Spring框架的Shiro配置
- 基于Spring框架的Shiro配置
- 基于Spring框架的Shiro配置
- 基于Spring框架的Shiro配置
- 基于Spring框架的Shiro配置
- Shiro配置---基于spring框架
- IE浏览器bug 原因 haslayout
- 一次诡异的NIO和IO性能测试
- qt configure
- 页面上报错:Invalid left-hand side in assignment
- 3056: 升降梯口
- 基于spring的shiro配置
- 滑动滤波算法
- Python GUI 编程
- SpringBoot静态资源处理
- test
- 【canvas】非零环绕原则
- Linux第二天的学习记录
- 数据库TPCE benchmark测试工具
- 模板匹配opencv