Spring Http Invoker使用简介
来源:互联网 发布:淘宝手机端优惠券设置 编辑:程序博客网 时间:2024/06/04 06:36
一、Spring HTTP Invoker简介
Spring HTTP invoker 是 spring 框架中的一个远程调用模型,执行基于 HTTP 的远程调用(意味着可以通过防火墙),并使用 java 的序列化机制在网络间传递对象。这需要在远端和本地都使用Spring才行。客户端可以很轻松的像调用本地对象一样调用远程服务器上的对象,这有点类似于 webservice ,但又不同于 webservice ,区别如下:
WebServiceHttp Invoker跨平台,跨语言只支持 java 语言支持 SOAP ,提供 wsdl不支持结构庞大,依赖特定的 webservice 实现,如 xfire等结构简单,只依赖于 spring 框架本身说明:
1. 服务器端:通过 HTTP invoker 服务将服务接口的某个实现类提供为远程服务
2. 客户端:通过 HTTP invoker 代理向服务器端发送请求,远程调用服务接口的方法
3. 服务器端与客户端通信的数据均需要序列化
二、配置服务器端和客户端的步骤
配置服务器端
1. 添加 springJAR 文件
2. 创建相应的DTO(如果需要用到的话)
3. 创建服务接口
4. 创建服务接口的具体实现类
5. 公开服务
配置客户端
1. 添加 springJAR 文件
2. 创建相应的DTO(如果需要用到的话)
3. 创建服务接口
4. 访问服务
三、实例讲解
配置服务器端
先来个项目结构图:

1). 添加 springJAR 文件,这就不用说了,直接照着图片添加相应的类库。
2). 创建服务接口和相应的DTO(Data Transmission Object)
这里我们需要调用远端的服务来查询一个User对象,因此需要DTO啦。下面这个User类就是用于在网络中传输的POJO类,也就是DTO啦,因此需要实现Serializable接口:
package com.abc.invoke.bean;import java.io.Serializable;public class User implements Serializable { private static final long serialVersionUID = -6970967506712260305L; private String name; private int age; private String email; public int getAge() { return age; } public void setAge(int age) { this.age = age; } public String getName() { return name; } public void setName(String name) { this.name = name; } public String getEmail() { return email; } public void setEmail(String email) { this.email = email; } @Override public String toString() { return "User [name=" + name + ", age=" + age + ", email=" + email + "]"; }}3). UserService是一个接口,里面定义了服务的方法,这里面的方法将会被客户端调用:
package com.abc.invoke.server.service;import com.abc.invoke.bean.User;public interface UserService { public User getUserbyName(String name);}4). 创建服务接口的具体实现类。这里的UserServiceImpl是实现了UserService方法:
package com.abc.invoke.server.service.impl;import com.abc.invoke.bean.User;import com.abc.invoke.server.service.UserService;public class UserServiceImpl implements UserService { public User getUserbyName(String name) { User u = new User(); u.setName(name); u.setEmail("abc@abc.com"); u.setAge(20); return u; }}这里面我没有写DAO等层面的东西,因为那些不是这篇文章要讲述的内容,因而我只是简单的将传给服务端的参数封装到对象里的一个字段就返回了。
5). 公开服务
下面是web.xml文件的内容:
<?xml version="1.0" encoding="UTF-8"?><web-app xmlns:xsi="http://www.w3.org/2001/XMLSchema-instance" xmlns="http://java.sun.com/xml/ns/javaee" xmlns:web="http://java.sun.com/xml/ns/javaee/web-app_2_5.xsd" xsi:schemaLocation="http://java.sun.com/xml/ns/javaee http://java.sun.com/xml/ns/javaee/web-app_3_0.xsd"> <display-name>SpringInvoke</display-name> <servlet> <servlet-name>service</servlet-name> <servlet-class>org.springframework.web.servlet.DispatcherServlet</servlet-class> <init-param> <param-name>contextConfigLocation</param-name> <param-value>classpath:service-servlet.xml</param-value> </init-param> <load-on-startup>1</load-on-startup> </servlet> <servlet-mapping> <servlet-name>service</servlet-name> <url-pattern>/service/*</url-pattern> </servlet-mapping> <!-- 其实下面这个welcome-file-list没啥用,我留着只是为了在起好Tomcat后不会报一个404而已 --> <welcome-file-list> <welcome-file>index.html</welcome-file> </welcome-file-list></web-app>这里我们使用/service作为service的前缀,那么客户端请求调用时需要加上这个前缀,比如:
http://{host}:{port}/InvokeServer/service/{serviceName}
里面用到的service-servlet文件:
<?xml version="1.0" encoding="UTF-8"?><beans xmlns="http://www.springframework.org/schema/beans" xmlns:xsi="http://www.w3.org/2001/XMLSchema-instance" xmlns:context="http://www.springframework.org/schema/context" xsi:schemaLocation="http://www.springframework.org/schema/beans http://www.springframework.org/schema/beans/spring-beans-3.0.xsd http://www.springframework.org/schema/context http://www.springframework.org/schema/context/spring-context-3.0.xsd"> <!-- 这个Bean映射了当URL是/userService时,处理器为userServiceInvoker --> <bean class="org.springframework.web.servlet.handler.SimpleUrlHandlerMapping"> <property name="mappings"> <props> <prop key="/userService">userServiceInvoker</prop> </props> </property> </bean> <!-- Announce that this interface is a HTTP invoker service. --> <bean id="userServiceInvoker" class="org.springframework.remoting.httpinvoker.HttpInvokerServiceExporter"> <property name="service" ref="userServiceImpl" /> <property name="serviceInterface" value="com.abc.invoke.server.service.UserService" /> </bean> <bean id="userServiceImpl" class="com.abc.invoke.server.service.impl.UserServiceImpl" /></beans>注意:
<prop key=”/userService”>userServiceInvoker</prop>中的/userService是请求的服务的URL中的一部分,就是说这样的URL会被userServiceInvoker处理
这里将com.abc.invoke.server.service.UserService映射给了com.abc.invoke.server.service.impl.UserServiceImpl类了。
到此为止,服务器算是配置好了,接下来开始配置客户端。
配置客户端
先来看看项目结构图:
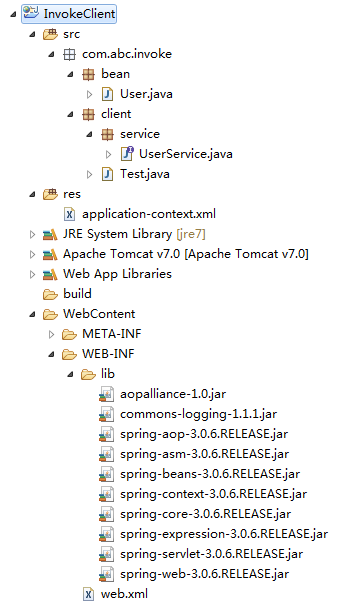
1). 添加 springJAR 文件,这也不用说了,直接照着图片添加相应的类库。
2). 创建服务接口和相应的DTO。
特别注意:这个类和Server端声明的DTO要一样,包名和字段名都要一样才行。因为客户端发起请求查询User,服务端处理后先将User序列化后在返回给客户端,而客户端拿到这个User后需要将其反序列化。如果包名或者字段名不同,则会被认为是不同的对象,会反序列化失败,调用也就出错了。我之前就是将User类的包名写得不一样(User类的包名在服务端为com.abc.invoke.server.bean,而在客户端则为com.abc.invoke.client.bean),报了以下错误:
Exception in thread "main" org.springframework.remoting.RemoteAccessException: Could not deserialize result from HTTP invoker remote service [http://localhost:8080/InvokeServer/service/userService]; nested exception is java.lang.ClassNotFoundException: com.abc.invoke.server.bean.User at org.springframework.remoting.httpinvoker.HttpInvokerClientInterceptor.convertHttpInvokerAccessException(HttpInvokerClientInterceptor.java:208) at org.springframework.remoting.httpinvoker.HttpInvokerClientInterceptor.invoke(HttpInvokerClientInterceptor.java:145) at org.springframework.aop.framework.ReflectiveMethodInvocation.proceed(ReflectiveMethodInvocation.java:172) at org.springframework.aop.framework.JdkDynamicAopProxy.invoke(JdkDynamicAopProxy.java:202) at com.sun.proxy.$Proxy0.getUserbyName(Unknown Source) at com.abc.invoke.client.Test.main(Test.java:14)很明显可以看出,Could not deserialize result from HTTP invoker remote service……,就是因为Server端与Client端的DTO的包名不同导致反序列化失败。
3). 创建服务接口
这也没啥好说的,接口和Server端定义的一样就行,不一样肯定报错。可以直接将DTO和接口定义的类拷贝到客户端即可。这个接口将会被看做是客户端和服务端通信的“契约”。
4). 访问服务
来看看application-context.xml:
<?xml version="1.0" encoding="UTF-8"?><beans xmlns="http://www.springframework.org/schema/beans" xmlns:xsi="http://www.w3.org/2001/XMLSchema-instance" xmlns:context="http://www.springframework.org/schema/context" xsi:schemaLocation="http://www.springframework.org/schema/beans http://www.springframework.org/schema/beans/spring-beans-3.0.xsd http://www.springframework.org/schema/context http://www.springframework.org/schema/context/spring-context-3.0.xsd"> <!-- 客户端使用 HttpInvokerProxyFactoryBean 代理客户端向服务器端发送请求,请求接口为 UserService 的服务 --> <bean id="userService" class="org.springframework.remoting.httpinvoker.HttpInvokerProxyFactoryBean" > <property name="serviceUrl" value="http://localhost:8080/InvokeServer/service/userService"/> <property name="serviceInterface" value="com.abc.invoke.client.service.UserService" /> </bean> </beans>这里使用了org.springframework.remoting.httpinvoker.HttpInvokerProxyFactoryBean这个类来作为一个service的代理类。注意到serviceUrl属性为http://localhost:8080/InvokeServer/service/userService (当然,我在本机启动的服务端并在本机通过main函数调用service,我在另一台机器上运行Test类的main函数,调用结果正确)。这个localhost:8080应改为实际的IP地址和端口。),这个URL的地址以/service开始,因此会被Server端拦截下来,而URL中的 /userService则为service路径,该路径与在Server端中service-servlet.xml中声明的
<prop key="/userService">userServiceInvoker</prop>路径一致,因此这个调用会被userServiceInvoker处理。
最后再写一个简单的测试类Test.java:
package com.abc.invoke.client;import org.springframework.context.ApplicationContext;import org.springframework.context.support.ClassPathXmlApplicationContext;import com.abc.invoke.bean.User;import com.abc.invoke.client.service.UserService;public class Test { public static void main(String[] args) { ApplicationContext ac = new ClassPathXmlApplicationContext( "classpath:application-context.xml"); UserService service = (UserService)ac.getBean("userService"); User u = service.getUserbyName("Alvis"); System.out.println(u); }}这个类也很简单,就是从Spring的Context中取出了定义的userService这个Bean(这其实就是服务端service的一个代理类),然后直接调用该service的方法获得结果并打印。
到此为止,客户端配置完成。
四、启动服务并测试
直接在项目InvokeServer上启动Tomcat,可以看到路径/userService的处理者是userServiceInvoker:

下面是远程调用的执行结果:
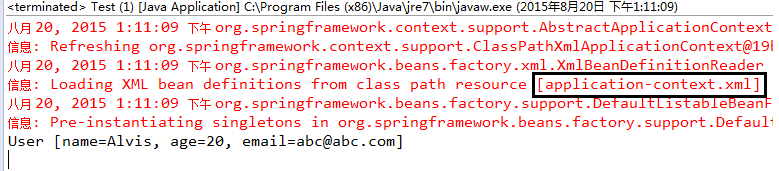
从结果中可以看到,我代码里写的名字叫Alvis,用客户端调用服务端的service后,返回的对象中名字是客户端设置的名字,测试成功。
这里是项目源代码,供需要的朋友参考。
- Spring Http Invoker使用简介
- Spring Http Invoker使用简介
- Spring Http Invoker使用简介
- Spring HTTP invoker简介
- Spring HTTP invoker简介
- Spring HTTP invoker简介
- Spring HTTP invoker简介
- Spring HTTP invoker简介
- Spring HTTP invoker简介
- Spring HTTP invoker 简介
- Spring HTTP invoker简介
- Spring HTTP Invoker使用
- Spring HTTP Invoker使用
- Spring HTTP Invoker使用介绍
- Spring HTTP Invoker使用介绍
- Spring HTTP Invoker使用介绍
- Spring HTTP Invoker使用介绍
- Spring HTTP Invoker使用介绍
- Python入门
- for循环,迭代器,range范围的操作方法
- mongoDb 封装DAO
- 教你Windows平台安装配置Hadoop2.5.2(不借助cygwin)
- 磁盘存储分布不均与单词计数案例
- Spring Http Invoker使用简介
- (十九)JDK5特性
- 85. Maximal Rectangle
- 文件泄露漏洞
- docker
- yii2 数据库事务
- 在tensorflow中使用函数封装操作的误区
- [日常训练] Tree
- FastDFS+Nginx实现文件服务器