AppFuse in Eclipse
来源:互联网 发布:知梦地方门户网站系统 编辑:程序博客网 时间:2024/04/29 19:51
AppFuse, by default, is configured to be an Eclipse project. When you run ant newto create a new project, you will get the .project and .classpath filesto start your project with. However, you will need to make a few easysetting changes in Eclipse (particularly to run Ant). This tutorial shows you how to setup Eclipse to develop your AppFuse project.
- In general, I don't use Eclipse for much more than afancy text editor. I do most of my compiling, testing and deploymentfrom the command line. This howto will hopefully make it easier for youto use Eclipse for building and testing, but if it doesn't work for you- the best fallback is to use the command line for running the Anttasks. Of course, if you figure out ways to make the Eclipseintegration better - please let me know.
This tutorial is based on Windows XP and Eclipse 3.0.1 and should work on any platform. You can download Eclipse 3.0.1 if you don't already have it installed. I also recommend downloading my Eclipse plugins bundle or purchasing MyEclipse.A pipe dream of mine is to be able to use create a MyEclipse/AppFuseproject - but that would likely require an entire rewrite of AppFuse'sdirectory structure and build file and I just don't have the time orenergy. Besides, the current system works pretty well if you don't mindusing Ant.
Table of Contents
- [1] Create New Java Project in Eclipse
- [2] Configuring Ant in Eclipse
- [3] Add build.xml to Ant View
- [4] Run Ant
- [5] Run JUnit Tests in Eclipse
- [6] Tips for Debugging and UI Editing
Create New Java Project in Eclipse [#1]
Open Eclipse (either with an existing or a new workspace) and to goFile → New → Project. Then select "Java Project" and hit the Nextbutton. In the Project Name field, enter the name of your project (i.e.appfuse) and the directory that your project lives (i.e.c:/source/appfuse) in the box below. If you're prompted to switch theJava Perspective, choose Yes.If you try to build the project at this point, you'll likely get numerous errors. Most of them involve the fact that the UserFormclass can not be found. This is because all of the ActionForms inAppFuse (if you're using the Struts version) are generated from POJOswith XDoclet.
All of the tasks for XDoclet are configured in the Ant build.xmlfile so the easiest thing to do is to run "ant gen-forms" to generatethe ActionForms. If you have Ant 1.6.2+ installed and in your path, youcan do this from the command line. The next step shows you howconfigure Eclipse to run your AppFuse build.xml.
TIP: Here's a way to hide the JARs you see in Eclipse's Package Explorer.Configuring Ant in Eclipse [#2]
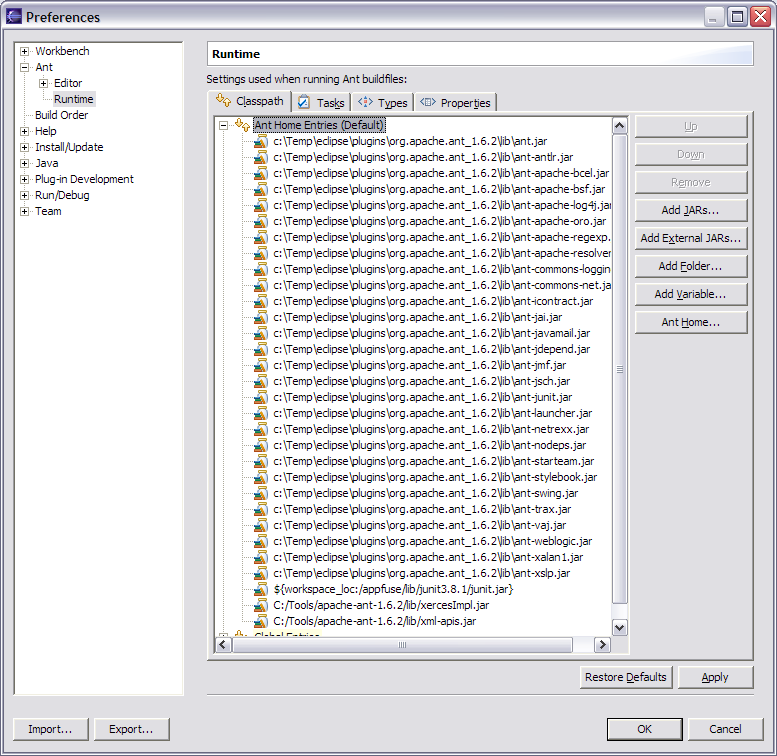
The easiest way to configure Eclipse for AppFuse is to install Anton your hard drive (i.e. c:/Tools/apache-ant-1.6.2) and then pointEclipse's ANT_HOME to this directory. To do this, go to Window →Preferences → Ant → Runtime. Then click the "Ant Home" button andselect the installation folder on your hard drive.
If you'd rather use Eclipse's built-in Ant, you'll need to addjunit.jar to its classpath. To do this, go to Window → Preferences →Ant → Runtime. Then click the "Add JARs" button and select junit.jarfrom appfuse/lib/junit3.8.1/lib/junit.jar. Click OK until you arriveback at the workbench view.
Next, add the catalina-ant.jar (from $CATALINA_HOME/server/lib) to the ant classpath. Then in the property tab, add tomcatTasks.properties (in lib/ant-contrib) file as a global properties file.
Below is a screenshot of what your Ant Runtime classpath should look like after the above modifications:
Add build.xml to Ant View [#3]
Now we need to add the build.xml to Eclipse's Ant View. To do this, goto Window → Show View → Ant. Then click on the first icon in this view(screenshot below) to add AppFuse's build file.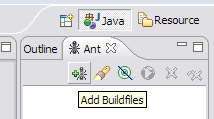
Run Ant [#4]
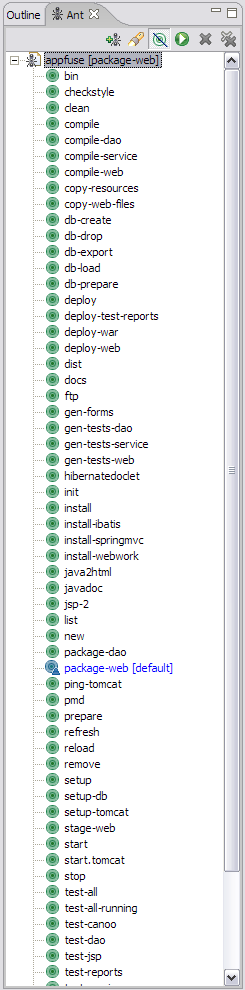
After adding the build.xml, you should be able to expand it in the AntView and execute any of the targets. I usually do "test-all" to verifyall the tests pass in my initial project. For a list of targets I usemost often, see AppFuse Ant Targets.Now if you run the "compile" target and then refresh the project(right-click on project → Refresh) you shouldn't see any errors in the"Problems" pane. You should now be able to compile and create classesas you normally would. Sometimes when my imports aren't resolvingcorrectly in Eclipse, I do have to run Project → Clean in Eclipse.
NOTE: If you're using the internal version of Ant, you may get an error message like the one below:BUILD FAILED: C:/source/appfuse/build.xml:802: The following error occurred while executing this line:
C:/source/appfuse/build.xml:780: The following error occurred while executing this line:
java.lang.NoClassDefFoundError: org/apache/xml/serialize/OutputFormat
This is because there are tasks that require Xerces to be in your Ant classpath [reference]. I added xercesImpl.jar and xml-apis.jar (from my self-installed version of Ant) to Eclipse's Ant classpath to solve this.
At this point, you should see something similar to the screenshot below.
Run JUnit Tests in Eclipse [#5]
It'salso possible to run your JUnit tests in Eclipse. But before runningthem, you need to run the "war" target. After this target completes,refresh your project.After you have successfully done so, in Eclipse open a test you'dlike to run (i.e. UserDAOTest) and go to Run → Debug As → JUnit Test.Note that you may have to run the "db-load" target before you run yourtests every so often. I did have the following method in theBase*TestCase class for each layer, but this caused DBUnit to reloadthe database before every test in a Test class. Removing it reduces theexecution time of "test-all" by more than 30 seconds.
    protected void setUp() throws Exception {
        DataSource ds = (DataSource) ctx.getBean("dataSource");
        IDatabaseConnection conn = new DatabaseConnection(ds.getConnection());
        IDataSet dataSet =
            new XmlDataSet(new FileInputStream("metadata/sql/sample-data.xml"));
        // clear table and insert only sample data
        DatabaseOperation.CLEAN_INSERT.execute(conn, dataSet);
        conn.close();
    }
If the instructions above don't work for running JUnit tests in Eclipse, I suggest just using the command line - i.e. ant test-dao -Dtestcase=UserDAO. Running tests from the command line always works. ;-)
Tips for Debugging and UI Editing [#6]
For debugging, I use the Tomcat Pluginin Eclipse and set breakpoints. To make the breakpoints work you willneed to indicate your source-path using the Eclipse menu Window->Preferences, select Tomcat, then Source Path.For little changes, I use "ant deploy-web" which only takes a coupleof seconds. For truly minor tweaks, it's sometimes easier to edit thefile in Tomcat's webapps folder. For major design changes, I usuallyrun the app, view source on a page and save it to a "sandbox" folder inthe same directory as my project. Then I do a find/replace and changeall "/appfuse/" references to "../web/". This allows me to change CSSand JS files and just refresh the file in the sandbox.
Attachments: ant-runtime.png
 96096 bytes ant-targets.png 28653 bytes ant-view.png 6585 bytes
- AppFuse in Eclipse
- Mysql Specific in Appfuse
- appfuse--eclipse篇
- appfuse结合eclipse开发流程
- eclipse搭建AppFuse开发环境
- AppFuse
- appfuse
- appfuse
- AppFuse
- appfuse
- Appfuse
- appfuse
- appfuse
- appfuse
- Appfuse
- Appfuse
- J2EE开发平台:Eclipse之Appfuse浅析
- 转:appfuse结合eclipse开发流程
- Asp.net中多项目共享Session(摘自CSDN文档中心)
- 数据导出Excle
- Pb程序开发规范
- c++/vc++的一些学习方法
- Open Source的一些网站,自己收集来的
- AppFuse in Eclipse
- 成功必备
- 各个学习英文网站的汇总
- 英语实时在线广播资源-网络英语广播
- 面向Microsoft SQL Server 2005的本机XML Web Services概述
- 寻OracleIAS的培训(价钱好商量)
- 测试
- 更新更强的日历脚本(downmoon)
- 20050826_How to report a Bug