vmware经验总结--2.VMWare系列软件的安装
来源:互联网 发布:网络商标续费多少钱 编辑:程序博客网 时间:2024/04/30 03:41
2 VMWare安装
关于本章
本章描述内容如下表所示。
标题
内容
介绍vmware Workstation 6.5版本的安装配置。
介绍vmware esx server 3.5版本的安装配置。
介绍vmware esxi server 4版本的安装配置。
2.1 vmware Workstation安装及配置
2.1.1 安装前准备
安装vmware Workstation时,要准备软件包及license,包括:
l windows下:VMware-Workstation-6.5.0-118166.exe。
l Linux下:VMware-Workstation-6.5.0-118166.i386.rpm或VMware-Workstation-6.5.0-118166.x86_64.rpm
去官方网站注册,即可获得免费license。
2.1.2 windows下安装步骤配置
步骤 1 安装
安装非常简单,双机VMware-Workstation-6.5.0-118166.exe后,在图形窗口中一直点下一步即可完成安装.
如出现“1718错误”,解决方法请参见:http://support.microsoft.com/kb/925336/zh-cn。
图2-1 1718错误

步骤 2 配置网络
点击“开始 – 所有程序 – Vmware - VMware Server - Manage Virtual Networks”,如下图。
图2-2 Manage Virtual Networks
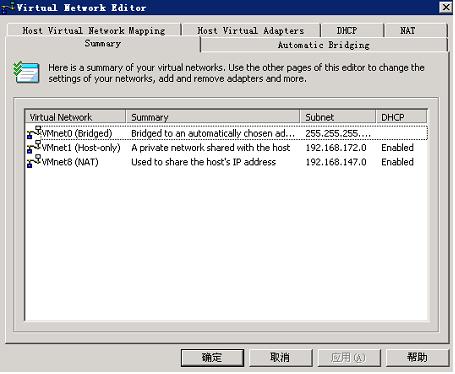
vmware提供三种可选的虚拟网络,分别为Bridged, Host-only, NAT。
Bridged是在宿主机的网卡上,建立网桥连接。虚拟机中的操作系统通过宿主机上的网桥展现在物理网络上,两者的网络IP必须设置成在一个网段上,对网络上的其它机器而言,它们就像是有2台物理机器一样。(如有多个网卡,可在上图中,指定一个网卡上建立网桥,否则它会自动选择一个网卡。)这种是最常用,最简单的网络方式。
NAT是在宿主机上增加一个虚拟网络,宿主机上的这个虚拟网络和虚拟机操作系统的网卡,配置成同一网段的IP,即可实现二者通迅。如果虚拟机也需要访问宿主机的真实物理网络,则配置要复杂一些,如有兴趣可上网查阅。
Host-only方式基本上不使用,如有兴趣可上网查阅。
默认是以上三种网络同时打开着,实际使用时,可关掉不需要的另2种(除非你想测试一下给虚拟机里的操作系统上加上第2个不同网络的网卡)。
步骤 3 创建虚拟机
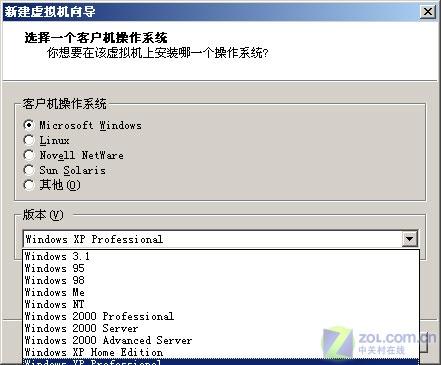
1:点击文件——新建——虚拟机,然后按照以下步骤操作。
图2-3 Step1: Create Virtual Machine
2:创建虚拟机的向导,帮助你配置你的虚拟系统的参数(比如硬盘、内存、网络的设置等等,以下步骤中的配置参数,在以后可以随时修改,新手可多做尝试,无需担心)。
图2-4 Step2: Virtual Machine Wizard
3:选择虚拟系统文件的兼容格式(新手推荐选择默认选项)
图2-5 Step3: Virtual Machine configuration

4:按照默认设置继续点击下一步,选择好您需要的操作系统,包括Windows3.1在内的所有Windows操作系统,VMWare都提供支持。(必须要有选好系统的安装光盘或者iso镜象文件)
图2-6 Step4: Select a Guest Operating System
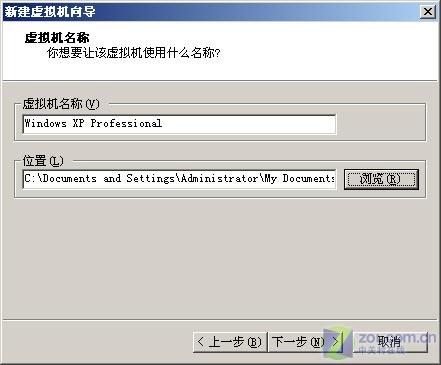
5:配好虚拟机的名字,以及存放的位置。该位置其实就是您操作系统的安装路径,我们建议大家选择一个磁盘比较大的空间,并且新建一个文件夹。如果要备份你的虚拟系统,只要备份这个文件夹就可以了。
图2-7 Step5: Name the Virtual Machine
6:配置网络模式(选择NAT方式的话,一般主机不用做任何的设置虚拟机就可以利用主机上网,)
图2-8 Step6: Network Type

7:配置虚拟磁盘的容量,在这里可以直接单击完成,来完成基本操作设置,磁盘默认空间是8GB,用户可以根据自己的实际使用情况来调整大小,也可以自定义分区。
图2-9 Step7: Specify Disk Capacity

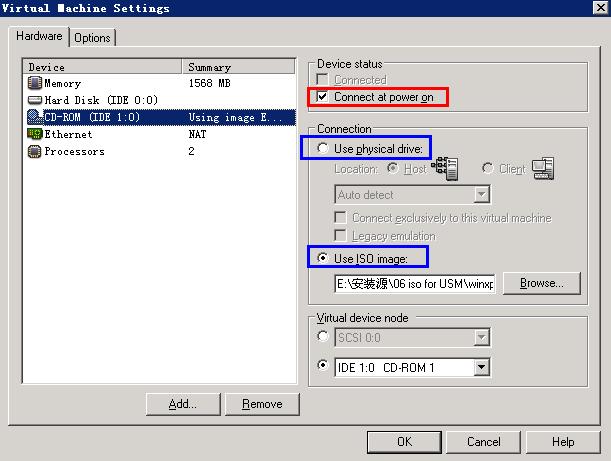
8: 虚拟机的配置,左边列表树中,选中刚创建的虚拟机,点击“虚拟机 > 配置”。配置的原则是只要能满足需要即可(如内存,CPU,磁盘的大小),不需要的虚拟设备建议删除(如软驱,串口)。刚开始时,是需要CD-ROM来进行安装虚拟机内的操作系统的,可以使用宿主机上的光驱(插入系统安装盘),也可以是光盘镜像文件。
图2-10 Step8: Virtual Machine Settings
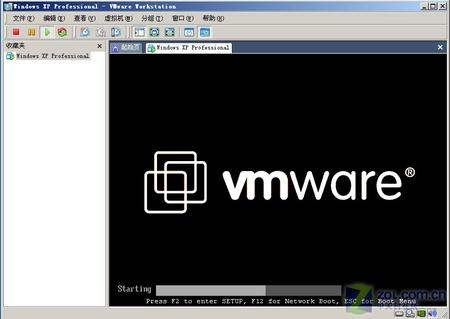
步骤 4 给虚拟机安装操作系统
在上一步骤中,配置好虚拟机的硬件,(虚拟机的CD-ROM如果使用的是宿主机的光驱,则需要插入window xp系统安装盘),然后可以点击“ ”启动虚拟机,并进行操作系统的安装了。
图2-11 虚拟机启动界面
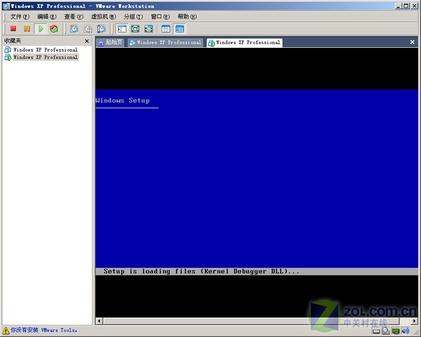
安装操作系统:安装操作系统的过程就不细说,网上教程很多,和真实的机器安装系统是一样的。
图2-12 虚拟机中操作系统安装

2.1.3 Linux下安装步骤配置
安装和配置方法请参见vmware server安装中的 “2.2.3 Linux下安装步骤配置”。
2.2 vmware server安装及配置
2.2.1 安装前准备
安装vmware server时,要准备软件包及license,包括:
l windows下:VMware-server-2.0.0-122956.exe。
l Linux下:VMware-server-2.0.0-122956.i386.rpm或VMware-server-2.0.0-122956.x86_64.tar.gz
购买正版license(网上也可找到很多)。无license的话,可免费使用2个月。
2.2.2 windows下安装步骤配置
安装和配置非常简单,1.0版本的配置界面,和vmware workstation一样;在2.0版本中,只不过将图形窗口,转换成了web页面(默认登陆用户名密码为操作系统管理员用户及密码),展示内容和配置方法一样。
因此,请参见“2.1.2 windows下安装步骤配置”。
图2-13 vmware server 2.0配置界面

2.2.3 Linux下安装步骤配置
步骤 1 安装。
linux71:~ # rpm -ivh VMware-server-2.0.0-122956.i386.rpm
Preparing... ########################################### [100%]
1:VMware-server ########################################### [100%]
步骤 2 配置.
重点在这步,需要安装一下软件包
Gcc、gcc-c++、kernel-devel
执行配置
linux71:~ # vmware-config.pl
Making sure services for VMware Server are stopped.
Stopping VMware services:
Virtual machine monitor done
You must read and accept the End User License Agreement to continue.
Press enter to display it.
回车,然后显示Lic,按Q键退出,提示
Do you accept? (yes/no)
输入yes,回车,提示
Thank you.
Configuring fallback GTK+ 2.4 libraries.
In which directory do you want to install the mime type icons?
[/usr/share/icons]
使用默认值,回车,提示
What directory contains your desktop menu entry files? These files have a
.desktop file extension. [/usr/share/applications]
使用默认值,回车,提示
In which directory do you want to install the application's icon?
[/usr/share/pixmaps]
使用默认值,回车,提示
Do you want networking for your virtual machines? (yes/no/help) [yes]
使用默认值,回车,提示
Configuring a bridged network for vmnet0.
Your computer has multiple ethernet network interfaces available: eth0, eth1,
eth2, eth3, eth4. Which one do you want to bridge to vmnet0? [eth0]
使用默认值,回车,提示
The following bridged networks have been defined:
. vmnet0 is bridged to eth0
lines 1-2/2 (END)
按Q键退出,提示
The following bridged networks have been defined:
. vmnet0 is bridged to eth0
Do you wish to configure another bridged network? (yes/no) [no]
使用默认值,回车,提示
Do you want to be able to use NAT networking in your virtual machines? (yes/no)
[yes]
使用默认值,回车,提示
Configuring a NAT network for vmnet8.
Do you want this program to probe for an unused private subnet? (yes/no/help)
[yes]
使用默认值,回车,提示
Probing for an unused private subnet (this can take some time)...
The subnet 192.168.5.0/255.255.255.0 appears to be unused.
This system appears to have a DHCP server configured for normal use. Beware
that you should teach it how not to interfere with VMware Server's DHCP server.
There are two ways to do this:
1) Modify the file /etc/dhcpd.conf to add something like:
subnet 192.168.5.0 netmask 255.255.255.0 {
# Note: No range is given, vmnet-dhcpd will deal with this subnet.
}
2) Start your DHCP server with an explicit list of network interfaces to deal
with (leaving out vmnet8). e.g.:
dhcpd eth0
Consult the dhcpd(8) and dhcpd.conf(5) manual pages for details.
Hit enter to continue.
回车,提示
The following NAT networks have been defined:
. vmnet8 is a NAT network on private subnet 192.168.5.0.
lines 1-2/2 (END)
按Q键退出,提示
Do you wish to configure another NAT network? (yes/no) [no]
使用默认值,回车,提示
Do you want to be able to use host-only networking in your virtual machines?
[yes]
输入“no”,回车,提示
Trying to find a suitable vmnet module for your running kernel.
The module bld-2.6.5-7.201-i586bigsmp-SuSE9.1 loads perfectly in the running
kernel.
The default port : 902 is not free. We have selected a suitable alternative
port for VMware Server use. You may override this value now.
Remember to use this port when connecting to this server.
Please specify a port for remote console connections to use [904]
使用默认值,回车,提示
WARNING: VMware Server has been configured to run on a port different from the
default port. Remember to use this port when connecting to this server.
Shutting down xinetd: done
Starting INET services. (xinetd) done
Configuring the VMware VmPerl Scripting API.
Building the VMware VmPerl Scripting API.
Using compiler "/usr/bin/gcc". Use environment variable CC to override.
Installing the VMware VmPerl Scripting API.
The installation of the VMware VmPerl Scripting API succeeded.
Generating SSL Server Certificate
In which directory do you want to keep your virtual machine files?
[/var/lib/vmware/Virtual Machines]
使用默认值,回车,提示
The path "/var/lib/vmware/Virtual Machines" does not exist currently. This
program is going to create it, including needed parent directories. Is this
what you want? [yes]
使用默认值,回车,提示
Please enter your 20-character serial number.
Type XXXXX-XXXXX-XXXXX-XXXXX or 'Enter' to cancel:
如果有序列号则输入,也可以暂时不用输入,回车,提示
You cannot power on any virtual machines until you enter a valid serial number.
To enter the serial number, run this configuration program again, or choose
'Help > Enter Serial Number' in the virtual machine console.
Starting VMware services:
Virtual machine monitor done
Virtual ethernet done
Bridged networking on /dev/vmnet0 done
Host-only networking on /dev/vmnet8 (background) done
NAT service on /dev/vmnet8 done
The configuration of VMware Server 1.0.5 build-80187 for Linux for this running
kernel completed successfully.
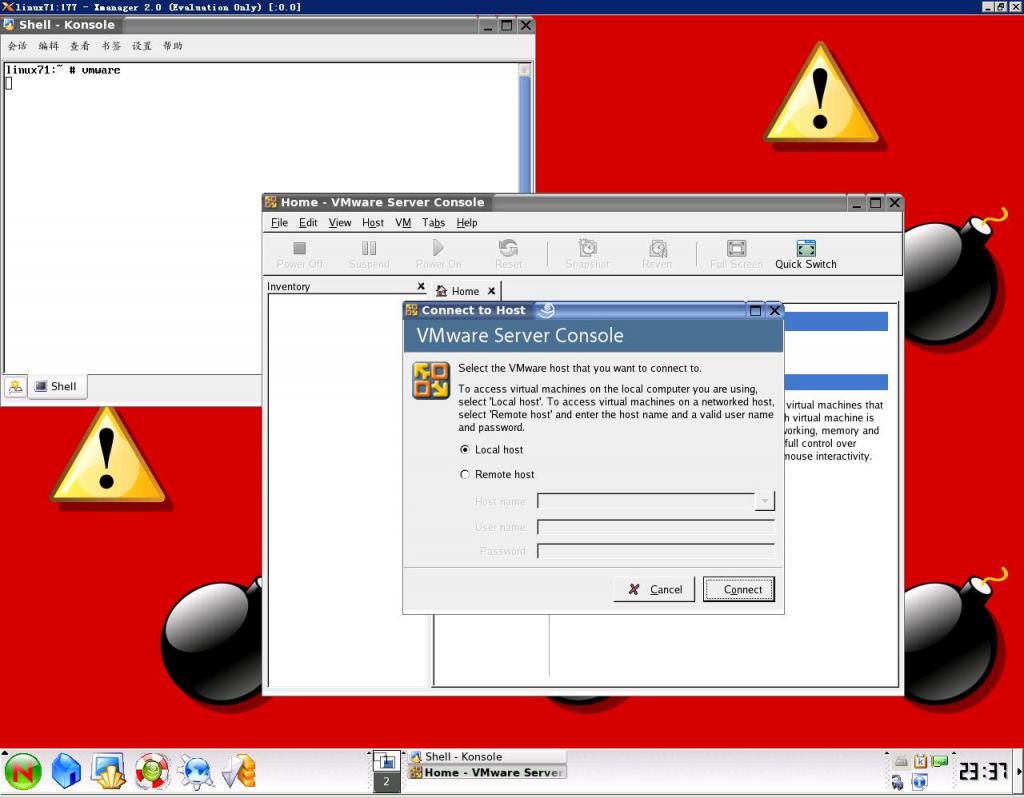
步骤 3 安装完成,可以使用Xmanager等远程工具登陆,打开一个终端程序,输入vmware,出现管理界面,如下图:
图2-14 linux下启动vmware server窗口
步骤 4 FQA:
1.如果最后遇到If you do have "inetd" or "xinetd" installed, make sure that /etc/inetd.conf or /etc/xinetd.d exists.
需要安装 inetd或xinetd
再重新配置
#vmware-config.pl
2.提示 /usr/src/linux/include找不到头文件
安装 kernel-devel
2.3 vmware esx安装及配置
2.3.1 安装前准备
安装vmware esx时,要准备软件包及license,包括:
l 下载esx-3.5.0_Update_1-82663.iso或更版本,并刻成光盘。
l VirtualCenter_VMware-VIMSetup-2.5.0-U3.iso或更版本vSphere Server
l VMware Infrastructure Client(以下简称VI Client): VMware-viclient.exe,其实已包含在VirtualCenter中,当然也可以单独去官网上下载。最新4.0版本为VMware-viclient-all-4.0.0-162856.exe
vmware esx(或esxi系列)功能非常强大,在此有必要简单介绍一下它的架构。
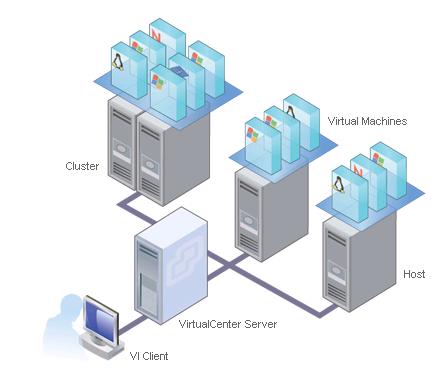
如下图所示,Host为物理机器,首先每台物理机上需安装vmware esx (或esxi)系统,之后就可以在上面布署N个虚拟机,这些虚拟机只使用自已宿主机(Host)的资源;多个主机(Host)也可以组成为一个集群(Cluster),再在此集群上,布署虚拟机。
VirtualCenter Server是虚拟机网络中的配置管理服务器,可对整个网络上的vmware进行管理,(如虚拟机布署,配置,快照,资源监控,性能监控,告警,虚拟机迁移,虚拟机与物理机相互转换等,各种任务定期调度)。 安装于windows系列机器上,需要使用sqlserver 2005 express(这是免费产品),需要单独的license。
VirtualCenter Server的所有操作配置,都是通过VI Client在图形界面上进行的。(Client和Server可装在一台机器上,也可以装在其它机器上。使用VirtualCenter Server所在windows机器的管理员账户,即可连接到VirtualCenter Server。)
如果你只管理一个Host宿主机,则不需要VirtualCenter Server,直接可以用VI Client连接到宿主机上进行配置管理。
图2-15 vmware esx (或esxi)架构图
2.3.2 安装vmware esx
步骤 1 设置机器从光驱引导,放入刻录好的esx安装光盘后,重启机器。
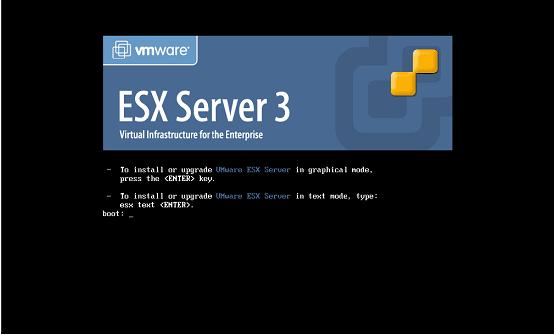
步骤 2 直接按回车键,进入图形化的安装界面,安装步骤比较简单,此处不介绍。
2.3.3 vmware esx配置远程管理IP
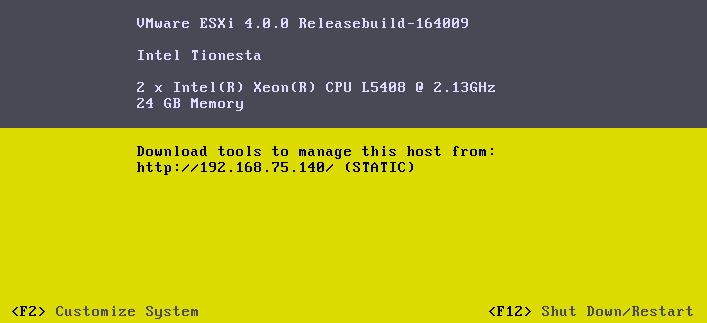
步骤 1 使用显示器,键盘鼠标(或KVM)连接到主机,界面如下:
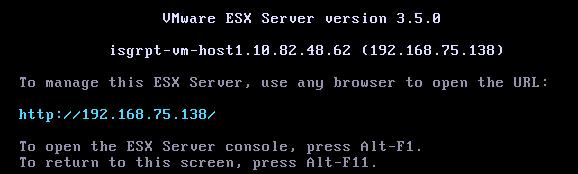
步骤 2 按“Alt + F1”,输入用户名密码。
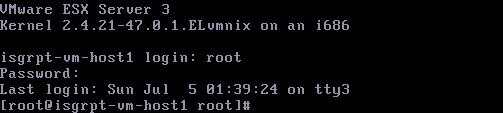
步骤 3 列出当前系统所有的物理网卡:输入“esxcfg-nics –l”,再按回车。要了解esxcfg-nics命令的用法的话,可以输入esxcfg-nics /?或man esxcfg-nics。 下文所描述的命令也可以通过此法来学习和了解。

步骤 4 配置远程管理IP。
esxcfg-vswitch -a vSwitch0 #创建虚拟交换机
esxcfg-vswitch -A "Service Console" vSwitch0 #在此交换机上,创建端口组,即虚拟的vlan。
esxcfg-vswitch -L vmnic3 vSwitch0 #将物理网卡vmnic3绑定到交换机上
esxcfg-vswif -a vswif0 -p "Service Console" -i 192.168.75.138 -n 255.255.255.0 –b 192.168.75.255 #在交换机上,创建一个虚拟接口,IP:192.168.75.138,掩码255.255.255.0,广播地址192.168.75.255,此处的这个IP,就是vmware esx的远程管理IP,如果你写错了IP或需要修改IP,也可以用esxcfg-vswif命令来完成。
esxcfg-vswitch –l #列出所有的虚拟交换机(以及它的vlan)
esxcfg-vswif –l #列出所有的接口

该步骤配置的内容,也可以在/etc/sysconfig/network和/etc/sysconfig/network-scripts/ifcfg-vswif0这2个文件中查看。
步骤 5 测试一下配置的远程管理IP是否通畅: (按“ctrl + c”中断)
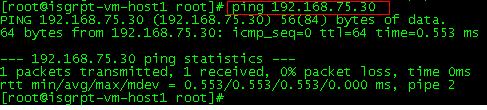
如果不通畅,可能是上一步骤中的vmnic3网卡并没有接通网络,或者IP没配对(esxcfg-vswif命令可修改ip)。下面介绍一下更换一块物理网卡进行绑定。
esxcfg-vswitch -U vmnic3 vSwitch0 #取消虚拟交换机vSwitch0上绑定的网卡vmnic3
esxcfg-vswitch -L vmnic4 vSwitch0 #将物理网卡vmnic3绑定到交换机上
ping 192.168.75.30 #测试网络是否通畅,不通的话,请检查网线或继续更换网卡绑定,直到通畅为止。
2.3.4 vmware esx配置ssh服务
步骤 1 参照上一节步骤1, 步骤2进入命令行。
步骤 2 修改配置文件/etc/ssh/sshd_config。
vi /etc/ssh/sshd_config
把PermitRootLogin 的值改为yes 让Root可以通过SSH直接登录,然后保存。
步骤 3 重启sshd服务。
service sshd restart
2.4 vmware esxi安装及配置
2.4.1 安装前准备
安装vmware esx时,要准备软件包及license,包括:
l 下载esxi-3.5或更新版本VMware-VMvisor-ESXi-4.0.0-164009.x86_64.iso版本,并刻成光盘。
l VirtualCenter_VMware-VIMSetup-2.5.0-U3.iso或更版本vSphere Server
l VMware Infrastructure Client(以下简称VI Client): VMware-viclient.exe,其实已包含在VirtualCenter中,当然也可以单独去官网上下载。最新4.0版本为VMware-viclient-all-4.0.0-162856.exe
license和esx版本通用,“参见2.3.1 安装前准备”
2.4.2 安装vmware esxi
Use the ESX Server 3i Installable CD‐ROM to install ESX Server 3i onto a hard drive
(SATA, SAS, or SCSI). This procedure presumes you are using a keyboard and monitor
attached to the ESX Server host to perform the installation.
To install ESX Server 3i:
1 Insert the ESX Server 3i Installable CD into the CD drive.
2 Set the BIOS to boot from the CD.
The ESX Server runs through its boot process until the Welcome screen displays.
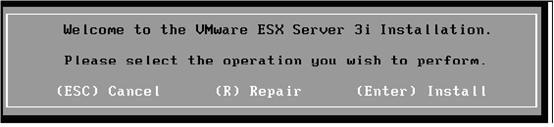
If this screen does not display, do the following:
a Reboot the machine.
b Press the key required to enter your machine’s BIOS Setup page.This key is often F1, F2, or F10.
c Set the CD drive as the first boot device.
d Reboot the machine.
3 Press Enter to continue with the Installation.
The text installer steps you through each process of the ESX Server installation.
When the installer completes the operation, the Installation Complete screen
displays.
4 Remove the CD and reboot the host.
2.4.3 vmware esxi配置远程管理IP
步骤 1 使用显示器,键盘鼠标(或KVM)连接到主机,界面如下:

步骤 2 按“F2”键,输入用户名密码。(初始时是没有密码的,没密码时该界面不显示)

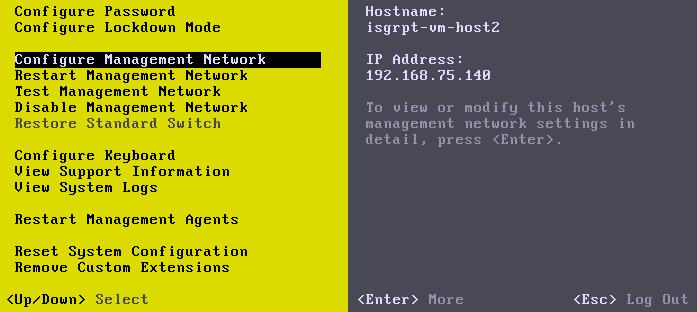
步骤 3 配置网络step1: 选择“Configure Management Network”,按回车键。
步骤 4 配置网络step2: “选择Network Adapters”,按回车键。
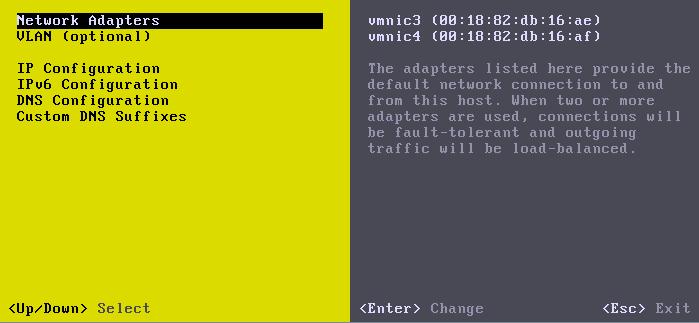
步骤 5 配置网络step3: 选择合适的网卡做为远程管理(按空格键选定或取消,可多选),按回车键。此时回到“步骤 4”的界面。

步骤 6 配置网络step4:配置管理IP,选择“IP Configuration”按回车键。

步骤 7 配置网络step5: 配置好管理用的IP,掩码,网关,按回车键。
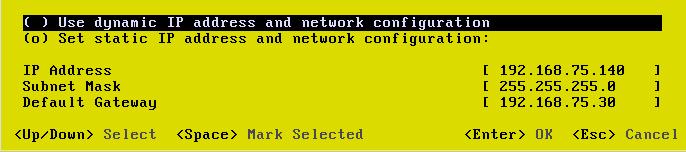
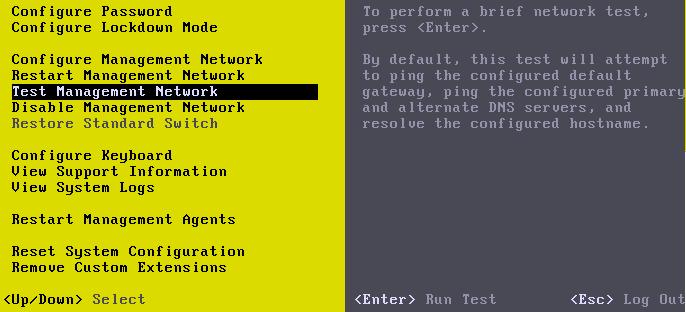
步骤 8 配置网络step6:再按Esc,回到“步骤 3”的界面。此时选择“Test Management Network”,即可测试。(如果测试网络不通,则重新执行“步骤 3 至 步骤 8”,注意在步骤 5,就要换一块网卡配管理IP哦)。

2.4.4 vmware esxi配置ssh服务
步骤 1 使用显示器,键盘鼠标(或KVM)连接到主机,界面如下:
步骤 2 按“Alt + F1”,出现黑屏界面,输入“unsupported”(不会显示在屏幕上),按回车。

步骤 3 此时需要输入管理密码。

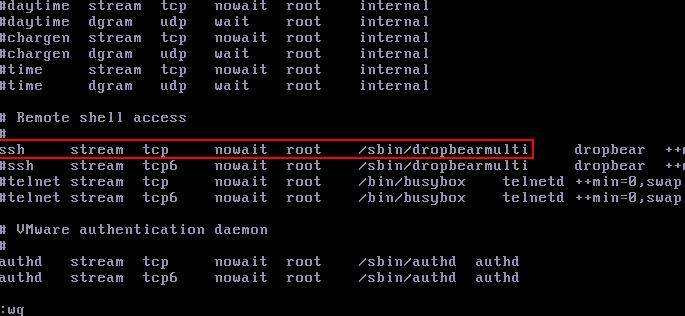
步骤 4 成功进入命令行状态以后,输入“vi /etc/inetd.conf”。

步骤 5 然后找到开头是#ssh的那一行,删除注释符#,保存退出。
退出vi编辑器后,输入: ps | grep inetd 来获取inetd的进程号,然后执行 kill -HUP <进程号> ,这样系统会重新读取配置文件,就打开了。

步骤 6 输入“exit”,退出了命令行状态。再按“Alt + F2”,使其回到原始界面即可。
- vmware经验总结--2.VMWare系列软件的安装
- vmware经验总结--2.VMWare系列软件的安装
- 虚拟机软件VMware Workstation:VMware Tools的正确安装方法
- 虚拟机软件VMWare安装
- VMware软件安装问题
- VMware安装Ghost XP SP3 经验总结
- vmware经验总结--1.vmware概述
- 如何卸载ubuntu下的vmware系列软件
- VMware虚拟机下VMware Tools的安装
- VMware 8.0 安装 FC5 的VMware tools
- VMware 虚拟机 Fedora18 的VMware Tools安装
- VMware安装VMware Tools遇到的问题
- VMware安装VMware Tools遇到的问题
- vmware tools 的安装
- VMware Tool的安装
- VMware Tools 的安装
- VMware虚拟机的安装
- vmware的安装
- 对软件项目管理的探讨
- CultureInfo 类
- sql server 2005 海量数据处理
- 如何:在十六进制字符串与数值类型之间转换(C# 编程指南)
- Linux的异步IO机制(转)
- vmware经验总结--2.VMWare系列软件的安装
- Struts2框架安全缺陷[转贴]
- Menu动态加载数据
- 中兴为什么换帅?zz
- 基于ECOS的CMMB环境搭建
- How to automate mail merge to Word using OLE and ODBC[VFP调用Word邮件合并—微软提供]
- 扩频 扩频因子
- CSS研究之盒子模型
- 数组指针