magento 1.4 -- 自定义变量(Custom Variables)使用初探
来源:互联网 发布:java比较日期是否相等 编辑:程序博客网 时间:2024/06/06 14:27
在CMS中使用的变量(Variables)在1.3时代就已经存在,只不过那时候只有少数几个,而且使用时需要自己手写。比如很常用的{{store url=""}}和{{skin url=""}},分别代表网站根url和当前使用模板的文件夹目录。
到了Magento1.4,后台引入了强大的编辑器和自定义变量,变量的使用更加方便而且可以在自带的基础上自己添加新变量了。
首先看下编辑器,打开一个CMS的内容页,编辑器里第一行第一个图标就是插入变量(Insert Variable),或者隐藏编辑器后文本域上四个按钮的最后一个。
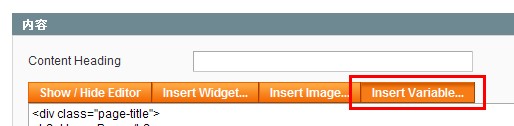
点击插入变量,可以看到默认变量的一个列表,点击某个变量就可以在内容相应的位置插入这个变量。
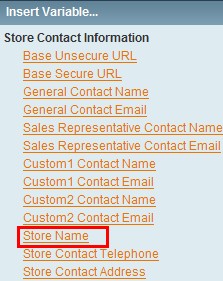
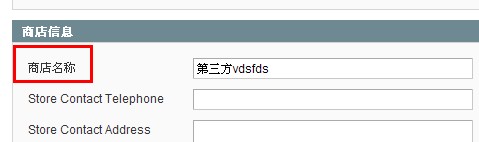
上图的Store Name插入后的结果是{{config path="general/store_information/name"}},前台的显示结果是后台配置->基本设置里的商店名称框里填的内容。
可以看出{{config path="*"}}拿的是后台系统设置里的一些值,而系统设置的值全部都在数据库的core_config_data表,表中就有path字段,尝试把path里的值换成其他配置,比如{{config path="web/unsecure/base_url"}},前台确实能拿到网站根目录。这样可以看出{{config path="*"}}是拿系统配置的一些值的通用写法。
接下来看下自定义变量,打开菜单System->Custom Variables,点击按钮新增一个变量
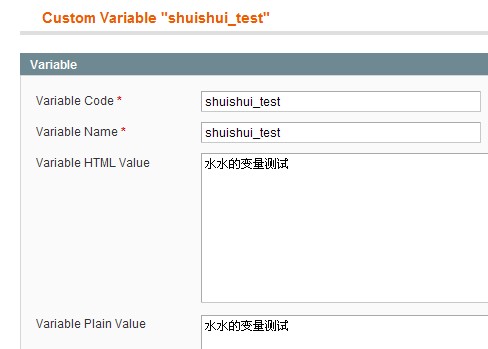
保存之后回到CMS页面去看一下,现在点击插入变量的时候就可以看到刚刚添加的新变量了,点击插入这个新变量,结果是{{customVar code=shuishui_test}}

最终结果

前台显示结果
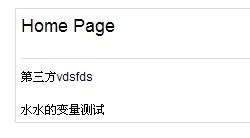
可以看到后台所填的商店名和自己写的新变量都获取到了。
最后,怎么在.phtml文件中使用自定义变量呢,看下面的代码
Magento的变量使用的地方很多,这里只是就我了解简单描述了下,有些地方都还有待研究,比如在有些变量只能在邮件模板使用而不能在普通CMS中使用等等。
- magento 1.4 -- 自定义变量(Custom Variables)使用初探
- Google Analytics新增自定义变量 Custom Variables
- 如何在piwik中获得用户变量(Custom Variables)
- Magento - how to add custom variables to new order E-mail?
- piwik custom variables
- Magento copy custom option module(自定义选项复制插件)
- 将自定义选项(custom options)批量导入Magento
- 将自定义选项(custom options)批量导入Magento(一)
- Magento Email Variables
- asterisk使用之Channel Variables (通道变量)
- asterisk使用之Channel Variables (通道变量)
- Magento初探
- Magento - get custom attributes
- create magento custom api
- magento custom api configuration
- Writing Magento Custom API
- Mysql User-Defined Variables 用户自定义变量 SET or DECLARE
- 插件: images and custom options,magento添加多图片,自定义选项custom options,catelog,分类的插件以及使用方法!!!
- Java的线程最大数量
- nginx module 开发谈(3)
- Redhat5.4下安装oracle10g
- Linux下select的使用小记
- 技术人员职业生涯的红色警报
- magento 1.4 -- 自定义变量(Custom Variables)使用初探
- 国外专家谈游戏制作
- 《大话设计模式》- 代理模式设计
- javascript prototype介绍的文章
- 海明距离
- 交叉编译gstreamer for arm
- Using util package
- JVM 垃圾回收机制与GC性能调优
- SQL SERVER 2008的数据压缩