flex与mysql交互
来源:互联网 发布:鲁班钢筋软件下载 编辑:程序博客网 时间:2024/04/28 14:38
这个小例子通过remoteobject的通讯方法。实现flex与mySQL数据库的交互。
BlazeDS 是一个基于服务器的 Java 远程控制 (remoting) 和 Web 消息传递 (messaging) 技术,它能够使得后端的 Java 应用程序和运行在浏览器上的 Adobe Flex 应用程序相互通信。使用Blazeds可以很方便的连接java后台,同时他也提供HttpService、webservice方式,不过在Blazeds中可以通过配置文件中对其进行设置的,这样提高了应用的灵活性。其中最重要的还是RemotingObject技术,他可以直接远程远程调用java后台提供的公共接口,使其效率大大提升,一般是采用HTTPService方式的10倍左右。

1 使用mySQL中的test数据库,建表名为admin.表中字段为: id username userpwd
(最终目的:将数据库表中的记录最终显示在flex端的DateGrid组件中显示出来)
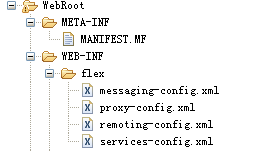
2 建立myEclipse的工程。新建->web project 输入工程名后。需要将事先下载的Blazeds包粘贴至工程目录下。并且将mysql的驱动放到工程目录lib的文件夹下
(我使用版本blazeds_turnkey_3-0-0-544.zip。将解压后的文件夹中的blazeds.war改成rar的拓展名,并解压,将得到的META-INF和WEB-INF两个文件夹拷入刚建成的工程下webroot下)
3 编写所需的java方法
- ConnextionHelper.java
- import java.sql.Connection;
- import java.sql.DriverManager;
- import java.sql.SQLException;
- public class ConnectionHelper
- {
- private String url;
- private static ConnectionHelper instance;
- private ConnectionHelper()
- {
- try {
- Class.forName("com.mysql.jdbc.Driver");
- url = "jdbc:MySQL://localhost/test";
- } catch (Exception e) {
- e.printStackTrace();
- }
- }
- public static Connection getConnection() throws SQLException {
- if (instance == null) {
- instance = new ConnectionHelper();
- }
- try {
- return DriverManager.getConnection(instance.url,"root","root");
- } catch (SQLException e) {
- throw e;
- }
- }
- public static void close(Connection connection)
- {
- try {
- if (connection != null) {
- connection.close();
- }
- } catch (SQLException e) {
- e.printStackTrace();
- }
- }
- }
- DAOException.java
- public class DAOException extends RuntimeException
- {
- static final long serialVersionUID = -1881205326938716446L;
- public DAOException(String message)
- {
- super(message);
- }
- public DAOException(Throwable cause)
- {
- super(cause);
- }
- public DAOException(String message, Throwable cause)
- {
- super(message, cause);
- }
- }
- Admin.java
- import java.io.Serializable;
- public class Admin implements Serializable {
- static final long serialVersionUID = 103844514947365244L;
- private int id;
- private String username;
- private String userpwd;
- public Admin() {
- }
- public Admin(int id,String username,String userpwd) {
- this.id = id;
- this.username=username;
- this.userpwd=userpwd;
- }
- public int getId() {
- return id;
- }
- public void setId(int id) {
- this.id = id;
- }
- public String getUsername() {
- return username;
- }
- public void setUsername(String username) {
- this.username = username;
- }
- public String getUserpwd() {
- return userpwd;
- }
- public void setUserpwd(String userpwd) {
- this.userpwd = userpwd;
- }
- }
- AdminService.java
- import java.util.ArrayList;
- import java.util.List;
- import java.sql.*;
- import flex.jie.ConnectionHelper;
- import flex.jie.DAOException;
- public class AdminService {
- public List getAdmins() throws DAOException {
- List list = new ArrayList();
- Connection c = null;
- try {
- c = ConnectionHelper.getConnection();
- Statement s = c.createStatement();
- ResultSet rs = s.executeQuery("SELECT * FROM admin ORDER BY id");
- while (rs.next()) {
- list.add(new Admin(rs.getInt("id"),
- rs.getString("username"),
- rs.getString("userpwd")));
- }
- } catch (SQLException e) {
- e.printStackTrace();
- throw new DAOException(e);
- } finally {
- ConnectionHelper.close(c);
- }
- return list;
- }
- }
在remoting-config.xml文件中 添加(source处根据实际的建包名填写)
- <destination id="admin">
- <properties>
- <source>flex.jie.user.AdminService</source>
- </properties>
- </destination>
至此。myEclipse工程中所需代码以及配置已经完成。将工程部署并发布在Tomacat下面。
接下来,flex端的步骤。
首先 新建Flex Project ,输入工程名。在server technology处选择J2EE,点击next
填写刚刚发布在tomcat下的目录名。点击完成。
在默认的mxml中的代码如下:
- <?xml version="1.0" encoding="utf-8"?>
- <mx:Application xmlns:mx="http://www.adobe.com/2006/mxml" backgroundColor="#FFFFFF">
- <mx:RemoteObject id="srv" destination="admin"/>
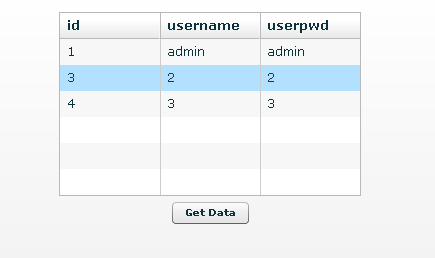
- <mx:DataGrid dataProvider="{srv.getAdmins.lastResult}" width="100%" height="100%"/>
- <mx:Button label="Get Data" click="srv.getAdmins()"/>
- </mx:Application>
在tomcat启动的前提下,点击运行即可。
或者想显示指定的列。只需要稍作修改即可
- <?xml version="1.0" encoding="utf-8"?>
- <mx:Application xmlns:mx="http://www.adobe.com/2006/mxml" backgroundColor="#FFFFFF" creationComplete="srv.getAdmins()">
- <mx:Script>
- <![CDATA[
- import mx.rpc.events.ResultEvent;
- import mx.collections.ArrayCollection;
- [Bindable]public var ad:ArrayCollection;
- private function adminHandler(event:ResultEvent):void
- {
- ad= event.result as ArrayCollection
- }
- ]]>
- </mx:Script>
- <mx:RemoteObject id="srv" destination="admin">
- <mx:method name="getAdmins" result="adminHandler(event)"/>
- </mx:RemoteObject>
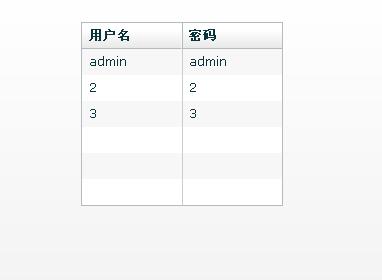
- <mx:DataGrid dataProvider="{ad}">
- <mx:columns>
- <mx:DataGridColumn headerText="用户名" dataField="username"/>
- <mx:DataGridColumn headerText="密码" dataField="userpwd"/>
- </mx:columns>
- </mx:DataGrid>
- </mx:Application>
显示为形式可为:
说明:此时的destination对应remote-config.xml中的id号 。建立连接。从而flex端所用到的java方法可以找到。返回数据库中所建表的信息
- flex与mysql交互
- Amfphp与Flex交互:读取mysql数据
- Flex与Servlet交互
- Flex与JavaScript交互
- Flex与Ajax交互
- flex与数据库交互
- flex与数据库交互
- flex与php交互
- flex与数据库交互
- Delphi与Flex交互
- FLEX与javascript交互
- flex与js交互
- Flex与JavaScript交互
- flex与ajax交互
- flex与ajax交互
- Flex与Servlet交互
- flex数据传输与交互
- Flex与服务器交互
- 技术人员职业生涯的红色警报
- IKVM.NET_第十一篇_开发者指南_Java中开发.NET应用程序
- 174.36.30.71 www.dropbox.com
- 《写给中国人的经济学》
- 利用cxf开发WebService
- flex与mysql交互
- Vc++读写Excell文件
- 详解Oracle创建用户权限全过程
- Satsun Studio 工作室
- LESSON 9: 工具栏,状态栏.
- 外面看着像进来,进店不会空手出,武汉奇美服饰有限公司就是这么牛
- Android中使用ALSA声卡
- mac终端下vim配色备份
- iPhone 升级到3.1.2固件后消失了设置IMAP邮件帐户的功能后,设置IMAP方式访问QQ邮箱的方法