Effective Source Insight
来源:互联网 发布:ip电话软件 编辑:程序博客网 时间:2024/06/06 11:37
s into Source Insight
Source Insight can integrate different kinds of source control tool into it, this document only describe how to integrate ClearCase as an example.
Step 1:
Options→Custom Commands…
Step 2:
Select ‘Check Out’ command and edit new command “cleardlg /checkout %f” in the ‘Run’ field:
Figure 1 - Configure the Check Out Command
Step 3:
If you want to use the source control icon in the tool bar, you can select it as following:
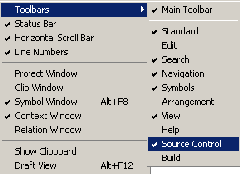
View→Toolbars→Source Control
Figure 2 - Show Source Control Toolbar
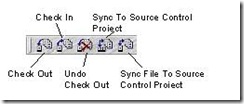
The following toolbar will be added to the GUI:
Figure 3 – The Source Control Toolbar
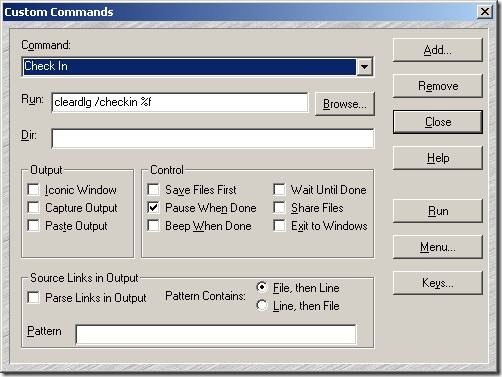
Select ‘Check In’ command and edit new command “cleardlg /checkin %f” in the ‘Run’ field:
Figure 4 - Configure the Check In Command
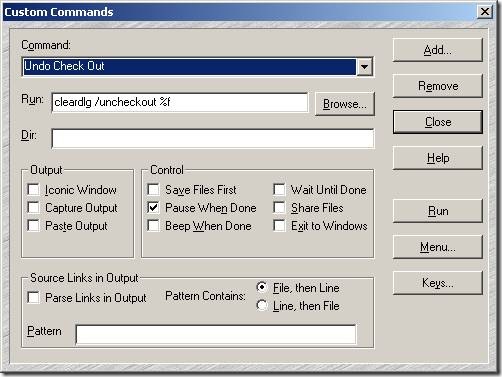
Select ‘Undo Check Out’ command and edit new command “cleardlg /uncheckout %f” in the ‘Run’ field:
Figure 5 - Configure the Undo Check Out Command
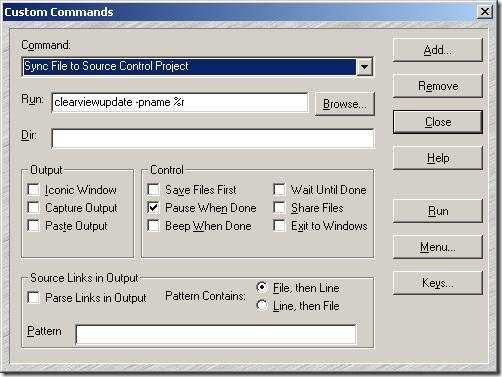
Select ‘Sync File to Source Control Project’ command and edit new command “clearviewupdate -pname %r” in the ‘Run’ field:
Figure 6 - Sync File to Source Control Project
Select ‘Sync to Source Control Project’ command and edit new command “clearviewupdate -pname %j” in the ‘Run’ field:
Figure 7 - Sync to Source Control Project
There is no ‘Version Tree’ command in the default custom commands. We need to add it manually.
Step 1:
Options→Custom Commands…→Add…
Step 2:
Edit new command name ‘Version Tree’ in the field:
Figure 8 - Add New Custom Command
Step 3:
Select ‘Version Tree’ command and edit new command “clearvtree %f” in the ‘Run’ field:
- Configure the Version Tree Command
Step 4:
If you want run the new command in the ‘Work’ menu, please click the ‘Menu…’ button in the dialog of Figure 9, or do it as following:
Options→Menu Assignments…
Step 5:
1. Select ‘Custom Cmd: Version Tree’ in the ‘Command’ field
2. Select ‘Work’ in the ‘Menu’ field
3. Click ‘Insert’ button (need click the ‘Menu Contents’ field first)
4. Use ‘Up’ or ‘Down’ to set the menu’s position
- Configure the Work Menu
outs
Figure 11 - Configure the Find Checkout Command
Previous Version
Figure 12 - Configure the Compare Command
Figure 13 - Configure the ClearCase Explorer Command
Figure 14 - Configure the History Command
Figure 15 - Configure the Properties of Version Command
Figure 16 - Configure the Properties of Element Command
Suggestion:
All the commands should be inserted into the ‘Work’ menu by using the step4 and step5 methods introduced by section 1.6, and then you can use them conveniently. After configure the menu, you will get a work menu like following:
Figure 17- Work Menu
For more information about ClearCase’s cleardlg, you can run command “cleardlg /?” in DOS prompt:
Figure 18 - More Information about cleardlg
The following table shows all the custom commands, just for copy and paste.
Table 1 Custom Commands
Command
Run
1
Clear Case Explorer
clearexplorer
2
Find Checkouts
clearfindco
3
Check Out
cleardlg /checkout %f
4
Check In
cleardlg /checkin %f
5
Undo Check Out
cleardlg /uncheckout %f
6
History
clearhistory %f
7
Version Tree
clearvtree %f
8
Compare with Previous Version
cleardlg /diffpred %f
9
Properties of Version
cleardescribe %f
10
Properties of Element
cleardescribe %f@@
11*
Sync File to Source Control Project
clearviewupdate -pname %r
12*
Sync to Source Control Project
clearviewupdate -pname %j
* is for snapshot view only
The default tool used to compare files in ClearCase is cleardiffmrg.exe, if you want to use some other software to do the same job, here is how to configure it:
Step 1:
Open file: “C:/Program Files/Rational/ClearCase/lib/mgrs/map”
Step 2:
Find the line:
text_file_delta xcompare ../../bin/cleardiffmrg.exe
And edit the tool’s path like following:
text_file_delta xcompare C:/Software/r-Beyond.Compare/BC2.exe
Note:
C:/Software/r-Beyond.Compare/BC2.exe is my compare tool’s path, and you should set the correct path of yourself.
Shift + F8
Ctrl + o
Esc to close the dialog box
Ctrl + /
Ctrl + m
F5
F9
F10
Options→Document Options…
Figure 19 - Document Options Setting
In the Coding Style for ECDS [2], indentation should be made with spaces rather than with tab characters. Source Insight could expand tab to spaces automatically by selecting ‘Expand tabs’ and setting ‘Tab width’ like following:
Figure 20 - Document Options Setting
In the Coding Style for ECDS [2], it is recommended that line length should no longer than 79 characters. Source Insight could show the margin by selecting ‘Show right margin’ and setting ‘Margin width’ like following:
Figure 21 - Document Options Setting
Options→Preferences…
Figure 22 - Preferences Setting
Options→Document Options…→Auto Indent…
It is suggested that select ‘Smart’ in the ‘Auto Indent Type’ field, and do not select the ‘Indent Open Brace’ and ‘Indent Close Brace’ options in the ‘Smart Indent Options’ field.
Figure 23 - Auto Indenting
Like the VBA for Word or Excel, Source Insight provides a C-like macro language, which is useful for scripting commands, inserting specially formatted text, and automating editing operations.
This document only introduces a simple way of how to edit the macro file and run macros by shortcut key.
and utils.em file
The Base project is automatically created when the first time you run Source Insight. And the Base project is a good place to add your favorite Source Insight editor macro files.
The default file in the Base project is utils.em, open the file and add following codes to it. The function is open the corresponding .cpp or .h file of current file.
1: // Open the corresponding .cpp or .h file2: macro OpenCorrespondingCppOrHFile()3: {4: hCurrentBuf = GetCurrentBuf ()5: bname = GetBufName (hCurrentBuf)6: len = strlen (bname)7:8: if (".cpp" == strmid (bname, len-4, len))9: {10: filename = strmid (bname, 0, len-4)#".h"11: }12: else if (".h" == strmid (bname, len-2, len))13: {14: filename = strmid (bname, 0, len-2)#".cpp"15: }16: else17: {18: filename = Nil19: }20: if (filename != Nil)21: {22: hbufnext = OpenBuf (filename)23: if (hbufnext != hNil)24: {25: SetCurrentBuf (hbufnext)26: }27: }28: }
Options→Key Assignments…
Choose the “Macro: OpenCorrespondingCppOrHFile” in the Command field and press “Assign New Key…” button. I suggest assigning “Alt + ~” to this macro.
After these setting, you can open another project and test the “Alt + ~” shortcut key then.
Figure 24 - Assign Keystrokes to macro
[1] Source Insight Help
- Effective Source Insight
- Source Insight
- Source Insight
- source insight
- Source Insight
- Source Insight
- Source Insight
- source insight
- source insight
- source insight
- source insight
- source insight
- Source Insight
- source insight
- Source Insight
- Source Insight
- source insight
- Source Insight
- 魔兽争霸的地图验证漏洞和作弊图原理,兼谈魔兽联机机制[转载]
- 使用Eclipse中的代码追踪
- PHP删除数组元素
- 总结一下最近一周所犯的低级错误
- MDA模型驱动介绍
- Effective Source Insight
- 替换文本中的指定内容(电子邮件),以及其它指定的内容
- Ajax网页源码抓取程序
- CVS SVN VSS 使用对比
- C/C++常用网站
- Oracle BIEE 安装过程中出现的问题及解决方法
- 用语言杀人
- BS 架构系统的测试
- Subversion中文帮助手册
![clip_image002[4] clip_image002[4]](http://hi.csdn.net/attachment/201008/26/0_1282804255FNnK.gif)
![clip_image013[1] clip_image013[1]](http://hi.csdn.net/attachment/201008/26/0_1282804267NMMu.gif)


