Form Authentication for MOSS 2007 Site
来源:互联网 发布:淘宝dnf异次元碎片cdk 编辑:程序博客网 时间:2024/05/01 23:48
Introduction
The purpose of this document is to provide the step by stepinformation about enabling the Form Based Authentication (FBA) for MOSS2007 site. MOSS 2007 sites uses windows authentication by default. Butsome business needs form based authentication to fulfill therequirements.
Below section explains to enable Form Authentication for MOSS 2007 site.
Setting up ASP.Net 2.0 Forms Authentication User and Role Data Source
This section explains creation of database which is used to storeuser's information such as credentials and roles which is used for FormAuthentication. This section also explains the configuration ofMembership and Role providers in the web.config file and creation ofusers using ASP.Net configuration wizard. This article shows creating auser and which will be used for testing Form Authentication later.
Create Database
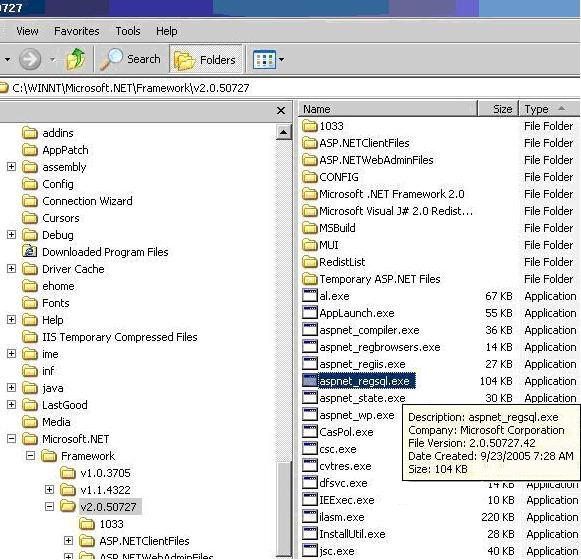
To create database, Microsoft has provided a tool/ utility called aspnet_regsql.exe that creates a database for us. This utility can be found in %windir%/Microsoft.Net/Framework/vx.x.xxxxx folder. Please see the image below:
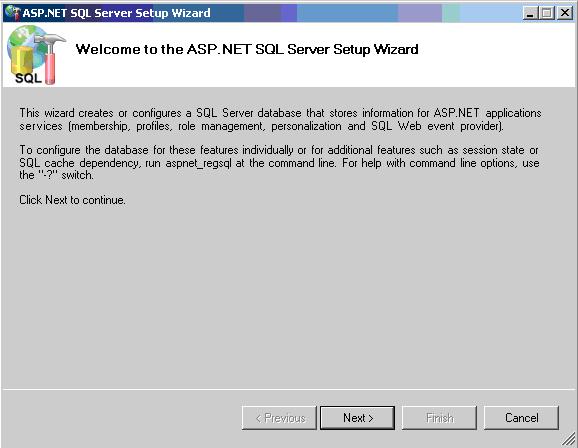
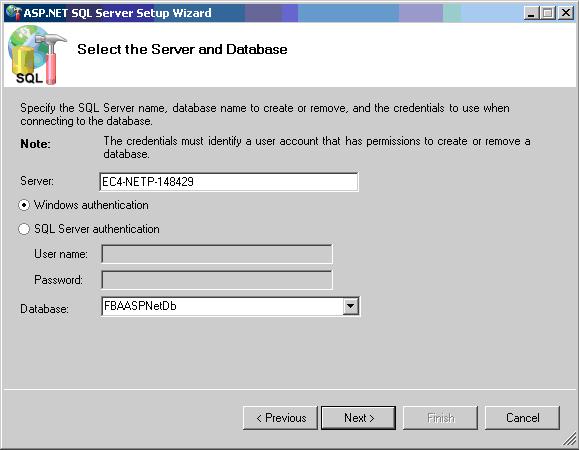
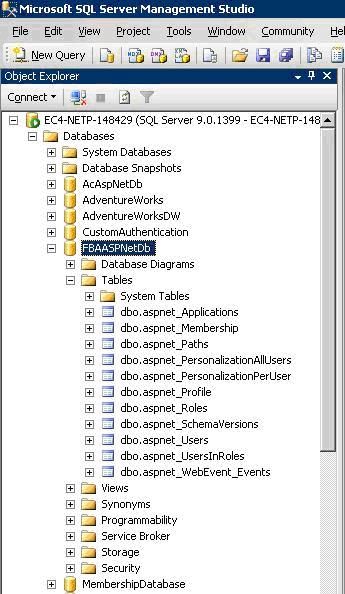
Executing aspnet_regsql.exe file will open ASP.Net SQL Setup wizardthat will walk through creating the ASP.Net 2.0 database. I have addedthe database name as FBAASPNetDb and configured it for windows authentication. Please see the image below:
Click on Next button. Please see the image below:
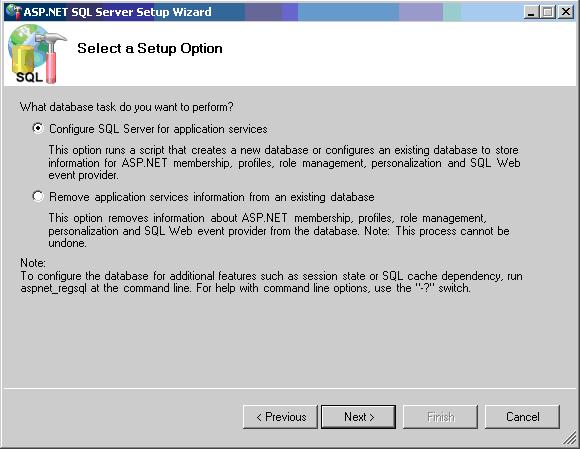
Select Configure SQL Server for application services option and click Next button. Please see the image below:
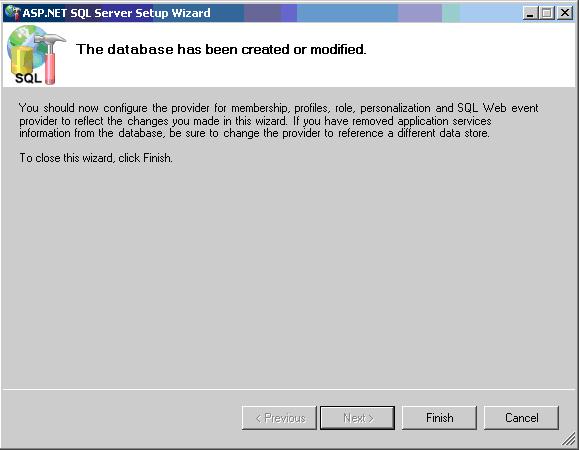
Click Next button. Now the database FBAASPNetDb is created successfully. Please see the image below:
Configure Membership and Role Providers
In the previous section,database is created successfully. Now we need to add a user in todatabase. Using ASP.Net Configuration Wizard, users can be added thedatabase. This can be achieved by creating web site that will allow usto add the users and roles and also ensure the database connectionstrings, membership and role providers are correctly configured beforewe bring Sharepoint in to equation.
Below steps explains creating web site and configuring membership and role providers and executing ASP.Net Configuration Wizard.
a) Open Visual Studio 2005 and select File � New � Web Site. In the New Web Site dialog, select the ASP.Net Web Site template and enter the location to store the web site files. Please see the image below:
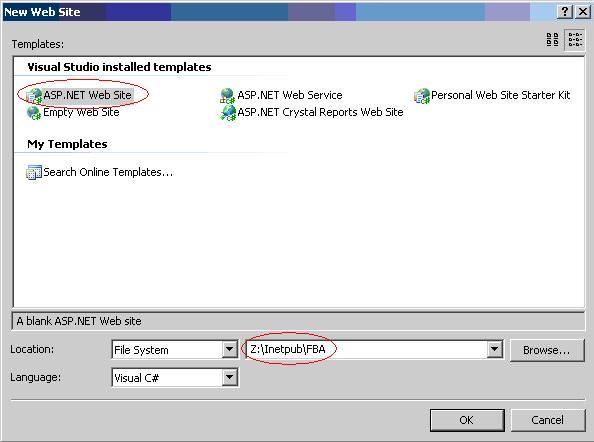
In the above image, location shows Z:/Inetpub/FBA. This is becauseSharepoint server root directory is mapped to my system as VisualStudio 2005 is not installed in server machine. You can choose anylocation whichever is comfortable for you.
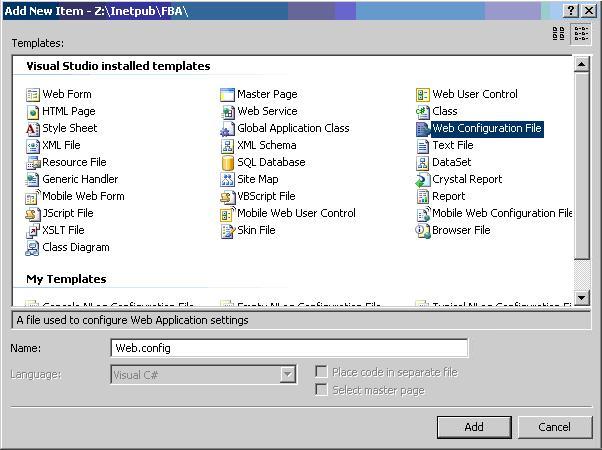
b) Add a new web.config file to web site project. Please see the image below:
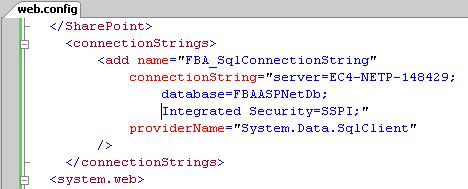
c) By default, you will see a <connectionStrings/> node within <configuration> node. Specify the connection string to the database which has been created in the previous section. Please see the image below:
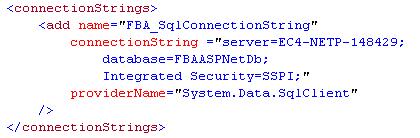
I have mentioned server as EC4-NETP-148429. This is the server in which SQL Server 2005 is installed. Please mention the respective server name.
d) After setting up the connection string, we need to specify themembership and role providers in the web.config file. In this article,I am using ASP.Net SQL Membership and Role providers. So specify theprovider's information within the <system.web> tag. Please seethe image below:
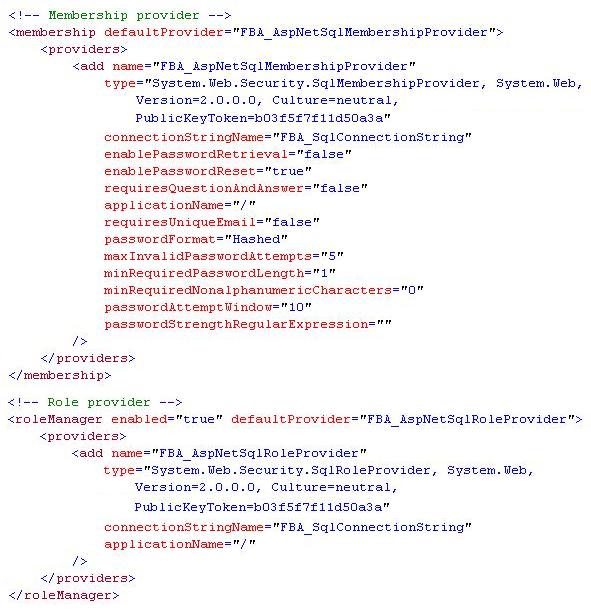
One thing we need to make sure that is, the provider name and connection stringattribute specified in the web.config file should not be same asspecified in the machine.config file. When we install .Net Framework2.0, default connection string and providers are specified in themachine.config file.
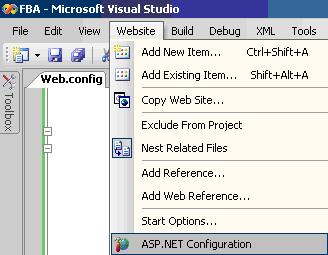
e) Save web.config file and launch the ASP.Net Configuration Wizard by clicking on Website � ASP.Net Configuration. Please see the image below:
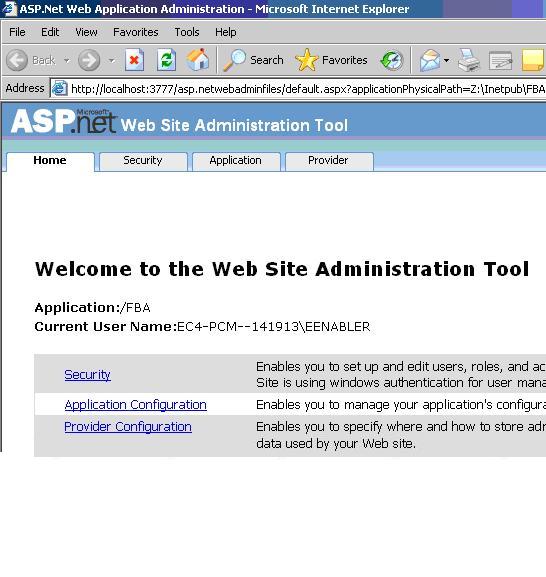
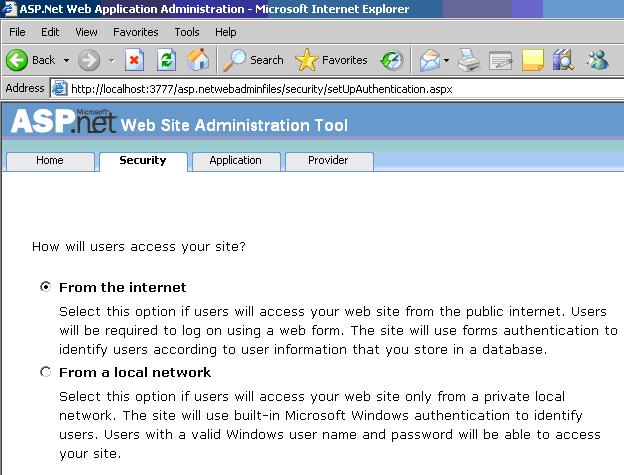
f) Set the authentication type in the above wizard. To do this, click Security link. In the Security tab, under Users section, click Select authentication type link. Select From the internet option and press Donebutton which is available in the bottom right corner. By selecting thisoption, which means that site will use form authentication to identifyusers. Please see the image below:
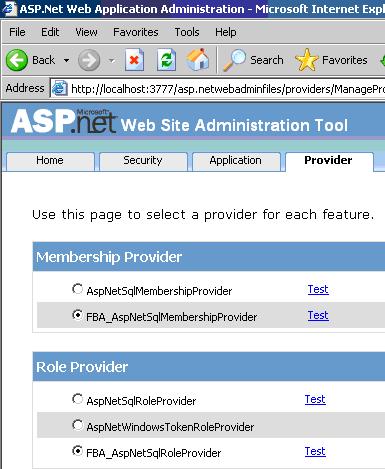
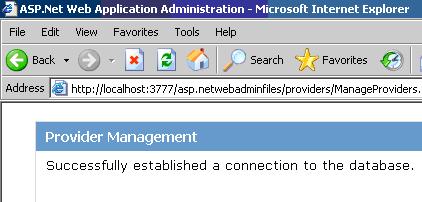
g) To test the membership and role providers, click on Provider tab. In the Provider tab, click on Select a different provider for each feature (advanced) link. Select right / correct membership and role provider and click Test link to ensure that providers are communicating to right database. Please see the image below:
At this point, we configured web.config file with connection stringand providers information. Also we tested the providers with thedatabase. Next section will explain adding users to database.
Create a User
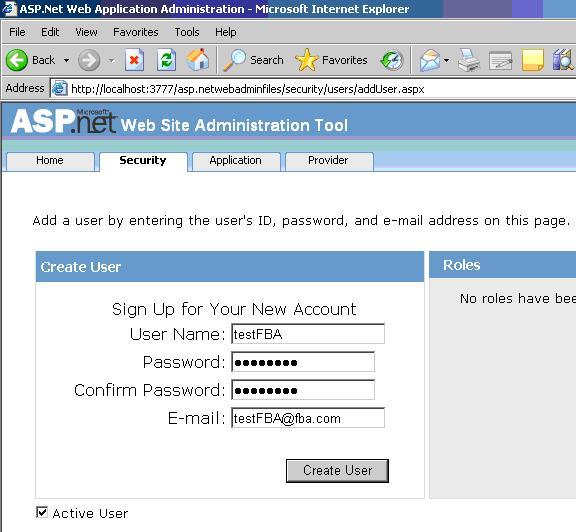
a) To add users, click on Security tab. In Security tab, under Users section, click Create user link. Here I am adding user as testFBA and password as password which will be used for testing form authentication later. Please see the image below:
Now we have created a user successfully. Do not worry about creating roles at this time and will be explained later.
Creating Web Applications
This section explains creating web application using SharepointCentral Administration. In this article I am creating two IIS websites; one is extranet site which will be used by the content ownersand configured to windows authentication. Another site is internet sitespecifically for internet users and configured to form authentication.Below section explains creating of two sites.
Creating extranet IIS Web site
Before creating new site, we need to create new web application.Below is the step by step information for creating new web application.
a) Click Start � All Programs � Microsoft Office Server � Central Administration.
b) In the Application Management tab, under Sharepoint Web Application Management section, click Crate or extend Web application link.
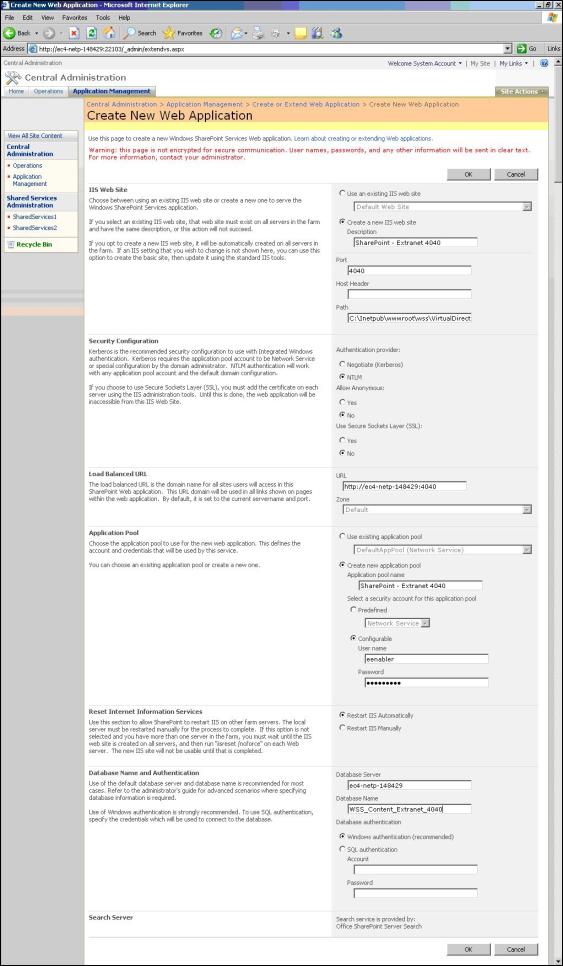
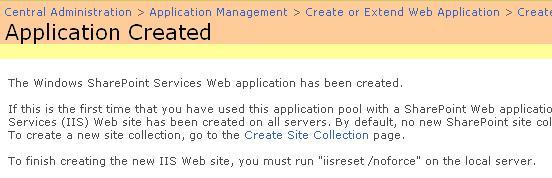
c) In Create or Extend Web Application page, click Create a new Web Application link. Provide the information to create new web application and click OK button. Please see the image below.
d) Create site under the above web application. To do this, in Application Management tab, under Sharepoint Site Management section, click Create site collection link.
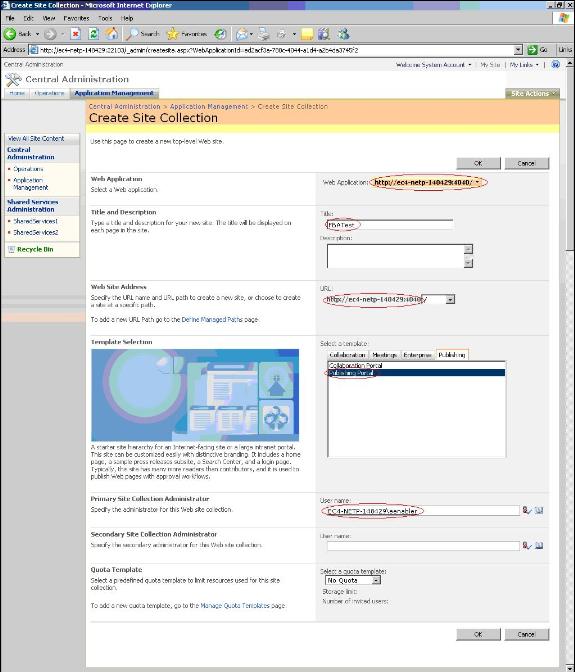
e) In Create Site Collection page, select the web application whichhave been created in the previous step and provide other information tocrate the site and click OK button. Please see the image below.
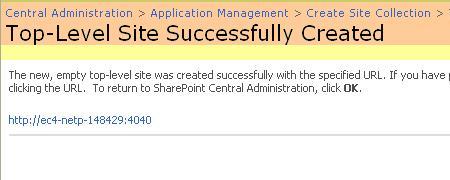
Now we created the web application and site successfully. Next section explains creating internet site.
Creating internet IIS Web site
This section explains extend our web application to another internetsite which has been created in the previous sections. This site is foranonymous or internet users.
a) Click Start � All Programs � Microsoft Office Server � Central Administration.
b) In the Application Management tab, under Sharepoint Web Application Management section, click Crate or extend Web application link.
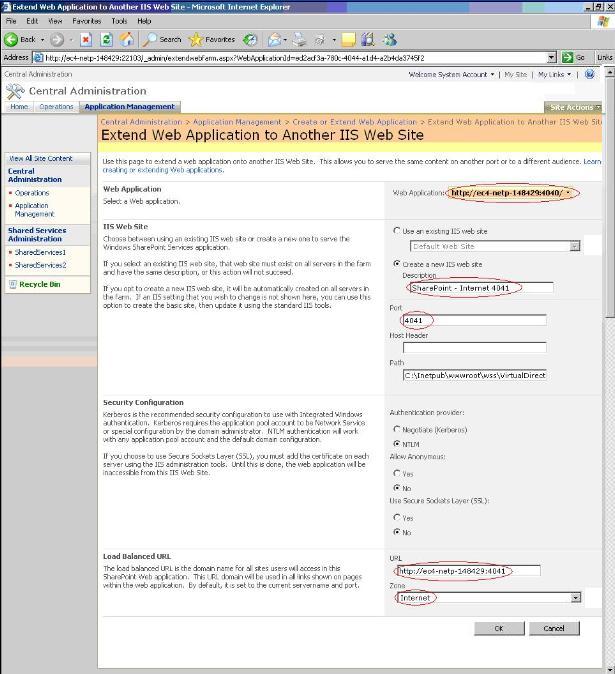
c) In Create or Extend Web Application page, click Extend an existing Web application link. Provide the information to extend the web application and click OK button. Please see the image below.
Now we have successfully created extranet and internet site. Below is the URL for these sites.
For extranet site: http://ec4-netp-148429:4040
For internet site: http://ec4-netp-148429:4041
Open the browser and testboth the site by typing the URL. But these two sites are asking aboutwindows authentication because these sites are not yet configured toform authentication.
Below section explains configuration of web.config file of each site with connection string and providers information.
Configure Web Application to communicate with Form Authentication Data Store
In this section, we are modifying the web.config file of two sites.Web.config file resides in the root directory of the site i.e. c:/Inetpub/wwwroot/wss/Virtual Directories. Under this, two folders i.e. 4040 and 4041 are available. Web.config file of specific site is available inside these folders.
Configure web.config file of extranet site
The web.config file of extranet site is available in c:/Inetpub/wwwroot/wss/VirtualDirectories/4040 folder.
a) Open web.config file, specify the <connectionStrings> node defined in the section 2.2.c just after the closing </SharePoint> tag and opening <system.web> tag. Please see the image below:
b) Add the membership and role provider node which is defined in thesection 2.2.d, just after opening the <system.web> tag. Pleasesee the image below:

c) Save the web.config file.
Configure web.config file of internet site
The web.config file of internet site is available in c:/Inetpub/wwwroot/wss/VirtualDirectories/4041 folder.
a) Open the web.config file and follow the same step specified in the Section 4.1
Configure SharePoint Central Administration
The web.config file of Central Administration site is available inc:/Inetpub/wwwroot/wss/VirtualDirectories/13035 folder. To find thevirtual directory open IIS. Under Web Site folder, find Sharepoint Central Administration v3. Right click to open properties. In the Properties pop up, click Home Directory tab and find the Local Path.
a) Open the web.config file and follow the same step specified in the Section 4.1
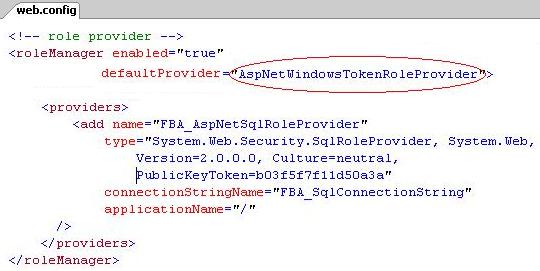
b) Here we need to very careful while specifying defaultProvider information for Role Provider. In the Role Manager attribute, add AspNetWindowsTokenRoleProvider as defaultProvider. This is necessary because Central Administration still uses Windows Authentication for the role provider. Please see the image below:
c) Save the web.config file.
Enable Form Authentication for Internet site
Enabling Form Authentication to internet site using CentralAdministration is very simple. Below steps explains the enabling formauthentication.
a) Browse to Central Administration web site. Select Application Management Tab.
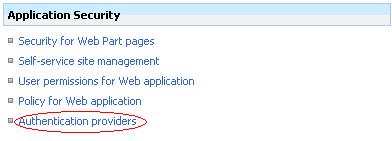
b) In the Application Management Tab, under Application Security section, click on Authentication Providers link. Please see the image below:
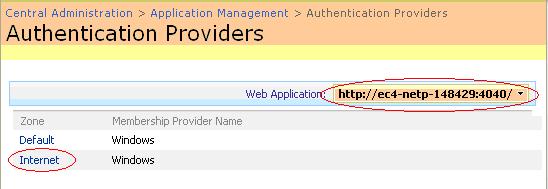
c) Select the Extranet Web Application. You could see Default and Internetzone for the extranet web application. In this we are configuring formauthentication for Internet application. Please see the image below:
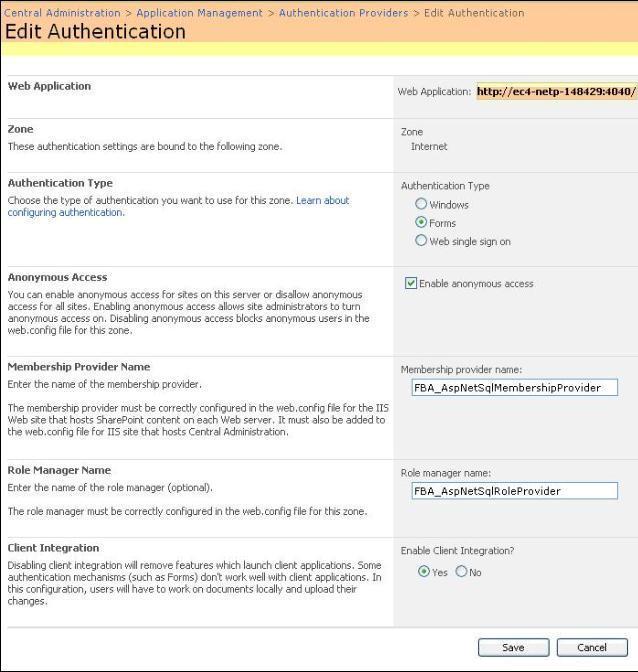
d) Click on Internet zone option. Edit Authentication page will open. Select Authentication Type as Forms. Check the enable anonymous access check box and provide membership and role manager name. After providing the information, click on Save button. Please see the image below:
Now we successfully enabled the form authentication for the internetsite. To prove form authentication is actually working with our datastore, we need to add the user to the site. Below step explains toadding user to site.
e) Browse to extranet web site. In our case it is http://ec4-netp-148429:4040
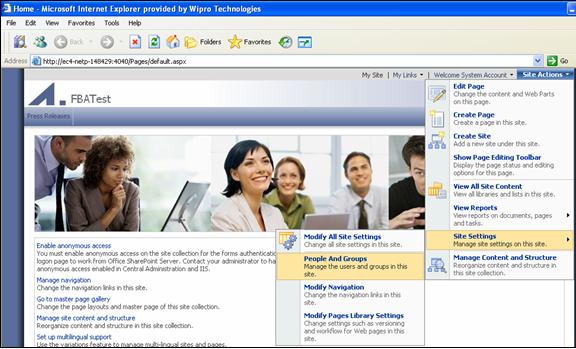
f) Click Site Actions � Site Settings � People And Groups. Please see the image below:
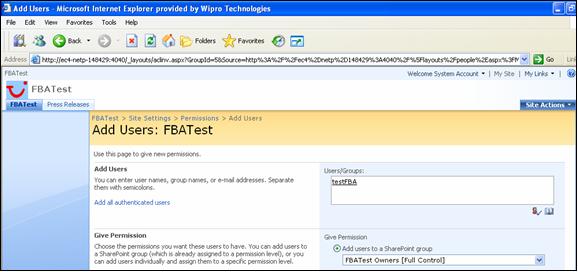
g) Click on New � Add User.
h) In the Add User page, enter user name as testFBA which we createdin the previous steps and provide the permission for the user. Pleasesee the image below:
Now we created a user and granted the permission successfully. Below steps explains testing form authentication.
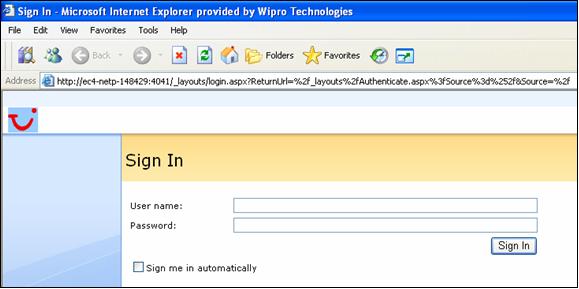
i) To test Form Authentication, Browse the internet site. In our case it is http://ec4-netp-148429:4041
j) Now system will redirect to Sign In page. Please see the image below:
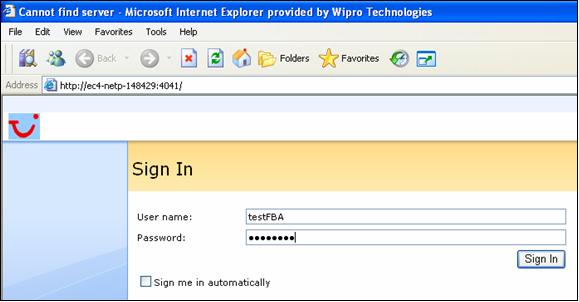
k) Enter testFBA as user name and password as password and click on Sign In button. Please see the image below:
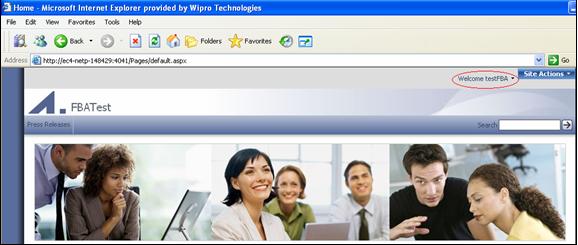
Now we successfully log in into internet site with form authentication.
Author
Nagendra Gunaga is having 5.8 years of experience in IT industry.His experience is in .Net Framework, C#.Net, ADO.Net, ASP.Net, SQLServer and Microsoft Office SharePoint Server.
License
Thisarticle has no explicit license attached to it but may contain usageterms in the article text or the download files themselves. If in doubtplease contact the author via the discussion board below.
A list of licenses authors might use can be found here
About the Author
NagendraGunaga

Team Leader
- Form Authentication for MOSS 2007 Site
- MOSS 2007 Site migrate MOSS 2010
- FullTextQuery for Moss At specify Site
- MOSS 2007 Publishing web site definition template – onet.xml – syntax for properties and getting the right content types
- Creating a custom Site Definition in MOSS 2007
- Moss配制Form认证
- ASP.NET Authentication - Form Authentication
- form based authentication
- J2EE Form-based Authentication
- 关于Moss 2007 Form认证的随笔,一定要使用FORM认证吗?
- ASP.NET Form Authentication - Membership Authentication
- 配置Android环境 SDK提示Site Authentication
- MOSS 2007
- ASP.NET Form Authentication - Form Authentication With Directory
- Asp.net 2.0 Form Authentication
- Authentication failed for
- 转载:WSS 3.0与Form Server 2007、MOSS 2007各版本功能对比
- 转载:WSS 3.0与Form Server 2007、MOSS 2007各版本功能对比
- Android的第一个应用
- 表空间查询和扩展
- 会話用語
- 微笑面对
- Flex之数据格式化
- Form Authentication for MOSS 2007 Site
- Linux Perforce(P4)客户端使用
- jboss 的端口修改位置总结
- 在Asp.Net项目中应用Jquery.validation时遇到的一个问题
- 夜深人静
- 现在的就业形式还可以
- PHP大型网站的架构实例分析
- javascript 选择文件夹
- 怎么实现网络分发txt文件