006.设计模式之Singleto模式
来源:互联网 发布:战争雷霆e100数据 编辑:程序博客网 时间:2024/04/30 20:24
006.设计模式之Singleto模式
场景:
在一些涉及到硬件的系统中, Singleton模式可以使用. 例如打印程序中, 一般连接一台打印机, 那我程序中应该有一个打印机对象, 我们可以使用一个全局对象代表打印机, 但为了更好的确保不重复声明打印机对象, 那我就使用Singleton模式.
又例如线程池, 内存池, 连接池等, 一般系统一个池就够了, 也可以使用Singleton模式.
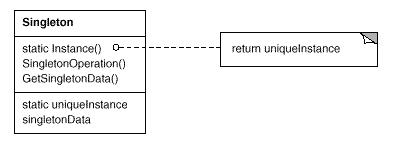
Singleton 模式
保证一个类仅有一个实例,并提供一个访问它的全局访问点。
适用性 当类只能有一个实例而且客户可以从一个众所周知的访问点访问它时。
当这个唯一实例应该是通过子类化可扩展的,并且客户应该无需更改代码就能使用一个扩展的实例时。
很简单, 对某个类来说, 在系统运行期, 最多只能同时有一个对象存在, 就采用该模式.
例如一些硬件, 系统只连接一个硬件, 如果产生了该硬件的多个对象可能会产生冲突.
实现方法:
在C++中, 通过把构造函数和析构函数私有, 并使用一个静态函数来返回该类唯一对象.
有两种实现方法:
// 方法1
// 该方法的特点就是在第一次调用的时候对象才产生, 但由于使用静态对象, 所以在系统退出的时候对象才被释放.
// 该方法不需要考虑对象的释放问题. 如果该对象不是太占用资源或者使用非常频繁的话, 可以使用该方法.
// 方法2
// 该方法使用new对象, 可以随时释放.
// 所以该方法要注意对象的释放, 如果对象很占用资源的话, 可以使用该方法, 在需要的时候new出来, 再不需要的时候释放它.
角色
…
使用
…
说明:
代码:
…
#include "stdafx.h"
#include <iostream>
#include <memory>
// 该方法在这个实例不太占用资源时
// 或者调用很频繁时使用比较好.
////////////////////////////////////////////////////////////////////////////
class Singleton_One
{
private:
Singleton_One(){}
~Singleton_One(){}
public:
static Singleton_One& GetSingleton()
{
static Singleton_One s_instance; // 通过这个实现单个实例
return s_instance;
}
void DoSomething()
{
std::cout << "Singleton Do Something!";
}
};
////////////////////////////////////////////////////////////////////////////
// 方法
// 该方法是new出来的, 可以手动释放
// 但你需要主动释放,
// 增加一个智能指针, 就可以不手动释放, 并且可以随时释放.
// 其实智能指针是另外一个模式.
class Singleton_Two
{
private:
Singleton_Two(){}
~Singleton_Two(){}
static Singleton_Two* s_instance;
public:
static Singleton_Two* GetSingleton()
{
if (!s_instance)
{
s_instance = new Singleton_Two();
}
return s_instance;
}
void DoSomething()
{
std::cout << "Singleton Do Something!";
}
void Release()
{
if(s_instance)
{
delete s_instance;
s_instance = NULL;
}
}
};
Singleton_Two* Singleton_Two::s_instance = NULL;
//////////////////////////////////////////////////////////////////////
// 方法智能指针版
// 有了智能指针, 你可以随时的释放该对象, 如果忘记了, 在系统退出的时候也会释放.
class Singleton_Two_Ex
{
private:
Singleton_Two_Ex()
{
std::cout << "create Singleton_Two_Ex" << std::endl;
}
~Singleton_Two_Ex()
{
std::cout << "delete Singleton_Two_Ex" << std::endl;
}
friend std::auto_ptr<Singleton_Two_Ex>;
static std::auto_ptr<Singleton_Two_Ex> s_instance;
public:
static Singleton_Two_Ex* GetSingleton()
{
if (s_instance.get() == 0)
{
s_instance.reset(new Singleton_Two_Ex());
}
return s_instance.get();
}
void DoSomething()
{
std::cout << "Singleton Do Something!" << std::endl;
}
void Release()
{
if(s_instance.get() == 0)
{
s_instance.reset(0);
}
}
};
// 这里要注意智能指针的实现, 就怕它在里面new Singleton_Two_Ex
std::auto_ptr<Singleton_Two_Ex> Singleton_Two_Ex::s_instance;
// 方法的使用智能指针的模板版本
// 该版本可以把Singleton模式与具体的类的逻辑分开.
// 简单就好
template<class T>
class SingletonT : public T
{
public:
static SingletonT< T >* GetSingleton()
{
if (s_instance.get() == 0)
{
s_instance.reset(new SingletonT< T >());
}
return s_instance.get();
}
void Release()
{
if(s_instance.get() == 0)
{
s_instance.reset(0);
}
}
private:
SingletonT(){};
~SingletonT()
{
};
SingletonT(const T&);
SingletonT& operator=(const T&);
friend std::auto_ptr<SingletonT< T > >;
static std::auto_ptr<SingletonT< T > > s_instance;
};
template<class T>
std::auto_ptr<SingletonT< T > > SingletonT<T>::s_instance;
class CTest
{
private:
CTest()
{ }
~CTest()
{
std::cout << "CTest析构" << std::endl;
}
friend SingletonT< CTest>; // 注意这里
public:
void DoSomething()
{
std::cout << "模板测试" << std::endl;
}
};
int _tmain(int argc, _TCHAR* argv[])
{
// 方法使用
Singleton_Two_Ex* p = Singleton_Two_Ex::GetSingleton();
p->DoSomething();
// 模板法使用
SingletonT<CTest> *refT = SingletonT<CTest>::GetSingleton();
refT->DoSomething();
refT->Release();
return 0;
}
看工程006Singleton.rar
http://download.csdn.net/source/2850430
总结:
1. 注意问题
C++并没有规定不同编译单元(translation unit,简单说就是一个可编译的cpp文件)中static对象的初始化顺序。如果一个程序中有多个Singleton对象,那么这些Singleton对象的析构顺序也将是任意的。很显然,当多个Singleton对象有依赖关系时,smart pointer根本无法保证Singleton的析构顺序(增加手动析构可以解决问题)。
msdn中对atexit描述如下:
The atexit function is passed the address of a function (func) to be called when the program terminates normally. Successive calls to atexit create a register of functions that are executed in last-in, first-out (LIFO) order. The functions passed to atexit cannot take parameters. atexit use the heap to hold the register of functions. Thus, the number of functions that can be registered is limited only by heap memory.
需要说明的是atexit并不比smart pointer好多少,LIFO的保证对于有复杂依赖关系的多个Singleton依然束手无力,但是用atexit替换smart pointer却是必须的,它是设计完美Singleton的基础。
#如果你疑惑atexit为什么还是不行,请考虑下面的情况:
NOTE:下面的情况在Modern C++ Design中叫做KDL(Keyboard,Display,Log)problem。
某个程序中使用了如下3个Singleton:Keyboard,Display,Log。Keyboard和Display分别对应于计算机的键盘和显示器,Log用来记录错误信息。假设当Keyboard和Display的构造函数和析构函数出现错误时会调用Log记录错误信息,并且构造和析构导致的任何错误都会终止程序。
在程序启动时,如果Keyboard构造成功,Display构造失败,很显然在Display的构造函数中将会构造Log而且失败信息会被Log记录,根据假设这时候程序准备退出,atexit注册的函数将会按LIFO的顺序被调用。因为Keyboard先于Log构造,所以Log先于Keyboard析构,但是当由于某种原因Keyboard在析构时失败,想要调用Log记录错误信息时,Log早已被销毁,则Log::Instance()将会导致未定义行为。
# atexit的严重问题:
从上面的例子可以看出,atexit和smart pointer相比仅仅是有LIFO的保证而已,这样的保证貌似也不怎么有效,因为atexit跟smart pointer一样也无法解决KDL probleam。
atexit由于LIFO带来了另外的问题,看下面的代码:
#include <cstdlib>
void Bar() { ... }
void Foo()
{
std::atexit(Bar);
}
int main()
{
std::atexit(Foo);
return 0 ;
}
上面的小段代码用atexit注册了Foo,Foo调用了std::atexit(Bar)。当程序退出时,根据atexit的LIFO保证,Bar在Foo之后注册,因此Bar应该在Foo之前调用,但是当Bar注册的时候Foo已经调用了,Bar根本就没有机会能够在Foo之前调用。这明显自相矛盾对吧,没办法,C++标准好像忽视了这一点,因此如果类似代码被调用,肯定不会有什么好的结果,好一点是resource leak,差一点估计程序就崩溃了!!!
atexit的这个问题跟Singleton有关系吗?当然有,如果在一个Singleton的析构函数中调用atexit就会出现上述问题。即在KDL problem中,如果Keyboard和Display都构造成功,当Keyboard或Display任意一个析构失败时,Keyboard或Display在析构函数中会构造Log,Log的构造函数会间接调用atexit。oops!!!,可怕的未定义行为。
看到这里你一定对atexit相当失望,貌似它带来的好处多于坏处。但是请你相信,如果适当设计,atexit在后面的Singleton改造中会起到很重要的作用。
用atexit后的代码:
// Header file Singleton.h
class Singleton
{
public :
static Singleton& Instance() // Unique point of access
{
if (0 == _instance)
{
_instance = new Singleton();
atexit(Destroy); // Register Destroy function
}
return * _instance;
}
void DoSomething()
{}
private :
static void Destroy() // Destroy the only instance
{
if(_instance != 0)
{
delete _instance;
_instance = 0 ;
}
}
Singleton(){} // Prevent clients from creating a new Singleton
~Singleton(){} // Prevent clients from deleting a Singleton
Singleton(const Singleton&); // Prevent clients from copying a Singleton
Singleton& operator=(const Singleton& );
private :
static Singleton *_instance; // The one and only instance
};
// Implementation file Singleton.cpp
Singleton* Singleton::_instance = 0;
你有没有仔细考虑过Destroy中的_instance = 0;这一行代码,上述代码实际上实现的是不死鸟模式(The Phoenix Singleton),所谓不死鸟,就跟一辉一样可以死而复生。上面的代码可以解决本文最早提出的KDL problem,即如果Keyboard析构失败,虽然Log已经析构,但是由于Destroy中的_instance = 0;这一行代码,Log::Instance()将会创建一个新的Log对象,程序将会表现良好。当然了,Phoenix Singleton仅能用于无状态的Singleton,如果Log需要保存某些状态,Phoenix Singleton也不会带来任何好处。你当然可以用某些方法维持Phoenix Singleton的状态,但是在做之前先想想看是否值得,维持状态可能会使Singleton变得特别复杂。
上面的Phoenix Singleton已经可以满足大部分需要,如果你的Singleton没有涉及到多线程,多个Singleton之间也没有依赖关系,你大可以放心使用。但是如果你用到多线程,或者你的Singleton关系如KDL般复杂,或者你觉得对每一个Singleton都敲同样的代码让你厌烦。在后面几篇会有一个多线程安全的,能够解决多个Singleton依赖关系的,基于模板的Singleton实现。
有一点深奥!!!!!!!!!!!!!!!!! 看似该模式很简单, 但也可以很复杂.
项目应用
在涉及到独占, 硬件的时候都可以使用Singleton模式, 但涉及到有多个Singleton时 而且他们存在依赖关系时, 会有点复杂, 视实际情况.
在涉及到多线程应用时, 你可以加入一个锁做互斥操作(应该要注意锁的粒度尽量的小), 具体的所与系统有关(boost好像也有多线程了)
有人说为了避免错误
static Singleton *_instance; // The one and only instance
在这句增加 volatile 修饰符, 我觉得可以.
// 别人实现 感觉是不是想复杂了?
/*解六*/
class Singleton
{
public:
static Singleton &Instance()
{
if( !m_pInstatnce)
{
Lock(m_mutex);
If( !m_pInstance )
{
if(m_destroyed)
OnDeadReference();
else
Create();
}
UnLock(m_mutex);
}
return *m_pInstance;
}
private:
static volatitle Singleton *m_pInstatnce;
static bool m_destroyed;
private:
Singleton();
Singleton(const Singleton&);
Singleton& operator=(const Singleton&);
~Singleton()
{
m_pInstance = 0;
m_destroyed = true;
}
static void Create()
{
static Singleton sInstance;
m_pInstanace = &sInstance;
}
static void OnDeadReference()
{
Create();
new (m_pInstance) Singleton;
atexit(KillPhoenixSingleton);
m_destroyed = false;
}
void KillPhoenixSingleton()
{
m_pInstance->~Singleton();
}
}
Singleton *Singleton:m_pInstatnce = NULL;
bool m_destroyed =false;
引用:
http://blog.csdn.net/tianhai110/archive/2008/02/24/2118048.aspx
http://www.1-100.org/other/41844.htm
http://blog.sina.com.cn/s/blog_48db23f6010006zp.html
http://blog.chinaunix.net/u2/63316/showart_2103905.html
- 006.设计模式之Singleto模式
- 【剑指offer】面试题2:实现Singleto模式 java
- 006.设计模式之模板模式
- 【设计模式】设计模式之适配器模式
- 【设计模式】设计模式之外观模式
- 【设计模式】设计模式之工厂模式
- 设计模式之FlyWeight模式
- 设计模式之command模式
- 设计模式之proxy模式
- 设计模式之Singleton模式
- 设计模式之Builder模式
- 设计模式之观察者模式
- 设计模式之 Command 模式
- 设计模式之创建模式
- 设计模式之结构模式
- 设计模式之工厂模式
- 设计模式之Facade模式
- 设计模式之Adapter模式
- 关于socket阻塞与非阻塞情况下的recv、send、read、write返回值
- JBI个人理解(一)
- 有用的地址汇总
- 26个Jquery使用小技巧(jQuery tips, tricks & solutions)
- oracle-sql基本操作1
- 006.设计模式之Singleto模式
- automake 生成目标, 关闭调试信息
- 卸载时保留用户文件夹
- 成大事必备9种能力、9种手段、9种心态分享
- linux下常用软件
- oracle中限制指定用户的连接数
- Linux设备驱动程序学习(1)-字符设备驱动程序
- 网络攻击之基于ARP欺骗的网络攻击程序源码
- tuxedo 错误号及错误信息描述