自定义callouts part 2
来源:互联网 发布:房地产经济评价软件 编辑:程序博客网 时间:2024/04/29 13:16
前一篇是part1, part2在自定义的view上加了一些uiimageview与uibutton.请看原文。

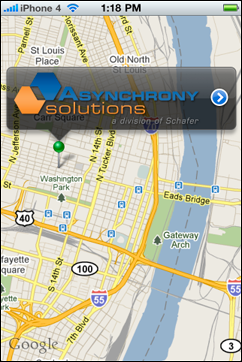
Part 1 showed how to build a custom map callout that provides more content flexibility than the native callout, but maintains the expected look and behavior. In part 2 we will add a very common element of the map interface into our custom callout – the accessory button. At first glance this seems simple: just add a button to the callout. However, MapKit intercepts touch events and causes undesired callout behavior. The code used to add an accessory button is also applicable to any other button(s) or responders you may want to add to a callout, giving you the flexibility to do what you feel is best for your users.
Add the Button
We will begin by adding the button as we normally would, to see this behavior in action. This will be done by creating a subclass of the custom callout from part 1. Notice the attempt to call the standard callback for an accessory tap in calloutAccessoryTapped.
We will also implement that callback in the map view delegate. Normally a new view would be pushed on to the navigation stack at this point, but for this example it will be simpler to just display an alert.
Prevent Deselection of the Parent Annotation
If the button is tapped now, the alert will be displayed, but the callout is removed because the touch event also caused the parent annotation to be deselected just as if the button were not there. To solve this problem, we will have to disable selection changes on the parent annotation and make a small change to mapView:didDeselectAnnotationView: in the mapView delegate.
First off, we need to subclass MKPinAnnotationView (or MKAnnotationView if using a custom annotation) to add a preventSelectionChange property and override setSelected:animated:.
When the button is tapped, the callout needs to set the new preventSelectionChangeproperty to YES and set it back to NO a short time later (1 second seems to be a good delay for this call). This needs to be done before the typical touch event callbacks are invoked so we will override hitTest:withEvent:. Also, The mapView keeps track of which annotations are selected, so when selection changes on the parent are re-enabled, the map view needs to be forced to select the annotation again.
Even though the selection change is disabled on the parent annotation view, the map view will still invoke the delegate method mapView:didDeselectAnnotationView:. Add an additional condition to the if-statement to prevent removal when the annotation view is not allowing selection changes.
Prevent Selection of Other Annotations
With the above code, the callout now behaves as expected in most situations; however, if another annotation happens to be under the button, it will be selected. The simplest way to solve this is to disable all the annotation views on the map except the custom callout and the parent annotation. We can find all of the other annotation views by getting the subviews of the superview of the callout, and checking that they inherit from MKAnnotationView. Also, they must be re-enabled a short time later (again, a 1 second delay works well).
Conclusion
Now the Custom Map Callout is complete. Using the code and concepts presented in this post and Part 1, you have the tools to build callouts that fit your needs. With minor adjustments to this code, you can add multiple buttons, implement a callout with adjustable width, or change the look of the callout to match your application’s style.
You may download the full source code to see a working example.
- 自定义callouts part 2
- 自定义callouts part 1
- Web Part 教程--自定义 Web Part
- Asp.Net MVC 视图(创建自定义HTML Helpers) - Part.2
- 创建自定义 AngularJS 指令:Part 2 孤立作用域
- Processing Notify Callouts
- Processing Classify Callouts
- MS CRM Callouts Tip - 在Callouts中调用log4net
- MS CRM Callouts Tip - Avoid Dead Loop in Callouts
- MS CRM Callouts Tip - 在Callouts中调用log4net
- MS CRM Callouts Tip - 在Callouts中调用log4net
- MS CRM Callouts Tip - 在Callouts中调用log4net
- 源码-Oracle数据库管理-第十六章-异常处理机制-Part 2(自定义异常)
- [Android Exercise]仿微信游戏界面PART.2—自定义样式shape和selector的应用
- 创建自定义 AngularJS 指令:Part 5 link
- LaTex(PART XIII)\newcommand自定义命令
- MS CRM Callouts Tip - Debug and Development
- J2EE clustering part 2
- 激活后台运行程序的窗口
- EditPlus格式化代码(js,css)
- 情人节?癫痫日?大家快乐就好。
- ORA-12560: TNS: 协议适配器错误的解决方法
- 手动封装系统
- 自定义callouts part 2
- Java中Integer
- 我看出来了,你们个个都身怀绝技!
- ShapeFile格式文件说明
- 【转载】document.createElement()的用法
- javascript object的classid收集
- html自动换行的小问题
- 如何面对“人生的困境”
- 两个问题:ie+ajax 和 ie+getElementsbyname


