SQL Data Comparison with Visual Studio 2010
来源:互联网 发布:royce巧克力淘宝假货 编辑:程序博客网 时间:2024/05/22 05:00
SQL Data Comparison with Visual Studio 2010
By: Arshad Ali -- 8/23/2010
Rating:
Problem
In my last tip "SQL Schema Comparison with Visual Studio 2010", I showed how to compare schema objects, synchronize them or get incremental deployment scripts. This is good way to synchronize the schema objects between two different environments, but we also often need to compare and synchronize the data that tables (which have the same structure) contain. For example we normally define some master data in a development environment during development and would like the same data to be deployed/inserted/updated to Test/QA/UAT/Production environments after development. So how can we do this, how we can compare data of the tables between different databases and generate data synchronization or incremental data deployment scripts?
Solution
Although there are several different tools available for data comparison (some you need to purchase and some are free) I am going to discuss the Microsoft Visual Studio Database edition for data comparison.
Microsoft Visual Studio Database edition offers several features for database development, for example you can create a database project which is nothing but an offline representation of a database for database development and version control, Database Unit Testing, Code Analysis, Schema Comparison, Data Comparison etc. In this demonstration I am going to show how Data Comparison works on Visual Studio 2010 Ultimate edition although you can do the same with Visual Studio 2005/2008 Database edition too.
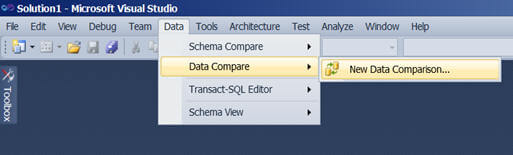
Open the Microsoft Visual Studio IDE (Integrated Development Studio) and you will see a "Data" menu in the menu bar depending on the Microsoft Visual Studio edition you have installed (for more details click here). Select Data Compare under Data menu and then New Data Comparison as shown below.
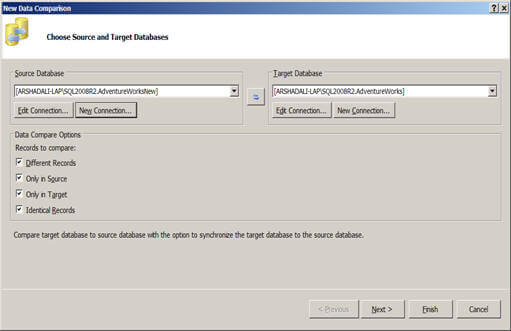
You will see a dialog box like this, here you need to specify your source and target database (for which you need to set up a connection to your SQL Server instance). And next you can specify the data comparison options, for example do you want to list all the different records on the result screen or/and records which only exist in source or/and records which only exist in target or/and identical records between source and target. Click on Next to move ahead in the wizard.
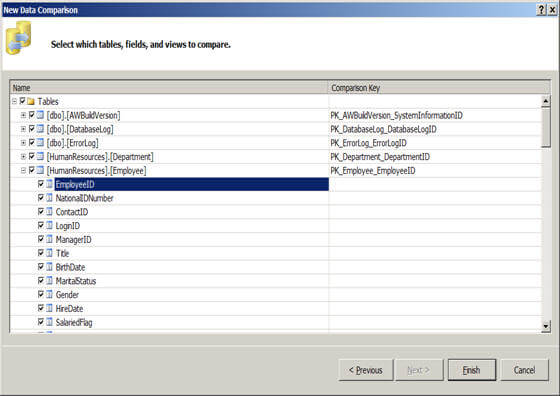
On the next screen you can select which tables or views you want to be considered during the data comparison, also you can individually select the columns which you want to be part of the comparison as you can see below. The source and target tables/views must have a primary/unique key which is used as a comparison key during the data comparison. If the table/view has multiple indexes you can select which one will be considered as the comparison key here also.
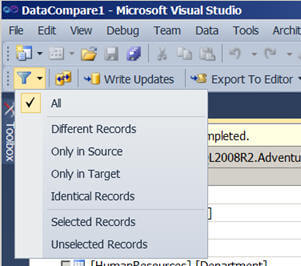
The moment you click on the Finish button in the above screen, it will start doing the data comparison for the selected objects and finally will show the comparison result. You will notice a new tool bar on top, some of the options of this new tool bar are: you can filter out the data comparison result as you can see in the image below, you can synchronize your target tables' data by writing updates to it, you can export your data synchronization/incremental update script to a file or to the editor.
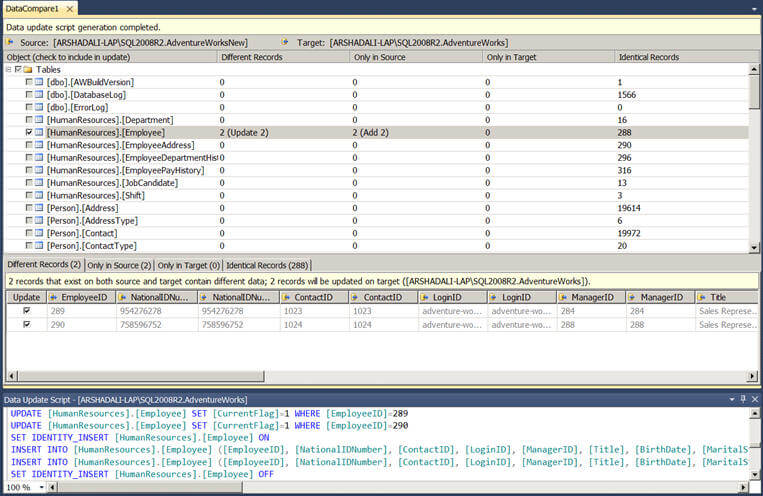
The data comparison result screen will look like the image shown below. On the top pane there are five columns; the first column shows the name of the objects considered in the comparison, second column tells the number of different records between source and target, third column tells the number of records which only exist in source likewise the fourth column gives the number of records which only exist in target and finally the fifth column gives the total number of identical records between source and target.
The next pane has four different tabs, if you notice in the "Different Records" tab the first column "Update" is a check box which you can select/unselect to consider that record in synchronization, next you will see the primary/unique key and then later on all the columns appear twice, the first appearance shows the column value from the source and the second appearance shows the column value from the target. This way you can easily see/compare the changes.
The bottom pane shows the target database data update script depending on the basis of the selection you used above. As you can see, I have two updates and two new records at the source and the scripts appear in this pane. If you are not able to see it or want to refresh it, click on the "Refresh Update Script" icon on the toolbar to display or to refresh the changes.
Note:
- To compare data between source and target you need to have a primary/unique key or unique constraints on both tables i.e. on source and target tables.
- Your table might have primary key along with other unique keys, so you can select which key you would like to use as the comparison key in the second page of the wizard.
- The name, owner and structure must be the same for both source and target tables to appear on second page of the wizard for data comparison.
- Even though SQL Server is case-insensitive, by default, the data comparison is case sensitive when considering name and owner of the table/view.
- SQL Data Comparison with Visual Studio 2010
- SQL Schema Comparison with Visual Studio 2010
- OpenCV 2.1.0 with Visual Studio 2010
- integrate stlport with visual studio 2010
- Compiling Lua with Visual Studio 2010
- Debug VBScript with Visual Studio
- Installing FLTK with Visual Studio
- Programmatic Code Coverage Data Merging in Visual Studio 2010
- Visual Studio 2010生成SQL Server测试数据
- Remote Data Access Synchronization with SQL Server 2005 Compact Edition and Visual C#.NET
- OpenCV 2.1.0 with Visual Studio 2010(1)
- OpenCV 2.1.0 with Visual Studio 2010(2)
- can't use QT_VS_Addin 1.1.9 with Visual Studio 2010
- [ZZ]How To Compile Qt 4.7 with Visual Studio 2010
- Setting up DirectX 11 with Visual Studio 2010
- Visual Studio 2010 环境下 配置LibCurl with SSL 方法
- Windows 7 Native Development with Visual Studio 2010
- can't use QT_VS_Addin 1.2.1 with Visual Studio 2010
- 生成条形码代码
- 外语学习的真实方法及误区(转)
- SQL Schema Comparison with Visual Studio 2010
- hibernate id 映射配置
- Tuning Nagios For Maximum Performance
- SQL Data Comparison with Visual Studio 2010
- mysql的三种安装方式:RPM 二进制包和源代码
- 对话框的隐藏
- Linux指令积累
- (转)struts2的零配置
- ASP.NET中的callback实现机制总结
- 接口 interface
- PopMenu效果的学习
- 数据库Backup/restore, 数据库同步, 数据库比较(Schema,Data)