android 3D 游戏实现之人物行走(MD2)
来源:互联网 发布:java中的同步方法 编辑:程序博客网 时间:2024/04/30 23:30
如果充分理解了HelloWorld(见android 3D 游戏实现之First step),了解了一些JPCT-AE游戏框架的机制,
那么,这个示例可以是进阶篇了,其实用JPCT-AE加载3DS,MD2文件都很简单了,主要是掌握一些基本的操作,
今天我先把怎么实现加载MD2文件的代码附上,明天我再传上如果实现载入3DS及3DS KeyFrame动画的代码附上。
此程序所需的纹理贴图及MD2文件请从http://download.csdn.net/user/Simdanfeg处下载
下面附上源程序(呵呵,很Cool^_^)
(1)Activity源码
package sim.feel; import java.io.IOException;import java.io.InputStream; import android.app.Activity;import android.content.res.AssetManager;import android.content.res.Resources;import android.graphics.Bitmap;import android.graphics.BitmapFactory;import android.opengl.GLSurfaceView;import android.os.Bundle; public class LoadM extends Activity {private GLSurfaceView glView;private MyRenderer mr; @Overridepublic void onCreate(Bundle savedInstanceState) {super.onCreate(savedInstanceState);// 加载图片LoadImage.loadi(getResources());// 加载文件new LoadAssets(getResources());glView = new GLSurfaceView(this);mr = new MyRenderer();glView.setRenderer(mr);setContentView(glView);}} // 载入纹理图片class LoadImage {public static Bitmap bitmap; public static void loadi(Resources res) {bitmap = BitmapFactory.decodeResource(res, R.drawable.disco);}} // 载入Assets文件夹下的文件class LoadAssets {public static Resources res; public LoadAssets(Resources resources) {res = resources;} public static InputStream loadf(String fileName) {AssetManager am = LoadAssets.res.getAssets();try {return am.open(fileName, AssetManager.ACCESS_UNKNOWN);} catch (IOException e) {return null;}}}
(2)MyRenderer类代码
package sim.feel;import javax.microedition.khronos.egl.EGLConfig;import javax.microedition.khronos.opengles.GL10;import android.opengl.GLSurfaceView.Renderer;import com.threed.jpct.FrameBuffer;import com.threed.jpct.Loader;import com.threed.jpct.Object3D;import com.threed.jpct.RGBColor;import com.threed.jpct.Texture;import com.threed.jpct.TextureManager;import com.threed.jpct.World;public class MyRenderer implements Renderer {// 纹理数组private String[] textures = { "disco" };// scaleprivate float thingScale = 0.8f;// world对象private World world;// FrameBuffer对象private FrameBuffer fb;// Object3Dprivate Object3D snork;// 行走动画private int an = 2;private float ind = 0;/*** 绘制到屏幕上*/public void onDrawFrame(GL10 gl) {doAnim();// 以蓝色清除整个屏幕fb.clear(RGBColor.BLACK);world.renderScene(fb);world.draw(fb);fb.display();}public void onSurfaceChanged(GL10 gl, int width, int height) {if (fb != null) {fb = null;}fb = new FrameBuffer(gl, width, height);}public void onSurfaceCreated(GL10 gl, EGLConfig arg1) {world = new World();world.setAmbientLight(150, 150, 150);// 将所有纹理添加到所定义的纹理数组中,此程序只有一个,所以为txtures[0]for (int i = 0; i < textures.length; i++) {TextureManager.getInstance().addTexture(textures[i],new Texture(LoadImage.bitmap));}// 从assets文件夹中读取snork.md2文件snork = loadModel("snork.md2", thingScale);// 旋转snork对象到"适当位置"snork.translate(0, -25, -50);// 给snork对象添加名为disco的纹理贴图snork.setTexture(textures[0]);// 释放部分资源snork.strip();// 编译snork.build();// 将snork添加到World对象中world.addObject(snork);world.getCamera().setPosition(0, 0, -100);world.getCamera().lookAt(snork.getTransformedCenter());}// 载入模型private Object3D loadModel(String filename, float scale) {Object3D model = Loader.loadMD2(LoadAssets.loadf(filename), scale);return model;}/*** 实现MD2人物行走的关键代码*/public void doAnim() {//每一帧加0.018find += 0.018f;if (ind > 1f) {ind -= 1f;}// 关于此处的两个变量,ind的值为0-1(jpct-ae规定),0表示第一帧,1为最后一帧;//至于an这个变量,它的意思是sub-sequence如果在keyframe(3ds中),因为在一个//完整的动画包含了seq和sub-sequence,所以设置为2表示执行sub-sequence的动画,//但这里设置为2我就不太明白了,不过如果不填,效果会不自然,所以我就先暂时把它//设置为2snork.animate(ind, an);}}
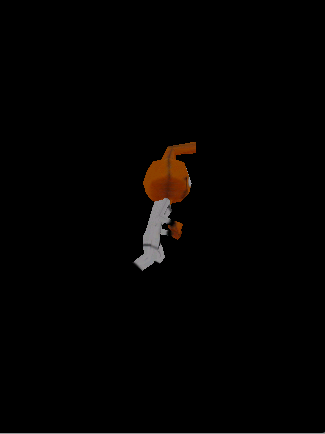
运行效果:
- android 3D 游戏实现之人物行走(MD2)
- 【Unity 3D 游戏引擎】NGUI 触摸UI和人物行走冲突的解决办法
- unity之人物行走的实现
- android 学习: 人物行走
- Cocos2D实现RPG游戏人物地图行走的跟随效果
- unity普通的3D地图+人物行走demo
- 3D游戏如何实现人物的自动寻路
- flash 游戏设计笔记:人物行走
- 3D游戏中人物换装解决方案
- 3D游戏中人物换装解决方案
- Cocos2d-x 3.2 大富翁游戏项目开发-第十部分实现人物轮流行走
- Unity3D 游戏引擎之FBX模型的载入与人物行走动画的播放(十二)
- 角色游戏之3(人物血条的实现)
- android 3D 游戏实现
- 用Bitmap/BitmapData 实现人物行走
- android 3D 游戏实现之静止岩石(3DS)
- android 3D 游戏实现之First Step
- android 3D 游戏实现之简单碰撞检测
- 良好的监控架构
- 20110510 Brew工程师培训笔记——第十章 IDisplay使用简介
- 将BMP图像读成数组
- Ubuntu 10.04操作小总结
- 隐藏DataGridView中无数据的列
- android 3D 游戏实现之人物行走(MD2)
- 64位Win7安装使用32位网络打印机
- 字符串hash算法比较
- 使用 XMPP 构建一个基于 web 的通知工具
- 分享一下cookies操作(增、删、改、查)小经验
- Android 程序调用系统发信息程序
- 更新系统新要求
- OverNet
- 使用正则替换文章屏蔽词,1500个屏蔽词,6KB的文章,替换用时01毫秒