AndroidGUI17:Layout常用技巧
来源:互联网 发布:外贸怎么做 知乎 编辑:程序博客网 时间:2024/05/16 01:19
我们经常用到的控件都是View的派生类,他们通常都是可见的。ViewGroup也是View的派生类,但ViewGroup通常是不可见的。
ViewGroup的主要作用:
+作为Layout。比如LinearLayout、RelativeLayout、FrameLayout和TableLayout
+作为View的容器。比如Gallery、GridView、ImageSwitcher、ScrollView、TabHost和ListView
其实Layout也可以被认为是View的一种容器。
本文仅讨论ViewGroup作为Layout的常用技巧。
1. LinearLayout
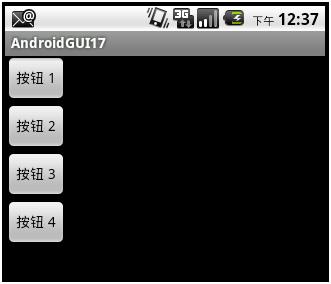
LinearLayout顾名思义就是线性布局。其子View对象要么以“行”排列,要么以“列”排列,这取决于其orientation属性是horizontal还是vertical的。
创建一个AndroidProject项目。然后在创建一个linearlayout.xml,使其内容如下:
<?xml version="1.0" encoding="utf-8"?>
<LinearLayout
xmlns:android="http://schemas.android.com/apk/res/android"
android:orientation="vertical"
android:layout_width="wrap_content"
android:layout_height="wrap_content">
<Button
android:id="@+id/linearbutton01"
android:layout_width="wrap_content"
android:layout_height="wrap_content"
android:text="按钮 1"
/>
<Button
android:id="@+id/linearbutton02"
android:layout_width="wrap_content"
android:layout_height="wrap_content"
android:text="按钮 2"
/>
<Button
android:id="@+id/linearbutton01"
android:layout_width="wrap_content"
android:layout_height="wrap_content"
android:text="按钮 3"
/>
<Button
android:id="@+id/linearbutton01"
android:layout_width="wrap_content"
android:layout_height="wrap_content"
android:text="按钮 4"
/>
</LinearLayout>
将Activity对应的代码中的setContentView的参数,改为:R.layout.linearlayout,运行后得到的结果如下:
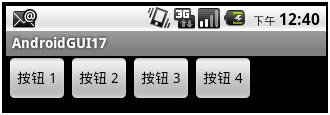
如果将linearlayout.xml中的orientation属性值改为”horizontal”,那么运行后的结果如下:
2. RelativeLayout
RelativeLayout可以根据子View对象彼此之间的位置关系来显示子View对象。比如通过”above”、”below”、”tothe left of”、”to theright of”其他的子View对象来定位。
创建一个布局文件relativelayout.xml,使其内容如下:
<?xml version="1.0" encoding="utf-8"?>
<RelativeLayout
xmlns:android="http://schemas.android.com/apk/res/android"
android:id="@+id/relativelayout"
android:layout_width="fill_parent"
android:layout_height="fill_parent">
<Button
android:id="@+id/buttonCenter"
android:layout_width="wrap_content"
android:layout_height="wrap_content"
android:text="Center"
android:layout_centerInParent="true"
/>
<ImageView
android:id="@+id/ImageView01"
android:layout_width="wrap_content"
android:layout_height="wrap_content"
android:layout_above="@id/buttonCenter"
android:layout_centerHorizontal="true"
android:src="@drawable/icon"
/>
<TextView
android:id="@+id/textview01"
android:layout_width="wrap_content"
android:layout_height="wrap_content"
android:layout_toLeftOf="@id/buttonCenter"
android:textSize="20px"
android:text="Android1"
/>
<TextView
android:id="@+id/textview02"
android:layout_width="wrap_content"
android:layout_height="wrap_content"
android:layout_toLeftOf="@id/buttonCenter"
android:layout_centerVertical="true"
android:textSize="20px"
android:text="Android2"
/>
<TextView
android:id="@+id/textview03"
android:layout_width="wrap_content"
android:layout_height="wrap_content"
android:layout_below="@+id/textview01"
android:textSize="20px"
android:text="Android3"
/>
</RelativeLayout>
将Activity对应的代码中的setContentView的参数,改为:R.layout.framelayout,运行后得到的结果如下:

3. FrameLayout
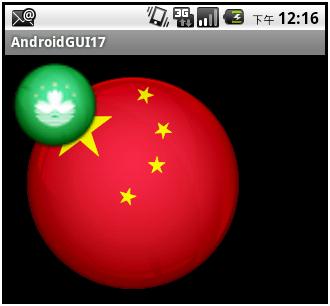
FrameLayout以“栈”的形式显示子View(比如控件)。可以想FrameLayout添加多个View对象,但是每个View在缺省的情况下都被画在该layout的左上角。比如,通常可以用于在同一个区域,显示多个图片。
FrameLayout的大小就是其中尺寸最大的子View的大小。
往项目的res/drawable-mdpi文件夹,加入两个图片资源:


它们的文件名分别为:china.png和macau.png。
创建一个布局文件framelayout.xml,使其内容如下:
<?xml version="1.0" encoding="utf-8"?>
<FrameLayout
android:id="@+id/framelayout"
xmlns:android="http://schemas.android.com/apk/res/android"
android:layout_width="wrap_content"
android:layout_height="wrap_content"
>
<ImageView
android:id="@+id/imageview01"
android:layout_width="wrap_content"
android:layout_height="wrap_content"
android:src="@drawable/china"
android:minHeight="200px"
android:minWidth="200px"
/>
<ImageView
android:id="@+id/imageview02"
android:layout_width="wrap_content"
android:layout_height="wrap_content"
android:src="@drawable/macau"
android:minHeight="100px"
android:minWidth="100px"
android:layout_gravity="center"
/>
</FrameLayout>
将Activity对应的代码中的setContentView的参数,改为:R.layout.framelayout,运行后得到的结果如下:

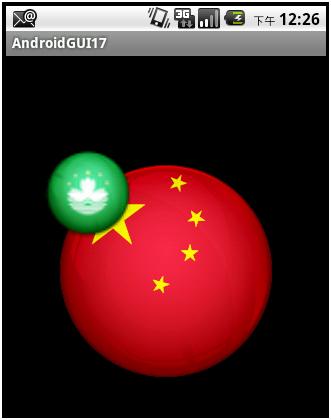
如果把framelayout.xml中的第二个ImageView中的android:layout_gravity="center"属性去掉,那么所得到的结果将是:
如果将android:layout_gravity="center"属性加入到FrameLayout本身,那么得到的结果如下:
在代码中,我们可以通过形如:
FrameLayoutfl = (FrameLayout)this.findViewById(R.id.framelayout);
这样的方式,来获得FrameLayout对象,然后通过FrameLayout中的方法addView向其中增加子View对象,也可以通过removeView从其中删除子View对象。addView和removeView均有多个重载方法。
4. TableLayout
TableLayout将子View按照TableRow的方式从上到下进行排列。TableRow基本上和一个orientation属性为“horizontal”的LinearLayout相同,它代表的是一个TableLayout中的一行。在TableRow中可以增加子View,在用一个TableRow中子View的排列是从左至右的。
缺省地,TableRow的顺序是从0开始的,在一个TableRow中的列的顺序也是从0开始的。
创建一个tablelayout.xml,使其内容如下:
<?xml version="1.0" encoding="utf-8"?>
<TableLayout xmlns:android="http://schemas.android.com/apk/res/android"
android:id="@+id/talbelayout"
android:layout_width="fill_parent"
android:layout_height="fill_parent"
android:stretchColumns="*"
>
<!-- *代表所有的列,也可以用"0,1,2,3,4..."代替 -->
<TableRow android:id="@+id/tablerow0">
<TextView
android:text="1234567890"
android:textSize="10px"
/>
<TextView
android:text="1234567890"
android:textSize="10px"
/>
<TextView
android:text="1234567890"
android:textSize="10px"
/>
<TextView
android:text="1234567890"
android:textSize="10px"
/>
</TableRow>
<!-- 上面的代码,意味着这个TableLayout有4列 -->
<TableRow android:id="@+id/tablerow1">
<Button
android:id="@+id/leftbutton"
android:text="Left"
android:textSize="12px"
android:layout_height="40px"
/>
<Button
android:id="@+id/leftbutton"
android:text="Middle"
android:textSize="12px"
android:layout_height="40px"
/>
<Button
android:id="@+id/leftbutton"
android:text="Right"
android:textSize="12px"
android:layout_height="40px"
android:layout_column="2"
android:layout_span="2"
/>
</TableRow>
<!-- leftbutton的起始位置在第2(3)列(android:layout_column="2"),
占用2列(android:layout_span="2")-->
<TableRow android:id="@+id/tablerow2">
<Button
android:id="@+id/backbutton"
android:text="Back Button"
android:layout_column="2"
/>
</TableRow>
<!-- backbutton处于第2(3)列的位置(android:layout_column="2")-->
<TableRow android:id="@+id/tablerow3">
<Button
android:id="@+id/spanbutton"
android:text="Span Button"
android:layout_column="0"
android:layout_span="2"
/>
</TableRow>
<!-- backbutton处于第0(1)列的位置(android:layout_column="0")
占用2列(android:layout_span="2")-->
<TableRow android:id="@+id/tablerow4">
<TextView
android:gravity="right"
android:paddingRight="8px"
android:text="姓名:"
/>
<EditText
android:id="@+id/editname"
android:layout_column="1"
android:layout_span="2"
android:text=""
/>
</TableRow>
<TableRow android:id="@+id/tablerow5">
<TextView
android:gravity="right"
android:paddingRight="8px"
android:text="地址:"
/>
<EditText
android:id="@+id/editname"
android:layout_column="1"
android:layout_span="3"
android:text=""
/>
</TableRow>
</TableLayout>
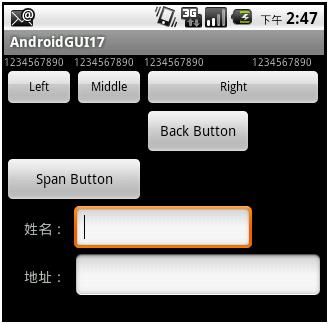
将Activity对应的代码中的setContentView的参数,改为:R.layout.tableayout,运行后得到的结果如下:
- AndroidGUI17:Layout常用技巧
- magento 增加一个layout template// Magento 常用技巧与方法
- UI layout设置技巧
- Linear Layout 布局技巧
- layout 分层技巧
- android Layout技巧汇总
- Android常用Layout介绍
- Android 常用Layout介绍
- Layout的常用属性
- Android 初学常用layout
- Layout常用属性介绍
- Layout常用属性介绍
- Extjs5 常用layout
- layout 常用属性
- Layout常用属性介绍
- Layout常用属性介绍
- Layout开发小技巧(一)
- Layout开发小技巧(二)
- aimei
- losetup 命令的用法
- 2011春“东林杯”ACM/ICPC黑龙江省赛总结
- 字节对齐---arm-linux-gcc和gcc
- struts1 上传图片
- AndroidGUI17:Layout常用技巧
- Python学习---日期操作
- 用时间生成不重复的字符
- 测试javascript checkUrl isUrl验证url范例
- ajax+jsp 以及js编码处理问题
- 大脑发育
- SCP(Secure Copy)
- Oracel 10.2安装与设置 em
- Ext简单验证