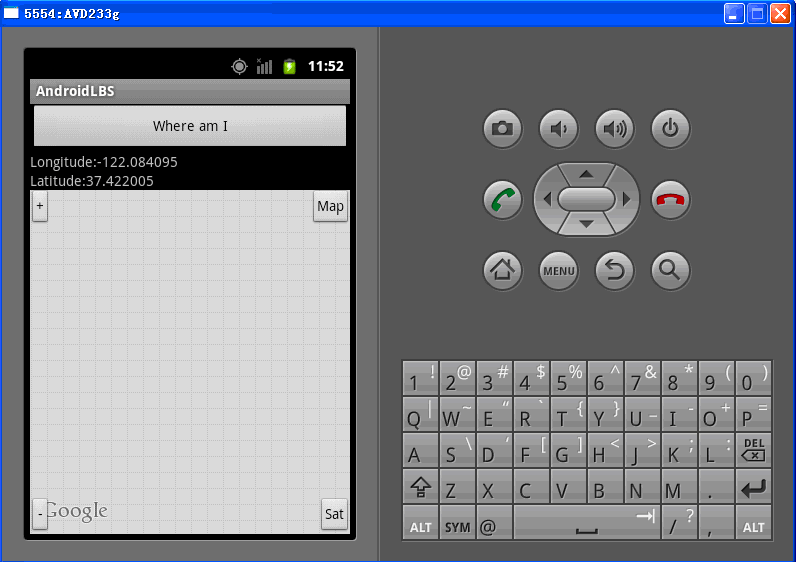
Google 地图, 缩放控制, 卫星视图和地图视图
来源:互联网 发布:.com.cn域名好吗 编辑:程序博客网 时间:2024/04/30 05:49
1. 界面布局, 见下图:

MapView 上面左上角地图放大按钮, 左正解缩小按钮, 右上角切换地图视图按钮, 右下角切换卫星视图按钮.
2. res/layout/main.xml
<?xml version="1.0" encoding="utf-8"?><LinearLayout xmlns:android="http://schemas.android.com/apk/res/android" android:orientation="vertical" android:layout_width="fill_parent" android:layout_height="fill_parent" ><Button android:id="@+id/gpsButton"android:layout_width="fill_parent"android:layout_height="wrap_content"android:text="Where am I"/><LinearLayout xmlns:android="http://schemas.android.com/apk/res/android" android:layout_width="wrap_content" android:layout_height="wrap_content" ><TextViewandroid:id="@+id/lbl_longitude"android:layout_width="wrap_content"android:layout_height="wrap_content"android:text="Longitude:"/><TextViewandroid:id="@+id/txt_longitude"android:layout_width="wrap_content"android:layout_height="wrap_content"/></LinearLayout><LinearLayout xmlns:android="http://schemas.android.com/apk/res/android" android:layout_width="wrap_content" android:layout_height="wrap_content" ><TextViewandroid:id="@+id/lbl_Latitude"android:layout_width="wrap_content"android:layout_height="wrap_content"android:text="Latitude:"/><TextViewandroid:id="@+id/txt_Latitude"android:layout_width="wrap_content"android:layout_height="wrap_content"/></LinearLayout><RelativeLayout xmlns:android="http://schemas.android.com/apk/res/android"android:orientation="vertical" android:layout_width="fill_parent" android:layout_height="fill_parent"><view class="com.google.android.maps.MapView"android:id="@+id/myMap"android:layout_width="wrap_content"android:layout_height="wrap_content"android:clickable="true"android:apiKey="ABQIAAAAm2_1rdYR-zQm5djUKUH-7xT2yXp_ZAY8_ufC3CFXhHIE1NvwkxQpjZcBBZk1RRZ-TFNJFMlbrU7oqg"/><Button android:id="@+id/buttonZoomIn" style="?android:attr/buttonStyleSmall" android:text="+" android:layout_width="wrap_content" android:layout_height="wrap_content" /> <Button android:id="@+id/buttonMapView" style="?android:attr/buttonStyleSmall" android:text="Map" android:layout_alignRight="@+id/myMap" android:layout_width="wrap_content" android:layout_height="wrap_content" /> <Button android:id="@+id/buttonSatView" style="?android:attr/buttonStyleSmall" android:text="Sat" android:layout_alignRight="@+id/myMap" android:layout_alignBottom="@+id/myMap" android:layout_width="wrap_content" android:layout_height="wrap_content" /><Button android:id="@+id/buttonZoomOut" style="?android:attr/buttonStyleSmall" android:text="-" android:layout_alignBottom="@+id/myMap" android:layout_width="wrap_content" android:layout_height="wrap_content" /> </RelativeLayout></LinearLayout>
要使用Google Maps API , 必须生成API密钥, 参考:生成API密钥 . 上图界面使用了相对布局RelativeLayout , 按钮使用style="?android:attr/buttonStyleSmall" 紧缩样式, 关于样式可以参考android-sdk\platforms\android-10\data\res\values\attrs.xml
- <!-- Normal Button style. --> <attr name="buttonStyle" format="reference" /> - <!-- Small Button style. --> <attr name="buttonStyleSmall" format="reference" /> - <!-- Button style to inset into an EditText. --> <attr name="buttonStyleInset" format="reference" /> - <!-- ToggleButton style. --> <attr name="buttonStyleToggle" format="reference" />
3. AndroidManifest.xml , 需要添加访问权限.
<?xml version="1.0" encoding="utf-8"?><manifest xmlns:android="http://schemas.android.com/apk/res/android" package="com.gps" android:versionCode="1" android:versionName="1.0"> <uses-sdk android:minSdkVersion="10" /> <uses-permission android:name="android.permission.ACCESS_FINE_LOCATION"></uses-permission> <uses-permission android:name="android.permission.INTERNET"></uses-permission> <application android:icon="@drawable/icon" android:label="@string/app_name"> <activity android:name=".AndroidLBS" android:label="@string/app_name"> <intent-filter> <action android:name="android.intent.action.MAIN" /> <category android:name="android.intent.category.LAUNCHER" /> </intent-filter> </activity><uses-library android:name="com.google.android.maps" /> </application></manifest>
4. AndroidLBS.java 继承MapActivity
package com.gps;import com.google.android.maps.GeoPoint;import com.google.android.maps.MapActivity;import com.google.android.maps.MapController;import com.google.android.maps.MapView;import android.content.Context;import android.location.Criteria;import android.location.Location;import android.location.LocationListener;import android.location.LocationManager;import android.os.Bundle;import android.view.View;import android.widget.Button;import android.widget.TextView;public class AndroidLBS extends MapActivity { /** Called when the activity is first created. */ @Override public void onCreate(Bundle savedInstanceState) { super.onCreate(savedInstanceState); setContentView(R.layout.main); final MapView mapView = (MapView) findViewById(R.id.myMap); final MapController mapCntrl = mapView.getController(); final Button zoomIn = (Button) findViewById(R.id.buttonZoomIn); zoomIn.setOnClickListener(new Button.OnClickListener() {public void onClick(View v) {zoomIn(mapView, mapCntrl);} }); final Button zoomOut = (Button) findViewById(R.id.buttonZoomOut); zoomOut.setOnClickListener(new Button.OnClickListener() {public void onClick(View v) {zoomOut(mapView, mapCntrl);} }); final Button gpsButton = (Button) findViewById(R.id.gpsButton); gpsButton.setOnClickListener(new Button.OnClickListener() {public void onClick(View arg0) {LoadCoords();} }); final Button buttonSatView = (Button) findViewById(R.id.buttonSatView); buttonSatView.setOnClickListener(new Button.OnClickListener() {public void onClick(View arg0) {showSat(mapView);} }); final Button buttonMapView = (Button) findViewById(R.id.buttonMapView); buttonMapView.setOnClickListener(new Button.OnClickListener() {public void onClick(View arg0) {showMap(mapView);} }); } private final LocationListener locationListener = new LocationListener() {public void onStatusChanged(String provider, int status, Bundle extras) {}public void onProviderEnabled(String provider) {updateWithNewLocation(null);}public void onProviderDisabled(String provider) {}public void onLocationChanged(Location location) {updateWithNewLocation(location);}}; // 放大 +public void zoomIn(MapView mv, MapController mc){ if(mv.getZoomLevel()!=21){ mc.setZoom(mv.getZoomLevel() + 1);} } //缩小 -public void zoomOut(MapView mv, MapController mc){ if(mv.getZoomLevel()!=1){mc.setZoom(mv.getZoomLevel() - 1);}} //设置卫星视图public void showSat(MapView mv) {if (!mv.isSatellite()) {mv.setSatellite(true);}}//关闭卫星视图,切换到常规地图视图public void showMap(MapView mv) {if (mv.isSatellite()) {mv.setSatellite(false);}} public void LoadCoords() { LocationManager locationManager = (LocationManager) getSystemService( Context.LOCATION_SERVICE); //判断gps provider是否开启 System.out.println("@isProviderEnabled:" + locationManager.isProviderEnabled(LocationManager.GPS_PROVIDER)); Criteria criteria = new Criteria(); criteria.setAccuracy(Criteria.ACCURACY_FINE); //设置精度 criteria.setBearingRequired(false); //设置方向? criteria.setAltitudeRequired(false); //设置海拔 criteria.setCostAllowed(true); criteria.setPowerRequirement(Criteria.POWER_LOW); String provider = locationManager.getBestProvider(criteria, true); Location location = locationManager.getLastKnownLocation(provider); System.out.println("@provider:" + provider + ", @location:" + location); if (null == location) { //通过GPS获取位置 location = locationManager.getLastKnownLocation(LocationManager.GPS_PROVIDER); if (null == location) { //通过network获取位置 location = locationManager.getLastKnownLocation(LocationManager.NETWORK_PROVIDER); } } updateWithNewLocation(location); locationManager.requestLocationUpdates(provider, 2000, 10, locationListener); } public void updateWithNewLocation(Location location) { TextView txtLongitude = (TextView) findViewById(R.id.txt_longitude); TextView txtLatitude = (TextView) findViewById(R.id.txt_Latitude); MapView myMap = (MapView) findViewById(R.id.myMap); if (null != location) { Double lngPoint = location.getLongitude(); Double latPoint = location.getLatitude(); txtLongitude.setText(lngPoint.toString()); txtLatitude.setText(latPoint.toString()); //google map GeoPoint point = new GeoPoint((int) (lngPoint.intValue()* 1E6), (int) (latPoint.intValue() * 1E6)); MapController mapController = myMap.getController(); mapController.setCenter(point); mapController.animateTo(point); mapController.setZoom(9); } else { txtLongitude.setText("无法获取地理位置经度"); txtLatitude.setText("无法获取地理位置纬度"); } }@Overrideprotected boolean isRouteDisplayed() {// TODO Auto-generated method stubreturn false;}}
问题及总结: 用模拟器还是没有模拟出地图来, 始终显示不出来地图, 如有高人, 望不吝赐教!
- Google 地图, 缩放控制, 卫星视图和地图视图
- Google maps V3控制地图的缩放和显示范围
- google 卫星地图
- GOOGLE卫星地图
- 同时支持google地图和卫星图
- Google地图API方式查看卫星地图
- 有感于GOOGLE的卫星地图!!!
- GOOGLE卫星地图 计算方式
- Google卫星地图的军事基地
- google卫星地图 、奉下载地址和部分坐标
- IOS MKMapView 地图视图
- 地图展示自定义视图
- IOS MKMapView 地图视图
- 地图-大头针视图
- iOS MKMapView 地图视图
- IOSMKMapView地图视图 详解
- Android开发--控制Google地图--添加缩放图标
- 百度地图、Google地图的缩放比例
- android教程--xml解析
- 浅尝JQchart!
- 2.3函数与函数的重载
- awk用法小结
- 嵌入式基础总结
- Google 地图, 缩放控制, 卫星视图和地图视图
- poi 实现 java生成excel
- 算法--找出数组中出现次数超过一半的数
- 设计模式
- php webservice最常用的方法
- JAVA I/O流的分类
- CRunTimeClass::m_pNextClass
- win7下VS2010及IIS7配置常见问题
- flash跨域问题解决


