【Java】多线程
来源:互联网 发布:食品科学与数据分析 编辑:程序博客网 时间:2024/06/11 04:31
多线程在我操作系统的博客中也有涉及,而这里我们讲一下java中的多线程实现。
先回顾一下,
进程是运行中的应用程序,一个应用程序可以同时启动多个进程。
同一个进程的线程是共享一个地址空间的。
抢占式:随时能够中断另一个任务。
非抢占式:只有一个任务同意被中断时才能被中断。会导致死锁。
多线程:共享变量因此便于通信,创建开销少。
多进程:相互独立,通信有共享内存和消息传递,创建开销很大。
java的GUI用一个单独的线程在后台收集用户界面的事件。
因此repaint调用时,会把这个事件发送到事件请求队列中,执行完前面的事件,才会执行repaint事件。
java有一个线程在后台垃圾回收。
Thread.sleep(int i); 线程睡眠i毫秒。
小知识点:多线程下载为何快?
java多线程实现方法:
实现Runnable接口,实现run方法
(1)继承Runnable并实现public void run();
(2)Thread t=new Thread(Runnable r);
(3)t.start();自动调用run方法,执行完就返回。
注意点:
(1)覆盖的run方法不能声明抛出异常,因为继承的方法不能抛出比父类更多的异常。
(2)不要随便覆写start方法,如果要覆写,则调用super.start().
(3)一个线程只能被启动一次。
(4)两个线程之间没有任何关系,一个线程抛出异常终止,另一个线程没有任何影响。
以下程序说明多个线程没有任何影响:
public class MyThread2{public static void main(String args[]){Thread t1 = new Thread(new Thread1());Thread t2 = new Thread(new Thread2());t1.start();t2.start();}}class Thread1 implements Runnable{public void run(){try{Thread.sleep(500);}catch(Exception e){}int a = 1/0;System.out.println("线程1结束");}}class Thread2 implements Runnable{public void run(){for(int a=0;a<20;a++){System.out.println("a = "+a );try{Thread.sleep(100);}catch(Exception e){}}System.out.println("线程2结束");}}//线程相互不影响继承Thread方法,覆写run方法
runnable能够实现资源共享。
问题:如果一个线程同时实现Runnable接口和继承Thread类,则会调用哪一个?
答:会调用Thread类的方法;因为Thread类的run源码如下:
class Thread{ private Runnable target; public void run() {if (target != null) {//如果Runnable不为空,则调用runnable的方法; target.run();} }}因此传统的实现多线程的继承Thread是重写run方法;
但是如果继承了Thread类并实现了run方法,则会覆盖此方法,因此如果调用run方法,则会调用Thread覆写的run方法;
以下代码会打印出Thread;
package org.xiazdong.thread;import org.junit.Test;public class ThreadDemo01 {@Testpublic void test1() {Thread thread = new Thread(new Runnable() {@Overridepublic void run() {System.out.println("Runnable");}}) {@Overridepublic void run() {System.out.println("Thread");}};thread.start();}}常用方法:
(1)Thread cur = Thread.currentThread();
(2)String name = cur.getName();
(3)cur.setName(String name);
t.interrupt()请求中断一个线程,线程的中断状态位置位.当线程在阻塞时被请求中断,则抛出异常并被终止,特别在sleep()这个阻塞调用中,如果有请求中断,则会清除中断状态位。
Thread.currentThread().isInterrupted()判断中断状态位是否被置位。
线程状态:
1.new。Thread t=new Thread()时。
在堆中创建一个线程对象,这个对象和一般的JAVA对象一样。
2.runnable。t.start()时。注意只是可运行的,因此可以运行也可以没有运行,因为在线程运行时会有中断发生。
JVM创建了方法调用栈、程序计数器,这个线程放在可运行池中,等待CPU授权。
3.running.执行中。
4.blocked。当(1)sleep()(2)I/O中断(3)申请锁但是没有得到。当被阻塞时,CPU可以运行另外的线程。
5.dead。当(1)run正常返回(2)run由于异常返回。
但是都不会对其他线程造成影响。
t.isAlive()判断是否是可运行的或阻塞的。
优先级:
线程调度器只是把优先级看作一个参考因素,而不是全部。
t.setPriority(int );
static yield() 当前线程让步,选择其他线程中优先级最高的。
t.setDaemon(boolean) 标记为守护线程。
守护线程:为其他线程提供服务,当只有守护线程时,则程序退出。
后台线程特性:
(1)如果前台线程全部结束,则JVM会终止后台线程。
public class MyThread5 extends Thread{private static int a = 0;public void run(){while(true){System.out.println(getName()+":"+a++);try{Thread.sleep(100);}catch(Exception e){}if(a==100) break;yield();}}public static void main(String args[]){MyThread5 t1 = new MyThread5();MyDaemon t2 = new MyDaemon();t2.setDaemon(true);t1.start();t2.start();}static class MyDaemon extends Thread{public void run(){while(true){a = 1;try{Thread.sleep(1000);}catch(Exception e){}}}}}Timer和TimerTask(定时器和定时任务)
Timer timer = new Timer(boolean daemon); 创建一个定时器,参数是是否为后台线程。
TimerTask是一个抽象类,必须继承并覆写run方法。
timer.schedule(task,long delay,long period); delay 毫秒是运行task的延迟,period 毫秒是运行task的周期,即每隔perioid执行一次。
timer.schedule(TimerTask task, Date time) ; 在特定的时间执行这个定时器任务;
package timer;import java.util.*;public class TimerDemo extends Thread{private int a;private static int count;public void start(){super.start();Timer timer = new Timer(true);TimerTask task = new TimerTask(){public void run(){while(true){a = 0;try{sleep(1000);}catch(Exception e){}}}};timer.schedule(task,10,500);}public void run(){while(true){System.out.println(getName()+":"+a++);try{Thread.sleep(100);}catch(Exception e){}if(count++==100) break;}}public static void main(String args[]){TimerDemo t1 = new TimerDemo();t1.start();}}任务:2秒运行一次,4秒运行一次,再2秒运行一次.....(连环任务)
通过以下代码能够实现循环调用定时器;
class MyTask extends TimerTask{public void run(){new Timer().schedule(new MyTask(),2000);}}package org.xiazdong.thread;import java.util.Date;import java.util.Timer;import java.util.TimerTask;public class ThreadDemo01 {public static void main(String[] args) throws Exception {Timer timer = new Timer();timer.schedule(new MyTask(), 2000);while (true) {System.out.println(new Date().getSeconds());Thread.sleep(1000);}}}class MyTask extends TimerTask{public static int count = 0;@Overridepublic void run() {count = (count+1)%2;System.out.println("bombing");Timer t2 = new Timer();t2.schedule(new MyTask(), 2000+count*2000);}}线程调度
(1)设置优先级.
(2)sleep(); 当前线程阻塞,睡眠好后,则回到可运行状态,等待CPU。
(3)yield();让步,即把当前线程放回可运行池中,并选取一个优先级最高的获得CPU使用权。
(4)join();如果A线程是当前运行线程,则A调用B的join方法,则A进入阻塞状态,直到B执行完毕,A才恢复可运行。
public class MyThread3 extends Thread{private static StringBuffer buf = new StringBuffer();public void run(){for(int a=0;a<10;a++){buf.append("当前线程:"+currentThread().getName()+"\n");}}public static void main(String args[])throws Exception{MyThread3 t1 = new MyThread3();MyThread3 t2 = new MyThread3();t1.start();t2.start();t1.join();t2.join();System.out.println(MyThread3.buf);}}sleep和yield的区别:
sleep:把机会留给其他线程,即使其他线程比当前睡眠的线程优先级低也不要紧。
yield:只会给相同优先级的线程给予机会,yield是直接进入可运行状态。而sleep则是先进入阻塞状态。
sleep比yield具有更好的移植性。
线程组:ThreadGroup
根据功能进行分类,比如有多个线程是用来下载图片的,当用户请求中断时,这些线程是一起中断的,为了操作方便,可以把他们归在一个线程组。
如果线程A创建了线程B,并且线程B在构造方法中没有指定线程组,则B加入A所属的线程组。
不能中途改变线程组。
默认有一个main线程组。
ThreadGroup g=new ThreadGroup("....");
Thread t1=new Thread(g,"...");
Thread t2=new Thread(g,"...");
g.interrupt(); 中断t1和t2
g.activeCount(); g这个线程组中可运行状态的线程数量
t1.getThreadGroup();返回t1所属的线程组。
g.enumerate(Thread[] threads); 将当前还活着的线程的引用复制到threads中。
未捕获异常处理器:
当在run方法发生异常时,如果你try-catch了,则会捕获了,如果你throws了,则会抛出,但是如果发生了那些你没有预料到的异常,则会发送给未捕获异常处理器,然后线程终止。
(1)Thread.UncaughtExceptionHandler接口是未捕获异常处理器,必须实现uncaughtException(Thread,Throwable);
(2)------设置:t.setUncaughtExceptionHandler(handler)
-------设置默认:调用静态方法 Thread.setDefaultUncaughtExceptionHandler(handler);
-------如果没有为线程设置未捕获异常处理器,则默认为ThreadGroup的未捕获异常处理器,因为ThreadGroup实现了这个接口。
class MachineGroup extends ThreadGroup{public MachineGroup(){super("MachineGroup");}public void uncaughtException(Thread t,Throwable e){System.out.println(getName()+" catches an exception from "+ t.getName());super.uncaughtException(t,e);}}class MachineHandler implements Thread.UncaughtExceptionHandler{private String name;public MachineHandler(String name){this.name = name;}public void uncaughtException(Thread t,Throwable e){System.out.println(name+" catches an exception from "+ t.getName());}}public class UncaughtDemo extends Thread{public UncaughtDemo(ThreadGroup group,String name){super(group,name);}public void run(){int a = 1/0;}public static void main(String args[]){ThreadGroup g = new MachineGroup();UncaughtExceptionHandler defaultHandler = new MachineHandler("DefaultHandler");UncaughtDemo.setDefaultUncaughtExceptionHandler(defaultHandler);UncaughtDemo m1 = new UncaughtDemo(g,"线程-1");UncaughtDemo m2 = new UncaughtDemo(g,"线程-2");UncaughtExceptionHandler curHandler = new MachineHandler("Machine2-Handler");m2.setUncaughtExceptionHandler(curHandler);m1.start();m2.start();}}同步
在同步块中,如果执行Thread.sleep()或Thread.yield(),并不会释放锁,而是把执行的权利给了其他线程。
synchronized声明不会被继承。
建议:
为了尽可能地并发,我们应该只把对资源竞争的代码同步。
注意:同步只用于业务逻辑方法中,而不写在线程中!
wait()、notify()
每个对象都有一把锁,这个锁对应有一个等待队列,一个对象还有一个等待池(调用wait后的效果)
s.wait():当前线程释放s对象的锁,并且进入该对象的等待池。 一般放在while中。
s.notify():当前线程调用s的notify,把在s等待池中的一个线程放入锁队列。
while(flag){t.wait();}.....t.notify();虚假唤醒
如果代码形式为:
if(flag){t.wait();}则会出现虚假唤醒的问题;问题1:一个类的普通方法怎么互斥?
通过在方法声明中使用synchronized;
问题2:一个类的普通方法和静态方法怎么互斥?
通过用类的class对象进行同步!而如果静态方法声明synchronized,则默认就是相对class对象同步;
比如:
//fun和staticfun不能同步//fun2和staticfun能够同步class A{//以下的synchronized 表示 synchronized(this)public synchronized void fun(){}//以下的synchronized 表示 synchronized(A.class)public synchronized static void staticfun(){}public void fun2(){synchronized(A.class){}}}
共享对象种类:
(1)线程范围内共享数据:用ThreadLocal;(2)每个线程都共享数据:通过Runnable构造函数传递 或者 static属性;Runnable run1 = new MyRunnable1(data);class MyRunnable1 implements Runnable{private Data1 data;public MyRunnable1(Data1 data){this.data = data;}}private static Data1 data2 = new Data1();public static void main(String[] args) {new Thread(){public void run(){ //data2操纵数据}}.start();}
以下代码通过传递Runnable构造函数操纵同一个j;package org.xiazdong.sync;public class Demo05 {public static void main(String[] args) {Data1 data = new Data1();Runnable run1 = new MyRunnable1(data);Runnable run2 = new MyRunnable2(data);new Thread(run1).start();new Thread(run2).start();}}class MyRunnable1 implements Runnable{private Data1 data;public MyRunnable1(Data1 data){this.data = data;}@Overridepublic void run() {data.increment();System.out.println(data.j);}}class MyRunnable2 implements Runnable{private Data1 data;public MyRunnable2(Data1 data){this.data = data;}@Overridepublic void run() {data.decrement();System.out.println(data.j);}}class Data1{int j = 100;public synchronized void increment(){j++;}public synchronized void decrement(){j--;}}
以下代码通过static属性在线程间操纵同一个j;package org.xiazdong.sync;public class Demo05 {private static Data1 data2 = new Data1();public static void main(String[] args) {new Thread(){public void run(){data2.increment();System.out.println(data2.j);}}.start();new Thread(){public void run(){data2.decrement();System.out.println(data2.j);}}.start();}}class Data1{int j = 100;public synchronized void increment(){j++;}public synchronized void decrement(){j--;}}同步块:
synchronized(obj){ critical section} 即利用对象的锁进行同步。实例
子线程执行10次,再主线程执行100次,再子线程执行10次,再主线程执行100次.......
package org.xiazdong.sync;public class Demo02 {public static void main(String[] args) throws InterruptedException {final Business business = new Business();new Thread(){public void run(){while(true)business.sub();}}.start();Thread.sleep(10);new Thread(){public void run(){while(true)business.main();}}.start();}}class Business {boolean subfinished = false;//记录是否该sub()执行public synchronized void sub(){if(!subfinished){subfinished = true;for(int i=0;i<10;i++){System.out.println("sub:"+(i+1));}}}public synchronized void main(){if(subfinished){subfinished = false;for(int i=0;i<100;i++){System.out.println("main:"+(i+1));}}}}生产者-消费者问题
public class AppDemo{public static void main(String args[]){Stack s = new Stack("Stack");Producer p = new Producer("Producer",s);Consumer c1 = new Consumer("Consumer1",s);Consumer c2 = new Consumer("Consumer2",s);}}class Consumer extends Thread{private Stack stack;public Consumer(String name,Stack s){super(name);stack = s;start();}public void run(){for(int i=0;i<100;i++){synchronized(stack){String good = stack.pop();System.out.println(getName() +" pop "+good);}try{Thread.sleep(1000);}catch(Exception e){}}}}class Producer extends Thread{private Stack stack;public Producer(String name,Stack s){super(name);stack = s;start();}public void run(){for(int i=0;i<200;i++){synchronized(stack){String good = "good "+(stack.getPoint()+1);stack.push(good);System.out.println(getName() +" push "+good);}}}}class Stack{public final static int LEN = 100;private int point = -1;private String name;private String goods[] = new String[LEN];public Stack(String name){this.name = name;}public String getName(){return name;}public synchronized int getPoint(){return point;}public synchronized String pop(){if(point==-1) return null;//如果消费者不能拿到String tmp = goods[point];goods[point] = null;point--;return tmp; }public synchronized void push(String name){if(point==LEN-1) return; point++;goods[point] = name;}}ThreadLocal类
ThreadLocal类主要用来作为线程范围内的共享数据;JavaWeb中访问Servlet时,每个线程都会有一个容器用来存放数据;此处就使用了ThreadLocal;比如:
而一般实现此种需求需要使用map实现,如图:
而ThreadLocal则是类似于此种方式实现;ThreadLocal类提供了:
(1)ThreadLocal<Integer> map = new ThreadLocal<Integer>(); //创建一个ThreadLocal对象,存放Integer数据;
(2)map.set(1); //为当前线程存放数据1;
(3)int data = map.get(); //从当前线程中取出数据1;
(4)map.remove(); //从当前线程中删除数据1;package org.xiazdong.sync;import java.util.HashMap;import java.util.Map;import java.util.Random;public class Demo04 {private static ThreadLocal<Integer> map2 = new ThreadLocal<Integer>();public static void main(String[] args) {for (int i = 0; i < 3; i++) {new Thread() {public synchronized void run() {Random random = new Random();int data = random.nextInt(100);map2.set(data);new A().fun();}}.start();}}static class A{public void fun(){System.out.println(Thread.currentThread().getName()+":"+map2.get());}}}
创建线程范围内共享的对象:注意:此类为singleton类,并且内置ThreadLocal;特别注意:ThreadLocal的使用也只能在业务中使用,而不能在线程中使用,因此必须记住!class Data {private String name;private int age;public String getName() {return name;}public void setName(String name) {this.name = name;}public int getAge() {return age;}public void setAge(int age) {this.age = age;}private static ThreadLocal<Data>map = new ThreadLocal<Data>();private Data(){}public static Data getInstance(){Data instance = map.get();if(instance==null){instance = new Data();map.set(instance);}return instance;}}释放锁:
(1)正常执行完。
(2)因为异常而导致线程终止,则释放。
锁的使用方式:
(1)ReentrantLock
以上的unlock放在finally中因为防止抛出异常而没有释放锁;
特性:锁是可重入的,即如果一个线程得到了某个对象的锁,则可以随便怎么使用锁,即 可以多次使用锁。
(2)ReentrantReadWriteLock
ReentrantReadWriteLock lock=new ReentrantReadWriteLock();
Lock readLock=lock.readLock(); 从读写锁中抽取读锁
Lock writeLock=lock.writeLock(); 从读写锁中抽取写锁
问题:设计一个缓存系统Cache
缓存定义:一开始在缓存中寻找,如果找不到,则去数据库中取,并放入缓存;
package org.xiazdong.sync;import java.util.HashMap;import java.util.Map;import java.util.concurrent.locks.ReentrantReadWriteLock;public class CacheData {private Map<String, Object> cache = new HashMap<String, Object>();private ReentrantReadWriteLock lock = new ReentrantReadWriteLock();//读写锁public Object get(String key) {//一进去上读锁lock.readLock().lock();Object value;try {value = cache.get(key);//如果找不到,则在数据库中读取,并写入cache,因此上写锁if (value == null) {lock.readLock().unlock();lock.writeLock().lock();try {if(value==null){value = DB.query(key); cache.put(key,value); } } finally {lock.writeLock().unlock();}lock.readLock().lock();}} finally {lock.readLock().unlock();}return value;}}条件变量的使用
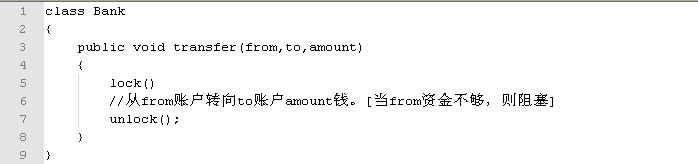
条件变量是对于锁功能的补充,比如我们营造一个如下结构的程序:
当多个线程同时访问这个transfer函数,总会有一个串行化顺序,比如Person1得到了这个函数的使用权,但是他现有资金不足以转出,则会停止,等待别人转入等到有足够的钱转出时才继续执行,但是他却没有放弃这个函数的使用权,因此其他人没有办法使用这个函数,因此也没有办法转给Person1钱,因此程序就无法继续。唯一的解决办法就是使用条件变量。
一个锁能有多个条件变量。
试图获得锁:tryLock()
lock.tryLock()如果能获得锁则返回true并获得锁,如果不能则不会阻塞,能够去做其他事。
lock.tryLock(long s,TimeUnit.MILLISECONDS) 试图获得锁,如果不能获得,则阻塞s秒后去做其他事。在阻塞时中断则抛出异常。
Condition:条件变量
Condition c=lock.newCondition();
java中默认每个对象都有一把隐式锁,一把隐式锁只有一个条件变量。因此老式的java程序中使用synchronized关键字进行同步。
老式同步方法:synchronized 新式同步方法:锁+条件变量 Lock lock=new ReentrantLock();Condition c=lock.newCondition(); 初始化 wait() c.await()放入条件变量的等待队列,并且释放c对应的锁,使得其他人能用这把锁。【阻塞状态】 阻塞时发生中断则抛出异常。 wait(long milli) c.await(long s,TimeUnit.MILLISECONDS)相比较上面的方法,如果milli毫秒后会自动变回可运行状态。 notifyAll() c.signalAll() 把条件变量的等待队列的线程全部放回。【可运行状态】 notify() c.notify() 随机抽取条件变量等待队列中的一个线程放回变成可运行状态。比较而言:synchronized比较方便。
缺点:以上的同步方法需要我们自己写代码进行同步,不是自动同步。
监视器:一种OO的同步方法,不需要考虑如何加锁。
用Condition替换Synchronized
形如:
lock.lock();try{while(....)condition.await();condition.signal();}finally{lock.unlock();}
用Condition实现先执行sub,再执行main、再执行sub;package org.xiazdong.sync;import java.util.concurrent.locks.Condition;import java.util.concurrent.locks.Lock;import java.util.concurrent.locks.ReentrantLock;public class ConditionTest {public static void main(String[] args) throws Exception {final Business business = new Business();new Thread() {public void run() {while (true)try {business.sub();} catch (Exception e) {e.printStackTrace();}}}.start();Thread.sleep(10);new Thread() {public void run() {while (true)try {business.main();} catch (Exception e) {e.printStackTrace();}}}.start();}static class Business {boolean subfinished = false; // 记录是否该sub()执行Lock lock = new ReentrantLock();Condition condition = lock.newCondition();public void sub() throws Exception {lock.lock();while (subfinished) {condition.await();}for (int i = 0; i < 10; i++) {System.out.println("sub:" + (i + 1));}subfinished = true;condition.signal();lock.unlock();}public void main() throws Exception {lock.lock();while (!subfinished) {condition.await();}for (int i = 0; i < 100; i++) {System.out.println("main:" + (i + 1));}subfinished = false;condition.signal();lock.unlock();}}}condition实现多路同步
声明多个Condition变量;
任务:先执行1,再执行2,再执行3,再执行1......
package org.xiazdong.sync;import java.util.concurrent.locks.Condition;import java.util.concurrent.locks.Lock;import java.util.concurrent.locks.ReentrantLock;public class MultiConditionTest {public static void main(String[] args) {final Business1 bus = new Business1();for (int i = 0; i < 10; i++) {new Thread() {public void run() {bus.fun1();}}.start();new Thread() {public void run() {bus.fun2();}}.start();new Thread() {public void run() {bus.fun3();}}.start();}}}class Business1 {Lock lock = new ReentrantLock();Condition condition1 = lock.newCondition();Condition condition2 = lock.newCondition();Condition condition3 = lock.newCondition();int count = 0;public void fun1() {lock.lock();try {while (count != 0)try {condition1.await();} catch (InterruptedException e) {e.printStackTrace();}System.out.println("1");count = (count + 1) % 3;condition2.signal();} finally {lock.unlock();}}public void fun2() {lock.lock();try {while (count != 1)try {condition2.await();} catch (InterruptedException e) {e.printStackTrace();}System.out.println("2");count = (count + 1) % 3;condition3.signal();} finally {lock.unlock();}}public void fun3() {lock.lock();try {while (count != 2)try {condition3.await();} catch (InterruptedException e) {e.printStackTrace();}System.out.println("3");count = (count + 1) % 3;condition1.signal();} finally {lock.unlock();}}}在API文档中实现的阻塞队列:
class BoundedBuffer { final Lock lock = new ReentrantLock(); final Condition notFull = lock.newCondition(); final Condition notEmpty = lock.newCondition(); final Object[] items = new Object[100]; int putptr, takeptr, count; public void put(Object x) throws InterruptedException { lock.lock(); try { while (count == items.length) notFull.await(); items[putptr] = x; if (++putptr == items.length) putptr = 0; ++count; notEmpty.signal(); } finally { lock.unlock(); } } public Object take() throws InterruptedException { lock.lock(); try { while (count == 0) notEmpty.await(); Object x = items[takeptr]; if (++takeptr == items.length) takeptr = 0; --count; notFull.signal(); return x; } finally { lock.unlock(); } } }
volatile变量:
对一个变量使用volatile,则会使得虚拟机和编译器知道这个变量会被并发访问。
死锁:线程T1,T2,T1有锁L1,T2有锁L2,如果T1想要L2的同时T2想要L1,则会发生死锁。
public class DeadLockDemo extends Thread{private Counter counter;public DeadLockDemo(Counter counter){this.counter = counter;start();}public void run(){for(int i=0;i<1000;i++){counter.add();}}public static void main(String args[]){Counter c1 = new Counter();Counter c2 = new Counter();c1.setFriend(c2);c2.setFriend(c1);DeadLockDemo m1 = new DeadLockDemo(c1);DeadLockDemo m2 = new DeadLockDemo(c2);}}class Counter{private int a;private Counter friend;public void setFriend(Counter friend){this.friend = friend;}public synchronized void add(){a++;Thread.yield();friend.delete();System.out.println(Thread.currentThread().getName()+": add");}public synchronized void delete(){a--;System.out.println(Thread.currentThread().getName()+": delete");}}
废弃方法
suspend和resume:
suspend:暂停一个线程,不会放弃持有的锁.resume:运行一个线程。废弃原因:(1)容易导致死锁(2)一个线程能随时暂停另一个线程,不合理public class SuspendDemo extends Thread{private int a;public void run(){for(int i=0;i<1000;i++){synchronized(this){a+=i;Thread.yield();a-=i;}}}public synchronized void reset(){a = 0;}public static void main(String args[])throws Exception{SuspendDemo s = new SuspendDemo();//s获得SuspendDemo的锁s.start();yield();s.suspend();s.reset();//main调用reset方法之前先要获得SuspendDemo的锁,但是此时s获得,并且暂停。s.resume();}}stop:
stop终止这个线程.废弃原因:如果终止时该线程正在执行一个原子操作,则会产生逻辑不一致.线程安全数据结构
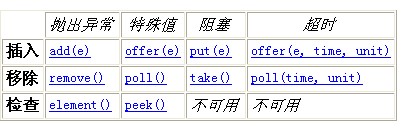
阻塞队列:BlockingQueue 适合用于生产者-消费者模型
Queue是BlockingQueue的父类:
BlockingQueue提供的方法如下:
因此多个阻塞的两个方法。
(1)LinkedBlockingQueue<T>:基于链表,容量无限阻塞队列。
(2)ArrayBlockingQueue<T>:一个由数组支持的有界阻塞队列。有界缓冲区
-ArrayBlockingQueue<Integer> queue = new ArrayBlockingQueue<Integer>(n); //创建一个容量为n的阻塞队列;
(3)PriorityBlockingQueue<T>:无界阻塞优先级队列。
(4)DelayQueue<T>:队列中的元素都需要实现Delayed接口和Comparable接口。当元素的延迟用完(小于0)才能从队列中删除。
ArrayBlockingQueue代码示例:
package org.xiazdong.tradition;import java.util.concurrent.ArrayBlockingQueue;public class BlockingQueueTest {public static void main(String[] args) {final ArrayBlockingQueue<Integer> queue = new ArrayBlockingQueue<Integer>(5);new Thread() {public void run() {for (int i = 0; i < 10; i++) {synchronized (this) {try {Thread.sleep(100);queue.put(3);} catch (Exception e) {e.printStackTrace();}System.out.println("放入数据,目前有"+queue.size());}}}}.start();new Thread() {public void run() {for (int i = 0; i < 10; i++) {synchronized (this) {try {Thread.sleep(1000);queue.take();} catch (InterruptedException e) {e.printStackTrace();}System.out.println("取出数据,目前有"+queue.size());}}}}.start();}}示例2:用ArrayBlockingQueue实现实现先线程1走,再线程2走,再线程1走,再线程2走....
package org.xiazdong.tradition;import java.util.concurrent.ArrayBlockingQueue;public class CommunicationBlockingQueueTest {public static void main(String[] args) {final Business business = new Business();new Thread() {public void run() {for(int i=0;i<50;i++){business.sub();}}}.start();try {Thread.sleep(100);} catch (InterruptedException e) {e.printStackTrace();}for(int i=0;i<50;i++)business.main();}static class Business{private ArrayBlockingQueue<Integer> queue1 = new ArrayBlockingQueue<Integer>(1);private ArrayBlockingQueue<Integer> queue2 = new ArrayBlockingQueue<Integer>(1);public Business(){try {queue2.put(2);} catch (InterruptedException e) {e.printStackTrace();}}public void sub(){for (int i = 0; i < 10; i++) {try {queue2.take();} catch (InterruptedException e) {e.printStackTrace();}System.out.println("sub:" + i);try {queue1.put(2);} catch (InterruptedException e) {e.printStackTrace();}}}public void main(){for (int i = 0; i < 100; i++) {try {queue1.take();} catch (InterruptedException e) {e.printStackTrace();}System.out.println("main:" + i);try {queue2.put(2);} catch (InterruptedException e) {e.printStackTrace();}}}}}
ArrayBlockingQueue在现实中非常实用.线程安全集合
一般的ArrayList、HashMap、HashSet等集合都不是线程安全的;并发库中提供了:(1)CopyOnWriteArrayList: 多线程的ArrayList;(2)ConcurrentSkipListHashMap:多线程的HashMap;小问题:HashMap和HashSet在实现上有什么关联?
答:HashSet在内部实现是通过HashMap的key实现的;并发队列ConcurrentLinkedQueue:一个基于链接节点的无界线程安全队列。
1.offer
2.poll
3.peek
并发散列映射表ConcurrentHashMap<K,V>:支持多个读写器
下面是原子性操作:
1.putIfAbsent(key,value):添加
- 如果key原来没有,则插入。
- 如果key原来有,则返回旧值。
3.remove(key,value):移除key-value对,如果不在映射中,则不执行任何操作
- if (map.containsKey(key) && map.get(key).equals(value)) {
map.remove(key);
return true;
} else return false;4.replace(key,oldvalue,newValue):替换
- if (map.containsKey(key) && map.get(key).equals(oldValue)) {
map.put(key, newValue);
return true;
} else return false;写时复制数组CopyOnWriteArryaList<T>:每个修改他的线程都有这个数组的一份拷贝。
任何collection类通过包装器能够变为线程安全。
Callable和Future
Callable<T>:类似Runnable,唯一的区别就是前者有返回值,后者无返回值,因此前者可以用于异步计算。
Future<T>用于保存Callable异步计算的结果。
1.get() 计算完之前阻塞,计算好了则返回结果。
2.isDone()返回是否计算完毕
3. future.get(int seconds ,TimeUnit.SECONDS) 在seconds秒内一定要得到结果,不然抛出异常;
实例代码:
package org.xiazdong.thread;import java.util.concurrent.Callable;import java.util.concurrent.ExecutionException;import java.util.concurrent.ExecutorService;import java.util.concurrent.Executors;import java.util.concurrent.Future;public class Demo03 {public static void main(String[] args) throws Exception {ExecutorService service = Executors.newSingleThreadExecutor();Future<String> future = service.submit(new Callable<String>(){@Overridepublic String call() throws Exception {return "Hello";}});System.out.println(future.get());}}同时提交多个Callable并返回多个Future
2.提交作业:
(1)提交一个任务
- Future<T> result=pool.submit(Callable<T>task)
- pool.execute(Runnable task);
(2)提交多个任务
- ArrayList<Callable<T>>task;
- List<Future<T>>results=pool.invokeAll(task); 提交所有任务。
Future<T>result=pool.invokeAny(task); 任意提交其中一个已完成任务。
3.result.get()可得结果
4.pool.sutdown()在用完线程池后关闭。
package org.xiazdong.sync;import java.util.ArrayList;import java.util.List;import java.util.concurrent.Callable;import java.util.concurrent.ExecutionException;import java.util.concurrent.ExecutorService;import java.util.concurrent.Executors;import java.util.concurrent.Future;public class CallableFuture {public static void main(String[] args) throws Exception, ExecutionException {ExecutorService service = Executors.newFixedThreadPool(3);ArrayList<Callable<Integer>> list = new ArrayList<Callable<Integer>>();for (int i = 0; i < 10; i++) {final int a = i;list.add(new Callable<Integer>() {@Overridepublic Integer call() throws Exception {System.out.println(Thread.currentThread().getName());return a;}});}List<Future<Integer>> results = service.invokeAll(list);for (Future<Integer> f : results) {if (f.isDone())System.out.println(f.get());}}}多线程实现另外几种方法:
1.FutureTask类
结合以上两个接口,FutureTask是实现了以上两个接口的类,能够把Callable作为参数传进去,可以利用FutureTask得到Callable计算的结果。
FutureTask<T> implements Runnable,Future<T>
构造:FutureTask(Callable<T>c);
放入线程:Thread t=new Thread(ft);
开始执行:t.start();
取得结果:ft.get();
2.Executors类 线程池类
线程池的优点:
(1)线程可以重用。
(2)限制线程个数。
线程池的变种:
1.创建线程池
(1)ExecutorService pool=Executors.newCachedThreadPool():在必要的时候能创建线程
(2)ExecutorService pool=Executors.newFixedThreadPool(int n);在线程池中创建固定数量的线程
(3) ExecutorService pool=Executors.newSingleThreadExecutor();线程池中只有一个线程,顺序执行线程。
pool.execute(Runnable run); //执行runnable的run方法;
pool.shutdown(); 在没有任务时结束线程池;
预定时间执行线程池:
ScheduledExecutorService pool=Executors.newScheduledThreadPool(int threads);线程池中只有一个线程,顺序执行线程。
pool.schedule(Runnable run,int delay,TimeUnit unit); 在delay的单位时间后启动任务。
pool.scheduleAtFixedRate(Runnable com,long initialDelay,long period,TimeUnit); initialDelay秒后周期性的启动任务。
package org.xiazdong.sync;import java.util.concurrent.ExecutorService;import java.util.concurrent.Executors;public class Demo07 {public static void main(String[] args) {ExecutorService pool = Executors.newFixedThreadPool(3); //创建一个只能容纳3个线程的线程池for (int i = 0; i < 10; i++) {pool.execute(new Runnable() {@Overridepublic void run() {System.out.println(Thread.currentThread().getName()); //Thread-name只能出现1,2,3}});}pool.shutdown(); //没有任务后线程池销毁}}package org.xiazdong.sync;import java.util.concurrent.ExecutorService;import java.util.concurrent.Executors;public class Demo07 {public static void main(String[] args) {ExecutorService pool = Executors.newSingleThreadExecutor(); //创建一个只能容纳1个线程的线程池for (int i = 0; i < 10; i++) {pool.execute(new Runnable() {@Overridepublic void run() {System.out.println(Thread.currentThread().getName()); //Thread-name只能出现1}});}pool.shutdown(); //没有任务后线程池销毁}}
package org.xiazdong.sync;import java.util.concurrent.ExecutorService;import java.util.concurrent.Executors;public class Demo07 {public static void main(String[] args) {ExecutorService pool = Executors.newCachedThreadPool(); //创建一个只能容纳1个线程的线程池for (int i = 0; i < 100; i++) {pool.execute(new Runnable() {@Overridepublic void run() {System.out.println(Thread.currentThread().getName()); //Thread-name只能出现1}});}pool.shutdown(); //没有任务后线程池销毁}}问:如何实现一个线程死了之后再启动一个线程?
答:用单线程池实现;
CompletionService类 :提交多个任务
(1)CompletionService<Integer> service = new ExecutorCompletionService<Integer>(Executor pool); //创建一个执行多个任务的服务,此任务的返回结果是Integer并且接收线程池,;
(2)service.submit(new Callable<Integer>(){}); //提交任务;
(3)Future<Integer> future = service.take();//获得先完成的任务的结果;
(4)Integer data = future.get(); //获得结果
package org.xiazdong.thread;import java.util.concurrent.Callable;import java.util.concurrent.CompletionService;import java.util.concurrent.ExecutorCompletionService;import java.util.concurrent.ExecutorService;import java.util.concurrent.Executors;import java.util.concurrent.Future;public class Demo03 {public static void main(String[] args) throws Exception {ExecutorService pool = Executors.newSingleThreadExecutor();CompletionService<Integer> service = new ExecutorCompletionService<Integer>(pool);for(int i=0;i<100;i++){final int s = i;service.submit(new Callable<Integer>(){@Overridepublic Integer call() throws Exception {Thread.sleep(100);return s;}});}for(int i=0;i<100;i++){Future<Integer> result = service.take();System.out.println(result.get());}}}控制线程组:ExecutorCompletionService<T> 内含阻塞队列
构造:ExecutorCompletionService<T> ecs=new ExecutorCompletionService(Executor e);提交:ecs.submit(Callable<T>c);取得结果是一个阻塞队列,队列中的元素是Future<T>:ecs.take().get();一些同步方法:1.CyclicBarrier 栅栏:顾名思义,就是如果在代码某处设个栅栏,则线程会执行到那停止,等到所有线程都到了,再一起执行。CyclicBarrier cb=new CyclicBarrier(int n,Runnable action); 规定n个线程,如果n个线程到齐,则执行action。cb.await();cb.await(int n,TimeUnit);2.倒计时门栓CountDownLatch 等到count变为0才开始执行。CountDownLatch cdl=new CountDownLatch(int count);cdl.await();等待直到count=0;countDown();3.同步队列SynchronousQueue<T>:put后阻塞等待take,take时阻塞等待put
- 例:put(1);后则会阻塞,直到调用take()获取1为止。
- 例:take()后会阻塞直到放入一个元素为止。
4.semaphore:
- 构造:Semaphore(int n); 初始为n的信号量
- acquire() n<=0时阻塞,否则n--;
- release() n++,释放acquire阻塞的线程。
Swing与线程:Swing中最基本的线程:
- main线程
- 实现分派线程 接收actionPerformed或paintComponent
- gc垃圾回收线程
Swing不是线程安全的。
设置组件属性一定要在组件实现之前。
setVisible(),pack,add称为组件实现。
在Java中,键盘输入、鼠标点击或者应用程序本身产生的请求会被封装成一个事件,放进一个事件队列中,java.awt.EventQueue对象负责从这个队列中取出事件并派发它们。而EventQueue的派发有一个单独的线程管理,这个线程叫做事件派发线程(Event Dispatch Thread),也就是EDT。此外,Swing的绘制请求也是通过EDT来派发的。
EventQueue.invokeLater(Runnable r);把r任务放到事件队列中等待事件分派线程执行。
当需要更新Swing的内容时,则需要将这段代码放入r类中。
native关键字:由java调用本机的系统函数。
java.util.concurrent.atomic 包
此包提供了原子操作的数据类型,比如说AtomicInteger表示原子操作的int;AtomicIntegerArray表示原子操作的int[];AtomicIntegerFieldUpdater表示原子操作类中的某个属性;
1.AtomicInteger
提供了常用的方法:
(1)AtomicInteger a =
AtomicInteger(int initialValue)//初始化a为整数initialValue;(2)int data = a.
addAndGet(int delta); // data = a+delta;(3)int data = a.
decrementAndGet(); // data = a-1;(4)int data = a.
incrementAndGet(); // data = a+1;(5)a.set(int value); //将a设置为value;
2.AtomicIntegerFieldUpdater
此类可以表示某个类中的整数属性,此属性必须是volatile的;
提供了常用的方法:
(1)AtomicIntegerFieldUpdater<U> field = AtomicIntegerFieldUpdater.
newUpdater(Class<U> tclass,String fieldName)//创建tclass类的fieldName属性;(2)int data = field.
addAndGet(T obj, int delta)//data = obj对象的field属性值+delta;(3)int data = field.
decrementAndGet(T obj); // --obj对象;(4)int data = field.get(T obj); //获得obj对象的属性值;
3.AtomicIntegerArray
此类代表整形数组;
常用方法;
(1)AtomicIntegerArray array = new AtomicIntegerArray(int length); //创建长度为length的数组;
(2)AtomicIntegerArray array = new AtomicIntegerArray(int[]arr); //array = int[]arr;
(3)array.set(int i,int value); // arr[i] = value;
(4)int a = array.get(i);
package org.xiazdong.sync;import java.util.concurrent.atomic.AtomicInteger;import java.util.concurrent.atomic.AtomicIntegerArray;import java.util.concurrent.atomic.AtomicIntegerFieldUpdater;public class Demo06 {private static AtomicInteger a = new AtomicInteger(3);private static AtomicIntegerFieldUpdater<Person> field = AtomicIntegerFieldUpdater.newUpdater(Person.class, "age");private static AtomicIntegerArray array = new AtomicIntegerArray(new int[]{1,2,3});public static void main(String[] args) {final Person p = new Person();new Thread(){public void run(){int b = a.addAndGet(3);int elem = array.get(1);array.addAndGet(1, 5);field.set(p,20);System.out.println("array-1: from "+elem+" to "+array.get(1));System.out.println("field:"+field.get(p));System.out.println("int:"+b);}}.start();new Thread(){public void run(){int b = a.decrementAndGet();System.out.println(b);}}.start();}}class Person{ volatile int age; public int getAge() { return age; } public void setAge(int age) { this.age = age; } }Semaphore:信号量
实现功能:有一个厕所,只有5个位置,因此第5个人进去以后,就不能有第6个人进去;即控制只能有规定数量的线程进入;
(1)Semaphore sp = new Semaphore(n); //创建只能有n个线程进入的
(2)int available = sp.availablePermits(); //返回还有几个线程可以进入;
(3)sp.require();//获得信号量
(4)sp.release(); //释放信号量
注意:谁都能释放信号量;如果信号量为1,则就是同步锁;
应用场景:停车位,厕所,占位问题;package org.xiazdong.sync;import java.util.concurrent.Semaphore;public class SemaphoreTest {public static void main(String[] args) {final Business bus = new Business();for(int i=0;i<10;i++){new Thread(){public void run(){bus.fun();}}.start();}}static class Business{Semaphore sp = new Semaphore(3);public void fun(){try {sp.acquire();} catch (InterruptedException e) {e.printStackTrace();}System.out.println(Thread.currentThread().getName()+"进入"+",还剩"+sp.availablePermits());try {Thread.sleep(1000);} catch (InterruptedException e) {// TODO Auto-generated catch blocke.printStackTrace();}sp.release();System.out.println(Thread.currentThread().getName()+"离开"+",还剩"+sp.availablePermits());}}}CyclicBarrier
常用方法:
(1)CyclicBarrier barrier = new CyclicBarrier(3); //创建一个栅栏,只要3个线程等着,就再执行;
(2)barrier.await(); //在栅栏处等着;
(3)barrier.getNumberWaiting(); //返回有几个线程在栅栏处等着;
一般来说,多个线程都会并发执行,谁也不会等谁,但是如果有了栅栏,则多个线程执行到一个栅栏时,则会都等到那,只有规定线程都执行到那,然后再一起继续执行,如图:
实现代码:
package org.xiazdong.sync;import java.util.concurrent.BrokenBarrierException;import java.util.concurrent.CyclicBarrier;public class CyclicBarrierTest {public static void main(String[] args) throws Exception {final CyclicBarrier barrier = new CyclicBarrier(3);System.out.println("一共有三个同学:");for(int i=0;i<3;i++){Thread.sleep(1000);new Thread(){public void run(){try {Thread.sleep(1000);} catch (InterruptedException e3) {e3.printStackTrace();}System.out.println(Thread.currentThread().getName()+"到达");System.out.println((barrier.getNumberWaiting()+1)+"个线程正在等");if((barrier.getNumberWaiting()+1)==3){System.out.println("出发!...");}try {barrier.await();} catch (InterruptedException e) {// TODO Auto-generated catch blocke.printStackTrace();} catch (BrokenBarrierException e) {// TODO Auto-generated catch blocke.printStackTrace();}try {Thread.sleep(1000);} catch (InterruptedException e2) {// TODO Auto-generated catch blocke2.printStackTrace();}}}.start();}}}CountDownLatch:倒计时器
常用方法:(1)CountDownLatch latch = new CountDownLatch(n); //创建数字为n的倒计时器(2)latch.await(); //等待,直到倒计时器为0;(3)latch.countDown(); //倒计时器减一;实现运动员比赛:全部运动员准备好后,直到裁判发令起跑;package org.xiazdong.sync;import java.util.Random;import java.util.concurrent.CountDownLatch;import java.util.concurrent.ExecutorService;import java.util.concurrent.Executors;public class CountDownLatchTest {public static void main(String[] args) throws Exception {final CountDownLatch latch1 = new CountDownLatch(1);final CountDownLatch latch2 = new CountDownLatch(8);ExecutorService pool = Executors.newCachedThreadPool();for(int i=0;i<8;i++){final int tmp = i;pool.execute(new Runnable(){@Overridepublic void run() {System.out.println("运动员"+tmp+"准备好了,等待...");try {latch1.await();} catch (InterruptedException e) {// TODO Auto-generated catch blocke.printStackTrace();}try {Thread.sleep(new Random().nextInt(1000));} catch (InterruptedException e) {// TODO Auto-generated catch blocke.printStackTrace();}System.out.println("运动员"+tmp+"到达...");latch2.countDown();}});}Thread.sleep(1000);System.out.println("裁判法令,开始起跑!");latch1.countDown();latch2.await();System.out.println("全体运动员到达..");pool.shutdown();}}Exchanger
两个线程交换数据;
场景:两人约定某地点,交换东西;
(1)Exchanger<T> exchanger = new Exchanger<T>(); //定义一个交换器,并且交换T类型的东西;
(2)T b = exchanger.exchange(T a) ; //用a交换,换回了b;
package org.xiazdong.sync;import java.util.concurrent.Exchanger;public class ExchangerTest {public static void main(String[] args) throws Exception {final Exchanger<Integer> ex = new Exchanger<Integer>();for(int i=0;i<2;i++){Thread.sleep(1000);final int tmp = i;new Thread(){public void run(){try {System.out.println(Thread.currentThread()+"到达持有:"+tmp);int a = ex.exchange(tmp);System.out.println(Thread.currentThread()+"换回:"+a);} catch (Exception e) {e.printStackTrace();}}}.start();}}}小知识点:静态内部类
如果要让内部类的行为类似于外部类的行为,则可以将内部类声明为static的;
原本一般的内部类对象创建需要依赖于外部类对象的创建,但是静态内部类则不需要;
小知识点:如果复制了源代码,则在Eclipse下的正确的包中 ctrl+v ,则可自动生成一个Java文件;
- 【Java多线程】多线程死锁
- Java 多线程
- java 多线程
- java多线程
- JAVA多线程
- java多线程
- JAVA多线程
- java多线程
- JAVA 多线程
- Java多线程
- java多线程
- JAVA 多线程
- Java 多线程
- Java 多线程
- java多线程
- Java 多线程
- Java多线程
- java 多线程
- 百练2980 大整数乘法
- mahout应用kmeans进行文本聚类2之——实例分析
- Chrome如何安装PR和Alexa插件
- 博客终于重新开通了,感动ing
- 8086寄存器
- 【Java】多线程
- android中的三种xml解析方法---sax解析,pull解析,dom
- .NET自定义控件应该如何实现?
- 算法入门之插入排序
- 设计模式学习(1) 工厂模式
- 实现textview同时具有水平滚动条和垂直滚动条
- SSH整合使用步骤
- Oracle培训笔记 8.6 逻辑结构(二)
- MacOS中卸载软件的软件