大家来找茬图片比较脚本
来源:互联网 发布:java http传输协议 编辑:程序博客网 时间:2024/04/28 16:35
第一份代码是比较两幅图,找出差异来。
# -*- coding: cp936 -*- import ctypes import Image, ImageGrab, ImageChops#构造RECT结构体 class RECT(ctypes.Structure): _fields_ = [('left', ctypes.c_long), ('top', ctypes.c_long), ('right', ctypes.c_long), ('bottom', ctypes.c_long)] def __str__(self): return str((self.left, self.top, self.right, self.bottom)) HWND = ctypes.windll.user32.FindWindowA(None, "大家来找茬") if HWND == 0: print "找不到窗口" quit() rect =RECT() ctypes.windll.user32.GetWindowRect(HWND,ctypes.byref(rect))print rect#去掉人物栏,去掉底边,去掉边框rect0 = (rect.left+2,rect.top+190+2,rect.right-2,rect.bottom-96-2)print rect0width = (rect0[2] - rect0[0])/2height = rect0[3] - rect0[1]rect1 = (0,0,width-15,height)rect2 = (width-1,0,rect0[2] - rect0[0]-16,height)im = ImageGrab.grab(rect0)im1 = im.crop(rect1)im2 = im.crop(rect2)imdiff = ImageChops.difference(im1,im2).save("c:/imdiff.bmp","")imdiff.show()左图:

右图:

比较结果:

第二份代码是通过opencv的轮廓检测功能分析差异边界
代码来自:http://www.opencv.org.cn/index.php/%E8%BD%AE%E5%BB%93%28contour%29%E6%A3%80%E6%B5%8B ,略有修改
'''Created on 2011-8-18 @author: Sunny'''#import cv moduleimport cvimport sys if __name__ == '__main__': # Declare the IplImage pImg = None; pContourImg = None; storage = cv.CreateMemStorage(0); contour = None; mode = cv.CV_RETR_EXTERNAL; # Create Windows cv.NamedWindow("src", 1) cv.NamedWindow("contour",1) # Load Image, Convert to Gray by force pImg = cv.LoadImage("c:/imdiff.bmp", 0) # A image in the same directory of the file. cv.ShowImage( "src", pImg ); # Apply the Memory Storage for Contour Image. pContourImg = cv.CreateImage(cv.GetSize(pImg),cv.IPL_DEPTH_8U,3); # copy source image and convert it to BGR image cv.CvtColor(pImg, pContourImg, cv.CV_GRAY2BGR); # Find contours contour = cv.FindContours( pImg, storage, cv.CV_RETR_EXTERNAL, cv.CV_CHAIN_APPROX_SIMPLE); # Draw the Contours cv.DrawContours(pContourImg, contour, cv.CV_RGB(255,0,0), cv.CV_RGB(0, 0, 255), 2, 2, 8); # Show Image cv.ShowImage( "contour", pContourImg ); cv.WaitKey(0); # Destory Windows cv.DestroyWindow( "src" ); cv.DestroyWindow( "contour" ); # Python2.7-OpenCV2.2 will Release Image MemStorage Automatically #cv.ReleaseImage( pImg ); #cv.ReleaseImage( pContourImg ); #cv.ReleaseMemStorage(storage); sys.exit(0)结果如图:
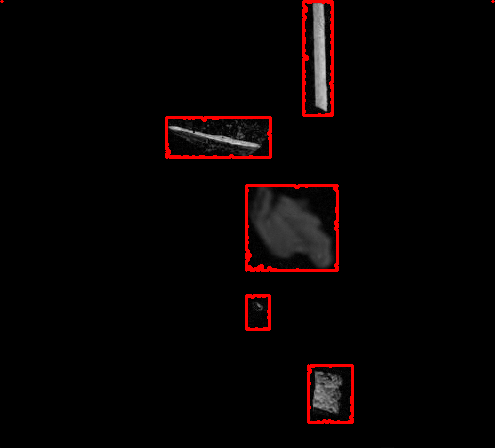
简单修改一下代码,将轮廓画在原始图片中,就可以明显的显示出差异了:
cv.DrawContours(pContourImg, contour, cv.CV_RGB(255,0,0), cv.CV_RGB(0, 0, 255), 2, 2, 8);#修改pContourImg
- 大家来找茬图片比较脚本
- 大家来找茬
- 大家来找茬
- 大家来找茬
- 【智力题】大家来找茬!
- 比较原始的QQ大家来找茬的原型
- 大家来找茬辅助工具实现
- gtk+ 游戏 “大家来找茬“
- 秒杀“大家来找茬”
- AOJ.602 大家来找茬
- 联众大家来找茬外挂(联众找茬外挂) 官网
- “图片差异检查”辅助工具(即“大家来找茬”辅助工具)源码分享
- QQ游戏-大家来找茬 外挂
- “大家来找茬”自制查找程序
- 大家来找茬辅助工具超级简易版
- 大家来找茬的部分代码
- 大家来找茬--初识图像处理
- QQHelper:QQ大家来找茬 辅助工具 外挂
- CSS教程:彻底掌握Z-index属性
- struct2 标签
- 收藏--真正爱你的男人
- 面试之C++(1):extern及extern “C”用法
- jdbc连数据库查询问题,isClose()方法为什么报错?
- 大家来找茬图片比较脚本
- GPRS系统中,一阶段接入和二阶段接入的区别
- redis
- JAVA读XML:sax,dom,jdom,dom4j的比较以及选择(个人觉得不错啊,自己比较喜欢dom4j)
- WinDbg定位内存泄露
- 课堂笔记--JDBC
- JDBC编程-----数据库的链接
- 未来IT行业将缩减到三类职业(The future of IT will be reduced to three kinds of jobs)
- JDBC之事务