Android中Parcel的分析以及使用
来源:互联网 发布:win7下安装mac os x 编辑:程序博客网 时间:2024/05/21 10:12
简单点来说:Parcel就是一个存放读取数据的容器, android系统中的binder进程间通信(IPC)就使用了Parcel类来进行客户端与服务端数据的交互,而且AIDL的数据也是通过Parcel来交互的。在Java空间和C++都实现了Parcel,由于它在C/C++中,直接使用了内存来读取数据,因此,它更有效率。
分析Binder机制中的客户端与服务器端进行实际操作ontransact()函数 :
//参数说明:// code :是请求的ID号 // data :客户端请求发送的参数// reply:服务器端返回的结果// flags:一些额外的标识,如FLAG_ONEWAY等,通常为0.virtual status_t onTransact( uint32_t code, const Parcel& data, Parcel* reply, uint32_t flags = 0);
从中我们可以看到Parcel的重要性以及窥探它的使用情况,接下来,我主要分析它的存储机制。
常用方法介绍:
obtain() 获得一个新的parcel ,相当于new一个对象
dataSize() 得到当前parcel对象的实际存储空间
dataCapacity() 得到当前parcel对象的已分配的存储空间, >=dataSize()值 (以空间换时间)
dataPostion() 获得当前parcel对象的偏移量(类似于文件流指针的偏移量)
setDataPosition() 设置偏移量
recyle() 清空、回收parcel对象的内存
writeInt(int) 写入一个整数
writeFloat(float) 写入一个浮点数
writeDouble(double) 写入一个双精度数
writeString(string) 写入一个字符串
当然,还有更多的writeXXX()方法,与之对应的就是readXXX(),具体方法请参阅SDK。
其中几个值得注意的方法为:
writeException() 在Parcel队头写入一个异常
writeException() Parcel队头写入“无异常“
readException() 在Parcel队头读取,若读取值为异常,则抛出该异常;否则,程序正常运行。
一、Parcel的分析
相信看了前面的值,对Parcel的使用该有了初步印象。那么,Parcel的内部存储机制是怎么样的?偏移量又是
什么情况?让我们回忆一下基本数据类型的取值范围:
boolean 1bit 1字节
char 16bit 2字节
int 32bit 4字节
long 64bit 8字节
float 32bit 4字节
double 64bit 8字节
如果大家对C语言熟悉的话,C语言中结构体的内存对齐和Parcel采用的内存存放机制一样,即读取最小字节
为32bit,也即4个字节。高于4个字节的,以实际数据类型进行存放,但得为4byte的倍数。基本公式如下:
实际存放字节:
判别一: 32bit (<=32bit) 例如:boolean,char,int
判别二: 实际占用字节(>32bit) 例如:long,float,String,数组等
当我们使用readXXX()方法时,读取方法也如上述:
实际读取字节:
判别一: 32bit (<=32bit) 例如:boolean,char,int
判别二: 实际字节大小(>32bit) 例如:long,float,String,数值等
由上可以知道,当我们写入/读取一个数据时,偏移量至少为4byte(32bit),于是,偏移量的公式如下:
f(x)= 4x (x=0,1,…n)
事实上,我们可以显示的通过setDataPostion(int postion) 来直接操作我们欲读取数据时的偏移量。毫无疑问,
你可以设置任何偏移量,但所读取的值是类型可能有误。因此显示设置偏移量读取值的时候,需要小心。
另外一个注意点就是我们在writeXXX()和readXXX()时,导致的偏移量是共用的,例如,我们在writeInt(23)后,
此时的datapostion=4,如果我们想读取5,简单的通过readInt()是不行的,只能得到0。这时我们只能通过
setDataPosition(0)设置为起始偏移量,从起始位置读取四个字节,即23。因此,在读取某个值时,可能需要使用
setDataPostion(int postion)使偏移量装换到我们的值处。
巧用setDataPosition()方法,当我们的parcel对象中只存在某一类型时,我们就可以通过这个方法来快速的读取
所有值。具体方法如下:
/** * 前提条件,Parcel存在多个类型相同的对象,本例子以10个float对象说明: */public void readSameType() {Parcel parcel =Parcel.obtain() ;for (int i = 0; i < 10; i++) {parcel.writeDouble(i);Log.i(TAG, "write double ----> " + getParcelInfo());}//方法一 ,显示设置偏移量 int i = 0;int datasize = parcel.dataSize();while (i < datasize) {parcel.setDataPosition(i);double fvalue = parcel.readDouble();Log.i(TAG, " read double is=" + fvalue + ", --->" + getParcelInfo());i += 8; // double占用字节为 8byte }//方法二,由于对象的类型一致,我们可以直接利用readXXX()读取值会产生偏移量//parcel.setDataPosition(0) ; ////while(parcel.dataPosition()<parcel.dataSize()){//double fvalue = parcel.readDouble();//Log.i(TAG, " read double is=" + fvalue + ", --->" + getParcelInfo());//}}由于可能存在读取值的偏差,一个默认的取值规范为:
1、 读取复杂对象时: 对象匹配时,返回当前偏移位置的该对象;
对象不匹配时,返回null对象 ;
2、 读取简单对象时: 对象匹配时,返回当前偏移位置的该对象 ;
对象不匹配时,返回0;
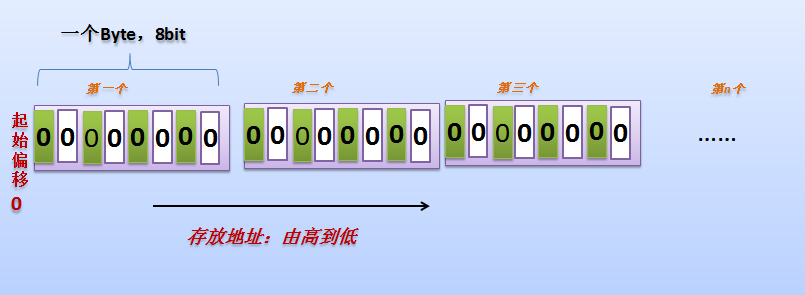
下面,给出一张浅显的Parcel的存放空间图,希望大家在理解的同时,更能体味其中滋味。有点简单,求谅解。
相信通过前面的介绍,你一定很了解了了Parcel的存储机制,下面给定一应用程序来实践。
1、布局文件如下:
<?xml version="1.0" encoding="utf-8"?><LinearLayout xmlns:android="http://schemas.android.com/apk/res/android"android:orientation="vertical" android:layout_width="fill_parent"android:layout_height="fill_parent"><TextView android:layout_width="fill_parent"android:layout_height="wrap_content" android:text="@string/hello" /><LinearLayout android:orientation="horizontal"android:layout_width="fill_parent" android:layout_height="wrap_content"><Button android:id="@+id/btWriteByte" android:layout_width="wrap_content"android:layout_height="wrap_content" android:text="写入一个byte值"></Button><Button android:id="@+id/btWriteInt" android:layout_width="wrap_content"android:layout_height="wrap_content" android:text="写入一个int值"></Button></LinearLayout><LinearLayout android:orientation="horizontal"android:layout_width="fill_parent" android:layout_height="wrap_content"><Button android:id="@+id/btWriteDouble" android:layout_width="wrap_content"android:layout_height="wrap_content" android:text="写入一个double值"></Button><Button android:id="@+id/btWriteString" android:layout_width="wrap_content"android:layout_height="wrap_content" android:text="写入一个String值"></Button></LinearLayout><View android:layout_width="fill_parent" android:layout_height="2dip"android:background="#FF1493"></View><LinearLayout android:orientation="horizontal"android:layout_marginTop="5dip" android:layout_width="fill_parent"android:layout_height="wrap_content"><Button android:id="@+id/btReadByte" android:layout_width="wrap_content"android:layout_height="wrap_content" android:text="读取一个byte值"></Button><Button android:id="@+id/btReadInt" android:layout_width="wrap_content"android:layout_height="wrap_content" android:text="读取一个int值"></Button></LinearLayout><LinearLayout android:orientation="horizontal"android:layout_width="fill_parent" android:layout_height="wrap_content"><Button android:id="@+id/btReadDouble" android:layout_width="wrap_content"android:layout_height="wrap_content" android:text="读取一个double值"></Button><Button android:id="@+id/btReadString" android:layout_width="wrap_content"android:layout_height="wrap_content" android:text="读取一个String值"></Button></LinearLayout><View android:layout_width="fill_parent" android:layout_height="2dip"android:background="#FF1493"></View><Button android:id="@+id/btSameType" android:layout_width="wrap_content"android:layout_height="wrap_content" android:text="利用setDataPosition读取多个值"></Button></LinearLayout>
2、配置文件如下:
<?xml version="1.0" encoding="utf-8"?><manifest xmlns:android="http://schemas.android.com/apk/res/android" package="com.qinjuning.parcel" android:versionCode="1" android:versionName="1.0"> <application android:icon="@drawable/icon" android:label="@string/app_name"> <activity android:name=".MainActivity" android:label="@string/app_name"> <intent-filter> <action android:name="android.intent.action.MAIN" /> <category android:name="android.intent.category.LAUNCHER" /> </intent-filter> </activity> </application></manifest>
3、程序主文件如下:
public class MainActivity extends Activity implements OnClickListener {private static String TAG = "PARCELTEST";// Button IDprivate static int[] btIds = new int[] { R.id.btWriteByte, R.id.btWriteInt,R.id.btReadDouble, R.id.btWriteString, R.id.btReadByte,R.id.btReadInt, R.id.btReadDouble, R.id.btReadString,R.id.btSameType };// 每种类型的当前值private byte cur_byte = 1; // 每次总写入 falseprivate int cur_int = 10; // 写入值 cur_int ++ ;private double cur_float = 100.0d; // 写入值 cur_float++ ;private String cur_str = "QinJun -->" + cur_int; // 写入值 "QinJun -->"+cur_intprivate Parcel parcel = null;@Overridepublic void onCreate(Bundle savedInstanceState) {super.onCreate(savedInstanceState);setContentView(R.layout.main);for (int i = 0; i < btIds.length; i++) {Button bt = (Button) findViewById(btIds[i]);bt.setOnClickListener(this);}parcel = Parcel.obtain(); // 获得一个Parcel对象 ,相当于new一个,初始大小为0Log.i(TAG, "The original parcel info" + getParcelInfo());}@Overridepublic void onClick(View view) {// TODO Auto-generated method stubint viewId = view.getId();switch (viewId) {case R.id.btWriteByte:parcel.setDataPosition(0);parcel.writeByte(cur_byte);Log.i(TAG, " after write byte, --->" + getParcelInfo());break;case R.id.btWriteInt:parcel.writeInt(cur_int);Log.i(TAG, " after write int, --->" + getParcelInfo());break;case R.id.btWriteDouble:parcel.writeDouble(cur_float);Log.i(TAG, " after write float, --->" + getParcelInfo());break;case R.id.btWriteString:parcel.writeString(cur_str);Log.i(TAG, " after write String, --->" + getParcelInfo());break;case R.id.btReadByte:byte b = parcel.readByte();Log.i(TAG, " read byte is=" + b + ", --->" + getParcelInfo()+ "String");break;case R.id.btReadInt:int i = parcel.readInt();Log.i(TAG, " read int is=" + i + ", --->" + getParcelInfo());break;case R.id.btReadDouble:float f = parcel.readFloat();readSameType();Log.i(TAG, " read float is=" + f + ", --->" + getParcelInfo());break;case R.id.btReadString:parcel.setDataPosition(0);String str = parcel.readString();Log.i(TAG, " read float is=" + str + ", --->" + getParcelInfo());break;case R.id.btSameType:readSameType();break;default:break;}}private String getParcelInfo() {// 得到parcel的信息return "dataSize = " + parcel.dataSize() + ", dataCapacity="+ parcel.dataCapacity() + ", dataPositon = "+ parcel.dataPosition();}/** * 前提条件,Parcel存在多个类型相同的对象,本例子以10个float对象说明: */public void readSameType() {for (int i = 0; i < 10; i++) {parcel.writeDouble(i);Log.i(TAG, "write double ----> " + getParcelInfo());}//方法一 ,显示设置偏移量 int i = 0;int datasize = parcel.dataSize();while (i < datasize) {parcel.setDataPosition(i);double fvalue = parcel.readDouble();Log.i(TAG, " read double is=" + fvalue + ", --->" + getParcelInfo());i += 8; // double占用字节为 8byte }//方法二,由于对象的类型一致,我们可以直接利用readXXX()读取值会产生偏移量//parcel.setDataPosition(0) ; ////while(parcel.dataPosition()<parcel.dataSize()){//double fvalue = parcel.readDouble();//Log.i(TAG, " read double is=" + fvalue + ", --->" + getParcelInfo());//}}}
由于取值时,可能存在类型的转换,因此点击按钮时,可能不会产生预期结果。因此,得保证偏移量对应数值的正确性。
二、Parcel的使用
关于Parcel的使用,请参考如下两票文章,小生也就不再赘述了。
1、 Android高手进阶教程(十七)之---Android中Intent传递对象的两种方法(Serializable,Parcelable)!
2、 Android高手进阶教程(二十五)之---Android 中的AIDL!!!
- Android中Parcel的分析以及使用
- Android中Parcel的分析以及使用
- Android中Parcel的分析以及使用
- Android中Parcel的分析以及使用
- Android中Parcel的分析以及使用
- Android中Parcel的分析以及使用
- Android中Parcel的分析以及使用
- Android中Parcel的分析以及使用
- Android中Parcel的分析以及使用
- Android中Parcel的分析以及使用
- Android中Parcel的分析以及使用
- Android中Parcel的分析以及使用
- Android中Parcel的分析以及使用
- Android中Parcel的分析以及使用
- Android中Parcel的分析以及使用
- Android中Parcel的分析以及使用
- Android中Parcel的解读
- Android中使用C++程序读写Parcel的简单例子
- [Java]关于throw,throws,try{}catch(){}
- 字典树(讲解+模版)
- SetStretchBltMode() 防止图片失真
- 如何将二维数组作为函数的参数传递
- linux学习笔记(1)
- Android中Parcel的分析以及使用
- 快排函数qsort调用的使用细则
- 如何动态开辟二维空间的问题,
- curl源码分析(二)协议注册与使用过程
- 谷歌在全球24个国家推出Chrome网络商店
- SQLITE3 使用总结(1)
- googlle MapView apiKey
- 浏览器用户代理简表
- 排序算法 种类 总结 介绍