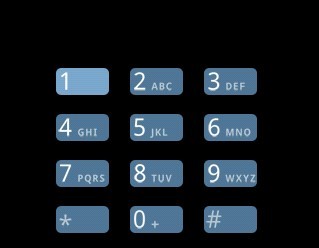
Android自定义控件之我的电话小键盘
来源:互联网 发布:淘宝客服需要做什么 编辑:程序博客网 时间:2024/06/18 09:16
关于Android的自定义控件,之前也写了两个,一个是简单地继承View,另一个通过继承Layout实现一个省市联动控件。这篇,将通过继承ViewGroup来实现一个电话拨打小键盘。本人一贯风格,懒得罗里吧嗦讲一大堆,直接上图上代码,一切尽在注释中!

1、MyPhoneCard.java
/** * * 自定义一个4*3的拨打电话的布局控件, * * */public class MyPhoneCard extends ViewGroup{private static final int COLUMNS = 3;private static final int ROWS = 4;private static final int NUM_BUTTON = COLUMNS*ROWS;private View[] mButtons = new View[NUM_BUTTON];private int mButtonWidth;private int mButtonHeight;private int mPaddingLeft;private int mPaddingRight;private int mPaddingTop;private int mPaddingBottom;private int mWidthInc;private int mHeightInc;private int mWidth;private int mHeight;public MyPhoneCard(Context context) {super(context);}public MyPhoneCard(Context context, AttributeSet attrs){super(context,attrs);}public MyPhoneCard(Context context, AttributeSet attrs, int defStyle){super(context,attrs,defStyle);}/** * 当从xml将所有的控件都调入内存后,触发的动作 * 在这里获取控件的大小,并计算整个ViewGroup需要的总的宽和高 */@Overrideprotected void onFinishInflate(){super.onFinishInflate();final View[] btns = mButtons;for(int i=0; i<NUM_BUTTON; i++){btns[i] = this.getChildAt(i);btns[i].measure(MeasureSpec.UNSPECIFIED, MeasureSpec.UNSPECIFIED);}//缓存大小final View child = btns[0];mButtonWidth = child.getMeasuredWidth();mButtonHeight = child.getMeasuredHeight();mPaddingLeft = this.getPaddingLeft();mPaddingRight = this.getPaddingRight();mPaddingTop = this.getPaddingTop();mPaddingBottom = this.getPaddingBottom();mWidthInc = mButtonWidth + mPaddingLeft + mPaddingRight;mHeightInc = mButtonHeight + mPaddingTop + mPaddingBottom;mWidth = mWidthInc*COLUMNS;mHeight = mHeightInc*ROWS;Log.v("Finish Inflate:", "btnWidth="+mButtonWidth+",btnHeight="+mButtonHeight+",padding:"+mPaddingLeft+","+mPaddingTop+","+mPaddingRight+","+mPaddingBottom);}/** * 这个方法在onFinishInflate之后,onLayout之前调用。这个方面调用两次 */@Overrideprotected void onMeasure(int widthMeasureSpec, int heightMeasureSpec){super.onMeasure(widthMeasureSpec, heightMeasureSpec);Log.v("ViewGroup SIZE:width=", mWidth+"");Log.v("ViewGroup SIZE: height=",mHeight+"");final int width = resolveSize(mWidth, widthMeasureSpec);//传入我们希望得到的宽度,得到测量后的宽度final int height = resolveSize(mHeight,heightMeasureSpec);//传入我们希望得到的高度,得到测量后的高度Log.v("ViewGroup Measured SIZE: width=", width+"");Log.v("ViewGroup Measured SIZE: height=", height+"");//重新计算后的结果,需要设置。下面这个方法必须调用setMeasuredDimension(width, height);}/** * 这个方法在onMeasure之后执行,这个自定义控件中含有12个子控件(每个小键),所以,重写这个方法, * 调用每个键的layout,将他们一个一个布局好 * 就是4*3的放置,很简单,一个嵌套循环搞定 */@Overrideprotected void onLayout(boolean changed, int left, int top, int right, int bottom) {final View[] buttons = mButtons;int i = 0;Log.v("BOTTOM:", bottom+"");Log.v("TOP", top+"");int y = (bottom - top) - mHeight + mPaddingTop;//这里其实bottom-top=mHeight,所以y=mPaddingTopLog.v("Y=", y+"");for(int row=0; row<ROWS; row++){int x = mPaddingLeft;for(int col = 0; col < COLUMNS; col++){buttons[i].layout(x, y, x+mButtonWidth, y+mButtonHeight);x = x + mWidthInc;i++;}y = y + mHeightInc;}}}2、布局文件:
<?xml version="1.0" encoding="utf-8"?><demo.phone.card.MyPhoneCard xmlns:android="http://schemas.android.com/apk/res/android" android:id = "@+id/dialpad" android:paddingLeft="7dp" android:paddingRight="7dp" android:paddingTop="6dp" android:paddingBottom="6dp" android:layout_gravity="center" android:layout_width="wrap_content" android:layout_height="wrap_content" android:layout_marginBottom="5dp"> <ImageButton android:id="@+id/one" android:src="@drawable/dial_num_1_no_vm" style="@style/dial_btn_style" /> <ImageButton android:id="@+id/two" android:src="@drawable/dial_num_2" style="@style/dial_btn_style"/> <ImageButton android:id="@+id/three" android:src="@drawable/dial_num_3" style="@style/dial_btn_style"/> <ImageButton android:id="@+id/four" android:src="@drawable/dial_num_4" style="@style/dial_btn_style"/> <ImageButton android:id="@+id/five" android:src="@drawable/dial_num_5" style="@style/dial_btn_style"/> <ImageButton android:id="@+id/six" android:src="@drawable/dial_num_6" style="@style/dial_btn_style"/> <ImageButton android:id="@+id/seven" android:src="@drawable/dial_num_7" style="@style/dial_btn_style"/> <ImageButton android:id="@+id/eight" android:src="@drawable/dial_num_8" style="@style/dial_btn_style"/> <ImageButton android:id="@+id/nine" android:src="@drawable/dial_num_9" style="@style/dial_btn_style"/> <ImageButton android:id="@+id/star" android:src="@drawable/dial_num_star" style="@style/dial_btn_style"/> <ImageButton android:id="@+id/zero" android:src="@drawable/dial_num_0" style="@style/dial_btn_style"/> <ImageButton android:id="@+id/pound" android:src="@drawable/dial_num_pound" style="@style/dial_btn_style"/> </demo.phone.card.MyPhoneCard>
这样,就实现了上图的小键盘。这个例子参考Android自带电话应用的实现。可见,在开发中,灵活运用自定义的控件,可以实现独特而富有魅力的效果!
- Android自定义控件之我的电话小键盘
- Android自定义控件之我的电话小键盘
- Android平板设备上的数字小键盘自定义控件的实现(非弹出软键盘)
- Android-自定义数字小键盘
- 我的Android进阶之旅------>Android电话窃听实例
- 我的自定义控件之旅——自定义进度条
- 自定义小键盘
- Android之自定义控件
- Android之自定义控件
- android之自定义控件
- Android自定义控件之虚线的用法
- Android自定义控件之SurfaceView的使用
- Android自定义控件之自定义日历控件
- Android自定义控件之自定义组合控件
- Android 自定义控件之自定义组合控件
- Android自定义控件之自定义组合控件
- 【组合控件】android自定义控件之带文字的ImageView
- android之自定义控件一控件的呈现机制
- POJ 2343 Airline company [DFS编号]
- WinRAR 4.01 key!注册文件 注册码
- AIR程序打包
- tomcat server.xml详解
- 怎么在PopUpButton当中加上横分割线
- Android自定义控件之我的电话小键盘
- 棋盘覆盖问题
- 冒泡排序
- 为什么C++编译器不支持模板头文件和实现代码分离的编译
- 一段有用的java3d代码,演示了java3d鼠标滑过对象事件。
- Opendiameter
- PS1设置Linux系统提示符
- 编译安装小错误
- 用汇编的眼光看C++(之判断流程)


