Android通知管理(NotificationManager)的使用,包括震动,led闪屏
来源:互联网 发布:知源药业有限公司 编辑:程序博客网 时间:2024/05/16 14:00
在android开发中经常要使用到通知,比如:收到短息,来电等等,通知是应用程序提醒用户的一种方式,他不需要使用Activity。
通知向用户传递信息有多种方式:(1)状态栏图标 (2)扩展的通知状态绘制器 (3)声音、震动、LED闪烁
通过一个小例子将上面几种方式集成到一起。
在配置扩展状态通知显示的时候,有两种方法:
1,使用setLatestEventInfo方法更新标准的扩展的状态通知显示中所显示的详细信息。
2,使用远程视图(Remote View)设置contentView和contentIntent,这样可以为扩展状态显示分配一个你需要的定制UI.
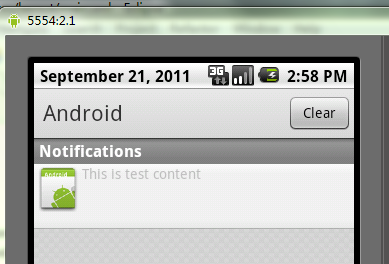
扩展状态窗口定制布局 my_status.xml(一个简单线性布局,前面放一个imageview,后面一个textview)
<?xml version="1.0" encoding="utf-8"?><LinearLayout xmlns:android="http://schemas.android.com/apk/res/android" android:layout_width="fill_parent" android:layout_height="fill_parent" android:orientation="horizontal"> <ImageView android:id="@+id/status_icon" android:layout_width="wrap_content" android:layout_height="wrap_content" /> <TextView android:id="@+id/status_text" android:layout_width="wrap_content" android:layout_height="wrap_content" /></LinearLayout>
要把这个定制布局分配给通知,要创建一个新的RemoteView对象,并把它分配给contentView属性,还需要想contentIntent属性分配一个待处理的意图(Pending Intent)代码如下:mNotification.contentView = new RemoteViews(this.getPackageName(),R.layout.my_status);mNotification.contentIntent = mContentIntent;
如果要修改定制布局中视图的属性或者外观,可以使用远程视图对象的set*方法
mNotification.contentView.setImageViewResource(R.id.status_icon,R.drawable.icon);mNotification.contentView.setTextViewText(R.id.status_text, "This is test content");
向通知添加声音、闪屏、振动效果的最简单最一致的方式是使用当前用户的默认设置。mNotification.defaults = Notification.DEFAULT_SOUND | Notification.DEFAULT_VIBRATE;如果想全部默认设置就使用DEFAULT_ALL常量
如果要使用自己的定制的声音或者动态修改声音就可以设置mNotification.sound = ringURI;
要设置振动类型的话,需要向通知的vibrate属性分配一个longs类型的数组;
比如:
long[] vibreate= new long[]{1000,1000,1000,1000,1000};mNotification.vibrate = vibreate;上面代码的作用是振动按照振动1秒,暂停1秒的模式进行振动,整个过程持续5秒。
需要注意的是,使用振动必须添加一个权限:
<uses-permission android:name="android.permission.VIBRATE"/>
设置闪屏
mNotification.ledARGB = Color.BLUE;
mNotification.ledOffMS= 0;
mNotification.ledOnMS = 1;
mNotification.flags = mNotification.flags | Notification.FLAG_SHOW_LIGHTS;
ledARGB属性可以用来设置LED的颜色,ledOffMS和ledOnMS属性则可以设置LED闪烁的频率和模式。ledOnMS设置为1并把ledOffMS设置为0来打开LED,两个都设置为0则关闭LED.完整的代码:
主界面布局文件
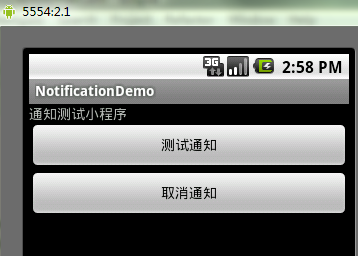
<?xml version="1.0" encoding="utf-8"?><LinearLayout xmlns:android="http://schemas.android.com/apk/res/android" android:orientation="vertical" android:layout_width="fill_parent" android:layout_height="fill_parent" ><TextView android:layout_width="fill_parent" android:layout_height="wrap_content" android:text="通知测试小程序" /><Buttonandroid:id="@+id/showStatusButton"android:layout_width="fill_parent" android:layout_height="wrap_content" android:text="测试通知"/><Buttonandroid:id="@+id/cancelButton"android:layout_width="fill_parent" android:layout_height="wrap_content" android:text="取消通知"/></LinearLayout>
activity
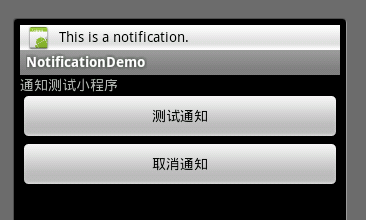
import android.app.Activity;import android.app.Notification;import android.app.NotificationManager;import android.app.PendingIntent;import android.content.Context;import android.content.Intent;import android.graphics.Color;import android.os.Bundle;import android.view.View;import android.view.View.OnClickListener;import android.widget.Button;import android.widget.RemoteViews;public class NotificationDemo extends Activity implements OnClickListener{ private Context mContext; private Button showStatusButton,cancelButton; private Notification mNotification; private NotificationManager mNotificationManager; private final static int NOTIFICATION_ID = 0x0001; @Override public void onCreate(Bundle savedInstanceState) { super.onCreate(savedInstanceState); setContentView(R.layout.main); mNotification = new Notification(R.drawable.icon,"This is a notification.",System.currentTimeMillis());mNotificationManager = (NotificationManager)this.getSystemService(NOTIFICATION_SERVICE); findViews(); } public void findViews(){ mContext = NotificationDemo.this; showStatusButton = (Button)findViewById(R.id.showStatusButton); cancelButton = (Button)findViewById(R.id.cancelButton); showStatusButton.setOnClickListener(this); cancelButton.setOnClickListener(this); } public void statusNotifi(){Intent mIntent = new Intent(mContext,NotificationDemo.class);//这里需要设置Intent.FLAG_ACTIVITY_NEW_TASK属性mIntent.setFlags(Intent.FLAG_ACTIVITY_NEW_TASK);PendingIntent mContentIntent =PendingIntent.getActivity(mContext,0, mIntent, 0);//1,使用setLatestEventInfo//这里必需要用setLatestEventInfo(上下文,标题,内容,PendingIntent)不然会报错.//mNotification.setLatestEventInfo(mContext, "新消息", "主人,您孙子给你来短息了", mContentIntent);//2,使用远程视图mNotification.contentView = new RemoteViews(this.getPackageName(),R.layout.my_status);mNotification.contentView.setImageViewResource(R.id.status_icon,R.drawable.icon);mNotification.contentView.setTextViewText(R.id.status_text, "This is test content");//使用默认的声音,闪屏,振动效果//mNotification.defaults = Notification.DEFAULT_ALL;//mNotification.defaults = Notification.DEFAULT_SOUND | Notification.DEFAULT_VIBRATE;//添加震动long[] vibreate= new long[]{1000,1000,1000,1000};mNotification.vibrate = vibreate;//添加ledmNotification.ledARGB = Color.BLUE;mNotification.ledOffMS= 0;mNotification.ledOnMS = 1;mNotification.flags = mNotification.flags | Notification.FLAG_SHOW_LIGHTS;//手动设置contentView属于时,必须同时也设置contentIntent不然会报错mNotification.contentIntent = mContentIntent;//触发通知(消息ID,通知对象)mNotificationManager.notify(NOTIFICATION_ID, mNotification); } public void onClick(View v) {if(v == showStatusButton){statusNotifi();}else if(v == cancelButton){mNotificationManager.cancel(NOTIFICATION_ID); //取消通知}}}
提示:每个设备对LED的控制方面可能具有不同的限制,如果设置的颜色不可用,可以尝试换用其他颜色试试。
振动和LED在模拟器中是看不到效果的,必须使用真机。
- Android通知管理(NotificationManager)的使用,包括震动,led闪屏
- Android NotificationManager与Notification(通知栏) 的使用
- 通知NotificationManager的简单使用
- android的NotificationManager的使用,快捷通知栏
- Android 通知栏 NotificationManager和Notification的使用总结
- Android中通知的提示音、震动和LED灯效果小例子
- Android-AlarmManager+notificationManager(闹钟+通知)的实例
- android 通知栏NotificationManager及自定义通知栏Notification的使用
- android Notification通知消息学习(NotificationManager)
- android NotificationManager 通知栏
- android 通知NotificationManager
- android NotificationManager:通知栏
- Android NotificationManager的简单使用
- Android使用NotificationManager来进行任务栏通知(使用Bmob第三方推送)
- Android震动的使用
- Android 通知栏NotificationManager设置
- Android Vibrator(震动器)的使用
- Android 发通知NotificationManager和Notification的详解
- Response.Redirect into a new window (with Extension Methods)
- 讲讲volatile的作用
- pku acm 1077
- poj 1655
- xml基础
- Android通知管理(NotificationManager)的使用,包括震动,led闪屏
- 谷歌Android手机应用开发环境的搭建
- mplayer的一些操作
- xml介绍
- 软件系统的4大技术本质
- 空洞与cp
- Android键盘事件的响应
- Linux设备驱动工程师之路——内核链表的使用
- c#操作access,update语句不执行的解决办法