win7+visual+studio+2010下安装和配置ace和boost
来源:互联网 发布:淘宝童装批发商城 编辑:程序博客网 时间:2024/05/21 09:32
1. Ace
1.1. Win7+Visual Studio2010编译
- Uncompress the ACE distribution into a directory, where it will create a ACE_wrappers directory containing the distribution. The ACE_wrappers directory will be referred to as ACE_ROOT in the following steps -- so ACE_ROOT\ace would be C:\ACE_wrappers\ace if you uncompressed into the root directory.
///将ACE5.8 source kit(zip file).zip解压缩到 C:\ ACE5.8source kit下;
目录宏ACE_ROOT =C:\ACE5.8source kit\ACE_wrappers
- Create a file called config.h in the ACE_ROOT\ace directory that contains:
#include "ace/config-win32.h"
////在目录ACE_ROOT下新建文件config.h,文件中内容为:
////#include"ace/config-win32.h"
- The static, DLL and MFC library builds are kept in different workspaces. Files with names *_Static contain project files for static builds. Workspaces for static and DLL builds will be available through the stock release at DOC group's website.
- Now load the solution file for ACE (ACE_ROOT/ACE.sln).
e.g. ACE_vc9_Static.sln
////使用visual studio 2010加载ACE_vc9_Static.sln,并编译,耗时
////较长,生成ACE_ROOT/lib下有ACEsd.lib
- Make sure you are building the configuration (i.e, Debug/Release) the one you'll use (for example, the debug tests need the debug version of ACE, and so on). All these different configurations are provided for your convenience. You can either adopt the scheme to build your applications with different configurations, or use ace/config.h to tweak with the default settings on NT.
Note: If you use the dynamic libraries, make sure you include ACE_ROOT\lib in your PATH whenever you run programs that uses ACE. Otherwise you may experience problems finding ace.dll or aced.dll.
////需要解释一下,vs的编译模式有两种:上面一种是生成静态库ACEsd.lib,其他程////序使用时,只需要在配置加载这个静态库,这个静态库就被加载到新程序中了,此////时需要将vs的编译对应设为静态模式。下面vs有详细介绍
////另外一种是动态库;这里就不介绍了。
2. Boost
2.1. Install In Windows
– 1:执行C:\Program Files\Microsoft Visual Studio 10\VC\vcvarsall.bat
– 2:cd D:\Software\boost_1_44_1\tools\build\jam_src中执行build_dist.bat,生成bin.ntx86\bjam.exe
– 3:将bjam.exe考到D:\Software\boost_1_44_1下
– 4:.Net中Tools中打开command
– cd D:\Software\boost_1_33_1
– bjam "-sVC80_ROOT=C:\Program Files\Microsoft Visual Studio8\VC" "-sTOOLS=vc-8_0" "--prefix=D:\Software\boost_1_33_1" install
– J:\public\boost_1_44_0> –bjam "-sVC100_ROOT=D:\ProgramFiles\Microsoft Visual Studio 10\VC" "-sTOOLS=vc-10_0" "--prefix=J:\public\boost_1_44_0" install
注意在。net中必须对应选择Multi-threaded Debug (/MTd)
3. Visual Studio
3.1. 设置
Configuration Type:Staticlib 和App
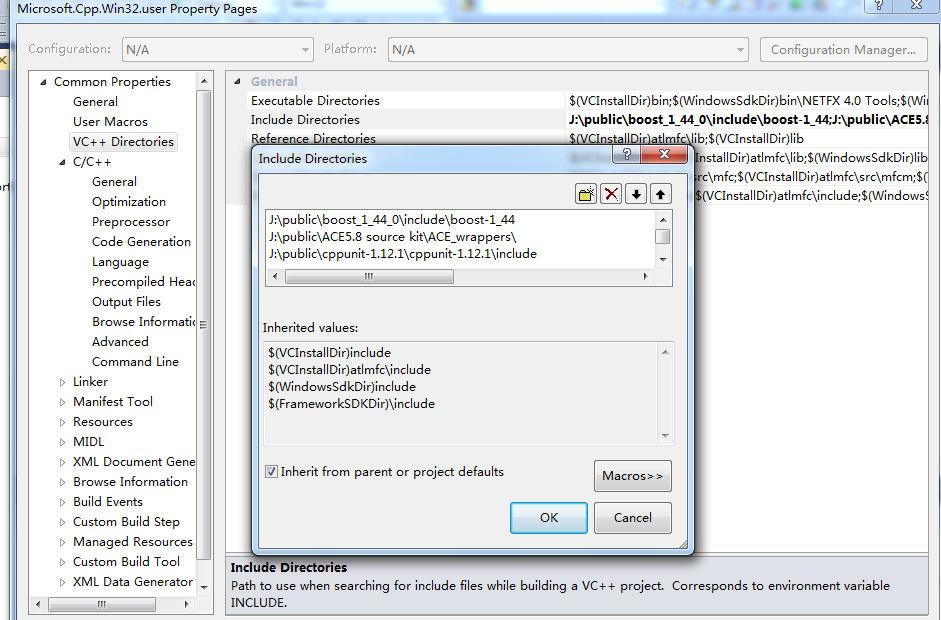
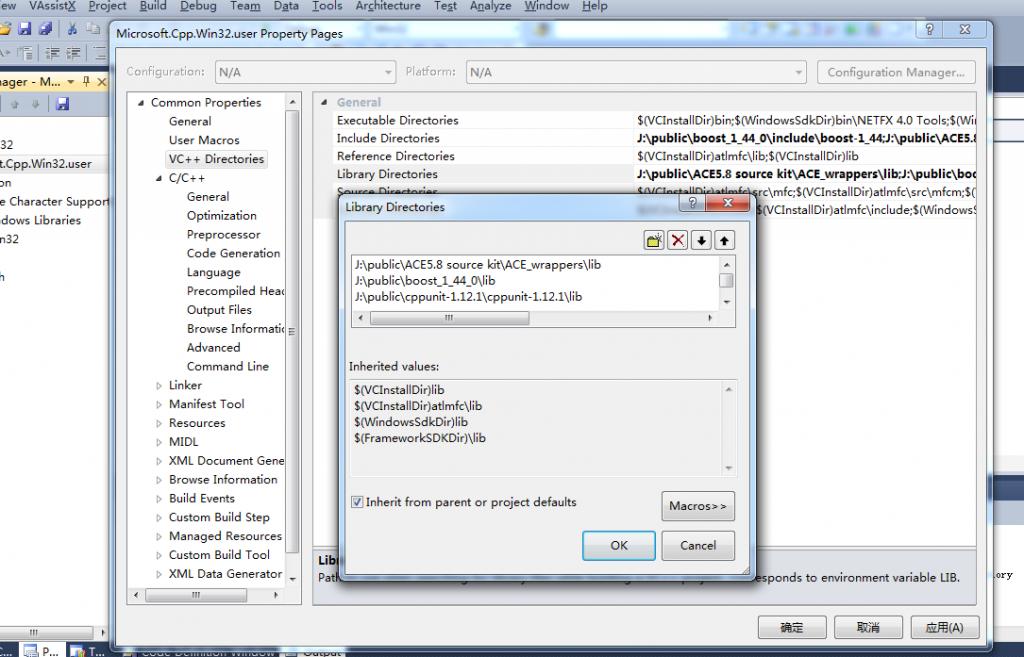
VC++ Directory :include 和library需要添加ace、cppunit、boost的相关目录
Preprocessor Difinition:增加ACE_AS_STATIC_LIBS
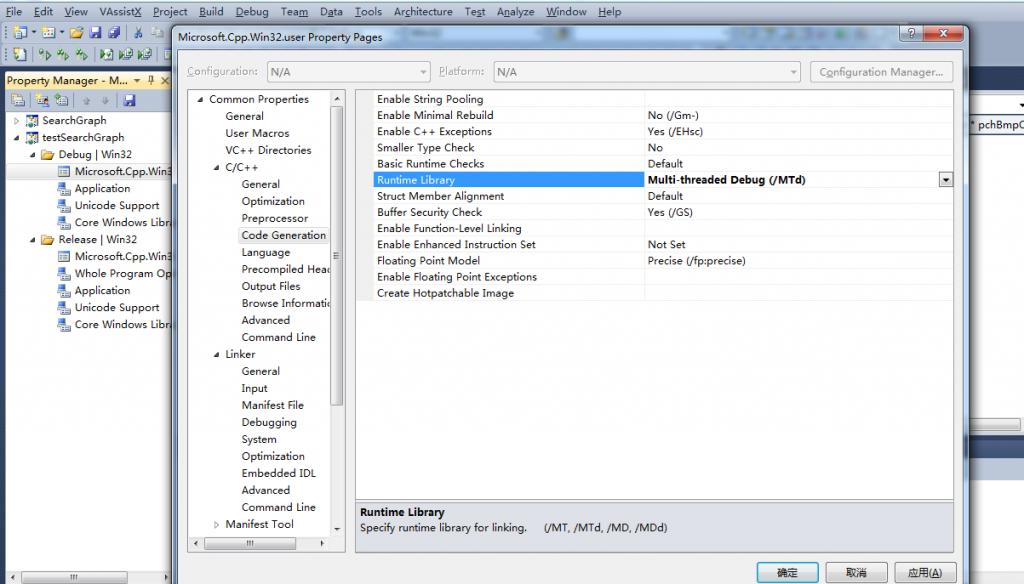
Runtime Library: MTd
3.1.1. Property Manage
首先要讲的是以前版本的visual studio,Tools-》options->Project Solution->VC++ directions无法使用了。郁闷吧。Followme!
第一步:选择View(视图)找到Property manage(属性管理器)。
网上都这么说,但是你会发现内容为空,第二次郁闷吧。其实很简单,随便打开或者新建一个项目,然后就可以打开了,呵呵。
第二步:选择View(视图)找到Property manage(属性管理器),注意不是属性窗口(property Window)也不是property page(属性页)。是不是找不到(呵呵,第二次郁闷吧)。
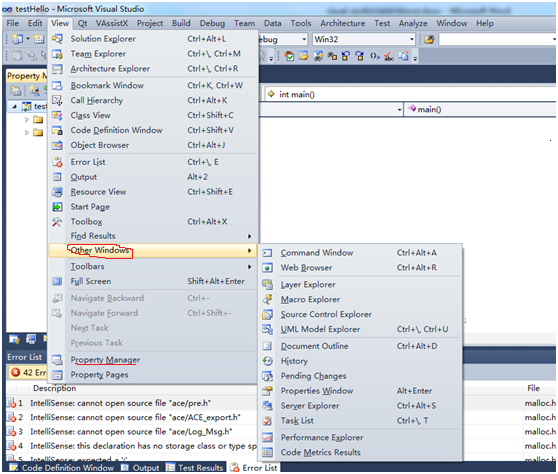
注意了,View中找到other windows(其他窗口)中能找到Property manage。这个功能在岗安装好时,是出现在在other windows中的,使用了几次后,就会从view直接看到了。呵呵
第三步:属性管理器中,找到通用而不是单个项目的VC++ Directory设置。
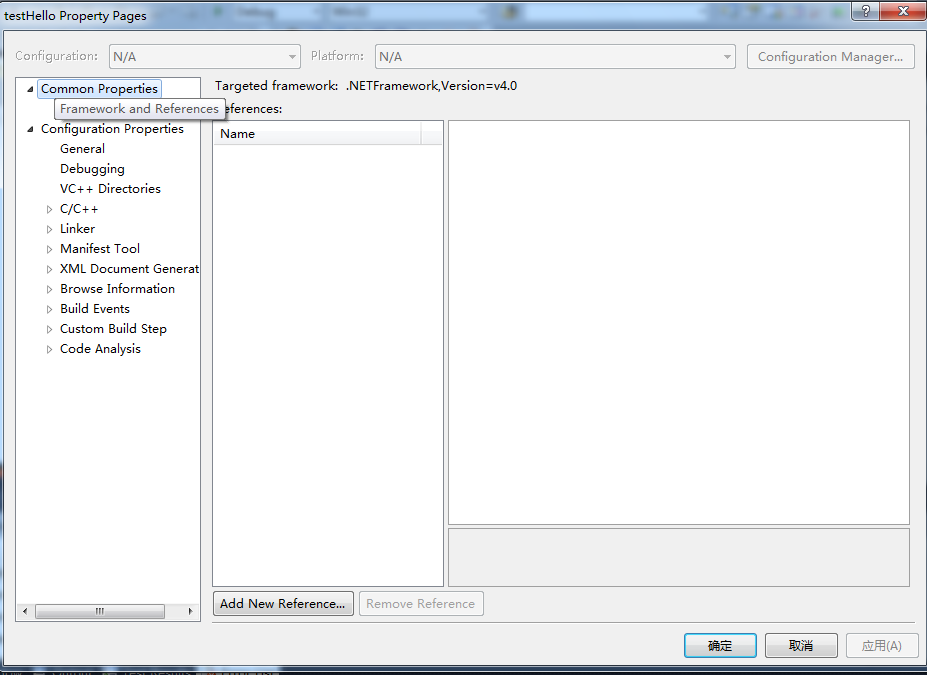
按照网上的教程,发现这个图中的Common Properties没有你要的东西(第三次郁闷,呵呵)。
注意了:想得到下面图中的效果吧_^_^!
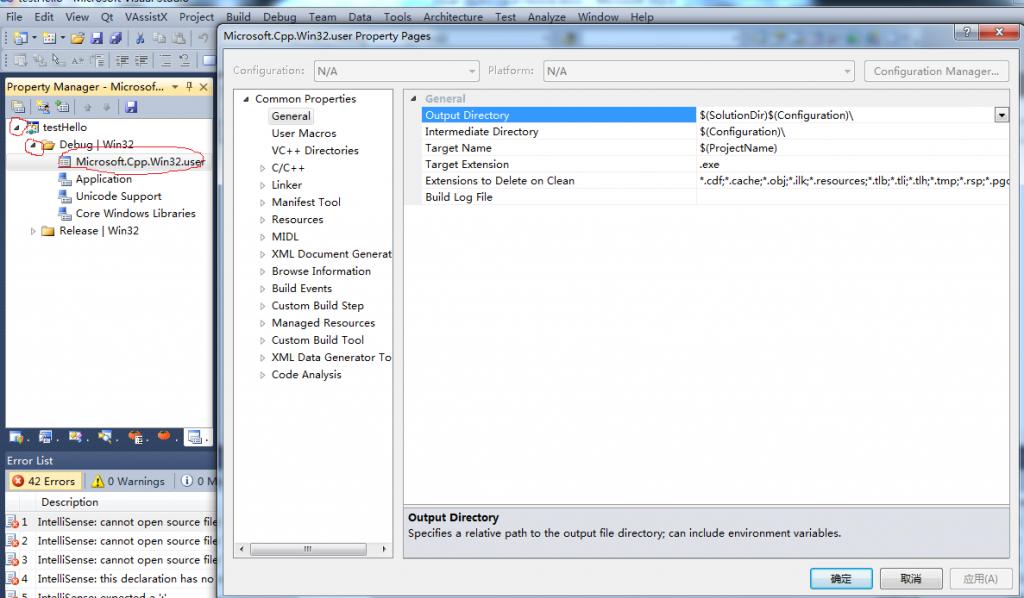
按照红色标志,依此点击小三角,最后选择双击“Microsoft.Cpp.Win32.user”,就可以设置全系统所有项目共用的效果了。
第四步:编译一个项目,发现property manage的修改没有生效(第四次郁闷)。
注意了,点击修改保存,重启visual studio 。怎么样,生效了吧。呵呵
1.1. 使用
1.1.1. Visual Studio
1:
Make sure you are building theconfiguration (i.e, Debug/Release) the one you'll use (for example, the debugtests need the debug version of ACE, and so on). All these differentconfigurations are provided for your convenience. You can either adopt thescheme to build your applications with different configurations, or useace/config.h to tweak with the default settings on NT.
Note: If you use the dynamic libraries,make sure you include ACE_ROOT\lib in your PATH whenever you run programs thatuses ACE. Otherwise you may experience problems finding ace.dll or aced.dll.
如果用ace。vcproj,则需将生成的dll考到syste32下,否则会在执行时,报错
使用Static无需。
2:用Static的项目
1):Preprocessor必须定义ACE_AS_STATIC_LIBS
Static version of ACE libraries are builtwith ACE_AS_STATIC_LIBS
defined. This macro should also be used inapplication projects that link to static ACE libraries
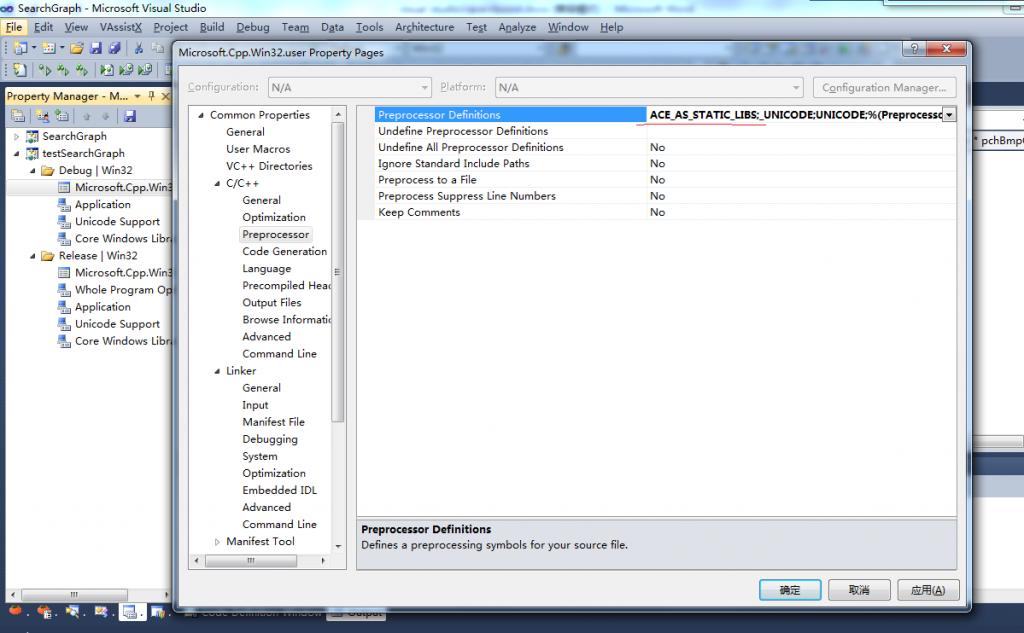
2):Preprocessor中_WINDOWS改成_CONSOLE
System中WINDOWS改成CONSOLE
Runtime Library:Multi-threadedDebug (/MTd)
3):VC++ Directionries-》includedirectories
添加ace 、boost 、cppunit的头文件目录定义
4):VC++ Directionries-》include directories
添加ace 、boost 、cppunit的lib库目录定义
3):main函数必须用
int main(int argc,char **argv)
不能用 main()
4):静态库:ACEsd.lib
注意Runtime library必须和编译的ace环境一致
- win7+visual+studio+2010下安装和配置ace和boost
- Windows 7 64bit和Visual Studio 2010下安装及使用Boost 1.47.0
- Windows 7 32/64bit和Visual Studio 2010下安装及使用Boost
- 在win7(32bit和64bit) visual studio 2010(vs2010)下安装opencv2.3
- Win7下安装配置OpenCV2.3+Visual Studio 2008
- 在Windows和Visual Studio上安装Boost
- 在Windows和Visual Studio上安装Boost
- 在Windows和Visual Studio上安装Boost
- visual studio和MATLAB下opencv配置
- Visual Studio Code安装和配置
- boost 配置 Visual studio
- Visual Studio 2010下安装和使用blitz++指南
- VS2008下安装和配置boost
- ACE 5.7.0 在Visual Studio 2008下的安装
- Visual Studio 2010 和 Boost库编译、开发
- Visual Studio 2010 和 Boost库编译、开发
- Visual Studio 2010 和 Boost库编译、开发
- vc6.0下ACE的安装和配置
- java语言实现图的深度优先遍历与广度优先遍历
- 插件8:拼写检查
- 如果在myeclipse上跑web工程[入门级]
- UVa 10115 - Automatic Editing
- PyQt4 - (1) PyQt4简介
- win7+visual+studio+2010下安装和配置ace和boost
- 谷歌董事长施密特:乔布斯是25年来最成功CEO
- CS的顶级会议和期刊
- ASCII 编码小结1
- 不要迷恋乔布斯:iPod研发者才是传说
- Android应用开发完全退出程序的通用方法!!!
- visual studio 2010下安装OpenCV及相关配置
- 乔布斯生父:希望见他一面 喝杯咖啡就好
- 类比较的过程