关于stretchableImageWithLeftCapWidth:topCapHeight方法的原理
来源:互联网 发布:js的闭包 编辑:程序博客网 时间:2024/05/01 11:41
最近在做app的皮肤部分,还真是遇到很多问题了,其中一个就是button的背景图片问题,有一系列按钮,尺寸不同,但都是一样的背景图片,
背景图片的尺寸只有一个,这样就需要拉伸图片来适应button的尺寸了,button是圆角的,一般的拉伸会把圆角给拉没了,完全没法看,网上搜了下,
找uiimage的一个方法:stretchableImageWithLeftCapWidth:topCapHeight:
下面是方法的原理:
Ouch. Yeah, it stretched them all right, along with the curved corners and shadows. Now, if you’ve come from the Flash world, you’re thinking, “Scale9!!! Use Scale9!” And right you are! There is an distant cousin of Scale9 in UIKit, called a “stretchable image”. You can create a stretchable image by taking a regular UIImage and calling the method, “stretchableImageWithLeft
The leftCapWidth is the margin on the left side of the image that will not be stretched. The right cap width (although there is no actual variable named that) is the remaining width, minus one pixel. Alright, that’s not very clear. We need a drawing.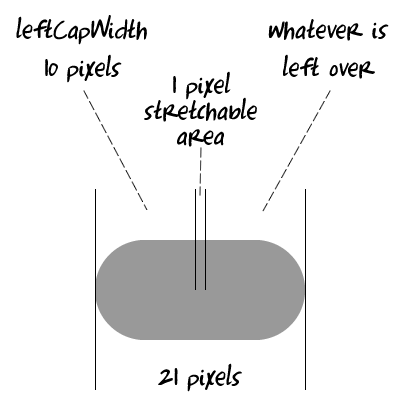
Ignoring the topCapHeight for now (which you can do by setting it to zero), we see we have an image that is 21 pixels wide. If we set the leftCapWidth to 10, that means the first 10 pixels will not be stretched. What will be stretched is the next single pixel. Only that pixel and nothing more, and it’s always just one pixel. Finally, everything to the right of that single pixel will not be stretched. So, in the above example, the image is 21 pixels wide. The leftCapWidth is 10, then there is one stretchy pixel. That leaves the right 10 pixels as not stretchable, which would be your right cap width, if such a variable existed.
Note that while my example is symmetrical, it doesn’t have to be. If I had made the leftCapWidth 5, then the right portion would have been 15 (21 – 5 – 1). Or if the whole image was only 20 pixels and leftCapWidth 10, the right portion would be 9 (20 – 10 – 1). Again, the stretchable area is always 1 pixel, so I don’t think it’s too easy to stretch a gradient like you can do in Scale9 in Flash (not that it usually works out too well anyway). If you are into formulas, the width of the right portion is total width – leftCapWidth – 1.
The topCapHeight works exactly the same way, but we don’t need it here. Let’s put this into action. Rather than massively nested brackets, we’ll create a reference to the two stretchable images.
- 关于stretchableImageWithLeftCapWidth:topCapHeight:方法的原理介绍
- 关于stretchableImageWithLeftCapWidth:topCapHeight方法的原理
- 关于stretchableImageWithLeftCapWidth:topCapHeight方法的原理
- 关于- (UIImage *)stretchableImageWithLeftCapWidth: topCapHeight:
- IOS图片拉伸的方法 UIImage stretchableImageWithLeftCapWidth:leftCapWidth:topCapHeight
- stretchableImageWithLeftCapWidth:topCapHeight:函数用法
- stretchableImageWithLeftCapWidth:topCapHeight:函数用法
- stretchableImageWithLeftCapWidth:topCapHeight:函数用法
- stretchableImageWithLeftCapWidth:topCapHeight:函数用法
- stretchableImageWithLeftCapWidth:topCapHeight:函数用法
- stretchableImageWithLeftCapWidth:topCapHeight:使用
- stretchableImageWithLeftCapWidth:leftCapWidth topCapHeight:
- stretchableImageWithLeftCapWidth:topCapHeight:函数用法 总结
- iOS图像拉伸,stretchableImageWithLeftCapWidth:topCapHeight:
- stretchableImageWithLeftCapWidth:topCapHeight:函数用法 总结
- stretchableImageWithLeftCapWidth:topCapHeight:函数用法 总结 (UIImage)
- iPhone图片拉伸:stretchableImageWithLeftCapWidth:topCapHeight && resizableImageWithCapInsets
- - (UIImage *)stretchableImageWithLeftCapWidth:(NSInteger)leftCapWidth topCapHeight:(NSInteger)topCap
- PermGen space
- 检查SELECTION-SCREEN 上面输入的参数是否合适
- javadoc-java 文档生成器的一些事儿
- LTP在Android上的移植
- C# []、List、Array、ArrayList 区别及应用
- 关于stretchableImageWithLeftCapWidth:topCapHeight方法的原理
- Servlet中listener和filter的总结[转]
- 实例讲解符合中国特色的和网络现状的实用CSS Hack(附源码)
- 发展模式
- 电脑辐射—-每天用电脑4-6小时的人必看
- 让Android也支持华为EM770模块
- 对汉字进行排序(RuleBasedCollator)
- net dll 循环注册
- window快捷键