自定义标题栏(并加入返回按钮)
来源:互联网 发布:大野克夫 知乎 编辑:程序博客网 时间:2024/05/16 18:06
废话不多说,直接上代码:
Java代码:
Main.java
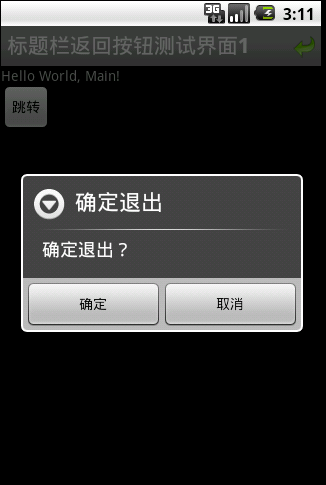
package com.JavaTiger;import android.app.Activity;import android.app.AlertDialog;import android.content.DialogInterface;import android.content.Intent;import android.os.Bundle;import android.view.KeyEvent;import android.view.View;import android.view.Window;import android.view.View.OnClickListener;import android.widget.Button;import android.widget.TextView;public class Main extends Activity {@Overridepublic void onCreate(Bundle savedInstanceState) {setTheme(R.style.CustomTheme);super.onCreate(savedInstanceState);requestWindowFeature(Window.FEATURE_CUSTOM_TITLE);setContentView(R.layout.main);getWindow().setFeatureInt(Window.FEATURE_CUSTOM_TITLE, R.layout.title);tvTitle = (TextView) findViewById(R.id.Titletext);tvTitle.setText("标题栏返回按钮测试界面1");btnBack = (Button) findViewById(R.id.TitleBackBtn);btnBack.setOnClickListener(new OnClickListener() {public void onClick(View v) {KeyEvent newEvent = new KeyEvent(KeyEvent.ACTION_DOWN,KeyEvent.KEYCODE_BACK);onKeyDown(KeyEvent.KEYCODE_BACK, newEvent);}});btnNext = (Button) findViewById(R.id.Button);btnNext.setOnClickListener(new OnClickListener() {public void onClick(View v) {Intent intent = new Intent();intent.setClass(Main.this, Next.class);startActivity(intent);}});}@Overridepublic boolean onKeyDown(int keyCode, KeyEvent event) {if (keyCode == KeyEvent.KEYCODE_BACK && event.getRepeatCount() == 0) {// 按下的如果是BACK,同时没有重复askForOut();return true;}return super.onKeyDown(keyCode, event);}private void askForOut() {AlertDialog.Builder builder = new AlertDialog.Builder(this);builder.setTitle("确定退出").setMessage("确定退出?").setPositiveButton("确定",new DialogInterface.OnClickListener() {@Overridepublic void onClick(DialogInterface dialog, int which) {finish();}}).setNegativeButton("取消",new DialogInterface.OnClickListener() {@Overridepublic void onClick(DialogInterface dialog, int which) {dialog.cancel();}}).setCancelable(false).show();}public TextView tvTitle;public Button btnBack;public Button btnNext;}注意:上面代码中红色代码的顺序,不能随便改变,一定要按照次顺序,否则会报错!
Next.java
package com.JavaTiger;import android.app.Activity;import android.os.Bundle;import android.view.KeyEvent;import android.view.View;import android.view.Window;import android.view.View.OnClickListener;import android.widget.Button;import android.widget.TextView;public class Next extends Activity {@Overridepublic void onCreate(Bundle savedInstanceState) {setTheme(R.style.CustomTheme);super.onCreate(savedInstanceState);requestWindowFeature(Window.FEATURE_CUSTOM_TITLE);setContentView(R.layout.next);getWindow().setFeatureInt(Window.FEATURE_CUSTOM_TITLE, R.layout.title);tvTitle = (TextView) findViewById(R.id.Titletext);tvTitle.setText("标题栏返回按钮测试界面2");btnBack = (Button) findViewById(R.id.TitleBackBtn);btnBack.setOnClickListener(new OnClickListener() {public void onClick(View v) {KeyEvent newEvent = new KeyEvent(KeyEvent.ACTION_DOWN,KeyEvent.KEYCODE_BACK);onKeyDown(KeyEvent.KEYCODE_BACK, newEvent);}});}public Button btnBack;public TextView tvTitle;}xml布局文件:
style.xml
<?xml version="1.0" encoding="utf-8"?> <resources> <style name="CustomTheme" parent="android:Theme"> <item name="android:windowTitleSize">40dip</item> </style> </resources>title.xml
<?xml version="1.0" encoding="utf-8"?><RelativeLayout xmlns:android="http://schemas.android.com/apk/res/android"android:layout_width="fill_parent" android:layout_height="fill_parent"> <TextView android:id="@+id/Titletext" android:layout_width="wrap_content" android:layout_height="wrap_content" android:layout_alignParentLeft="true" android:textSize="21dp" android:layout_marginTop="3dp" android:textColor="#ffffffff" android:textStyle="bold"/> <Buttonandroid:id="@+id/TitleBackBtn" android:layout_width="wrap_content" android:layout_height="wrap_content" android:background="@drawable/back" android:gravity="center" android:layout_marginTop="9dp" android:layout_alignParentRight="true"/></RelativeLayout>
main.xml
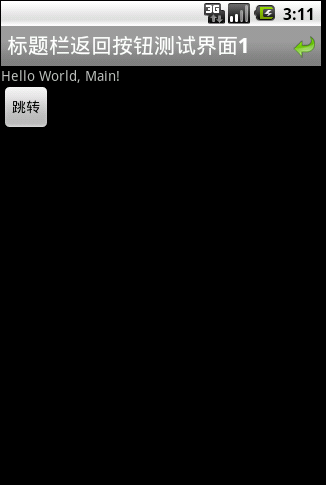
<?xml version="1.0" encoding="utf-8"?><LinearLayout xmlns:android="http://schemas.android.com/apk/res/android" android:orientation="vertical" android:layout_width="fill_parent" android:layout_height="fill_parent"><TextView android:layout_width="fill_parent" android:layout_height="wrap_content" android:text="@string/hello"/><Buttonandroid:text="跳转"android:id="@+id/Button"android:layout_width="wrap_content"android:layout_height="wrap_content"/></LinearLayout>next.xml
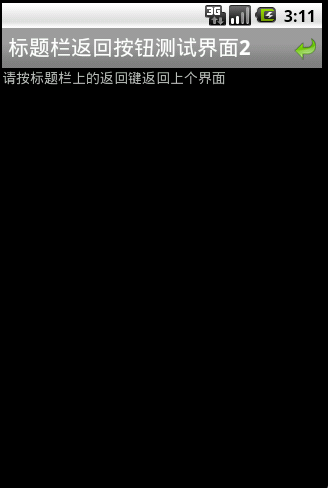
<?xml version="1.0" encoding="utf-8"?><LinearLayout xmlns:android="http://schemas.android.com/apk/res/android" android:orientation="vertical" android:layout_width="fill_parent" android:layout_height="fill_parent"><TextView android:layout_width="fill_parent" android:layout_height="wrap_content" android:text="请按标题栏上的返回键返回上个界面"/></LinearLayout>
欲行效果图如下:
demo源码下载链接 TitliBarBackBtn.rar
- 自定义标题栏(并加入返回按钮)
- android带返回按钮的自定义标题栏
- 安卓非自定义标题栏实现“返回”按钮
- android带返回按钮的自定义标题栏
- android带返回按钮的自定义标题栏布局文件详解
- React Native自定义带返回按钮的标题栏组件
- Activity标题栏添加返回按钮
- 在窗体的标题栏中加入按钮
- qml实现自定义标题栏按钮
- Android自定义带按钮标题栏
- 不通过push,给viewcontroller自定义UINavigationBar,并加上返回按钮
- android标题栏中添加返回按钮
- android标题栏中添加返回按钮
- android标题栏中添加返回按钮
- 给Android标题栏加上返回按钮
- android 自定义返回按钮
- Android自定义返回按钮
- 自定义NavgationBar返回按钮
- dedecms--autolist标签partsort参数无效的解决办法
- TweenMax你坑爹呢
- ARCEmu项目wow私服服务器网络模块分析(一)
- Hadoop构成
- 深入浅出之正则表达式(一)
- 自定义标题栏(并加入返回按钮)
- hadoop安装步骤
- CV---------Web textbooks and homepages
- apue源代码的使用与编译
- ARCEmu项目wow私服服务器网络模块分析(二)
- 带你了解生活中形形色色的卡-公交卡,会员卡,积分卡,银行卡,信用卡。。。
- 程序员的10个层次
- eclipse 快捷键
- Android实战系列源码与教程--由Andorid源码工作室提供