第8章 SportsStore:导航与购物车
来源:互联网 发布:js实现放大镜效果 编辑:程序博客网 时间:2024/05/16 07:32
C H A P T E R 8
■ ■ ■
SportsStore: Navigation and Cart
运动商店:导航与购物车
In the previous chapter,we set up the core infrastructure of the SportsStore application. Now we willuse the infrastructure to add key features to the application, and you’ll startto see how the investment in the basic plumbing pays off. We will be able toadd important customer-facing features simply and easily. Along the way, you’llsee some additional features that the MVC Framework provides.
在上一章中,我们建立了SportsStore应用程序的核心架构。现在,我们将利用这一基础结构把一些关键特性加到此应用程序上,并会看到上一章在基础结构方面的付出得到怎样的回报。我们能够简单而容易地添加面向客户的重要特性。沿着这种方式,你还会明白MVC框架提供的一些附加特性。
Adding Navigation Controls
添加导航控件
The SportsStoreapplication will be a lot more usable if we let customers navigate products bycategory. We will do this in three parts:
如果我们让客户通过产品目录(category)对产品进行导航,SportsStore应用程序将会更加适用得多。我们将从三个方面来做此事:
- Enhance the List action model in the ProductController class so thatit is able to filter the Product objects in the repository.
增强ProductController类中的List动作方法,以使它能够过滤存储库中的Product对象。 - Revisit and enhance our URL scheme and revise our reroutingstrategy.
重新考察并增强我们的URL方案,修订我们的路由策略。 - Create the category list that will go into the sidebar of the site,highlighting the current category and linking to others.
生成加入到网站工具条中的产品目录列表,高亮当前目录,并链接到其它目录。
Filtering the Product List
过滤产品列表
We are going to start byenhancing our view model class, ProductsListViewModel. We need to communicatethe current category to the view in order to render our sidebar, and this is asgood a place to start as any. Listing 8-1 shows the changes we made.
我们打算从增强我们的视图模型类ProductsListViewModel开始。我们需要当前目录与视图进行通信,以渲染我们的工具条,而且这是从事其它工作的一个很好的开端。清单8-1是我们所作的修改。
Listing 8-1. Enhancingthe ProductsListViewModel Class
using System.Collections.Generic;using SportsStore.Domain.Entities;namespace SportsStore.WebUI.Models { publicclass ProductsListViewModel { publicIEnumerable<Product> Products { get; set; } publicPagingInfo PagingInfo { get; set; } public string CurrentCategory { get;set; } }}We added a new propertycalled CurrentCategory. The next step is to update the ProductController classso that the List action method will filter Product objects by category and usethe new property we added to the view model to indicate which category has beenselected. The changes are shown in Listing 8-2.
我们添加了一个叫做CurrentCategory的新属性。下一步是更新ProductController类,以使List动作方法将通过目录来过滤Product对象,并用我们添加到视图模型的这个新属性来指示已选择了哪个目录。其修改如清单8-2所示。
Listing 8-2. AddingCategory Support to the List Action Method
public ViewResult List(string category, int page = 1) { ProductsListViewModelviewModel = new ProductsListViewModel { Products= repository.Products .Where(p => category == null|| p.Category == category) .OrderBy(p => p.ProductID) .Skip((page - 1) * PageSize) .Take(PageSize), PagingInfo= new PagingInfo { CurrentPage = page, ItemsPerPage = PageSize, TotalItems = repository.Products.Count() }, CurrentCategory = category }; returnView(viewModel);}We’ve made three changesto this method. First, we added a new parameter called category. This categoryis used by the second change, which is an enhancement to the LINQ query—ifcategory isn’t null, only those Product objects with a matching Categoryproperty are selected. The last change is to set the value of theCurrentCategory property we added to the ProductsListViewModel class. However,these changes mean that the value of TotalItems is incorrectly calculated—we’llfix this in a while.
我们已经对此方法作了三处修改。第一,我们添加了一个名为category的新参数。这个category由第二个修改来使用,以增强LINQ查询 —如果category非空,则只有与Category属性匹配的那些Product对象被选出。最后一个修改是设置我们添加到ProductsListViewModel类上的CurrentCategory属性的值。然而,这些修改意味着TotalIterms的值会不正确地计算 — 我们一会儿修正它。
UNIT TEST: UPDATING EXISTING UNITTESTS
单元测试:更新已有的单元测试
We have changed thesignature of the List action method, which will prevent some of our existingunit test methods from compiling. To address this, pass null as the firstparameter to the List method in those unit tests that work with the controller.For example, in the Can_Send_Pagination_View_Model test, the action section ofthe unit test becomes as follows:
我们已经修改了List动作方法的签名,这会阻碍我们已有的单元方法进行编译。为了修正它,以null作为第一个参数传递给与该控制器工作的那些单元测试的List方法。例如,在Can_Send_Pagination_View_Model测试中,单元测试的动作部分如下:
ProductsListViewModel result =(ProductsListViewModel)controller.List(null, 2).Model;
By using null,we receive all of the Product objects that the controller gets from therepository, which is the same situation we had before we added the newparameter.
通过用null,我们得到控制器从存储库所获得的全部Product对象,这与我们添加这个新参数之前的情况相同。
Even with these smallchanges, we can start to see the effect of the filtering. If you start theapplication and select a category using the query string, like this:
即使利用这些微小的变化,我们也能够看出过滤的效果。如果你运行此应用程序,并用查询字串选择一个目录,像这样:
http://localhost:23081/?category=Soccer
you’ll see only theproducts in the Soccer category, as shown in Figure 8-1.
你将只看到Soccer目录中的产品,如图8-1所示。
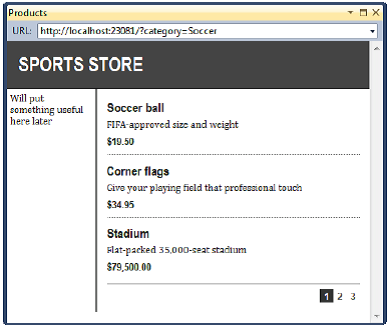
Figure 8-1. Using thequery string to filter by category
图8-1. 通过category使用查询字串进行过滤
UNIT TEST: CATEGORY FILTERING
单元测试:目录过滤
We need a unit test toproperly test the category filtering function, to ensure that we can filtercorrectly and receive only products in a specified category. Here is the test:
我们需要一个单元测试来适当地测试目录过滤功能,以确保我们可以正确地进行过滤,并只接收一个特定目录中的产品。以下是该测试:
[TestMethod]public void Can_Filter_Products() { //Arrange // -create the mock repository Mock<IProductRepository>mock = new Mock<IProductRepository>(); mock.Setup(m=> m.Products).Returns(new Product[] { newProduct {ProductID = 1, Name = "P1", Category = "Cat1"}, new Product {ProductID = 2, Name ="P2", Category = "Cat2"}, new Product {ProductID = 3, Name ="P3", Category = "Cat1"}, new Product {ProductID = 4, Name ="P4", Category = "Cat2"}, new Product {ProductID = 5, Name ="P5", Category = "Cat3"} }.AsQueryable()); //Arrange - create a controller and make the page size 3 items ProductControllercontroller = new ProductController(mock.Object); controller.PageSize= 3; //Action Product[]result = ((ProductsListViewModel)controller.List("Cat2", 1).Model) .Products.ToArray(); //Assert Assert.AreEqual(result.Length,2); Assert.IsTrue(result[0].Name== "P2" && result[0].Category == "Cat2"); Assert.IsTrue(result[1].Name== "P4" && result[1].Category == "Cat2");}This testcreates a mock repository containing Product objects that belong to a range ofcategories. One specific category is requested using the Action method, and theresults are checked to ensure that the results are the right objects in theright order.
这个测试生成了一个模仿存储库,该存储库含有属于一定目录范围的Product对象。用Action方法请求一个特定的目录,并检查其结果,以确认该结果是具有正确顺序的正确结果。
Refining the URL Scheme
细化URL方案
No one wants to see or useugly URLs such as /?category=Soccer. To address this, we are going to revisitour routing scheme to create an approach to URLs that suits us (and ourcustomers) better. To implement our new scheme, change the RegisterRoutesmethod in Global.asax to match Listing 8-3.
没人希望看到或使用像/?category=Soccer这种难看的URL。为了改善它,我们打算重新访问我们的路由方案,以生成一种更适合于我们(及我们的客户)的URL方法。为了实现新的方案,修改Global.asax的RegisterRoutes方法,使之符合清单8-3。
Listing 8-3. The New URLScheme
public static void RegisterRoutes(RouteCollectionroutes) { routes.IgnoreRoute("{resource}.axd/{*pathInfo}"); routes.MapRoute(null, "",// Only matches the empty URL (i.e. /) new{ controller = "Product", action = "List", category = (string)null, page =1 } ); routes.MapRoute(null, "Page{page}",// Matches /Page2, /Page123, but not /PageXYZ new{ controller = "Product", action = "List", category =(string)null }, new{ page = @"\d+" } // Constraints: page must be numerical ); routes.MapRoute(null, "{category}",// Matches /Football or /AnythingWithNoSlash new{ controller = "Product", action = "List", page = 1 } ); routes.MapRoute(null, "{category}/Page{page}",// Matches /Football/Page567 new{ controller = "Product", action = "List" }, // Defaults new{ page = @"\d+" } // Constraints: page must be numerical ); routes.MapRoute(null,"{controller}/{action}");}n Caution It is important to add the new routes in Listing 8-3 in the order they are shown. Routes areapplied in the order in which they are defined, and you’ll get some odd effectsif you change the order.
注意:清单8-3中重要的是按所示的顺序添加新路由。路由是按它们所定义的顺序来运用的,如果你改变了这种顺序,你会得到奇怪的效果。
Table 8-1 describes theURL scheme that these routes represent. We will explain the routing system indetail in Chapter 11.
表8-1描述了这些路由所表示的URL方案。我们将在第11章详细解释路由系统。
Table 8-1. Route Summary
URL
Leads To
导致
/
Lists the first page of products from all categories
列出所有目录产品的第一页
/Page2
Lists the specified page (in this case, page 2), showing items from all categories
列出显示所有目录条目的指定页(这里是page2)
/Soccer
Shows the first page of items from a specific category (in this case, the Soccer category)
显示指定目录条目中的第一页(这里是Soccer目录)
/Soccer/Page2
Shows the specified page (in this case, page 2) of items from the specified category (in this case, Soccer)
显示指定目录(这里是Soccer)条目的指定页(这里是page2)
/Anything/Else
Calls the Else action method on the Anything controller
调用Anything控制器上的Else动作方法
The ASP.NET routing systemis used by MVC to handle incoming requests from clients, but it also requestsoutgoing URLs that conform to our URL scheme and that we can embed in webpages. This way, we make sure that all of the URLs in the application areconsistent.
ASP.NET路由系统被用于由MVC来处理来自客户端的请求,但它也请求符合我们URL方案和我们可以嵌入在web页面中的输出URL,我们可以确保应用程序中的所有URL都是相容的。
n Note We show you how to unit test routing configurations inChapter 11.
注:我们将在第11章中向你演示如何单元测试路由配置。
The Url.Action method isthe most convenient way of generating outgoing links. In the previous chapter,we used this help method in the List.cshtml view in order to display the pagelinks. Now that we’ve added support for category filtering, we need to go backand pass this information to the helper method, as shown in Listing 8-4.
Url.Action方法是生成输出路由最方便的办法。在上一章中,我们为了显示页面连接,在List.cshtml视图中使用了这个辅助方法。现在,我们已经添加了对目录过滤的支持,我们需要回过头来把这个信息传递给这个辅助方法,如清单8-4所示。
Listing 8-4. AddingCategory Information to the Pagination Links
@modelSportsStore.WebUI.Models.ProductsListViewModel@{ ViewBag.Title= "Products";}@foreach (var p in Model.Products) { Html.RenderPartial("ProductSummary",p);}<div class="pager"> @Html.PageLinks(Model.PagingInfo,x => Url.Action("List", new{page = x, category =Model.CurrentCategory}))</div>Prior to this change, thelinks we were generating for the pagination links were like this:
在这个修改之前,我们为分页连接所生成的连接是像这样的:
http://<myserver>:<port>/Page2
If the user clicked a pagelink like this, the category filter he applied would be lost, and he would bepresented with a page containing products from all categories. By adding thecurrent category, which we have taken from the view model, we generate URLslike this instead:
如果用户点击这样的页面连接,他所运用的目录过滤将不再起作用,显示给他的将是一个含有所有目录的产品的一个页面。通过添加我们从视图模型所得到的当前目录,我们生成了如下所示的URL来代替:
http://<myserver>:<port>/Chess/Page2
When the user clicks thiskind of link, the current category will be passed to the List action method,and the filtering will be preserved. After you’ve made this change, you canvisit a URL such as /Chess or /Soccer, and you’ll see that the page link at thebottom of the page correctly includes the category.
当用户点击这种连接时,当前目录将被传递给List动作方法,过滤就会继续起作用。在你作了这些修改之后,你可以访问/Chess或/Soccer这样的URL,你将会看到页面底部的页面连接正确地指示了该目录。
Building a Category Navigation Menu
建立目录导航菜单
We now need to provide thecustomers with a way to select a category. This means that we need to presentthem with a list of the categories available and indicate which, if any,they’ve selected. As we build out the application, we will use this list ofcategories in multiple controllers, so we need something that is self-containedand reusable.
现在我们需要给客户提供选择目录的方法。意即,我们需要表现一个可用目录的列表,并指示出他们之中哪一个被选择了。随着我们对应用程序的扩建,我们将在多个控制中使用这个目录列表,因此我们需要做一些让它是自包含并且可重用的事情。
The ASP.NET MVC Frameworkhas the concept of child actions, which are perfect for creating items such asa reusable navigation control. A child action relies on the HTML helper methodcalled RenderAction, which lets you include the output from an arbitrary actionmethod in the current view. In this case, we can create a new controller (we’llcall ours NavController) with an action method (Menu, in this case) that rendersa navigation menu and inject the output from that method into the layout.
ASP.NET MVC框架具有一种叫做子动作的概念,它对生成诸如可重用导航控件之类的项目特别理想。子动作依赖于叫做RenderAction的HTML辅助方法,它让你包含了当前视图中任意动作方法的输出。在这里,我们可以生成一个新控制器(我们称之为NavController),它有一个动作方法(这里是Menu),它渲染一个导航菜单,并把此动作方法的输出注入到布局之中。
This approach gives us areal controller that can contain whatever application logic we need and thatcan be unit tested like any other controller. It’s a really nice way ofcreating smaller segments of an application while preserving the overall MVCFramework approach.
这个方法给了我们一个真正的控制器,它可以含有我们所需的各种应用程序逻辑,且可以像其它控制器一样进行单元测试。这是保持MVC整体框架前提下生成应用程序片段的一种很好的办法。
Creating the Navigation Controller
生成导航控制器
Right-click theControllers folder in the SportsStore.WebUI project and select Add → Controller from the pop-up menu.Set the name of the new controller to NavController, select the Emptycontroller option from the Template menu, and click Add to create the class.
右击SportsStore.WebUI项目的Controllers文件夹,从弹出菜单选择“添加” →“控制器”。将此新控制器的名字设为NavController,在模板菜单中选择“空控制器”选项,点击“添加”生成这个类。
Remove the Index methodthat Visual Studio creates by default and add the Menu action method shown inListing 8-5.
删除VisualStudio默认生成的Index方法,并添加如清单8-5所示的Menu动作方法。
Listing 8-5. The MenuAction Method
using System.Web.Mvc;namespace SportsStore.WebUI.Controllers { publicclass NavController : Controller { publicstring Menu() { return "Hello fromNavController"; } }}This method returns acanned message string, but it is enough to get us started while we integratethe child action into the rest of the application. We want the category list toappear on all pages, so we are going to render the child action in the layout.Edit the Views/Shared/_Layout.cshtml file so that it calls the RenderActionhelper method, as shown in Listing 8-6.
该方法返回一个固定的消息字符串,但它足以让我们把子动作集成到我们应用程序的其余部分。我们希望目录列表在所有页面上出现,因此我们打算在布局中渲染这个子动作。编辑View/Shared/_Layout.cshtml文件,以使它调用RenderAction辅助方法,如清单8-6所示。
Listing 8-6. Adding theRenderAction Call to the Razor Layout
<!DOCTYPE html><html><head> <title>@ViewBag.Title</title> <linkhref="@Url.Content("~/Content/Site.css")"rel="stylesheet" type="text/css" /> <scriptsrc="@Url.Content("~/Scripts/jquery-1.4.4.min.js")"type="text/javascript"></script></head><body> <divid="header"> <divclass="title">SPORTS STORE</div> </div> <divid="categories"> @{ Html.RenderAction("Menu","Nav"); } </div> <divid="content"> @RenderBody() </div></body></html>We’ve removed theplaceholder text that we added in Chapter 7 and replaced it with a call to theRenderAction method. The parameters to this method are the action method wewant to call (Menu) and the controller we want to use (Nav).
我们已经去掉了第7章添加的占位文本,代之以RenderAction方法的调用。该方法的参数是我们想调用的动作方法(Menu),和我们想使用的控制器(Nav)。
n Note The RenderAction method writes its content directly to theresponse stream, just like the RenderPartial method introduced in Chapter 7.This means that the method returns void, and therefore can’t be used with aregular Razor @ tag. Instead, we must enclose the call to the method inside aRazor code block (and remember to terminate the statement with a semicolon).You can use the Action method as an alternative if you don’t like thiscode-block syntax.
注:RenderAction方法直接把它的内容写入到响应流,就像第7章所介绍的RenderPartial方法一样。意即,该方法返回void,因此不能用一个规则的Razor标签@。我们必须把这个调用封装在一个Razor代码块中(而且要记住以分号为结束语句符)。如果你不喜欢这种代码语法,你可以选用Action方法来代替。
If you run theapplication, you’ll see that the output of the Menu action method is includedin every page, as shown in Figure 8-2.
如果你运行这个应用程序,你将看到包含在每个页面中的Menu动作方法的输出,如图8-2所示。
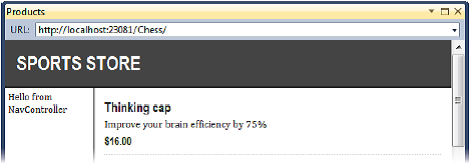
Figure 8-2. Displayingthe output from the Menu action method
Generating Category Lists
生成目录列表
We can now return to thecontroller and generate a real set of categories. We don’t want to generate thecategory URLs in the controller. We are going to use a helper method in theview to do that. All we need to do in the Menu action method is create the listof categories, which we’ve done in Listing 8-7.
现在我们可以返回到此控制器,并生成一组实际目录。我们不想在该控制器中生成目录URL。我们打算使用视图中的一个辅助方法来做这件事。我们在Menu动作方法中所要做的是生成目录列表,我们用清单8-7来实现。
Listing 8-7. Implementingthe Menu Method
using System.Collections.Generic;using System.Linq;using System.Web.Mvc;using SportsStore.Domain.Abstract;using SportsStore.WebUI.Models;namespace SportsStore.WebUI.Controllers { publicclass NavController : Controller { privateIProductRepository repository; publicNavController(IProductRepository repo) { repository= repo; } publicPartialViewResult Menu() { IEnumerable<string>categories = repository.Products .Select(x => x.Category) .Distinct() .OrderBy(x => x); returnPartialView(categories); } }}The Menu action method isvery simple. It just uses a LINQ query to obtain a list of category names andpasses them to the view.
Menu动作方法很简单。它只使用一个LINQ查询来获得一个目录名的列表并把它传递给视图。
UNIT TEST: GENERATING THE CATEGORY LIST
单元测试:生成目录列表
The unit test for ourability to produce a category list is relatively simple. Our goal is to createa list that is sorted in alphabetical order and contains no duplicates. Thesimplest way to do this is to supply some test data that does have duplicatecategories and that is not in order, pass this to the NavController, and assertthat the data has been properly cleaned up. Here is the unit test we used:
生成目录列表能力的单元测试是相当简单的。我们的目标是生成一个按字母顺序的且无重复的列表。最简单的方法是提供的测试数据是有重复且无序的目录,把它传递给NavController,并断言该数据得到了适当的整理。以下是我们所用的单元测试:
[TestMethod]public void Can_Create_Categories() { //Arrange // -create the mock repository Mock<IProductRepository>mock = new Mock<IProductRepository>(); mock.Setup(m=> m.Products).Returns(new Product[] { newProduct {ProductID = 1, Name = "P1", Category = "Apples"}, newProduct {ProductID = 2, Name = "P2", Category = "Apples"}, newProduct {ProductID = 3, Name = "P3", Category = "Plums"}, newProduct {ProductID = 4, Name = "P4", Category = "Oranges"}, }.AsQueryable()); //Arrange - create the controller NavControllertarget = new NavController(mock.Object); // Act =get the set of categories string[]results = ((IEnumerable<string>)target.Menu().Model).ToArray(); //Assert Assert.AreEqual(results.Length,3); Assert.AreEqual(results[0],"Apples"); Assert.AreEqual(results[1],"Oranges"); Assert.AreEqual(results[2],"Plums");}We created amock repository implementation that contains repeating categories andcategories that are not in order. We assert that the duplicates are removed andthat alphabetical ordering is imposed.
我们生成了一个模仿存储库的实现,它包含了重复性且未按顺序的目录。我们断言去掉了重复,并实现了按字母排序。
Creating the Partial View
生成部分视图
Since the navigation listis just part of the overall page, it makes sense to create a partial view forthe Menu action method. Right-click the Menu method in the NavController classand select Add View from the pop-up menu.
由于导航列表只是整个页面的一部分,故对Menu动作方法生成部分视图是有意义的。右击NavController类中的Menu方法,并从弹出菜单选择“添加视图”。
Leave the view name asMenu, check the option to create a strongly typed view, and enterIEnumerable<string> as the model class type, as shown in Figure 8-3.
保留视图名为Menu,选中“生成强类型视图”复选框,输入IEnumerable<string>作为模型类类型,如图8-3所示。
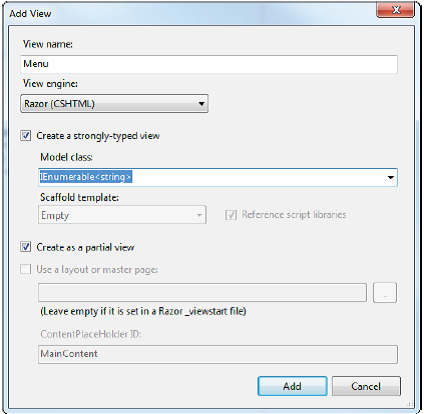
Figure 8-3. Creatingthe Menu partial view
Check the option to createa partial view. Click the Add button to create the view. Edit the view contentsso that they match those shown in Listing 8-8.
选中“生成部分视图”复选框。点击“添加”按钮以生成这个视图。编辑该视图内容,使之与清单8-8吻合。
Listing 8-8. The MenuPartial View
@model IEnumerable<string>@{ Layout =null;}@Html.ActionLink("Home","List", "Product")@foreach (var link in Model) { @Html.RouteLink(link,new { controller= "Product", action= "List", category= link, page= 1 })}We’ve added a link calledHome that will appear at the top of the category list and will take the userback to the first page of the list of all products with no category filter. Wedid this using the ActionLink helper method, which generates an HTML anchorelement using the routing information we configured earlier.
我们已经添加了一个叫做Home的连接,它出现在目录列表的顶部,并将用户带到无目录过滤情况下所有产品列表的第一页。我们用ActionLink辅助方法来实现,该方法用我们之前配置的路由信息生成一个超链接元素。
We then enumerated thecategory names and created links for each of them using the RouteLink method.This is similar to ActionLink, but it lets us supply a set of name/value pairsthat are taken into account when generating the URL from the routingconfiguration. Don’t worry if all this talk of routing doesn’t make senseyet—we explain everything in depth in Chapter 11.
然后我们枚举目录名,并用RouteLink方法为每个目录名生成一个连接,但在根据路由配置生成URL时,它让我们有考虑地提供一组“名字/值”对。如果还不能理解这里所说的路由,不用着急 —我们会在第11章详细解释路由的方方面面。
The links we generate willlook pretty ugly by default, so we’ve defined some CSS that will improve theirappearance. Add the styles shown in Listing 8-9 to the end of the Content/Site.cssfile in the SportsStore.WebUI project.
默认情况下,我们生成的连接很丑陋,因此我们定义了一些CSS以改善它的外观。把清单8-9所示的样式加到SportsStore.WebUI项目Content/Site.css文件的尾部。
Listing 8-9. CSS for theCategory Links
DIV#categories A{ font:bold 1.1em "Arial Narrow","Franklin Gothic Medium",Arial;display: block; text-decoration:none; padding: .6em; color: Black; border-bottom:1px solid silver;}DIV#categories A.selected { background-color:#666; color: White; }DIV#categories A:hover { background-color: #CCC; }DIV#categories A.selected:hover {background-color: #666; }You can see the categorylinks if you run the application, as shown in Figure 8-4. If you click acategory, the list of items is updated to show only items from the selectedcategory.
如果运行访应用程序,你可以看到这些目录连接,如图8-4所示。如果你点击一个目录,条目列表会作出更新,只会显示所选目录的条目。
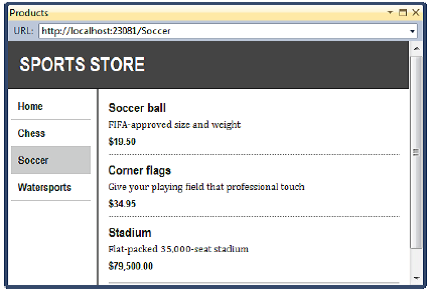
Figure 8-4. Thecategory links
Highlighting the Current Category
高亮当前目录
At present, we don’tindicate to users which category they are viewing. It might be something thatthe customer could infer from the items in the list, but it is preferable toprovide some solid visual feedback.
此刻,我们还没有给用户指明他们正在查看哪个目录。也许用户可以根据所列出的条目进行推断,但更好的是提供某种特定的视觉反馈。
We could do this bycreating a view model that contains the list of categories and the selectedcategory, and in fact, this is exactly what we would usually do. But instead,we are going to demonstrate the View Bag feature we mentioned in the Razorsection of Chapter 5. This feature allows us to pass data from the controllerto the view without using a view model. Listing 8-10 shows the changes to theMenu action method.
这件事我们可以通过生成一个含有目录列表和所选目录的视图模型来实现,而且事实上,这恰恰是我们通常的做法。但在这里,我们打算演示第5章在Razor章节所提到的View Bag(视图包)特性。该特性允许我们把控制器的数据传递给视图而不需要用视图模型。清单8-10演示了对Menu动作方法的修改。
Listing 8-10. Using theView Bag Feature
public ViewResult Menu(string category = null) { ViewBag.SelectedCategory = category; IEnumerable<string>categories = repository.Products .Select(x => x.Category) .Distinct() .OrderBy(x => x); returnView(categories);}We’ve added a parameter tothe Menu action method called category. The value for this parameter will beprovided automatically by the routing configuration. Inside the method body,we’ve dynamically created a SelectedCategory property in the ViewBag object andset its value to be the parameter value. In Chapter 5, we explained thatViewBag is a dynamic object, and we can create new properties simply by settingvalues for them.
我们给Menu动作方法添加了一个名为category的参数。这个参数的值将由路由配置自动提供。在方法体中,我们在ViewBag对象中动态地生成了一个SelectedCategory属性,并将它的值设置为这个参数的值。在第5章中,我们解释过ViewBag是一个动态对象,我们可以简单地通过为属性设置值的办法来生成一个新属性。
UNIT TEST: REPORTING THE SELECTED CATEGORY
单元测试:报告被选目录
We can test that the Menuaction method correctly adds details of the selected category by reading thevalue of the ViewBag property in a unit test, which is available through theViewResult class. Here is the test:
我们可以通过读取单元测试中ViewBag属性值的办法来测试Menu动作方法正确添加了所选目录的细节。以下是该测试:
[TestMethod]public void Indicates_Selected_Category() { //Arrange // -create the mock repository Mock<IProductRepository>mock = new Mock<IProductRepository>(); mock.Setup(m=> m.Products).Returns(new Product[] { newProduct {ProductID = 1, Name = "P1", Category = "Apples"}, newProduct {ProductID = 4, Name = "P2", Category = "Oranges"}, }.AsQueryable()); //Arrange - create the controller NavControllertarget = new NavController(mock.Object); //Arrange - define the category to selected stringcategoryToSelect = "Apples"; //Action stringresult = target.Menu(categoryToSelect).ViewBag.SelectedCategory; //Assert Assert.AreEqual(categoryToSelect,result);}Notice that wedon’t need to cast the property value from the ViewBag. This is one theadvantages of using the ViewBag object in preference to ViewData.
注意,我们不需要转换ViewBag的属性值。这是用ViewBag对象优于ViewData的优点之一。
Now that we are providinginformation about which category is selected, we can update the view to takeadvantage of this, and add a CSS class to the HTML anchor element thatrepresents the selected category. Listing 8-11 shows the changes to theMenu.cshtml partial view.
现在,我们提供了哪个目录被选择了的信息,我们可以更新视图以利用这一信息,并把一个CSS的class加到表示已选目录的HTML锚点元素。清单8-11显示了对Menu.cshtml部分视图的修改。
Listing 8-11.Highlighting the Selected Category
@model IEnumerable<string>@{ Layout =null;}@Html.ActionLink("Home","List", "Product")@foreach (var link in Model) { @Html.RouteLink(link, new{ controller= "Product", action= "List", category= link, page= 1 }, new { @class = link ==ViewBag.SelectedCategory ? "selected" : null } )}We have taken advantage ofan overloaded version of the RouteLink method, which lets us provide an objectwhose properties will be added to the HTML anchor element as attributes. Inthis case, the link that represents the currently selected category is assignedthe selected CSS class.
我们利用了RouteLink方法的过载版本,它让我们提供一个对象,该对象的属性将被添加到HTML锚点元素的属性上。这里,表示当前所选目录的连接的CSS的class被赋予selected值。
n Note Notice that we used @class in the anonymous object we passedas the new parameter to the RouteLink helper method. This is not a Razor tag.We are using a C# feature to avoid a conflict between the HTML keyword class(used to assign a CSS style to an element) and the C# use of the same word(used to create a class). The @ character allows us to use reserved keywordswithout confusing the compiler. If we just called the parameter class (withoutthe @), the compiler would assume we are defining a new C# type. When we usethe @ character, the compiler knows we want to create a parameter in theanonymous type called class, and we get the result we need.
注:注意,我们使用了@class匿名对象,把它作为新参数传递给RouteLink辅助方法。这不是一个Razor标签。我们使用了一个C#特性,以避免HTML关键词class(用来把一个CSS样式赋给一个元素)与C#的同样关键词(用来生成一个类)之间的冲突。@字符允许我们用保留关键词而不至使编译器产生混淆。如果我们只把这个参数写成class(不带@),编译器会假设我们正在定义一个新C#类型。当我们使用@字符时,编译器就知道我们是想生成一个叫做class的匿名类型参数,于是我们得到了我们所需要的结果。
Running the applicationshows the effect of the category highlighting, which you can also see in Figure8-5.
运行这个应用程序显示了目录高亮的效果,如图8-5所示。
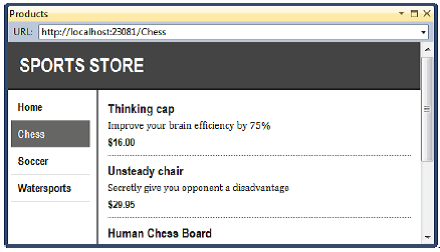
Figure 8-5.Highlighting the selected category
Correcting the Page Count
修正页面计数
The last thing we need todo is correct the page links so that they work correctly when a category isselected.
我们需要做的最后一件事是修正页面连接,以使它们在选择了一个目录时能正确地工作。
Currently, the number ofpage links is determined by the total number of products, not the number ofproducts in the selected category. This means that the customer can click thelink for page 2 of the Chess category and end up with an empty page becausethere are not enough chess products to fill the second page. You can see howthis looks in Figure 8-6.
当前,页面连接的数目是由产品总数确定的,而不是由被选择目录中的产品数所确定。这意味着,客户可以点击Chess目录的第2页而终止于一个空白页面,因为没有足够的棋类产品来填充第二个页面。你可以在图8-6看到这种情况。
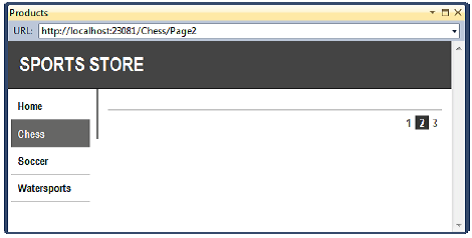
Figure 8-6. Displayingthe wrong page links when a category is selected
We can fix this byupdating the List action method in ProductController so that the paginationinformation takes the categories into account. You can see the required changesin Listing 8-12.
我们可以通过更新ProductController中的List动作方法来修正这种情况,以使分页信息把目录考虑进来。你可以在清单8-12中看到所需的修改。
Listing 8-12. CreatingCategory-Aware Pagination Data
public ViewResult List(string category, int page =1) { ProductsListViewModelviewModel = new ProductsListViewModel { Products= repository.Products .Where(p=> category == null ? true : p.Category == category) .OrderBy(p=> p.ProductID) .Skip((page- 1) * PageSize) .Take(PageSize), PagingInfo= new PagingInfo { CurrentPage= page, ItemsPerPage= PageSize, TotalItems = category == null ? repository.Products.Count(): repository.Products.Where(e=> e.Category == category).Count() }, CurrentCategory= category }; returnView(viewModel);}If a category is selected,we return the number of items in that category; if not, we return the totalnumber of products.
如果选择了一个目录,我们返回该目录中的条目数,如果没选,我们返回产品总数。
UNIT TEST: CATEGORY-SPECIFIC PRODUCT COUNTS
单元测试:特定目录的产品数
Testing that we are ableto generate the current product count for different categories is verysimple—we create a mock repository that contains known data in a range ofcategories and then call the List action method requesting each category inturn. We will also call the List method specifying no category to make sure weget the right total count as well. Here is the unit test:
测试我们能够对不同的目录生成当前产品数是很简单的 — 我们生成含有一定目录范围已知数据的模仿存储库,然后依次调用请求每个目录的List动作方法。我们也将调用未指定目录的List方法以确认我们也得到了正确的总数。以下是该单元测试:
[TestMethod]public voidGenerate_Category_Specific_Product_Count() { //Arrange // -create the mock repository Mock<IProductRepository>mock = new Mock<IProductRepository>(); mock.Setup(m=> m.Products).Returns(new Product[] { newProduct {ProductID = 1, Name = "P1", Category = "Cat1"}, newProduct {ProductID = 2, Name = "P2", Category = "Cat2"}, newProduct {ProductID = 3, Name = "P3", Category = "Cat1"}, newProduct {ProductID = 4, Name = "P4", Category = "Cat2"}, newProduct {ProductID = 5, Name = "P5", Category = "Cat3"} }.AsQueryable()); //Arrange - create a controller and make the page size 3 items ProductControllertarget = new ProductController(mock.Object); target.PageSize= 3; //Action - test the product counts for different categories int res1=((ProductsListViewModel)target.List("Cat1").Model).PagingInfo.TotalItems; int res2= ((ProductsListViewModel)target.List("Cat2").Model).PagingInfo.TotalItems; int res3=((ProductsListViewModel)target.List("Cat3").Model).PagingInfo.TotalItems; intresAll =((ProductsListViewModel)target.List(null).Model).PagingInfo.TotalItems; //Assert Assert.AreEqual(res1,2); Assert.AreEqual(res2,2); Assert.AreEqual(res3,1); Assert.AreEqual(resAll,5);}Now when we view acategory, the links at the bottom of the page correctly reflect the number ofproducts in the category, as shown in Figure 8-7.
现在,当我们查看一个目录时,页面底部的连接正确地反映了该目录中的产品数目,如图8-7所示。
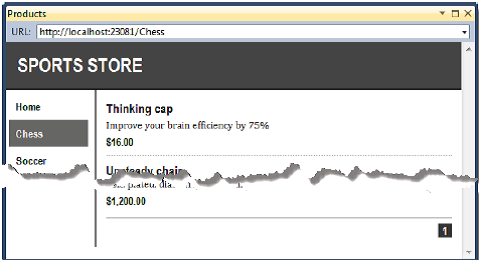
Figure 8-7. Displayingcategory-specific page counts
Building the Shopping Cart
建立购物车
Our application isprogressing nicely, but we can’t sell any products until we implement ashopping cart. In this section, we’ll create the shopping cart experience shownin Figure 8-8. This will be familiar to anyone who has ever made a purchaseonline.
我们的应用程序进展良好,但在我们没有实现购物车之前,我们还不能销售任何产品。在本章节中,我们将生成如图8-8所示的购物车体验。曾作过在线购物的人对它是熟悉的。
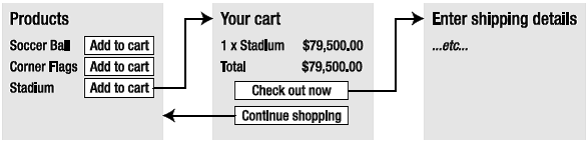
Figure 8-8. The basicshopping cart flow
图8-8. 基本的购物车流程
An Add to cart button willbe displayed alongside each of the products in our catalog. Clicking thisbutton will show a summary of the products the customer has selected so far,including the total cost. At this point, the user can click the Continueshopping button to return to the product catalog, or click the Checkout nowbutton to complete the order and finish the shopping session.
在一个目录中的每个产品的旁边都会显示一个“Add to cart(加入购物车)”按钮。点击这个按钮将显示该客户已选的产品摘要,包括总费用。在这里,客户可以点击“Continue shopping(继续购物)”按钮,以返回到产品目录,或点击“Check out now(付费离开)”按钮来完成订购,并结束购物会话。
Defining the Cart Entity
定义购物车实体
A shopping cart is part ofour application’s business domain, so it makes sense to represent a cart bycreating an entity in our domain model. Add a class called Cart to the Entitiesfolder in the SportsStore.Domain project. These classes are shown in Listing8-13.
购物车是我们应用程序事务域的一部分,因此,在我们的域模型中生成一个表现购物车的实体是有意义的。在SportsStore.Domain项目中的Entities文件夹中添加一个名为Cart的类。这些类如清单8-13所示。
Listing 8-13. The CartDomain Entity
using System.Collections.Generic;using System.Linq;namespace SportsStore.Domain.Entities { publicclass Cart { privateList<CartLine> lineCollection = new List<CartLine>(); publicvoid AddItem(Product product, int quantity) { CartLineline = lineCollection .Where(p => p.Product.ProductID == product.ProductID) .FirstOrDefault(); if(line == null) { lineCollection.Add(new CartLine { Product = product, Quantity = quantity}); }else { line.Quantity += quantity; } } publicvoid RemoveLine(Product product) { lineCollection.RemoveAll(l=> l.Product.ProductID == product.ProductID); } publicdecimal ComputeTotalValue() { returnlineCollection.Sum(e => e.Product.Price * e.Quantity); } publicvoid Clear() { lineCollection.Clear(); } publicIEnumerable<CartLine> Lines { get{ return lineCollection; } } } publicclass CartLine { publicProduct Product { get; set; } publicint Quantity { get; set; } }}The Cart class usesCartLine, defined in the same file, to represent a product selected by thecustomer and the quantity the user wants to buy. We have defined methods to addan item to the cart, remove a previously added item from the cart, calculatethe total cost of the items in the cart, and reset the cart by removing all ofthe selections. We have also provided a property that gives access to thecontents of the cart using an IEnumerble<CartLine>. This is allstraightforward stuff, easily implemented in C# with the help of a little LINQ.
Cart类使用了在同一个文件中定义的CartLine,以用来表示由该客户所选择的一个产品和该用户想要购买的数量。我们定义了一些方法,包括:把一个条目添加到购物车、从购物车中删除之前加入的条目、计算购物车条目总费用、以及删除全部选择重置购物车等。我们也提供了一个属性,它使用一个IEnumerable<CartLine>属性,以对购物车的内容进行访问。所有这些都很直观,利用一点点LINQ的辅助,很容易用C#来实现。
UNIT TEST: TESTING THE CART
单元测试:测试购物车
The Cart class isrelatively simple, but it has a range of important behaviors that we mustensure work properly. A poorly functioning cart would undermine the entireSportsStore application. We have broken down the features and tested themindividually.
Cart类相对简单,但它有一些我们必须确保能正确工作的行为。贫乏的购物车功能会破坏整个SportsStore应用程序。我们已经分解了这些特性,并分别对它们进行测试。
The first behavior relatesto when we add an item to the cart. If this is the first time that a givenProduct has been added to the cart, we want a new CartLine to be added. Here isthe test:
第一个行为关系到我们把一个条目添加到购物车的时候。如果这是第一次把一个给定的Product添加到购物车,我们希望增加一个新的CartLine。以下是该测试:
[TestMethod]public void Can_Add_New_Lines() { //Arrange - create some test products Productp1 = new Product { ProductID = 1, Name = "P1" }; Productp2 = new Product { ProductID = 2, Name = "P2" }; //Arrange - create a new cart Carttarget = new Cart(); // Act target.AddItem(p1,1); target.AddItem(p2,1); CartLine[]results = target.Lines.ToArray(); //Assert Assert.AreEqual(results.Length,2); Assert.AreEqual(results[0].Product,p1); Assert.AreEqual(results[1].Product,p2);}However, if the customerhas already added a Product to the cart, we want to increment the quantity of thecorresponding CartLine and not create a new one. Here is the test:
然而,如果客户已经把一个Product加到了购物车,我们希望增加相应CartLine的数据而不要生成一个新的。以下是该测试:
[TestMethod]public void Can_Add_Quantity_For_Existing_Lines(){ //Arrange - create some test products Productp1 = new Product { ProductID = 1, Name = "P1" }; Productp2 = new Product { ProductID = 2, Name = "P2" }; //Arrange - create a new cart Carttarget = new Cart(); // Act target.AddItem(p1,1); target.AddItem(p2,1); target.AddItem(p1,10); CartLine[]results = target.Lines.OrderBy(c => c.Product.ProductID).ToArray(); //Assert Assert.AreEqual(results.Length,2); Assert.AreEqual(results[0].Quantity,11); Assert.AreEqual(results[1].Quantity,1);}We also need to check thatusers can change their mind and remove products from the cart. This feature is implementedby the RemoveLine method. Here is the test:
我们也需要测试用户改变主意并从购物车删除产品的行为。这一特性是由RemoveLine方法来实现的。以下是测试:
[TestMethod]public void Can_Remove_Line() { //Arrange - create some test products Productp1 = new Product { ProductID = 1, Name = "P1" }; Productp2 = new Product { ProductID = 2, Name = "P2" }; Productp3 = new Product { ProductID = 3, Name = "P3" }; //Arrange - create a new cart Carttarget = new Cart(); //Arrange - add some products to the cart target.AddItem(p1,1); target.AddItem(p2,3); target.AddItem(p3,5); target.AddItem(p2,1); // Act target.RemoveLine(p2); //Assert Assert.AreEqual(target.Lines.Where(c=> c.Product == p2).Count(), 0); Assert.AreEqual(target.Lines.Count(),2);}The next behavior we wantto test is our ability to calculate the total cost of the items in the cart.Here’s the test for this behavior:
我们想要测试的下一个行为是计算购物车中各条目总费用的能力。以下是用于该行为的测试:
[TestMethod]public void Calculate_Cart_Total() { //Arrange - create some test products Productp1 = new Product { ProductID = 1, Name = "P1", Price = 100M}; Productp2 = new Product { ProductID = 2, Name = "P2" , Price = 50M}; //Arrange - create a new cart Carttarget = new Cart(); // Act target.AddItem(p1,1); target.AddItem(p2,1); target.AddItem(p1,3); decimalresult = target.ComputeTotalValue(); //Assert Assert.AreEqual(result,450M);}The final test is verysimple. We want to ensure that the contents of the cart are properly removedwhen we reset it. Here is the test:
最后一个测试很简单。我们希望在重置购物车时,恰当地删除了购物车的内容。以下是该测试:
[TestMethod]public void Can_Clear_Contents() { //Arrange - create some test products Productp1 = new Product { ProductID = 1, Name = "P1", Price = 100M }; Productp2 = new Product { ProductID = 2, Name = "P2", Price = 50M }; //Arrange - create a new cart Carttarget = new Cart(); //Arrange - add some items target.AddItem(p1,1); target.AddItem(p2,1); // Act - reset the cart target.Clear(); //Assert Assert.AreEqual(target.Lines.Count(),0);}Sometimes, asin this case, the code required to test the functionality of a type is muchlonger and much more complex than the type itself. Don’t let that put you offwriting the unit tests. Defects in simple classes, especially ones that playsuch an important role as Cart does in our application, can have huge impacts.
有时,正如上述情况一样,测试一个类型的功能所需的代码比该类型本身要长得多且复杂得多。不要让这种情况让你放弃单元测试。一个简单类的缺陷,尤其像这种在我们应用程序中起着重要作用的购物车如果有缺陷,有可能会产生巨大的影响。
Adding the Add to Cart Buttons
添加Add to Cart按钮
We need to edit theViews/Shared/ProductSummary.cshtml partial view to add the buttons to theproduct listings. The changes are shown in Listing 8-14.
我们需要编辑Views/Shared/ProductSummary.cshtml部分视图,以把这些按钮添加到产品列表。清单8-14显示了所作的修改。
Listing 8-14. Adding theButtons to the Product Summary Partial View
@model SportsStore.Domain.Entities.Product<div class="item"> <h3>@Model.Name</h3> @Model.Description @using(Html.BeginForm("AddToCart","Cart")) { @Html.HiddenFor(x => x.ProductID) @Html.Hidden("returnUrl",Request.Url.PathAndQuery) <input type="submit"value="+ Add to cart" /> } <h4>@Model.Price.ToString("c")</h4></div>We’ve added a Razor blockthat creates a small HTML form for each product in the listing. When this formis submitted, it will invoke the AddToCart action method in the Cart controller(we’ll implement this method in just a moment).
我们对列表中的每个产品添加了一个Razor代码块,它生成一个小型表单(Form)。当这个表单被递交时,它将请求Cart控制器中的AddToCart动作方法(我们一会儿就会实现这个方法)。
n Note By default, the BeginForm helper method creates a form thatuses the HTTP POST method. You can change this so that forms use the GETmethod, but you should think carefully about doing so. The HTTP specificationrequires that GET requests must be idempotent, meaning that they must not causechanges, and adding a product to a cart is definitely a change. We’ll have moreto say on this topic in Chapter 9, including an explanation of what can happenif you ignore the need for idempotent GET requests.
注:默认地,BeginForm辅助方法生成一个使用HTTP POST方法的表单。你可以对之进行修改,以使表单使用GET方法,但你这么做时应该仔细考虑。HTTP规范要求GET请求必须是幂等的,意即,它们必须不会引起变化,而把一个产品添加到购物车显然是一个变化(所以我们没用GET — 译者注)。关于这一论题,我们在第9章会有更多论述,并解释如果你对幂等的GET请求忽略了这种需求会发生什么。
We want to keep thestyling of these buttons consistent with the rest of the application, so addthe CSS shown in Listing 8-15 to the end of the Content/Site.css file.
我们希望这些按钮的样式与应用程序的其余部分一致,因此,把清单8-15所示的CSS样式加到Content/Site文件的尾部。
Listing 8-15. Styling theButtons
FORM { margin: 0; padding: 0; }DIV.item FORM { float:right; }DIV.item INPUT { color:White;background-color: #333; border: 1px solid black; cursor:pointer;}CREATING MULTIPLE HTML FORMS IN APAGE
在一个页面中生成多个HTML表单
Using the Html.BeginFormhelper in each product listing means that every Add to cart button is renderedin its own separate HTML form element. This may be surprising if you’ve beendeveloping with ASP.NET Web Forms, which imposes a limit of one form per page.ASP.NET MVC doesn’t limit the number of forms per page, and you can have asmany as you need.
在每个产品列表中使用Html.BeginForm辅助方法,意味着“Add to cart”按钮会被渲染成它自己独立的HTML表单元素。如果你一直是用ASP.NET的Web表单从事开发,这可能是很奇怪的事情,因为Web表单具有每个页面只有一个表单的限制。ASP.NET MVC并不限制每页表单的个数,你可以有所需要的任意多个。
There is notechnical requirement for us to create a form for each button. However, sinceeach form will postback to the same controller method, but with a different setof parameter values, it is a nice and simple way to deal with the buttonpresses.
我们为每个按钮生成一个表单没有技术上的要求。然而,由于每个表单将会回递给同一个控制器方法,但却带有了一组不同的参数值,所以,这是处理按钮点击的一种很好而简单的方式(指每按钮一个表单)。
Implementing the Cart Controller
实现购物车控制器
We need to create acontroller to handle the Add to cart button presses. Create a new controllercalled CartController and edit the content so that it matches Listing 8-16.
我们需要生成一个控制器来处理“Add to cart”按钮的点击。生成一个名为CartController的新控制器,并编辑其内容,使之与清单8-16吻合。
Listing 8-16. Creatingthe Cart Controller
using System.Linq;using System.Web.Mvc;using SportsStore.Domain.Abstract;using SportsStore.Domain.Entities;namespace SportsStore.WebUI.Controllers { publicclass CartController : Controller { privateIProductRepository repository; publicCartController(IProductRepository repo) { repository= repo; } publicRedirectToRouteResult AddToCart(int productId, string returnUrl) { Product product = repository.Products .FirstOrDefault(p => p.ProductID == productId); if(product != null) { GetCart().AddItem(product, 1); } returnRedirectToAction("Index", new { returnUrl }); } publicRedirectToRouteResult RemoveFromCart(int productId, string returnUrl) { Productproduct = repository.Products .FirstOrDefault(p =>p.ProductID == productId); if(product != null) { GetCart().RemoveLine(product); } returnRedirectToAction("Index", new { returnUrl }); } privateCart GetCart() { Cartcart = (Cart)Session["Cart"]; if(cart == null) { cart = new Cart(); Session["Cart"] = cart; } returncart; } }}There are a few points tonote about this controller. The first is that we use the ASP.NET session statefeature to store and retrieve Cart objects. This is the purpose of the GetCartmethod. ASP.NET has a nice session feature that uses cookies or URL rewritingto associate requests from a user together, to form a single browsing session.A related feature is session state, which allows us to associate data with asession. This is an ideal fit for our Cart class. We want each user to have hisown cart, and we want the cart to be persistent between requests. Dataassociated with a session is deleted when a session expires (typically becausea user hasn’t made a request for a while), which means that we don’t need tomanage the storage or life cycle of the Cart objects. To add an object to thesession state, we set the value for a key on the Session object, like this:
这个控制器有几个注意点。第一是我们运用ASP.NET会话状态特性来存储和接收Cart对象。这是GetCart方法的目标。ASP.NET有一个很好的会话特性,它使用cookies或URL重写的办法把一个用户的各个请求关联在一起。一个相关的特性是会话状态,它允许我们把数据与会话关联起来。这对我们的Cart类很合适。我们希望每个用户有他自己的购物车,而且我们希望购物在各次请求之间是保持的。当会话过期(典型地是用户好一会儿没有任何请求)时,数据与会话的关联被删除,这意味着我们不需要管理Cart对象的存储或其生命周期。把一个对象添加到一个会话状态,我们对Session对象上的键设置一个值,像这样:
Session["Cart"] = cart;
To retrieve an objectagain, we simply read the same key, like this:
要再次接收一个对象,我们只要简单地读取同一个键,像这样:
Cart cart = (Cart)Session["Cart"];
n Tip Session state objects are stored in the memory of the ASP.NETserver by default, but you can configure a range of different storageapproaches, including using a SQL database.
提示:Session状态对象默认存储在ASP.NET服务器的内存中,但你可以配置不同的存储方式,包括用一个SQL数据库。
For the AddToCart andRemoveFromCart methods, we have used parameter names that match the inputelements in the HTML forms we created in the ProductSummary.cshtml view. Thisallows the MVC Framework to associate incoming form POST variables with thoseparameters, meaning we don’t need to process the form ourselves.
对于AddToCart和RemoveFromCart方法,对我们在ProductSummary.cshtml视图中所生成的HTML表单中的input元素,我们使用了匹配的参数名。这可以让MVC Framework把输入表单的POST变量与这些参数关联起来,意即,我们不需要自己来处理这个表单。
Displaying the Contents of the Cart
显示购物车内容
The final point to noteabout the Cart controller is that both the AddToCart and RemoveFromCart methodscall the RedirectToAction method. This has the effect of sending an HTTPredirect instruction to the client browser, asking the browser to request a newURL. In this case, we have asked the browser to request a URL that will callthe Index action method of the Cart controller.
对Cart控制器最后要注意的一点是AddToCart(添加到购物车)和RemoveFromCart(从购物车删除)方法都调用了RedirectToAction(重定向到一个动作)方法。这具有把一个HTTP重定向指令发送到客户端浏览器、要求浏览器请求一个新的URL的效果。在这种情况下,我们要求浏览器请求一个URL,它调用Cart控制器的Index动作方法。
We are going to implementthe Index method and use it to display the contents of the Cart. If you referback to Figure 8-8, you’ll see that this is our workflow when the user clicksthe Add to cart button.
我们打算实现这个Index方法,并用它显示Cart的内容。如果你参考前述的图8-8,你会看到,当用户点击“Add to cart”按钮时,这就是我们的工作流。
We need to pass two piecesof information to the view that will display the contents of the cart: the Cartobject and the URL to display if the user clicks the Continue shopping button.We will create a simple view model class for this purpose. Create a new classcalled CartIndexViewModel in the Models folder of the SportsStore.WebUIproject. The contents of this class are shown in Listing 8-17.
我们需要把两个数据片段传递给显示购物车内容的视图:Cart对象以及如果用户点击“Continueshopping”按钮时要显示的URL。我们将为此目的生成一个简单的视图模型类。在SportsStore.WebUI项目的Models文件夹中生成一个名为CartIndexViewModel的新类。该类的内容如清单8-17所示。
Listing 8-17. TheCartIndexViewModel Class
using SportsStore.Domain.Entities;namespace SportsStore.WebUI.Models { publicclass CartIndexViewModel { publicCart Cart { get; set; } publicstring ReturnUrl { get; set; } }}Now that we have the viewmodel, we can implement the Index action method in the Cart controller class,as shown in Listing 8-18.
现在,我们有了这个视图模型,我们可以实现Cart控制器中的Index动作方法了,如清单8-18所示。
Listing 8-18. The IndexAction Method
public ViewResult Index(string returnUrl) { returnView(new CartIndexViewModel { Cart= GetCart(), ReturnUrl= returnUrl });}The last step is todisplay the contents of the cart is to create the new view. Right-click theIndex method and select Add View from the pop-up menu. Set the name of the viewto Index, check the option to create a strongly typed view, and selectCartIndexViewModel as the model class, as shown in Figure 8-9.
显示购物车内容的最后一步是生成新视图。右击Index方法并从弹出菜单选择“添加视图”。将视图名设置为Index,选中“强类型视图”复选框,并选择CartIndexViewModel作为模型类,如图8-9所示。
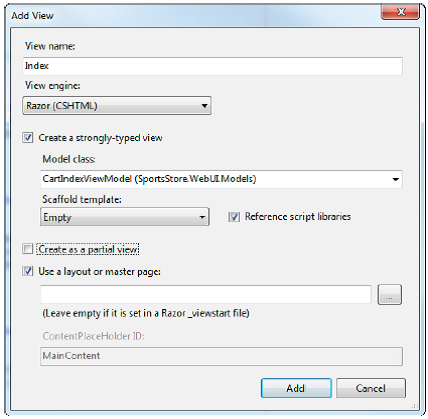
Figure 8-9. Adding the Index view
We want the contents ofthe cart to be displayed consistently with the rest of the application pages,so ensure that the option to use a layout is checked, and leave the text boxempty so that we use the default _Layout.cshtml file. Click Add to create theview and edit the contents so that they match Listing 8-19.
我们希望购物车的内容显示与应用程序的其它页面一致,为此,确保选中“使用布局”复选框,并保持其文本框为空,以使我们使用默认的_Layout.cshtml文件。点击“添加”以生成这个视图,并编辑其内容,使之与清单8-19吻合。
Listing 8-19. The IndexView
@model SportsStore.WebUI.Models.CartIndexViewModel@{ ViewBag.Title= "Sports Store: Your Cart";}<h2>Your cart</h2><table width="90%"align="center"> <thead><tr> <thalign="center">Quantity</th> <thalign="left">Item</th> <thalign="right">Price</th> <thalign="right">Subtotal</th> </tr></thead> <tbody> @foreach(varline in Model.Cart.Lines) { <tr> <tdalign="center">@line.Quantity</td> <tdalign="left">@line.Product.Name</td> <tdalign="right">@line.Product.Price.ToString("c")</td> <tdalign="right">@((line.Quantity * line.Product.Price).ToString("c"))</td> </tr> } </tbody> <tfoot><tr> <tdcolspan="3" align="right">Total:</td> <tdalign="right"> @Model.Cart.ComputeTotalValue().ToString("c") </td> </tr></tfoot></table><p align="center"class="actionButtons"> <ahref="@Model.ReturnUrl">Continue shopping</a></p>The view looks morecomplicated than it is. It just enumerates the lines in the cart and adds rowsfor each of them to an HTML table, along with the total cost per line and thetotal cost for the cart. The final step is to add some more CSS. Add the stylesshown in Listing 8-20 to the Site.css file.
该视图看上去比它本身更复杂些。其实它只是枚举了购物车中的各行信息,并把每行加入到一个HTML的表格,包括每行的总费用以及整个购物车的总费用。最后一步是再添加一些CSS。将清单8-20所示的样式添加到Site.css文件。
Listing 8-20. CSS forDisplaying the Contents of the Cart
H2 { margin-top: 0.3em }TFOOT TD { border-top: 1px dotted gray;font-weight: bold; }.actionButtons A, INPUT.actionButtons { font:.8em Arial; color: White; margin: .5em; text-decoration:none; padding: .15em 1.5em .2em 1.5em; background-color:#353535; border: 1px solid black;}We now have the basicfunctions of the shopping cart in place. When we click the Add to cart button,the appropriate product is added to our cart and a summary of the cart isdisplayed, as shown in Figure 8-10. We can click the Continue shopping buttonand return to the product page we came from—all very nice and slick.
现在我们有了购物车的基本功能。当我们点击“Add to cart”按钮时,相应的产品被添加到我们的购物车,并显示如图8-10所示的购物车摘要。我们可以点击“Continue shopping”按钮,并返回到我们从中而来的页面— 一切都很好而顺利。
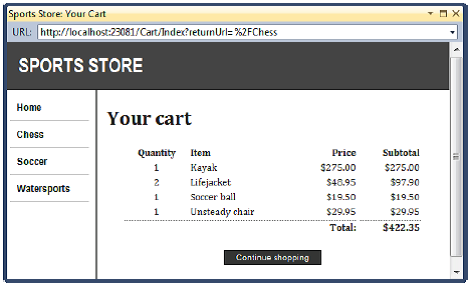
Figure 8-10. Displaying the contents of the shopping cart
图8-10. 显示购物车内容
We have more work to do.We need to allow users to remove items from a cart and also to complete theirpurchase. We will implement these features later in this chapter. Next, we aregoing to revisit the design of the Cart controller and make some changes.
我们还有更多工作要做。我们需要允许用户从购物车删除条目,以及完成它们的购物。我们将在本章后面实现这些特性。下一步,我们打算访问Cart控制器的设计,并作一些修改。
Using Model Binding
使用模型绑定
The MVC Framework uses asystem called model binding to create C# objects from HTTP requests in order topass them as parameter values to action methods. This is how MVC processesforms, for example. The framework looks at the parameters of the action methodthat has been targeted, and uses a model binder to get the values of the forminput elements and convert them to the type of the parameter with the samename.
MVC Framework使用了一个叫做模型绑定的系统,以生成一些HTTP请求的C#对象,目的是把这些对象作为参数值传递给动作方法。例如,MVC是这样处理表单的:框架会根据目标动作方法的参数,用模型绑定获得输入元素的值,并用同样的名字把它们转换成参数的类型。(我对这句话的理解是,模型绑定会把HTML表单的输入元素以同样的名字转换成目标动作方法所要求的对象类型,并以这些对象作为目标动作方法的参数。因此,模型绑定的作用是,按照目标方法的模型要求(即参数及其类型的要求),利用表单中的数据生成模型对象,将(这些)模型对象作为参数传递给目标方法— 译者注)
Model binders can createC# types from any information that is available in the request. This is one ofthe central features of the MVC Framework. We are going to create a custommodel binder to improve our CartController class.
模型绑定器可以根据请求中可用的任何信息来生成C#类型。这是MVC框架的核心特性之一。我们打算生成一个自定义模型绑定器来改善我们的CartController类。
We like using the sessionstate feature in the Cart controller to store and manage our Cart objects, butwe really don’t like the way we have to go about it. It doesn’t fit the rest ofour application model, which is based around action method parameters. We can’tproperly unit test the CartController class unless we mock the Sessionparameter of the base class, and that means mocking the Controller class and awhole bunch of other stuff we would rather not deal with.
我们喜欢用Cart控制器中的会话状态特性来存储和管理我们的Cart对象,但我们实在是不喜欢它要我们完成的方式(应当是指对会话状态数据的存取方式 — 译者注)。它不符合我们应用程序模型的其余部分,而这是动作方法参数的基础(其意思似乎是,动作方法参数的操作是以模型为基础的,而会话状态的操作却不是,所以需要模型绑定— 译者注)。我们不能适当地对CartController类进行单元测试,除非我们模仿基类的Session(会话)参数,意即,我们要模仿Controller类以及其它一大堆我们不想处理的东西。
To solve this problem, weare going to create a custom model binder that obtains the Cart objectcontained in the session data. The MVC Framework will then be able to createCart objects and pass them as parameters to the action methods in ourCartController class. The model binding feature is very powerful and flexible.We go into a lot more depth about this feature in Chapter 17, but this is anice example to get us started.
为了解决这个问题,我们打算生成一个自定义模型绑定器,以获得包含在会话数据中的Cart对象。MVC框架然后将能够生成Cart对象,并把它们作为参数传递给我们CartController类中的动作方法。这种模型绑定特性功能十分强大而灵活。我们将在第17章更深入地了解这一特性,但这里是让我们着手进行工作的一个很好的例子。
Creating a Custom Model Binder
生成一个自定义模型绑定器
We create a custom modelbinder by implementing the IModelBinder interface. Create a new folder in theSportsStore.WebUI project called Binders and create the CartModelBinder classinside that folder. Listing 8-21 shows the implementation of this class.
我们通过实现IModelBinder接口来生成一个自定义模型绑定器。在SportsStore.WebUI项目中生成一个名为Binders的文件夹,并在这个文件夹中生成一个CartModelBinder类。清单8-21显示了这个类的实现。
Listing 8-21. TheCartModelBinder Class
using System;using System.Web.Mvc;using SportsStore.Domain.Entities;namespace SportsStore.WebUI.Binders { publicclass CartModelBinder : IModelBinder { privateconst string sessionKey = "Cart"; publicobject BindModel(ControllerContext controllerContext, ModelBindingContextbindingContext) { //get the Cart from the session Cartcart = (Cart)controllerContext.HttpContext.Session[sessionKey]; //create the Cart if there wasn't one in the session data if(cart == null) { cart = new Cart(); controllerContext.HttpContext.Session[sessionKey] = cart; } //return the cart returncart; } }}The IModelBinder interfacedefines one method: BindModel. The two parameters are provided to make creatingthe domain model object possible. The ControllerContext provides access to allof the information that the controller class has, which includes details of therequest from the client. The ModelBindingContext gives you information aboutthe model object you are being asked to build and tools for making it easier.We’ll come back to this class in Chapter 17.
IModelBinder接口定义了一个方法:BindModel。提供两个参数使得生成域模型对象成为可能。ControllerContext提供了对控制器类所有信息的访问,包括客户端请求的细节。ModelBindingContext给你提供了要求你建立的模型对象的信息,以及使之更容易的工具。我们将在第17章回过头来讨论这个类。
For our purposes, theControllerContext class is the one we’re interested in. It has the HttpContextproperty, which in turn has a Session property that lets us get and set sessiondata. We obtain the Cart by reading a key value from the session data, andcreate a Cart if there isn’t one there already.
对于我们的目标,ControllerContext类是我们感兴趣的。它具有HttpContext属性,这又转而有了一个Session属性,它让我们可以获取和设置会话数据。我们通过读取会话数据的键值来获得Cart,并在还不存在Cart时生成一个Cart。
We need to tell the MVCFramework that it can use our CartModelBinder class to create instances ofCart. We do this in the Application_Start method of Global.asax, as shown inListing 8-22.
我们需要告诉MVC框架,它可以使用我们的CartModelBinder类来生成Cart的实例。我们在Global.asax的Application_Start方法中来实现它,如清单8-22所示。
Listing 8-22. Registeringthe CartModelBinder Class
protected void Application_Start() { AreaRegistration.RegisterAllAreas(); RegisterGlobalFilters(GlobalFilters.Filters); RegisterRoutes(RouteTable.Routes); ControllerBuilder.Current.SetControllerFactory(newNinjectControllerFactory()); ModelBinders.Binders.Add(typeof(Cart), newCartModelBinder());}We can now update theCartController class to remove the GetCart method and rely on our model binder.Listing 8-23 shows the changes.现在,我们可以更新CartController类,删去GetCart方法,并进行依赖于我们的模型绑定器的一些更新。清单8-23显示了这些修改。
Listing 8-23. Relying onthe Model Binder in CartController
using System.Linq;using System.Web.Mvc;using SportsStore.Domain.Abstract;using SportsStore.Domain.Entities;using SportsStore.WebUI.Models;namespace SportsStore.WebUI.Controllers { publicclass CartController : Controller { privateIProductRepository repository; publicCartController(IProductRepository repo) { repository= repo; } public RedirectToRouteResult AddToCart(Cart cart, int productId, stringreturnUrl) { Productproduct = repository.Products .FirstOrDefault(p =>p.ProductID == productId); if(product != null) { cart.AddItem(product,1); } returnRedirectToAction("Index", new { returnUrl }); } publicRedirectToRouteResult RemoveFromCart(Cartcart, int productId, string returnUrl) { Productproduct = repository.Products .FirstOrDefault(p =>p.ProductID == productId); if(product != null) { cart.RemoveLine(product); } returnRedirectToAction("Index", new { returnUrl }); } publicViewResult Index(Cart cart, stringreturnUrl) { returnView(new CartIndexViewModel { Cart = cart, ReturnUrl = returnUrl }); } }}We have removed the GetCartmethod and added a Cart parameter to each of the action methods.
我们删除了GetCart方法,并对每个动作方法添加了Cart参数。
When the MVC Frameworkreceives a request that requires, say, the AddToCart method to be invoked, itbegins by looking at the parameters for the action method. It looks at the listof binders available and tries to find one that can create instances of eachparameter type. Our custom binder is asked to create a Cart object, and it doesso by working with the session state feature. Between our binder and thedefault binder, the MVC Framework is able to create the set of parametersrequired to call the action method. And so it does, allowing us to refactor thecontroller so that it has no view as to how Cart objects are created whenrequests are received.
当MVC框架接收到一个需要的请求,比如说,请求AddToCart方法时,它通过查看该动作方法的参数开始运行。它查看可用绑定器列表,并试图找到一个能够生成每个参数类型实例的绑定器。我们的自定义绑定器要生成一个Cart对象,这是通过与会话状态特性进行工作来完成的。在我们绑定器与默认绑定器之间,MVC框架能够生成这组调用该动作方法所需要的参数。因此,这允许我们在接收到请求时重构控制器,以便没有视情况下如何生成Cart对象(这句好像译得有问题 — 译者注)。
There are a few benefitsto using a custom model binder like this. The first is that we have separatedthe logic used to create a Cart from that of the controller, which allows us tochange the way we store Cart objects without needing to change the controller.The second benefit is that any controller class that works with Cart objectscan simply declare them as action method parameters and take advantage of thecustom model binder. The third benefit, and the one we think is most important,is that we can now unit test the Cart controller without needing to mock a lotof ASP.NET plumbing.
像这样使用一个自定义模型绑定器有几个好处。第一是我们把用来生成Cart的逻辑与控制器分离开来了,这允许我们修改存储Cart对象的方式,而不需要修改控制器。第二个好处是任何与Cart对象一起工作的任何控制器类能够简单地把这些对象声明为动作参数,并利用这个自定义模型绑定器。第三个好处,也是我们认为最重要的好处是,我们现在能够单元测试Cart控制器,而不需要模仿大量的ASP.NET通道。
UNIT TEST: THE CART CONTROLLER
单元测试:购物车控制器
We can unit test theCartController class by creating Cart objects and passing them to the actionmethods. We want to test three different aspects of this controller:
我们可以通过生成Cart对象并把它们传递给动作方法来进行CartController类的单元测试。我们想要测试该控制器的三个不同方面:
- The AddToCart method should add the selected product to thecustomer’s cart.
AddToCart方法应该把所选的产品添加到客户的购物车 - After adding a product to the cart, we should be redirected to theIndex view.
把一个产品添加到购物车之后,我们应该被重定向到Index视图。 - The URL that the user can follow to return to the catalog should becorrectly passed to the Index action method.
用户随后可以返回到的产品目录的URL应该被正确地传递给Index动作方法。
Here are the unit tests weused:
以下是我们所使用的单元测试:
[TestMethod]public void Can_Add_To_Cart() { //Arrange - create the mock repository Mock<IProductRepository>mock = new Mock<IProductRepository>(); mock.Setup(m=> m.Products).Returns(new Product[] { newProduct {ProductID = 1, Name = "P1", Category = "Apples"}, }.AsQueryable()); //Arrange - create a Cart Cartcart = new Cart(); //Arrange - create the controller CartControllertarget = new CartController(mock.Object); // Act -add a product to the cart target.AddToCart(cart,1, null); //Assert Assert.AreEqual(cart.Lines.Count(),1); Assert.AreEqual(cart.Lines.ToArray()[0].Product.ProductID,1);}[TestMethod]public voidAdding_Product_To_Cart_Goes_To_Cart_Screen() { //Arrange - create the mock repository Mock<IProductRepository>mock = new Mock<IProductRepository>(); mock.Setup(m=> m.Products).Returns(new Product[] { newProduct {ProductID = 1, Name = "P1", Category = "Apples"}, }.AsQueryable()); //Arrange - create a Cart Cartcart = new Cart(); //Arrange - create the controller CartControllertarget = new CartController(mock.Object); // Act -add a product to the cart RedirectToRouteResultresult = target.AddToCart(cart, 2, "myUrl"); //Assert Assert.AreEqual(result.RouteValues["action"],"Index"); Assert.AreEqual(result.RouteValues["returnUrl"],"myUrl");}[TestMethod]public void Can_View_Cart_Contents() { //Arrange - create a Cart Cartcart = new Cart(); //Arrange - create the controller CartControllertarget = new CartController(null); // Act - call the Index action method CartIndexViewModelresult =(CartIndexViewModel)target.Index(cart, "myUrl").ViewData.Model; //Assert Assert.AreSame(result.Cart,cart); Assert.AreEqual(result.ReturnUrl,"myUrl");}Completing the Cart
完成购物车
Now that we’ve introducedour custom model binder, it’s time to complete the cart functionality by addingtwo new features. The first feature will allow the customer to remove an itemfrom the cart. The second feature will display a summary of the cart at the topof the page.
现在,我们已经介绍了自定义模型绑定器,到了我们通过添加两个新特性来完成购物车功能的时候了。第一个特性将允许客户删除购物车的条目。第二个特性将在页面的顶部显示购物车的摘要。
Removing Items from the Cart
删除购物车的条目
We have already definedand tested the RemoveFromCart action method in the controller, so letting thecustomer remove items is just a matter of exposing this method in a view, whichwe are going to do by adding a Remove button in each row of the cart summary.The changes to Views/Cart/Index.cshtml are shown in Listing 8-24.
我们已经定义并测试了控制器中的RemoveFromCart动作方法,因此,让客户删除条目只不过是一个在视图中暴露此方法的事情,我们打算在购物车摘要的每一行中添加一个Remove按钮的办法来实现它。按清单8-24对Views/Cart/Index.cshtml进行修改。
Listing 8-24. Introducinga Remove Button
...<td align="right">@((line.Quantity* line.Product.Price).ToString("c"))</td><td> @using (Html.BeginForm("RemoveFromCart","Cart")) { @Html.Hidden("ProductId",line.Product.ProductID) @Html.HiddenFor(x => x.ReturnUrl) <input class="actionButtons"type="submit" value="Remove" /> }</td>...n Note We can use the strongly typed Html.HiddenFor helper method tocreate a hidden field for the ReturnUrl model property, but we need to use thestring-based Html.Hidden helper to do the same for the Product ID field. If wehad written Html.HiddenFor(x => line.Product.ProductID), the helper wouldrender a hidden field with the name line.Product.ProductID. The name of thefield would not match the names of the parameters for theCartController.RemoveFromCart action method, which would prevent the defaultmodel binders from working, so the MVC Framework would not be able to call themethod.
注:我们可以用强类型的Html.HiddenFor辅助方法对ReturnUrl模型属性来生成一个隐藏的字段,但我们需要用基于字符串的Html.Hidden辅助方法对ProductID字段做同样的事情。如果我们写成Html.HiddenFor(x=> line.Product.ProductID),该辅助方法将以line.Product.ProductID为名字来渲染一个隐藏字段。该字段的名字将与CartController.RemoveFromCart动作方法的参数名不匹配,这会阻止默认的模型绑定器进行工作,因此,MVC框架便不能调用此方法。
You can see the Removebuttons at work by running the application, adding some items to the shoppingcart, and then clicking one of them. The result is illustrated in Figure 8-11.
运行应用程序,把一些条目添加到购物车,然后点击其中之一,你可以看到Remove按钮在工作。结果如图8-11所示。
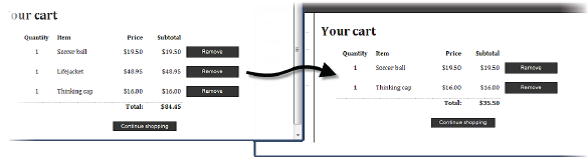
Figure 8-11. Removingan item from the shopping cart
图8-11. 删除购物车条目
Adding the Cart Summary
添加购物车摘要
We have a functioningcart, but we have an issue with the way we’ve integrated the cart into the interface.Customers can tell what’s in their cart only by viewing the cart summaryscreen. And they can view the cart summary screen only by addinga new a new item to the cart.
我们有了一个功能化的购物车,但我们把此购物车集成到接口的方式存在一个问题。客户可以通过查看购物车摘要屏幕的方式可以知道他们的购物车中有什么。而且他们只能通过把一个新条目加到购物车才能查看购物车摘要。
To solve this problem, weare going to add a widget that summarizes the contents of the cart and can beclicked to display the cart contents. We’ll do this in much the same way thatwe added the navigation widget—as an action whose output we will inject intothe Razor layout.
为了解决这一问题,我们打算添加一个汇总购物车内容并能够点击以显示购物车内容的小部件。我们采用与添加导航部件十分相似的方式来做这件事— 作为一个动作,把它的输出注入到Razor的布局。
To start, we need to addthe simple method shown in Listing 8-25 to the CartController class.
首先,我们把如清单8-25所示的一个简单的方法加到CartController类。
Listing 8-25. Adding theSummary Method to the Cart Controller
...public ViewResult Summary(Cart cart) { returnView(cart);}...You can see that this is avery simple method. It just needs to render a view, supplying the current Cart(which will be obtained using our custom model binder) as view data. We need tocreate a partial view that will be rendered in response to the Summary methodbeing called. Right-click the Summary method and select Add View from thepop-up menu. Set the name of the view to Summary, check the option for astrongly typed view, and set the model class to be Cart, as shown in Figure8-12. We want a partial view since we are going to inject it into our overallpage, so check the Create as a partial view option.
你可以看到,这是一个很简单的方法。它只需要渲染一个视图,提供当前Cart(它是用我们的自定义模型绑定器获得的)作为视图数据。我们需要生成一个部分视图,它在对Summary方法调用作出响应时被渲染。右击Summary方法并从弹出菜单选择“添加视图”。将视图名设为Summary,选中“强类型视图”复选框,并把模型类设置为Cart,如图8-12所示。我们需要一个部分视图,因为我们打算把它注入到我们的所有页面,因此,选中“生成部分视图”复选框。
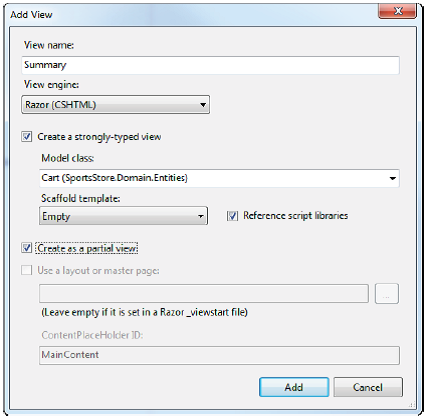
Figure 8-12. Addingthe Summary view
图8-12. 添加Summary视图
Edit the new partial viewso that it matches Listing 8-26.
编辑此新的部分视图使之与清单8-26匹配。
Listing 8-26. The SummaryPartial View
@model SportsStore.Domain.Entities.Cart@{ Layout =null;}<div id="cart"> <spanclass="caption"> <b>Your cart:</b> @Model.Lines.Sum(x => x.Quantity) item(s), @Model.ComputeTotalValue().ToString("c") </span> @Html.ActionLink("Checkout", "Index","Cart", new {returnUrl = Request.Url.PathAndQuery }, null)</div>This is a simple view thatdisplays the number of items in the cart, the total cost of those items, and alink that shows the contents of the cart to the user. Now that we’ve definedthe view that is returned by the Summary action method, we can include therendered result in the _Layout.cshtml file, as shown in Listing 8-27.
这是一个简单的视图,它显示购物车中的一些条目、这些条目的总费用、以及把购物车内容显示给用户的一个连接。现在我们已经定义了由Summary动作方法返回的这个视图,我们可以把它渲染的结果包含到_Layout.cshtml文件中,如清单8-27所示。
Listing 8-27. Adding theCart Summary Partial View to the Layout
...<body> <divid="header"> @{Html.RenderAction("Summary","Cart");} <div class="title">SPORTS STORE</div> </div> <divid="categories"> @{Html.RenderAction("Menu", "Nav"); }...The last step is to addsome additional CSS rules to format the elements in the partial view. Add thestyles in Listing 8-28 to the Site.css file in the SportsStore.WebUI project.
最后一步是添加一些CSS规则以对该部分视图中的元素进行格式化。将清单8-28的样式加到SportsStore.WebUI项目中的Site.css文件。
Listing 8-28. AddingStyles to Site.css
DIV#cart { float:right; margin: .8em; color:Silver; background-color: #555; padding: .5em .5em.5em 1em; }DIV#cart A { text-decoration: none; padding: .4em1em .4em 1em; line-height:2.1em; margin-left: .5em; background-color: #333;color:White; border: 1px solid black;}You can see the cartsummary by running the application. As you add items to the cart, the itemcount and total increase, as shown by Figure 8-13.
运行此应用程序,你可以看到购物车摘要。当你把条目添加到购物车时,条目数以及总费用都会增加,如图8-13所示。
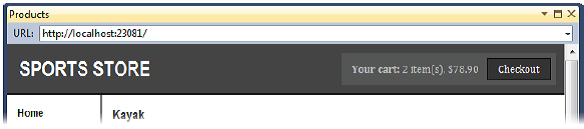
Figure 8-13. The cartsummary widget
图8-13. 购物车摘要部件
With this addition, we nowlet customers know what’s in their cart, and we also provide an obvious way tocheck out from the store. You can see, once again, how easy it is to useRenderAction to incorporate the rendered output from an action method in a webpage. This is a nice technique for breaking down the functionality of anapplication into distinct, reusable blocks.
利用这个附件,我们现在让客户知道他们的购物车中有什么,我们也显式地提供了一个付费离店的办法。再一次地,你可以看到用RenderAction把一个动作方法所渲染的输出组合到一个web页面是多么容易。这是把应用程序的功能分解成清晰的可重用块的一种很好的技术。
Submitting Orders
递交订单
We have now reached thefinal customer feature in SportsStore: the ability to check out and complete anorder. In the following sections, we will extend our domain model to providesupport for capturing the shipping details from a user and add a feature toprocess those details.
我们现在已经到达了完成SportsStore最后客户特性的时刻:付费并完成订单的功能。在以下章节中,我们将扩充我们的域模型,以提供对收集用户运送细节的支持,并添加一个特性以处理这些细节。
Extending the Domain Model
扩充域模型
Add a class calledShippingDetails to the Entities folder of the SportsStore.Domain project. Thisis the class we will use to represent the shipping details for a customer. Thecontents are shown in Listing 8-29.
把一个名为ShippingDetails的类添加到SportsStore.Domain项目的Entities文件夹。这是我们用来表示客户运送细节的一个类。其内容如清单8-29所示。
Listing 8-29. TheShippingDetails Class
using System.ComponentModel.DataAnnotations;namespace SportsStore.Domain.Entities { publicclass ShippingDetails { [Required(ErrorMessage= "Please enter a name")] publicstring Name { get; set; } [Required(ErrorMessage= "Please enter the first address line")] publicstring Line1 { get; set; } publicstring Line2 { get; set; } publicstring Line3 { get; set; } [Required(ErrorMessage= "Please enter a city name")] publicstring City { get; set; } [Required(ErrorMessage = "Please entera state name")] publicstring State { get; set; } publicstring Zip { get; set; } [Required(ErrorMessage= "Please enter a country name")] publicstring Country { get; set; } public bool GiftWrap { get; set; } }}You can see from Listing8-29 that we are using the validation attributes from theSystem.ComponentModel.DataAnnotations namespace, just as we did in Chapter 3.In order to use these attributes, we must add a reference to the assembly ofthe same name to the SportsStore.Domain project. We will explore validationfurther in Chapter 18.
你可以从清单8-29看出,我们使用了System.ComponentModel.DataAnnotations命名空间的校验属性,正如我们在第3章中所做的那样。为了使用这些属性,我们必须把对同名的程序的引用添加到SportsStore.Domain项目。我们将在第18章进一步考察校验。
n Note The ShippingDetails class doesn’t have any functionality, sothere is nothing that we can sensibly unit test.
注:ShippingDetails类没有任何功能,因此也就没有需要我们单元测试任何东西。
Adding the Checkout Process
添加付费过程
Our goal is to reach thepoint where users are able to enter their shipping details and submit theirorder. To start this off, we need to add a Checkout now button to the cartsummary view. Listing 8-30 shows the change we need to apply to theViews/Cart/Index.cshtml file.
我们的目的是达到用户能够输入他们的运送细节并递交他们的订单的地方。为了开始我们的工作,我们需要把一个Checkout now按钮添加到购物摘要视图。清单8-30显示我们需要对Views/Cart/Index.cshtml文件的修改。
Listing 8-30. Adding theCheckout Now Button
...</table><p align="center"class="actionButtons"> <ahref="@Model.ReturnUrl">Continue shopping</a> @Html.ActionLink("Checkout now","Checkout")</p>This single changegenerates a link that, when clicked, calls the Checkout action method of theCart controller. You can see how this button appears in Figure 8-14.
这个修改生成一个连接,点击的时候调用Cart控制器的Checkout动作方法。你可以在图8-14中看到该按钮是如何显示的。
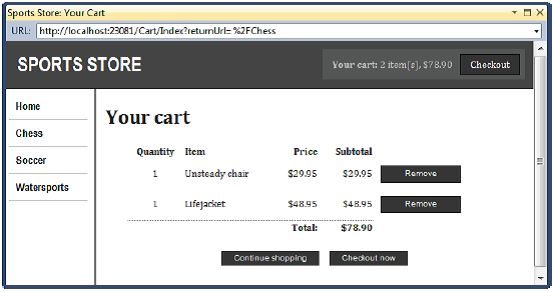
Figure 8-14. TheCheckout now button
图8-14.Checkout now按钮
As you might expect, wenow need to define the Checkout method in the CartController class. as shown inListing 8-31.
正如你可能想到的,我们现在需要以CartController类中定义Checkout方法。如清单8-31所示。
Listing 8-31. TheCheckout Action Method
public ViewResult Checkout() { returnView(new ShippingDetails());}The Checkout methodreturns the default view and passes a new ShippingDetails object as the viewmodel. To create the corresponding view, right-click the Checkout method,select Add View, and fill in the dialog box as shown in Figure 8-15. We aregoing to use the ShippingDetails domain class as the basis for the stronglytyped view. Check the option to use a layout, since we are rendering a fullpage and want it to be consistent with the rest of the application.
Checkout方法返回默认视图,并传递一个新的ShippingDetails对象作为视图模型。为了生成相应的视图,右击Checkout方法,选择“添加视图”,并按图8-15填充其对话框。我们打算用ShippingDetails域类作为这个强类型视图的基础。选中“使用布局”复选框,因为我们要渲染一个完整的页面并希望它与应用程序的其余部分一致。
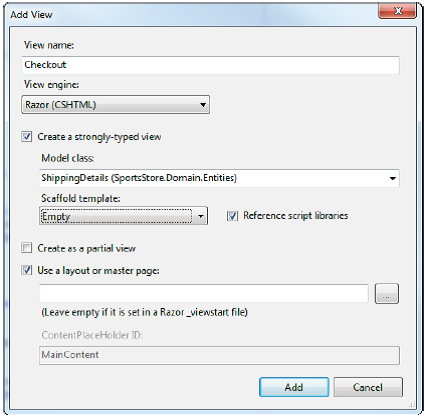
Figure 8-15. Addingthe Checkout view
图8-15. 添加Checkout视图
Set the contents of theview to match the markup shown in Listing 8-32.
设置该视图的内容,使之与清单8-32所示的标记相匹配。
Listing 8-32. TheCheckout.cshtml View
@model SportsStore.Domain.Entities.ShippingDetails@{ ViewBag.Title= "SportStore: Checkout";}<h2>Check out now</h2>Please enter your details, and we'll ship yourgoods right away!@using (Html.BeginForm()) { <h3>Ship to</h3> <div>Name: @Html.EditorFor(x => x.Name)</div><h3>Address</h3><div>Line 1: @Html.EditorFor(x => x.Line1)</div><div>Line 2: @Html.EditorFor(x =>x.Line2)</div><div>Line 3: @Html.EditorFor(x =>x.Line3)</div><div>City: @Html.EditorFor(x =>x.City)</div><div>State: @Html.EditorFor(x =>x.State)</div><div>Zip: @Html.EditorFor(x =>x.Zip)</div><div>Country: @Html.EditorFor(x =>x.Country)</div><h3>Options</h3><label> @Html.EditorFor(x => x.GiftWrap) Gift wrapthese items</label><p align="center"> <inputclass="actionButtons" type="submit" value="Completeorder" /></p>}You can see how this viewis rendered by running the application, adding an item to the shopping cart,and clicking the Checkout now button. As you can see in Figure 8-16, the viewis rendered as a form for collecting the customer’s shipping details.
运用此应用程序,把一个条目添加到购物车,然后点击Checkout now按钮,你可以看到该视图是如何渲染的。正如你在图8-16中所看到的,该视图为收集客户的运送细节渲染了一个表单。
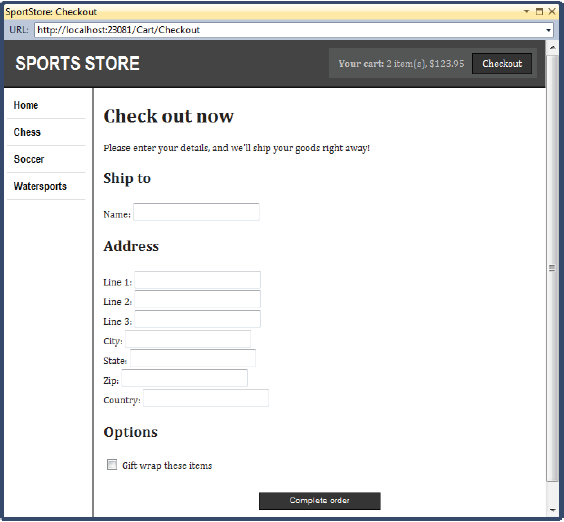
Figure 8-16. Theshipping details form
图8-16. 运送细节表单
We have rendered the inputelements for each of the form fields using the Html.EditorFor helper method.This method is an example of a templated view helper. We let the MVC Frameworkwork out what kind of input element a view model property requires, instead ofspecifying it explicitly (by using Html.TextBoxFor, for example).
我们用Html.EditorFor辅助方法为每个表单字段渲染了一个input元素。该方法是一个模板视图辅助方法的例子。我们让MVC框架决定一个视图模型属性需要采用哪种input元素,而不是进行明确的指定(例如用Html.TextBoxFor)。
We will explain templatedview helpers in detail in Chapter 16, but you can see from the figure that theMVC Framework is smart enough to render a checkbox for bool properties (such asthe gift wrap option) and text boxes for the string properties.
我们将在第16章详细解释模板视图辅助方法,但你可以从上图看到,MVC框架足够智能地对布尔属性(如“彩带包装”选项)渲染了一个检查框(checkbox)、对字符串属性渲染了一个文本框。
n Tip We could go further and replace most of the markup in the viewwith a single call to the Html.EditorForModel helper method, which wouldgenerate the labels and inputs for all of the properties in the ShippingDetailsview model class. However, we wanted to separate the elements so that the name,address, and options appear in different regions of the form, so it is simpleto refer to each property directly.
提示:我们可以进一步地在视图中用一个对Html.EditorForModel辅助方法的单一调用来替换大部分标记,这将为ShippingDetails视图模型类中的所有属性生成标签(label)和输入(input)标记。然而,我们希望把这些元素分离开来,以使名字、地址、以及一些选项能够出现在表单的不同区域,因此,直接简单地引用了每个属性。
Implementing the Order Processor
实现订单处理器
We need a component in ourapplication to which we can hand details of an order for processing. In keepingwith the principles of the MVC model, we are going to define an interface forthis functionality, write an implementation of the interface, and thenassociate the two using our DI container, Ninject.
在我们的应用程序,我们需要一个组件,以对订单的细节进行处理。与MVC模型原理一致,我们打算为此功能定义一个接口、编写该接口的一个实现、然后用我们的DI窗口Ninject把两者关联起来。
Defining the Interface
定义接口
Add a new interface calledIOrderProcessor to the Abstract folder of the SportsStore.Domain project andedit the contents so that they match Listing 8-33.
把名为IOrderProcessor的接口添加到SportsStore.Domain项目的Abstract文件夹,并编辑其内容使之与清单8-33吻合。
Listing 8-33. TheIOrderProcessor Interface
using SportsStore.Domain.Entities;namespace SportsStore.Domain.Abstract { publicinterface IOrderProcessor { voidProcessOrder(Cart cart, ShippingDetails shippingDetails); }}Implementing the Interface
实现接口
Our implementation ofIOrderProcessor is going to deal with orders by e-mailing them to the siteadministrator. We are, of course, simplifying the sales process. Moste-commerce sites wouldn’t simply e-mail an order, and we haven’t providedsupport for processing credit cards or other forms of payment. But we want tokeep things focused on MVC, and so e-mail it is.
IOrderProcessor的实现打算运用把订单邮件发送给网站管理员的办法来处理订单。当然,我们简化了销售过程。大多数电子商务网站不会简单地发送订单邮件,而且我们没有提供对处理信用卡的支持或其它支付表单。但我们希望保持事情集中在MVC方面,因此选择了发送邮件。
Create a new class calledEmailOrderProcessor in the Concrete folder of the SportsStore.Domain project andedit the contents so that they match Listing 8-34. This class uses the built-inSMTP support included in the .NET Framework library to send an e-mail.
在SportsStore.Domain项目中的Concrete文件夹中生成一个名为EmailOrderProcessor的新类,并按清单8-34编辑其内容。这个类使用了包含在.NET Framework库中内建的SMTP支持以发送电子邮件。
Listing 8-34. TheEmailOrderProcessor Class
using System.Net.Mail;using System.Text;using SportsStore.Domain.Abstract;using SportsStore.Domain.Entities;using System.Net;namespace SportsStore.Domain.Concrete { publicclass EmailSettings { publicstring MailToAddress = "orders@example.com"; publicstring MailFromAddress = "sportsstore@example.com"; publicbool UseSsl = true; publicstring Username = "MySmtpUsername"; publicstring Password = "MySmtpPassword"; publicstring ServerName = "smtp.example.com"; publicint ServerPort = 587; publicbool WriteAsFile = false; publicstring FileLocation = @"c:\sports_store_emails"; } publicclass EmailOrderProcessor :IOrderProcessor { private EmailSettings emailSettings; publicEmailOrderProcessor(EmailSettings settings) { emailSettings= settings; } public void ProcessOrder(Cart cart,ShippingDetails shippingInfo) { using(var smtpClient = new SmtpClient()) { smtpClient.EnableSsl =emailSettings.UseSsl; smtpClient.Host = emailSettings.ServerName; smtpClient.Port = emailSettings.ServerPort; smtpClient.UseDefaultCredentials = false; smtpClient.Credentials = newNetworkCredential(emailSettings.Username, emailSettings.Password); if (emailSettings.WriteAsFile) { smtpClient.DeliveryMethod =SmtpDeliveryMethod.SpecifiedPickupDirectory; smtpClient.PickupDirectoryLocation= emailSettings.FileLocation; smtpClient.EnableSsl = false; } StringBuilder body = new StringBuilder() .AppendLine("A new order has beensubmitted") .AppendLine("---") .AppendLine("Items:"); foreach (var line in cart.Lines) { var subtotal = line.Product.Price* line.Quantity; body.AppendFormat("{0} x{1} (subtotal: {2:c}", line.Quantity, line.Product.Name, subtotal); } body.AppendFormat("Totalorder value: {0:c}", cart.ComputeTotalValue()) .AppendLine("---") .AppendLine("Ship to:") .AppendLine(shippingInfo.Name) .AppendLine(shippingInfo.Line1) .AppendLine(shippingInfo.Line2 ??"") .AppendLine(shippingInfo.Line3 ??"") .AppendLine(shippingInfo.City) .AppendLine(shippingInfo.State ??"") .AppendLine(shippingInfo.Country) .AppendLine(shippingInfo.Zip) .AppendLine("---") .AppendFormat("Gift wrap: {0}",shippingInfo.GiftWrap ? "Yes" : "No"); MailMessagemailMessage = new MailMessage( emailSettings.MailFromAddress,// From emailSettings.MailToAddress,// To "New ordersubmitted!",// Subject body.ToString());//Body if (emailSettings.WriteAsFile) { mailMessage.BodyEncoding = Encoding.ASCII; } smtpClient.Send(mailMessage); } }}To make things simpler, wehave defined the EmailSettings class in Listing 8-34 as well. An instance ofthis class is demanded by the EmailOrderProcessor constructor and contains allof the settings that are required to configure the .NET e-mail classes.
为了使事情简单,我们在清单8-34中也定义了EmailSettings类。EmailOrderProcessor的构造器需要这个类(EmailSettings)的一个实例,这个类的实例也包含了配置.NET邮件类所需要设置的全部信息。
n Tip Don’t worry if you don’t have an SMTP server available. If youset the EmailSettings.WriteAsFile property to true, the e-mail messages will bewritten as files to the directory specified by the FileLocation property. Thisdirectory must exist and be writable. The files will be written with the .emlextension, but they can be read with any text editor.
提示:如果你还没有可用的SMTP服务器,不必担心。如果将EmailSettings.WriteAsFile属性设置为true,将会把邮件消息作为文件写到由FileLcation属性指定的目录。该目录必须已经存在且是可写入的。邮件文件的扩展名将为.eml,但它们不能被任何文本编辑器所读取。
Registering the Implementation
注册(接口)的实现
Now that we have animplementation of the IOrderProcessor interface and the means to configure it,we can use Ninject to create instances of it. Edit the NinjectControllerFactoryclass in the SportsStore.WebUI project and make the changes shown in Listing8-35 to the AddBindings method.
现在,我们有了IOrderProcessor接口的一个实现以及配置它的手段,我们可以用Ninject来生成它的实例。编辑SportsStore.WebUI项目中的NinjectControllerFactory类(在Infrastructure文件夹中 — 译者注),对AddBindings方法进行如清单8-35所示的修改。
Listing 8-35. AddingNinject Bindings for IOrderProcessor
private void AddBindings() { // put additional bindings here ninjectKernel.Bind<IProductRepository>().To<EFProductRepository>(); EmailSettingsemailSettings = new EmailSettings { WriteAsFile =bool.Parse(ConfigurationManager.AppSettings["Email.WriteAsFile"] ??"false") }; ninjectKernel.Bind<IOrderProcessor>() .To<EmailOrderProcessor>() .WithConstructorArgument("settings",emailSettings);}We created anEmailSettings object, which we use with the Ninject WithConstructorArgumentmethod so that we can inject it into the EmailOrderProcessor constructor whennew instances are created to service requests for the IOrderProcessor interface.In Listing 8-35, we specified a value for only one of the EmailSettingsproperties: WriteAsFile. We read the value of this property using theConfigurationManager.AppSettings property, which allows us to accessapplication settings we’ve placed in the Web.config file (the one in the rootproject folder), which are shown in Listing 8-36.
我们生成了一个EmailSettings对象,我们用来与Ninject的WithConstructorArgument方法一起使用,以便对IOrderProcessor接口的请求进行服务要生成新实例来时,我们可以把它注入到EmailOrderProcessor构造器之中。在清单8-35中,我们只为EmailSettings的一个属性:WriteAsFiles指定了一个值。 我们用ConfigurationManager.AppSettings属性来读取这个值,这允许我们访问已经在放在Web.config文件(根项目文件夹中的Web.config)中的应用程序设置,如清单8-36所示。
Listing 8-36. ApplicationSettings in the Web.config File
<appSettings> <addkey="ClientValidationEnabled" value="true"/> <addkey="UnobtrusiveJavaScriptEnabled" value="true"/> <add key="Email.WriteAsFile"value="true"/></appSettings>
Completing the Cart Controller
完成购物车控制器
To complete theCartController class, we need to modify the constructor so that it demands animplementation of the IOrderProcessor interface and add a new action methodthat will handle the HTTP form POST when the user clicks the Complete orderbutton. Listing 8-37 shows both changes.
为了完成CartController类,我们需要修改构造器,以使它要求IOrderProcessor接口的一个实现,并添加一个新的动作方法,它将在用户点击Completeorder按钮时,处理HTTP表单的POST。清单8-37显示了这两个修改。
Listing 8-37. Completingthe CartController Class
using System.Linq;using System.Web.Mvc;using SportsStore.Domain.Abstract;using SportsStore.Domain.Entities;using SportsStore.WebUI.Models;namespace SportsStore.WebUI.Controllers { public class CartController : Controller { private IProductRepository repository; privateIOrderProcessor orderProcessor; public CartController(IProductRepositoryrepo, IOrderProcessor proc) { repository= repo; orderProcessor= proc; } [HttpPost] publicViewResult Checkout(Cart cart, ShippingDetails shippingDetails) { if(cart.Lines.Count() == 0) { ModelState.AddModelError("","Sorry, your cart is empty!"); } if(ModelState.IsValid) { orderProcessor.ProcessOrder(cart,shippingDetails); cart.Clear(); returnView("Completed"); }else { return View(shippingDetails); } } public ViewResult Checkout() { return View(new ShippingDetails()); } ...rest of class...You can see that theCheckout action method we’ve added is decorated with the HttpPost attribute,which means that it will be invoked for a POST request—in this case, when theuser submits the form. Once again, we are relying on the model binder system,both for the ShippingDetails parameter (which is created automatically usingthe HTTP form data) and the Cart parameter (which is created using our custombinder).
你可以看到,我们已经添加的Checkout动作方法是用HttpPost属性来修饰的,这表示它将由POST请求来调用 — 在这里是,当用户递交表单时。另外,对ShippingDetails参数(使用HTTP表单数据自动生成的)和Cart参数(用我们自定义绑定器生成的),我们都要依靠模型绑定器系统。
n Note The change in constructor forces us to update the unit testswe created for the CartController class. Passing null for the new constructorparameter will let the unit tests compile.
注:构造器中的修改强制我们更新为CartController类生成的单元测试。为新的构造器参数传递null让单元测试通过编译。
The MVC Framework checksthe validation constraints that we applied to ShippingDetails using the dataannotation attributes in Listing 8-29, and any violations are passed to ouraction method through the ModelState property. We can see if there are anyproblems by checking the ModelState.IsValid property. Notice that we call theModelState.AddModelError method to register an error message if there are noitems in the cart. We’ll explain how to display such errors shortly, and we’llhave much more to say about model binding and validation in Chapters 17 and 18.
MVC框架使用清单8-29中的数据注解属性检查我们用于ShippingDetails的校验约束,并通过ModelState属性把非法情况传递给我们的动作方法。我们可以通过检查ModelState.IsValid属性看看是否有什么问题。注意,如果购物车中无条目,我们调用ModelState.AddModelError方法注册了一条错误消息。我们将在第17、18章中解释如何快捷地显示这种错误,并更多地讨论模型绑定和校验。
UNIT TEST: ORDER PROCESSING
单元测试:订单处理
To complete the unittesting for the CartController class, we need to test the behavior of the newoverloaded version of the Checkout method. Although the method looks short andsimple, the use of MVC Framework model binding means that there is a lot goingon behind the scenes that needs to be tested.
为了完成对CartController类的单元测试,我们需要测试新的Checkout过载方法。虽然该方法看上去短而简单是,但MVC框架模型绑定的使用意味着在需要被测试的场景背后要进行很多事。
We should process an orderonly if there are items in the cart and the customer has provided us with validshipping details. Under all other circumstances, the customer should be shownan error. Here is the first test method:
如果购物车中有条目,而且客户已经向我们提供了有效的运送细节,我们应该只处理一份订单。在所有其它情况下,都应该向客户显示一条错误消息。以下是第一个测试方法:
[TestMethod]public void Cannot_Checkout_Empty_Cart() { // Arrange - create a mock order processor Mock<IOrderProcessor> mock = newMock<IOrderProcessor>(); // Arrange - create an empty cart Cart cart = new Cart(); // Arrange - create shipping details ShippingDetails shippingDetails = newShippingDetails(); // Arrange - create an instance of thecontroller CartController target = newCartController(null, mock.Object); // Act ViewResult result = target.Checkout(cart,shippingDetails); // Assert - check that the order hasn't beenpassed on to the processor mock.Verify(m =>m.ProcessOrder(It.IsAny<Cart>(), It.IsAny<ShippingDetails>()), Times.Never()); // Assert - check that the method isreturning the default view Assert.AreEqual("",result.ViewName); // Assert - check that we are passing aninvalid model to the view Assert.AreEqual(false,result.ViewData.ModelState.IsValid);}This test ensures that wecan’t check out with an empty cart. We check this by ensuring that theProcessOrder of the mock IOrderProcessor implementation is never called, thatthe view that the method returns is the default view (which will redisplay thedata entered by customers and give them a chance to correct it), and that themodel state being passed to the view has been marked as invalid. This may seemlike a belt-and-braces set of assertions, but we need all three to be sure thatwe have the right behavior. The next test method works in much the same way,but injects an error into the view model to simulate a problem reported by themodel binder (which would happen in production when the customer enters invalidshipping data):
这个测试确保我们不能对空购物车进行付费。我们通过确保模仿IOrderProcessor实现的ProcessOrder方法不被调用的办法对此进行检查,该方法返回的视图是默认视图(它将重新显示由客户输入的数据并让客户进行修改),而且传递给视图的模型状态已经被标记为无效。
[TestMethod]public voidCannot_Checkout_Invalid_ShippingDetails() { // Arrange - create a mock order processor Mock<IOrderProcessor> mock = newMock<IOrderProcessor>(); // Arrange - create a cart with an item Cart cart = new Cart(); cart.AddItem(new Product(), 1); // Arrange - create an instance of thecontroller CartController target = newCartController(null, mock.Object); // Arrange - add an error to the model target.ModelState.AddModelError("error","error"); // Act - try to checkout ViewResult result = target.Checkout(cart, newShippingDetails()); // Assert - check that the order hasn't beenpassed on to the processor mock.Verify(m =>m.ProcessOrder(It.IsAny<Cart>(), It.IsAny<ShippingDetails>()), Times.Never()); // Assert - check that the method isreturning the default view Assert.AreEqual("",result.ViewName); // Assert - check that we are passing aninvalid model to the view Assert.AreEqual(false, result.ViewData.ModelState.IsValid);}Having established that anempty cart or invalid details will prevent an order from being processed, weneed to ensure that we do process orders when appropriate. Here is the test:
建立空购物车或非法细节将阻止订单被处理,我们需要确保在适当的时候进行订单处理。以下是此测试:
[TestMethod]public void Can_Checkout_And_Submit_Order() { // Arrange - create a mock order processor Mock<IOrderProcessor> mock = newMock<IOrderProcessor>(); // Arrange - create a cart with an item Cart cart = new Cart(); cart.AddItem(new Product(), 1); // Arrange - create an instance of thecontroller CartController target = newCartController(null, mock.Object); // Act - try to checkout ViewResult result = target.Checkout(cart, newShippingDetails()); // Assert - check that the order has beenpassed on to the processor mock.Verify(m =>m.ProcessOrder(It.IsAny<Cart>(), It.IsAny<ShippingDetails>()), Times.Once()); // Assert - check that the method isreturning the Completed view Assert.AreEqual("Completed",result.ViewName); // Assert - check that we are passing a validmodel to the view Assert.AreEqual(true,result.ViewData.ModelState.IsValid);}Notice that wedidn’t need to test that we can identify valid shipping details. This ishandled for us automatically by the model binder using the attributes weapplied to the properties of the ShippingDetails class.
注意,我们不需要测试我们可以识别的有效运送细节。这是通过模型绑定器使用我们运用于ShippingDetails类属性的性质为我们自动进行处理的。
Displaying Validation Errors
显示校验错误
If users enter invalidshipping information, the individual form fields that contain the problems willbe highlighted, but no message will be displayed. Worse, if users try to checkout an empty cart, we don’t let them complete the order, but they won’t see anyerror message at all. To address this, we need to add a validation summary tothe view, much as we did back in Chapter 3. Listing 8-38 shows the addition toCheckout.cshtml view.
如果用户输入非法的运送信息,有问题的那些非法表单字段将被高亮,但没有消息被显示出来。更坏的是,如果用户试图对一个空购物车进行付费,我们不会让他们完成这份订单,但他们却根本看不到任何错误消息。为了改正它,我们需要把一个校验摘要添加到视图,这很象我们在第3章所做的那样。清单8-38显示了添加到Checkout.cshtml视图的内容。
Listing 8-38. Adding aValidation Summary
...<h2>Check out now</h2>Please enter your details, and we'll ship yourgoods right away!@using (Html.BeginForm()) { @Html.ValidationSummary() <h3>Ship to</h3><div>Name: @Html.EditorFor(x =>x.Name)</div>...Now when customers provideinvalid shipping data or try to check out an empty cart, they are shown usefulerror messages, as shown in Figure 8-17.
现在,当客户提供非法运送数据或试图对空购物车付费时,会向他们显示一些有用的错误消息,如图8-17所示。
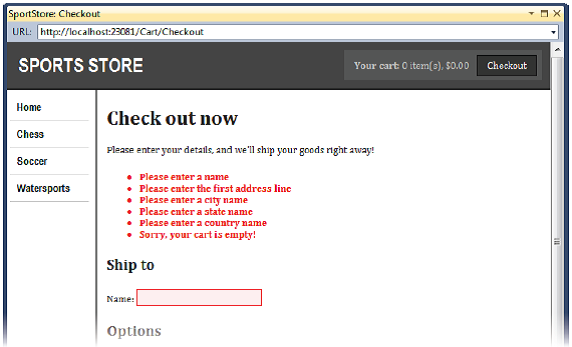
Figure 8-17.Displaying validation messages
图8-17. 显示校验消息
Displaying a Summary Page
显示摘要页面
(这一小节的标题应当叫做“显示感谢页面”— 译者注)
To complete the checkoutprocess, we will show customers a page that confirms the order has beenprocessed and thanks them for their business. Right-click either of theCheckout methods in the CartController class and select Add View from thepop-up menu. Set the name of the view to Completed, as shown in Figure 8-18.
为了完成付费过程,我们将向客户显示一个已经完成订单处理的确认页面并感谢他们的购物。右击CartController类中的任何一个Checkout方法,并从弹出菜单选择“添加视图”。将视图名设为Completed,如图8-18所示。
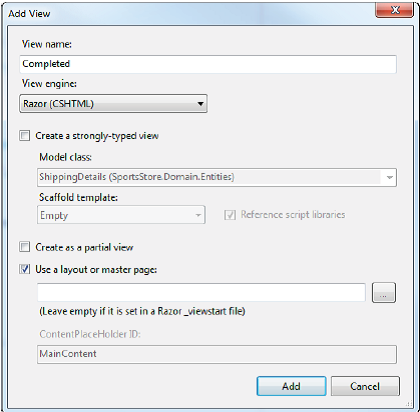
Figure 8-18. Creatingthe Completed view
图8-18. 生成Completed视图
We don’t want this view tobe strongly typed because we are not going to pass any view models between thecontroller and the view. We do want to use a layout, so that the summary pagewill be consistent with the rest of the application. Click the Add button tocreate the view and edit the content so that it matches Listing 8-39.
我们不希望这个视图是强类型视图,因为我们不打算在视图和控制器之间传递任何模型。我们要用一个布局,以使摘要页与应用程序的其余部分一致。点击“添加”按钮生成这个视图,并编辑其内容使之与清单8-39吻合。
Listing 8-39. TheCompleted.cshtml View
@{ ViewBag.Title = "SportsStore: OrderSubmitted";}<h2>Thanks!</h2>Thanks for placing your order. We'll ship yourgoods as soon as possible.
Now customers can gothrough the entire process, from selecting products to checking out. If theyprovide valid shipping details (and have items in their cart), they will seethe summary page when they click the Complete order button, as shown in Figure8-19.
现在,客户可以进行整个过程,从选择产品到付费离开。如果他们提供有效的运送细节(并在购物车中有条目),当他们点击“Complete order”按钮时,他们将看到摘要页面,如图8-19所示。
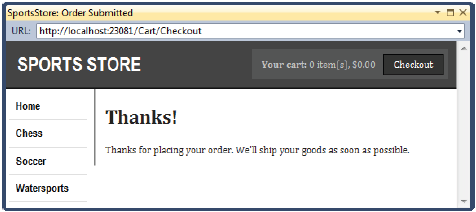
Figure 8-19. Thethank-you page
图8-19. 感谢页面
Summary
概要
We’ve completed all themajor parts of the customer-facing portion of SportsStore. It might not beenough to worry Amazon, but we have a product catalog that can be browsed bycategory and page, a neat shopping cart, and a simple checkout process.
我们已经完成了SportsStore面向客户部分的所有主要部分。这也许不足以让Amazon感到担忧,但我们有了一个产品目录,它可以通过目录和页面进行浏览,一个灵活的购物车,和一个简单的付费过程。
The well-separatedarchitecture means we can easily change the behavior of any piece of theapplication without worrying about causing problems or inconsistencieselsewhere. For example, we could process orders by storing them in a database,and it wouldn’t have any impact on the shopping cart, the product catalog, orany other area of the application.
良好分享的体系结构意味着我们可以很容易地修改应用程序任何片段的行为而不必担心会引起其它问题或不兼容。例如,我们可以通过把它们存储到数据库的办法来处理订单,那么它不会对购物车、产品目录、或应用程序的其它区域有任何影响。
In the next chapter, we’llcomplete the SportsStore application by adding the administration features,which will let us manage the product catalog and upload, store, and displayimages for each product.
下一章,我们将添加管理特性来完成SportsStore应用程序,这将使我们可以管理产品目录,并对每个产品进行更新、存储以及显示图片。
- 第8章 SportsStore:导航与购物车
- 第8章 SportsStore:导航与购物车 — 精通MVC 3 框架
- 第9章:SportsStore:管理
- 第7章 SportsStore — 一个真实的应用程序
- 第9章 SportsStore:管理 — 精通MVC 3 框架
- 第7章 SportsStore:一个真实的应用程序 — 精通MVC 3 框架
- MVC 音乐商店 第 8 部分: 购物车与 Ajax 更新
- angular——sportsStore项目的问题与解决
- 加入购物车与购物车加减
- Magento - 为购物车页面添加面包屑导航(breadcrumb)
- Magento - 为购物车页面添加面包屑导航(breadcrumb)
- WebApplication与Profile购物车
- .net ----DataTable与购物车
- WebApplication与Profile购物车
- 购物车分析与需求
- 便宜你:中产阶级购物导航
- 电子购物网站导航制作
- 第8 章输入框和导航组件
- Drupal7 forms_api_reference.html
- 宏使用中的常见的基础问题
- Sql Server用BCP对数据的导入导出
- android模拟器快捷键
- Android: NDK编程入门笔记
- 第8章 SportsStore:导航与购物车
- linux下which、whereis、locate、find 命令的区别
- 网站SEO不要为了优化而优化
- linux环境变量
- Item 失效后,采购单不能做退货动作(退货报RVTTH-115h错误)
- config-2.6-pvops_x86_64
- php跳转
- Android权限大全
- 软件测试概念