Android下的类OpenCV库---【FastCV】
来源:互联网 发布:淘宝卖的韩国直邮真假 编辑:程序博客网 时间:2024/06/05 09:47
https://developer.qualcomm.com/develop/mobile-technologies/computer-vision-fastcv/setting-developer-environment
(需代理或者翻墙访问)
继QCAR之后,高通近日发布了FastCV:一个针对移动平台的计算机视觉库。FastCV1.0是专为android设备设计的。但是可以预见后续的版本会支持iOS和WP设备。
FastCV可以运行在任何基于ARM的处理器,但是对于高通自家的Snapdragon是做了特别优化的。
FastCV1.0包括如下几个模块
- Math / Vector Operations
- Image processing
- Image transformation
- Feature detection
- Object detection
- 3D reconstruction
- Color conversion
- Clustering and search
- Memory Management
- Miscellaneous
Feature detection模块提供了Fast Corner和Harris Corner检测。
Object detection模块提供了一个17×17的基于梯度的描述子、NCC搜索、LK光流。
3D reconstruction模块提供了Affine、Homography变换估计、姿态估计。
可以看出FastCV不同于QCAR,FastCV主要提供更为底层的CV算法实验,目标人群是CV领域的开发人员。
FastCV首页
FastCV安装说明
一 .搭建开发环境
安装过程中最好要关闭 360一系列产品!!!
Setting up the Developer Environment
Supported Development Platforms
The FastCV™ SDK supports Android OS 2.1 and above.
The recommended development environment is Microsoft Windows 7 32/64bit or Windows XP.
The components to build the actual code (JDK, Eclipse+ADT and gcc) are available across multiple platforms. While building on Linux Ubuntu and Mac OS X environments is possible, we will be unable to support those platforms with detailed documentation. However, we have included hints and notes to platform specific issues that will help you set up your development environment on Linux Ubuntu 10.10 or Mac OS X 10.6 (Snow Leopard). This set-up guide has been written for the Win7 32/64bit platform with special notes for WinXP.
NOTE: If you already have both the Android SDK and the NDK setup, then please go directly to Installing the FastCV SDK.
Set-up the Android Development Environment
The FastCV SDK requires both the Android SDK and the NDK. The Android NDK is an extension to the Android SDK that lets Android developers build performance-critical parts of their applications in native code. SDK and NDK communicate over the Java-Native-Interface (JNI).
To set-up the development environment please install the following components in the order they appear below:
- JDK
- Eclipse IDE
- Android SDK Downloader
- Android ADT
- Android SDK platform support
- Cygwin Environment
- Android NDK
JDK
Download the Java SE Development Kit 7 (JDK)
http://www.oracle.com/technetwork/java/javase/downloads/
Click the 'Download' button from the JDK section of the 'Java Platform, Standard Edition' table, JavaSE7.
Install the JDK environment with default settings.
Detailed installation instructions and system requirements can be found at:
http://www.oracle.com/technetwork/java/javase/index-137561.html
MAC: The JDK is already integrated into the Mac OS X operating system.
可在cmd中敲入"java"查看是否安装成功。自己需要指定jre,jdk环境变量!!!
设置PC环境变量,在计算机—>属性—>高级系统设置—>高级—>环境变量中新建环境变量
JAVA_HOME
PATH
CLASSPATH
其中JAVA_HOME是java安装根目录地址,根据自己安装的情况填写;
注意CLASSPATH变量值最左边的“.”,表示当前目录。这是必须的,否则运行Java会找不到class文件。
Eclipse IDE
In this step you will install the Eclipse IDE. Download the latest version of Eclipse IDE for Java Developersfrom
http://www.eclipse.org/downloads/
NOTE: You may use other versions of Eclipse too, but our setup guide assumes this package!
Unpack the downloaded ZIP package and copy the contents of the archive starting with the subdirectory 'eclipse' to your program directory path in C:\Program Files\eclipse. You may also create a shortcut to eclipse.exe on your desktop or start menu.
Start eclipse.exe
The very first time that Eclipse is started, the IDE will ask you to assign storage space for your workspace. This directory will contain ONLY IDE specific settings and information. This is not your application development workspace (despite the notice in this window). This type of information is typically stored in the user's home directory, which is the default value here:C:\Users\USERNAME\workspace. Check "Use this as the default and do not ask again".
MAC: For Mac OS X we recommend that you use the 32-bit version of Eclipse.
LINUX: Eclipse is not always able to determine the location of the JVM,despite being in the path, To fix this, insert into <path-to-eclipse-dir>/eclipse.ini the following line at the top:
-vm /usr/java/jdk1.6.0_26/bin/java
Android SDK Downloader
The Android SDK is distributed through an SDK starter package containing the SDK Tools. Download the starter package from:
http://developer.android.com/sdk/index.html
The FastCV SDK uses r10 of the Android SDK. Unzip the archive and copy the contents into a directory, Ex. C:\Development\Android\android-sdk-windows\.
Throughout the Get Started guide we will refer to the base directory of your development environment as
<DEVELOPMENT_ROOT>= C:\Development\Android
NOTE: Do not use pathnames with spaces.
Add the tools\ directory to your Windows path. Right-click on Computer on the desktop and selectProperties. Use the Advanced system settings to open the System Properties window and select Environment Variables on the Advanced tab. Look for variable Path in the System variables window. After pressing Edit, scroll to the end of Variable value: and add the full path to the tools\ and the platform-tools\ directory to the end of the path, separated by a semicolon from the one before. For example:
;C:\Development\Android\android-sdk-windows\tools\;C:\Development\Android\android-sdk-windows\platform-tools\
NOTE: The last "\" at the end of the Path variable has to be included.
Android ADT installation in the next step will use this path to identify the Android development environment.
Troubleshooting
For troubleshooting Android related issues and for more detailed instructions on the Android SDK set-up, please refer to the following:
- Quick Start Android SDK set-up
- Installing the Android SDK.
MAC: Update $path variable to point to the 'make' utility and the Android SDK tools directory. Add the following to the /Users/<login-name>/.tcshrc:
set path = ( $path /Developer/usr/bin /Users/<login-name>/Development/Android/android-sdk-mac_x86/tools )
LINUX: Update your PATH to point to the 'make' utility and the Android SDK tools directory. If you use bash shell add the following to the ~/.bashrc :
export PATH=~/bin:/opt/android-sdk-linux_x86/tools/:$PATH
Android ADT
Android Development Tools (ADT) is a powerful extension to Eclipse that connects it with the Android SDK and helps with app development. This package is installed from within Eclipse. Select Help->Install New Software... . Add the url
https://dl-ssl.google.com/android/eclipse/
into Work with field. Eclipse will ask you to provide an arbitrary name for the update site.
After a short while Developer Tools appears in the field. At the very minimum, please select Android Development Tools and Android DDMS - which adds debugging support - from the list, and then click on Next-> .
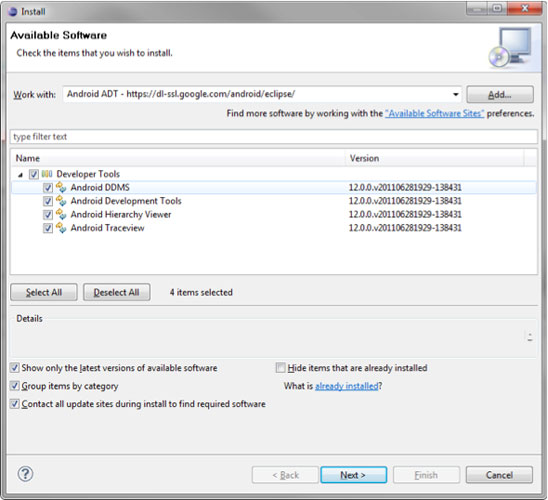
Eclipse component selection
After reviewing this selection and accepting the license terms, the downloader fetches the files and puts them in your Eclipse directory. After accepting the certificate and an automatic restart of Eclipse, the installation of the Android ADT is complete.
Android SDK Platform Support
To develop for Android, support for the appropriate Android platform must be installed. The Android SDK and AVD Manager is used to install additional components and support for different platforms. There are two methods to invoke the SDK and AVD Manager. Start the SDK SDK Manager.exe from the root of the SDK setup directory, or select in Eclipse the menu Window->Android SDK and AVD Manager. In case the Android SDK location was not setup correctly within Eclipse, go to Windows->Preferences->Android and set the SDK location field to the root of your SDK install directory.
In the Manager select Available Packages and check the following boxes under the standard repository https://dl-ssl.google.com/android/repository/repository.xml :
From the Android Repository:
- Documentation for Android SDK, API 13, revision 1
- SDK Platform Android 2.1, API 7, revision 3
- Samples for SDK API 8, revision 1 (optional)
From the Third party Add-ons / Google Inc. add-ons:
- Google USB Driver package, revision 4 难道这个可以捕捉外部pc摄像头当成android内置的?待解答
- 答:不是。。。具体可查阅"android真机USB调试设置"相关内容
- 先把你的手机通过USB线连接到电脑,在【我的电脑】右键【管理】,打开【计算机管理器】,找到【设备管理器】,在右边你应该可以看到你的安卓手机了,比如M9。对着它右键,选择【更新驱动程序软件】,再选择【浏览计算机以...】,找到你的Google USB Driver packa下载放置的目录,一般在android-sdk\extras\google\usb_driver目录。
最后,把你的应用程序运行或调试在安卓手机上。
再次回到Eclipse开发环境,对着您要运行的项目,右键选择Run As,此时会弹出一个选择框,会让你选择运行在哪个设备上,比如ADV或安卓手机。当然,你可以直接选择运行在安卓手机上了,点击OK后,再看看你的手机,没错,你开发的Android程序已经运行在你的安卓手机上了。
以上的配置说明是在Windows环境下操作的,主要原因是笔者现在使用的是一台Win7机器。当然,你可以类似的方式在Mac OS或Linux上配置。
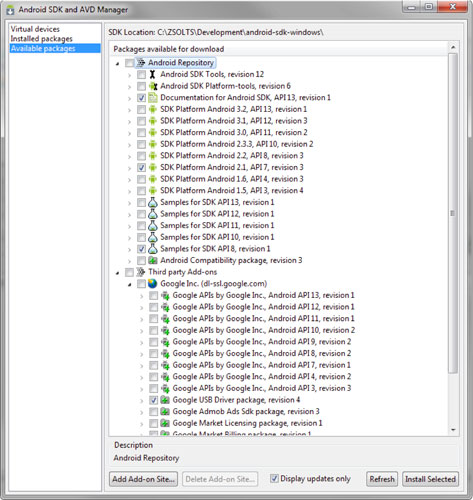
Android SDK component selection
To install the selected options you must hit Install Selected and accept all licenses on the next window. Use Accept All as a shortcut and hit Install.
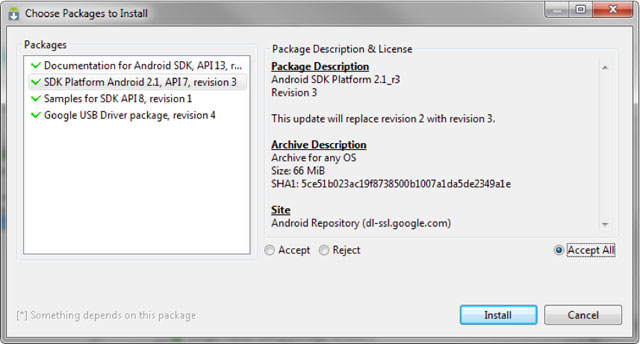
Android component license acceptance
The Eclipse environment is now ready for Android development.
Cygwin Environment
LINUX: This section is not relevant for Linux users.
MAC: This section is not relevant for Mac users who have Apple Developer Tools (XCode) installed. Install XCode if necessary from http://developer.apple.com/xcode/.
A GNU compiler is required to compile dynamic applications as shared libraries for the Android NDK. Android make files are designed to run with gcc4. On Windows, a convenient way to have the complete environment prepared for this, is to install Cygwin - currently version 1.7.9-1.
Cygwin uses an installer helper to manage the installation process. Go to http://www.cygwin.com/ and select "Install or update now!" below the introduction, or use the direct linkhttp://www.cygwin.com/setup.exe.
Click Setup.exe and select "Install from Internet" when prompted at "Choose A Download Source" in the installer. We recommend not changing the Root Directory in the next window, and leaving it at "C:\cygwin". The "Local Package Directory" holds the downloaded packages. You may want to keep them with the downloaded Setup.exe in the same directory so as to have a Cygwin installer directory. Choose a download site with a known fast connection near you.
When the package information is downloaded you will see a hierarchical browser to select packages. Select the following package from the hierarchy for download:
All -> Devel -> "make: The GNU version of the 'make' utility"
Select the word "skip" to change it to the actual version number, which is currently 3.81-2. Finish the installation by clicking next.
Your Cygwin environment is fully set-up to work with the FastCV SDK. If you have other similar environments installed, make sure to set your Windows path variable to point to "C:\cygwin\bin" so that bash uses this version of GNU's make.exe.
需要手动设置环境变量否则无法make!
Android NDK
The Android NDK is an extension to the Android SDK that lets Android developers build performance-critical parts of their applications in native code. Download the NDK package from
http://developer.android.com/sdk/ndk/index.html
The current version is r6.
Unzip the archive and copy the contents into a directory. To be consistent with our previous setup we recommend that you put the contents in "C:\Development\Android\android-ndk-r6\". Thus Android SDK and Android NDK share the same parent directory. We will later add the FastCV-SDK and your project files here.
NDK-r6 requires the above directory to be added to the Windows path! To do this right-click on 'My Computer' on the desktop and select properties. On the 'Advanced' tabs select 'Environment Variables' and look for Variable 'Path' in the 'System variables' window. After pressing 'Edit', scroll to the end of 'Variable value:' and add the full path to the directory to the end of the path, separated via semicolon from the one before. In the above example, you would have to add:
;C:\Development\Android\android-ndk-r6\
NOTE: Path has semicolon at the beginning. Do not use pathnames with spaces. Alternatively, you can also set a User variable with the name Path, but this is only valid for the current user. The last "\" at the end of the Path variable has to be included.
To test your installation you can compile any of the NDK sample applications. Using a Cygwin bash shell, navigate to the root directory of any demo application (e.g. for the 'san-angeles' sample app with out installation path above):
cd /cygdrive/c/Development/Android/android-ndk-r6/samples/san-angeles
ndk-build
The compiler should produce a dynamically linked library libsanangeles.so and write it to/libs/armeabi within the application directory. NDK-r6 includes support for different architectures so you might find different subdirectories in /libs.
Now your development environment is ready to host FastCV SDK related content.
MAC: Update $path variable to point to the ndk directory. Modify the /Users/<login-name>/.tcshrcfile to set the path by adding /Users/<login-name>/Development/Android/android-ndk-r6. Along with the changes applied in the section 'Android SDK Downloader' you will have:
set path = ( $path /Developer/usr/bin /Users//Development/Android/android-sdk-mac_x86/tools /Users//Development/Android/android-ndk-r6 )
LINUX: Update your PATH to point to the ndk directory. If you use bash shell modify the ~/.bashrcfile to set the path by adding /opt/android-ndk-r6. Along with the changes applied in the section 'Android SDK Downloader' you will have:
export PATH=~/bin:/opt/android-sdk-linux_x86/tools/:/opt/android-ndk-r6:$PATH
C/C++ Development Toolkit (CDT)
To compile the C/C++ portion of FastCV through Eclipse, not only android-ndk, we also need to install CDT. To install CDT, please go to Eclipse -> Help -> Install New Software -> Add
Based on your Eclipse version (can be checked at Help -> About Eclipse SDK or when Eclipse start), use the appropriate url listed below:
- For Eclipse Galileo: http://download.eclipse.org/tools/cdt/releases/galileo/
- For Eclipse Helios: http://download.eclipse.org/tools/cdt/releases/helios/
在线安装不了,打开上面的网址,安装离线的zip版本。
++++++++++++++++++++++
1.
If you get an error saying ndk-build not found
make all
make: /ndk-build: Command not found
make: *** [all] Error 127
Add ANDROID_NDK_ROOT at your environment variable. To do this, at Eclipse IDE, goes to Project -> Properties -> C/C++ Build -> Environment, then add
Variable: ANDROID_NDK_ROOT
Value: <path to android ndk directory>
2. Project->Clean...->Clean All Projects should fix these errors as Eclipse has to build some standard directories. This also creates the APK package for deployment.
3.
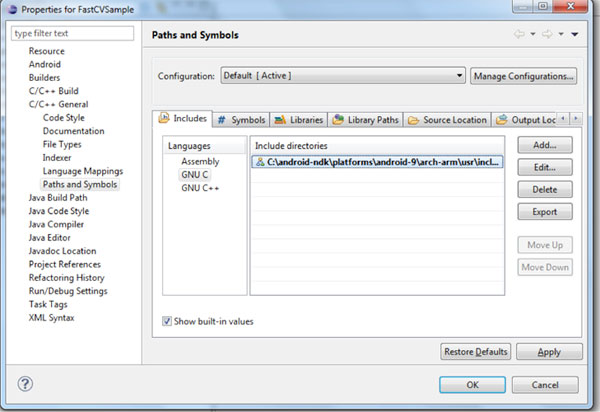
If you get an error saying C/C++ primitives not found, you might have to include the include folder of your ndk directory under project properties.
To do so, right click on Project->Properties->C/C++ General->Paths and Symbols.
Under GNU and GNU C++, add the Android NDK include directory
4.
Copy lib/libfastcv.a to your ndk lib directory (e.g <Android-NDK-Root/platforms/<Android API>/arch-arm/usr/lib)
否则有错误"ld.exe: cannot find -lfastcv"
5. Create a directory under the ndk include directory called fastcv. Copy the contents of inc directory from the installation directory to the new directory you just created under the ndk include directory (e.g <Android-NDK-Root/platforms/<Android API>/arch-arm/usr/include/fastcv)
Now when you click on "Build All", you should see something like follows in the Console Log:
**** Build of configuration Default for project FastCVSample ****
make all Host OS was auto-detected: windows
make[1]: Entering directory `/cygdrive/c/Development/fastcv-android-xx-yy-zz'
Gdbserver : [arm-linux-androideabi-4.4.3] libs/armeabi/gdbserver
Gdbsetup : libs/armeabi/gdb.setup
Compile++ thumb : fastcvsample <= fastcvsample.cpp
Compile++ thumb : fastcvsample <= FPSCounter.cpp
Compile++ thumb : fastcvsample <= CameraRendererRGB565GL2.cpp
Compile++ thumb : fastcvsample <= CameraUtil.cpp
StaticLibrary : libstdc++.a
SharedLibrary : libfastcvsample.so
Install : libfastcvsample.so => libs/armeabi/libfastcvsample.so
make[1]: Leaving directory `/cygdrive/c/Development/fastcv-android-xx-yy-zz'
The apk should be inside the \bin\ directory. The app has been successfully built.
貌似安装文件apk文件不能自动生成,需要手动run as-->Android Application才可生成。
+++++++++++++++++++++++++++++++++++++++++替代方法,才知道不好,大家慎用+++++++++++++++++++++++++++++++++++++++++++++++++
(4). 修改C:\Development\Android\fastcv-android-1-0-2\samples\fastcorner\jni 下Android.mk ,
注意:LOCAL_C_INCLUDES += vendor/qcom-proprietary/blur/tests/fastcvsample/jni \
C:/Development/Android/fastcv-android-1-0-2/inc
(5). 将FastCVSample.cpp 及 FastCVSampleRenderer.cpp 中 //#include <fastcv/fastcv.h> 改为 #include <fastcv.h>
- Android下的类OpenCV库---【FastCV】
- Android下的类OpenCV库---【FastCV】
- Android下fastcv搭建
- 搭建Android上的高通的FastCV环境
- 在Android平台上搭建Qualcomm的FastCv
- FastCV
- FastCV专注于移动平台的计算机视觉库
- Linux下安装FastCV 运行samples
- FastCV™: 高通开发的针对移动设备平台的计算机视觉库
- 基于fastcv的三维重建技术介绍
- 基于Qualcomm FastCv的边缘检测算法
- Qt平台下OpenCV for Android库的顺序
- android下进行opencv开发的配置
- Android下OpenCV的环境搭建
- Android下调用OpenCV的方法
- 【FastCV】FastCV实例1
- android下使用OpenCV
- android下使用opencv
- python3之python的核心数据类型(元组)
- Linux常用命令—帮助命令
- extjs grid 简单应用
- 京东网项目的所得
- Java中的可变参数
- Android下的类OpenCV库---【FastCV】
- Hibernate问题
- 内核文件夹作用
- 项目学习
- HIT OJ 1069 哈工大
- c#验证码
- C++的擂台法排序问题。
- 用横向下拉列表制作导航
- ISTQB AL-TA/TTA连载系列13:可移植性测试