Android动画应用之蚊香时钟
来源:互联网 发布:北京思源软件 编辑:程序博客网 时间:2024/04/28 05:55

最近学习Android动画,做了一个小实验——蚊香时钟,把Android的几种动画操作都用上了。
首先得在res文件夹下建立anim文件夹,后面关于动画的xml配置文件都得放在这里。
一。首先来说说图片上的蜡烛,他的出场涉及到Translate Animation(移动动画)以及Scale Animation (放大缩小动画)。
1.在anim文件夹内定义XML文件(fireout.xml)
<?xml version="1.0" encoding="utf-8"?>
<set xmlns:android="http://schemas.android.com/apk/res/android">
<translate
android:fromXDelta="-500"
android:toXDelta="0"
android:fromYDelta="-20"
android:toYDelta="0"
android:duration="1000"
android:repeatCount="0">
</translate>
<scale
android:fromXScale="0.0"
android:toXScale="1"
android:fromYScale="0.0"
android:toYScale="1"
android:pivotX="0"
android:pivotY="0"
android:duration="1000">
</scale>
</set>
该文件中同时包含了Translate Animation和Scale Animation ,默认两种动画是同时播放的,所以效果是叠加的,
也可以通过设置startOffset属性使两种动画启动时间不同。
2.调用Aniamtion
在Activity的onCreate中:
ivFire = (ImageView)findViewById(R.id.fire);
tranfireAnim = (TranslateAnimation)AnimationUtils.loadAnimation(this, R.anim.fireout);
3.启动动画
ivFire.startAnimation(tranfireAnim);
蜡烛的退场效果用到了Translate Animation(移动动画)以及Alpha Animation (透明度动画)
firego.xml
<set xmlns:android="http://schemas.android.com/apk/res/android">
<translate
android:fromXDelta="0"
android:toXDelta="150"
android:fromYDelta="0"
android:toYDelta="2"
android:duration="1000"/>
<alpha
android:fromAlpha="1.0"
android:toAlpha="0.0"
android:duration="1000" />
</set>
二。再说说蜡烛的火焰,火焰的跳动效果使用Frame-By-Frame Animation(帧动画)实现的。
我们知道,Android是不支持Gif动画的,也不建议使用Gif动画,所以我们制作只能用多张png图片逐帧播放的方式来实现动画效果。
1.在anim文件夹内定义XML文件(fire.xml)
<?xml version="1.0" encoding="utf-8"?>
<animation-list xmlns:android= "http://schemas.android.com/apk/res/android" android:oneshot="false">
<item android:drawable="@drawable/fire1" android:duration="200"/>
<item android:drawable="@drawable/fire2" android:duration="200"/>
<item android:drawable="@drawable/fire3" android:duration="200"/>
<item android:drawable="@drawable/fire4" android:duration="200"/>
</animation-list>
每个item就是一帧,drawable是该帧显示的图片,duration是显示时间,android:oneshot=”false”表示动画一直进行,若为true则表示只播放一次动画。
2.调用Aniamtion(两种方法)
ImageView ivFire = (ImageView)findViewById(R.id.fire);
可以:
fireAnimDra = (AnimationDrawable)getResources().getDrawable(R.anim.fire);
ivFire.setBackgroundDrawable(fireAnimDra);
也可以:
ivFire.setBackgroundResource(R.anim.fire);
Object backgroundObject = ivFire.getBackground();
fireAnimDra =(AnimationDrawable)backgroundObject;
3.启动动画
这里获取到了fireAnimDra,要开始动画只需fireAnimDra.start();即可。
但是不能在Activity的onCreate()方法里调用该方法,因为此时AnimationDrawable类尚未完全与window接触
另一种说法:
因为在OnCreate()中AnimationDrawable还没有完全的与ImageView绑定,在OnCreate()中启动动画,就只能看到第一张图片。
具体我也不是很清楚。。。,谁知道的话告诉我一下。
如果希望一开始就播放动画,可以加入一个onWindowFocusChanged()方法来启动:
public void onWindowFocusChanged(boolean hasFocus) {
// TODO Auto-generated method stub
super.onWindowFocusChanged(hasFocus);
if(hasFocus)
animation.start();
else
animation.stop();
}
也可以在onCreate中用Handler或者TimerTask延时一会儿再启动动画。
三。下面说说时针、分针以及秒针所使用的Rotate Animation(旋转动画),以时针为例,分针、秒针只需修改duration即可
1.在anim文件夹内定义XML文件(hour.xml)
hour.xml
<?xml version="1.0" encoding="utf-8"?>
<rotate xmlns:android="http://schemas.android.com/apk/res/android"
android:interpolator="@android:anim/linear_interpolator"
android:fromDegrees="0"
android:toDegrees="360"
android:pivotX="50%"
android:pivotY="84%"
android:duration="43200000"
android:repeatMode="restart"
android:repeatCount="infinite">
</rotate>
时针旋转一圈的时间duration被设为43200000ms及12小时,并且这里用到了linear_interpolator使得时针匀速旋转
动画的调用与启动过程和前面的Translate Animation(移动动画)以及Scale Animation (放大缩小动画)是相同的,这里就不重复了。
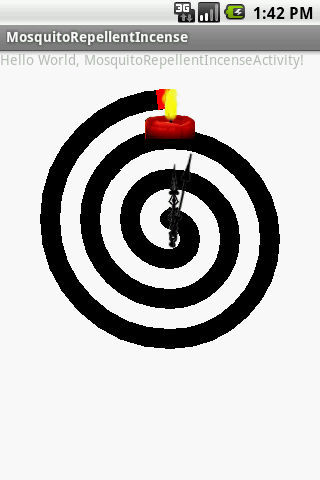
最后在看看蚊香的绘制以及其燃烧效果的实现
这是我花了最长时间的部分,一开始使用PS截了一个真实蚊香的PNG图,虽然看上去非常真实,有质感,但是发现后续的燃烧动画效果
根本无法实现,因为蚊香的形状不是特别的规整,我无法获得燃烧的路径。关于这个路径的获取我也看了不少资料,有一个方法是通过
算法获取图片的像素点位置(具体我也不清楚),感觉太麻烦就没研究了,最后自己用2D绘图实现了所要的效果。
首先我写了一个MyView继承了ImageView
import android.content.Context;
import android.graphics.Canvas;
import android.graphics.Color;
import android.graphics.Paint;
import android.graphics.Paint.Style;
import android.graphics.RectF;
import android.util.AttributeSet;
import android.widget.ImageView;
public class MyView extends ImageView
{
private float fRectLeft = 0;
private float fRectTop = 0;
private float fRectRight = 0;
private float fRectBottom = 0;
private float fRectLen = 0;
private float startAngle;
private float sweepAngle;
private RectF rect;
private int color = Color.BLACK;
private long second = -1;
private long minute;
private float degree;
public MyView(Context context)
{
super(context);
// TODO Auto-generated constructor stub
}
public MyView(Context context, AttributeSet attrs)
{
super(context, attrs);
// TODO Auto-generated constructor stub
}
public void setColor(int color)
{
this.color = color;
}
@Override
public void onDraw(Canvas c)
{
super.onDraw(c);
Paint paint = new Paint();
paint.setColor(color);
c.drawCircle(170, 150, 10, paint);
paint.setStrokeWidth(20);
paint.setStyle(Style.STROKE);
fRectLen = 40;
fRectLeft = 150;
fRectTop = 150;
fRectRight = fRectLeft+fRectLen;
fRectBottom = fRectTop+fRectLen;
rect = new RectF(fRectLeft, fRectTop, fRectRight, fRectBottom);
int i = 0;
while(i<3)
{
startAngle = 270;
sweepAngle = 90;
c.drawArc(rect, startAngle, sweepAngle, false, paint);
startAngle = 0;
sweepAngle = 90;
c.drawArc(rect, startAngle, sweepAngle, false, paint);
fRectLeft-=20;
fRectTop-=40;
fRectLen+=40;
fRectRight = fRectLeft+fRectLen;
startAngle = 90;
sweepAngle = 180;
rect = new RectF(fRectLeft, fRectTop, fRectRight, fRectBottom);
c.drawArc(rect, startAngle, sweepAngle, false, paint);
fRectLeft-=20;
fRectLen+=40;
fRectRight = fRectLeft+fRectLen;
fRectBottom = fRectTop+fRectLen;
rect = new RectF(fRectLeft, fRectTop, fRectRight, fRectBottom);
i++;
}
if(second>=0)
{
set();
paint.setColor(Color.RED);
c.drawArc(rect, startAngle, -6, false, paint);
paint.setColor(Color.GRAY);
c.drawArc(rect, 90+(minute/30 + 1 )%2*180, startAngle-( 90+(minute/30 + 1 )%2*180 ), false, paint);
if(second<1800);
else if(second<3600)
{
rect.set(50, 30, 290, 270);
c.drawArc(rect, 270, -180, false, paint);
}
else if(second<5400)
{
rect.set(50, 30, 290, 270);
c.drawArc(rect, 270, -180, false, paint);
rect.set(70, 70, 270, 270);
c.drawArc(rect, 90, -180, false, paint);
}
else if(second<7200)
{
rect.set(50, 30, 290, 270);
c.drawArc(rect, 270, -180, false, paint);
rect.set(70, 70, 270, 270);
c.drawArc(rect, 90, -180, false, paint);
rect.set(90, 70, 250, 230);
c.drawArc(rect, 270, -180, false, paint);
}
else if(second<9000)
{
rect.set(50, 30, 290, 270);
c.drawArc(rect, 270, -180, false, paint);
rect.set(70, 70, 270, 270);
c.drawArc(rect, 90, -180, false, paint);
rect.set(90, 70, 250, 230);
c.drawArc(rect, 270, -180, false, paint);
rect.set(110, 110, 230, 230);
c.drawArc(rect, 90, -180, false, paint);
}
else if(second<10800)
{
rect.set(50, 30, 290, 270);
c.drawArc(rect, 270, -180, false, paint);
rect.set(70, 70, 270, 270);
c.drawArc(rect, 90, -180, false, paint);
rect.set(90, 70, 250, 230);
c.drawArc(rect, 270, -180, false, paint);
rect.set(110, 110, 230, 230);
c.drawArc(rect, 90, -180, false, paint);
rect.set(130, 110, 210, 190);
c.drawArc(rect, 270, -180, false, paint);
}
}
}
public void Burn(long second)
{
this.second = second;
this.minute = second/60;
this.postInvalidate();
}
public void set()
{
/**
* 0<=time<30minite 270>=degree>90 fRectLeft=50 fRectTop=30 fRectLen=12
* 30<=time<60minte 90>=degree>-90 fRectLeft=70 fRectTop=70 fRectLen=10
* 60<=time<90minte 270>=degree>90 fRectLeft=90 fRectTop=70 fRectLen=8
* 90<=time<120minte 90>=degree>-90 fRectLeft=110 fRectTop=110 fRectLen=6
* 120<=time<150minte 270>=degree>90 fRectLeft=130 fRectTop=110 fRectLen=4
* 150<=time<180minte 90>=degree>-90 fRectLeft=150 fRectTop=150 fRectLen=2
*/
degree = 90+(minute/30 + 1 )%2*180 - second%1800*0.1f;
fRectLeft=50+20*(minute/30);
fRectTop=30+Math.round(minute/60.0)*40;
fRectLen=(12-2*(minute/30))*20;
fRectRight = fRectLeft+fRectLen;
fRectBottom = fRectTop+fRectLen;
rect = new RectF(fRectLeft, fRectTop, fRectRight, fRectBottom);
startAngle = degree;
sweepAngle = -0.1f;
}
}
在MyView里重写了ImageView的onDraw()方法,蚊香是通过 Canvas.drawArc(rect, startAngle, sweepAngle, false, paint)画弧线实现的;
其实我这里的蚊香就是一个等距螺旋线,通过drawArc画半圆,每次改变圆心和半径,从小到大共画了6个半圆组成一个完整的蚊香,上面的蓝色代码。
燃烧效果也是通过drawArc来实现的,具体为上面的红色代码区, public void set()根据当前时间计算出燃烧火星(蚊香上的红色弧线)以及烧过的区域(蚊香上的灰色弧线)
的半径,圆心,起始角度startAngle以及跨度sweepAngle,火星每秒移动0.1度。
下面给出我的Acyivity代码,希望能帮到有需要的人
import java.util.Timer;
import java.util.TimerTask;
import android.app.Activity;
import android.graphics.drawable.AnimationDrawable;
import android.os.Bundle;
import android.os.Handler;
import android.os.Message;
import android.util.Log;
import android.view.animation.Animation;
import android.view.animation.AnimationUtils;
import android.view.animation.RotateAnimation;
import android.widget.ImageView;
public class MosquitoRepellentIncenseActivity extends Activity
{
/** Called when the activity is first created. */
private MyView myIv1;
private ImageView ivHour;
private ImageView ivMinute;
private ImageView ivSecond;
private ImageView ivFire;
private Animation Anim;
private RotateAnimation rotateAnim;
private AnimationDrawable fireAnimDra;
private Timer timer;
private long second = 0;
@Override
public void onCreate(Bundle savedInstanceState)
{
super.onCreate(savedInstanceState);
setContentView(R.layout.main);
myIv1 = (MyView)findViewById(R.id.MView1);
//时针,匀速旋转动画
ivHour = (ImageView)findViewById(R.id.hour);
rotateAnim = (RotateAnimation)AnimationUtils.loadAnimation(this, R.anim.hour);
ivHour.startAnimation(rotateAnim);
//分针,匀速旋转动画
ivMinute = (ImageView)findViewById(R.id.minute);
rotateAnim = (RotateAnimation)AnimationUtils.loadAnimation(this, R.anim.minute);
ivMinute.startAnimation(rotateAnim);
//秒针,匀速旋转动画
ivSecond = (ImageView)findViewById(R.id.second);
rotateAnim = (RotateAnimation)AnimationUtils.loadAnimation(this, R.anim.second);
ivSecond.startAnimation(rotateAnim);
//蜡烛,平移动画,缩放动画
//蜡烛出现
ivFire = (ImageView)findViewById(R.id.fire);
Anim = (Animation)AnimationUtils.loadAnimation(this, R.anim.fireout);
Anim.setFillBefore(true);
Anim.setFillAfter(false);
ivFire.startAnimation(Anim);
//火焰,帧动画
//ivFire.setBackgroundResource(R.anim.fire);
//Object backgroundObject = ivFire.getBackground();
//fireAnimDra = (AnimationDrawable)backgroundObject;
//火焰,帧动画
fireAnimDra = (AnimationDrawable)getResources().getDrawable(R.anim.fire);
ivFire.setBackgroundDrawable(fireAnimDra);
//每秒更新一次蚊香燃烧进度,
timer = new Timer();
timer.schedule(tt, 0, 1000);//refresh once per second
}
TimerTask tt = new TimerTask()
{
@Override
public void run()
{
// TODO Auto-generated method stub
if(second>1)
{
//更新蚊香燃烧进度
myIv1.Burn(second);
}
if(second==5)
{
//蜡烛离开
Message msg = new Message();
handler.sendMessage(msg);
}
if(second==6)
{
//蜡烛消失
ivFire.setVisibility(ImageView.INVISIBLE);
}
second++;
}
};
Handler handler = new Handler()
{
public void handleMessage(Message msg)
{
//蜡烛,平移,透明度动画
//蜡烛离开
Anim = (Animation)AnimationUtils.loadAnimation(MosquitoRepellentIncenseActivity.this,R.anim.firego);
ivFire.startAnimation(Anim);
};
};
//让火焰帧动画在程序一开始就播放
public void onWindowFocusChanged(boolean hasFocus)
{
// TODO Auto-generated method stub
super.onWindowFocusChanged(hasFocus);
if(hasFocus)
{
//火焰动画
fireAnimDra.start();
Log.i("TAG", "hasFocus");
}
else
fireAnimDra.stop();
}
}
- Android动画应用之蚊香时钟
- android之时钟应用问题解决(一)
- Android 之动画animation 应用页面动画和Activity动画
- Android时钟动画小尝试
- Android 动画之ScaleAnimation应用详解
- Android 动画之ScaleAnimation应用详解
- Android 动画之TranslateAnimation应用详解
- Android 动画之AlphaAnimation应用详解
- Android 动画之ScaleAnimation应用详解
- Android 动画之RotateAnimation应用详解
- Android 动画之TranslateAnimation应用详解
- Android 动画之ScaleAnimation应用详解
- Android 动画之TranslateAnimation应用详解
- Android 动画之AlphaAnimation应用详解
- Android 动画之ScaleAnimation应用详解
- Android 动画之TranslateAnimation应用详解
- Android 动画之RotateAnimation应用详解
- Android 动画之TranslateAnimation应用详解
- 华为面试题与答案
- 华为软件工程师
- 一道华为面试题,关于程序优化的
- XVID、DIVX是什么意思
- 转 展望未来,总结过去10年的程序员生涯,给程序员小弟弟小妹妹们的一些总结性忠告
- Android动画应用之蚊香时钟
- MyJs
- java基础知识11(TCP客户端并发登陆
- win7简单命令让PC变身无线热点,共享M9上网
- 强命名程序集 sn.exe GAC(转http://blog.csdn.net/chenfeiyang2009/article/details/6055199)
- texarea wrap div 自动换行
- 重学c++:unknown character '0xa1'编译错误
- Java模式设计之单例模式
- 28个你必须知道的HTML5的新特性,技巧以及技术