QT 添加背景图片
来源:互联网 发布:孕27周彩超数据 编辑:程序博客网 时间:2024/05/31 19:09
另外可參考http://gotajuly.blog.51cto.com/2771348/721212
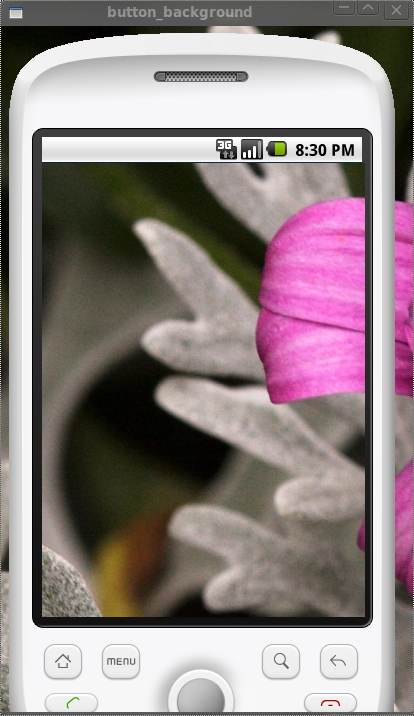
Qt Widget中给Widget加上背景图是本文要介绍的内容,主要是来了解并学习Qt Widget应用,具体内容的实现来看本文详解。
关键使用widget的palette的brush.
- int main(int argc, char *argv[]) {
- QApplication a(argc, argv);
- QWidget *widget = new QWidget();
- widget->setAutoFillBackground(true); // 这句要加上, 否则可能显示不出背景图.
- QPalette palette = widget->palette();
- palette.setBrush(QPalette::Window,
- QBrush(QPixmap("1.png").scaled( // 缩放背景图.
- widget->size(),
- Qt::IgnoreAspectRatio,
- Qt::SmoothTransformation))); // 使用平滑的缩放方式
- widget->setPalette(palette); // 至此, 已给widget加上了背景图.
- QHBoxLayout *layout = new QHBoxLayout();
- layout->addWidget(widget);
- QWidget *mw = new QWidget();
- mw->setLayout(layout);
- mw->resize(500, 500);
- //mw->setWindowFlags(Qt::FramelessWindowHint);
- mw->show();
- return a.exec();
- }

小结:Qt Widget中给Widget加上背景图的内容介绍完了,希望Qt Widget应用内容的学习能对你有所帮助!
http://hi.baidu.com/lx880128/blog/item/bc105e65e697a6e5f6365489.html
一. 首先创建一个 project. New->QT4 Gui Application. 创建完毕后,点击 XXX.ui ,开始添加菜单:双击左上角的 ”Type Here” 进行编辑,编辑完后回车(回车很重要),回车后就会出现下拉菜单,继续类似编辑。 Ok, 菜单编辑完成了,界面的 Action Editor 就会有你添加的内容 , 如下 .
第二步,给菜单添加图标。这里我们就需要创建资源文件了。选择 New->QT Source File( 注意必须要有 Pro 文件与之匹配 ) 。创建完成 后可以看到 Porject 里面多了一个资源文 件: XXX.qrc. 选择资源文件,点击 Add->Add Prefix1, 后继续 Add Files. 将 你需要的 ICO 文件,图片都添加到资源文件中 , 添加完成后保存。继续选择 XXX.ui, 双击 Action Editor 的某项 , 点击 ”Icon” 的” Choose Resource” 选择你想要的图标 , 点击 OK 完成 . 效果如下 ( 我都用的同一图 标 ):
第三步 , 给窗体加背景 . 单击右键 ->Change styleSheet, 在弹出的 ”Edit Style Sheet” 中点击 ” Add Source”->background image”, 选择想要添加的图片 , 点击 OK, 完成 . 同样其他的控件也可以通过同样的方式添加 .
二.
1. 程序中部件使用资源文件
a. 为工程新建Qt Resource file
b. 打开资源文件,新建profix,比如取名为"/"
c. Add files: 添加你的图片文件
d. 在程序中要使用的地方用如下方式使用:
QPixmap pixmap(urlInfo.isDir()? ":/dir.png":":/file.png");
item->setIcon(0,pixmap);
(注意:前面有个冒号“:”,不要忘记哦)
2.windows下为可执行程序添加图标:(参考帮助文档中的<<Setting the Application Icon>>)
a. 找一个图表文件放在工程目录, 如"qq.ico"
b. 在工程目录下添加一个*.rc文件,如"myproject.rc"
c. 在myproject.rc文件中添加如下内容:
IDI_ICON1 ICON DISCARDABLE "qq.ico"
d. 在qt的工程文件(*.pro文件)中添加如下内容:
RC_FILE = myproject.rc
OK,编译工程,看看生成的可执行程序的图标是不是变了!!!
http://www.cppblog.com/qianqian/archive/2010/07/25/121238.html
工作似乎走上正轨了,上周五的工作是做一个界面,用到QFrame和QPushButton,QFrame做主面板,QPushButton为其子控件,需要在主面板上贴背景图片,还需要在QPushButton上贴上相应的图标,弄了一天,再加上今天一小会,终于有一点点结果了 。
。
通过从Google上搜索各种方法(现在才知道Google比Baidu强大很多啊),最后都试了一些,主要有下面几种方法:
1. QPalette的方法
#include <QtGui>
int main(int argc, char *argv[])
{
QApplication app(argc,argv);
QFrame *frame = new QFrame;
frame->resize(400,700);
QPixmap pixmap("images/frame.png");
QPalette palette;
palette.setBrush(frame->backgroundRole(),QBrush(pixmap));
frame->setPalette(palette);
frame->setMask(pixmap.mask()); //可以将图片中透明部分显示为透明的
frame->setAutoFillBackground(true);
frame->show();
return app.exec();
}
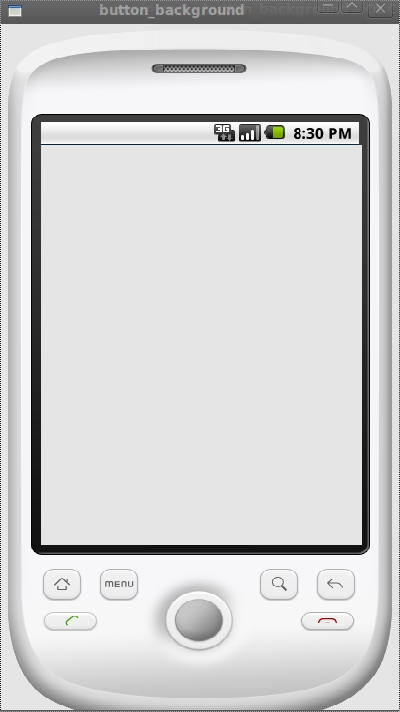
存在问题:图片可以显示出来,但是图片大小不能和frame大小一致,显示效果不好,具体怎样调整大小,以后再补充,效果如下(设置了透明的,好像很漂亮~透明部分将我的桌面显示出来了~_~):
2.setStyleSheet方法(非常好用的方法)
#include <QtGui>
int main(int argc, char *argv[])
{
QApplication app(argc,argv);
QFrame *frame = new QFrame;
frame->setObjectName("myframe");
frame->resize(400,700);
frame->setStyleSheet("QFrame#myframe{border-image:url(images/frame.png)}" );
frame->show();
return app.exec();
}
注意:很漂亮的效果吧~~注意代码中红线的部分噢,设置ObjectName后,才能保证setStyleSheet只作用在我们的frame上,不影响其子控件的背景设置。之所以用border-image而不用background-image,还是上面的问题,用background-image不能保证图片大小和控件大小一致,图片不能完全显示,这个以后再补充了,现在还没有找到方法。
3.paintEvent事件方法
#ifndef MYFRAME_H
#define MYFRAME_H
#include <QWidget>
#include <QtGui>
class MyFrame : public QWidget
{
public:
MyFrame();
void paintEvent(QPaintEvent *event);
};
#endif // MYFRAME_H
//myframe.cpp文件
#include "myframe.h"
MyFrame::MyFrame()
{
}
void MyFrame::paintEvent(QPaintEvent *event)
{
QPainter painter(this);
painter.drawPixmap(0,0,400,700,QPixmap("images/frame.png"));
}
//main.cpp文件
#include <QApplication>
#include <QtGui>
#include "myframe.h"
int main(int argc, char *argv[])
{
QApplication app(argc,argv);
MyFrame *frame = new MyFrame;
frame->resize(400,700);
frame->show();
return app.exec();
}
注:跟前面一样的效果吧,与前面的差别就是这个背景图片不随着窗口的大小而变化,因为它的固定大小被设置成(400,700)了。重写QWidget的paintEvent事件,当控件发生重绘事件,比如show()时,系统就会自动调用paintEvent函数。
好了,上面是三种设置背景图片的方法,下面我要说一个设置QPushButton的背景图片的方法,用的是setIcon方法(其实QPushButton设置背景图片也可以用前面三种方法的,不过现在这种Icon方法的看起来也不错)
#include <QtGui>
int main(int argc, char *argv[])
{
QApplication app(argc,argv);
QFrame *frame = new QFrame;
QPushButton * button0 = new QPushButton(frame);
QPushButton * button1 = new QPushButton(frame);
QPushButton * button2 = new QPushButton(frame);
QPushButton * button3 = new QPushButton(frame);
QPushButton * button4 = new QPushButton(frame);
QPushButton * button5 = new QPushButton(frame);
frame->setObjectName("myframe");
frame->resize(400,700);
frame->setStyleSheet("QFrame#myframe{border-image:url(images/frame.png)}" );
button0->setGeometry(60,150,68,68);
button1->setGeometry(160,150,68,68);
button2->setGeometry(260,150,68,68);
button3->setGeometry(60,280,68,68);
button4->setGeometry(160,280,68,68);
button5->setGeometry(260,280,68,68);
QIcon icon;
QPixmap pixmap0("images/SMS.png");
icon.addPixmap(pixmap0);
button0->setIcon(icon);
button0->setIconSize(QSize(68,68));
button0->setFixedSize(pixmap0.size());
button0->setMask(pixmap0.mask());
QPixmap pixmap1("images/EMail.png");
icon.addPixmap(pixmap1);
button1->setIcon(icon);
button1->setIconSize(QSize(68,68));
button1->setFixedSize(pixmap1.size());
button1->setMask(pixmap1.mask());
QPixmap pixmap2("images/Contacts.png");
icon.addPixmap(pixmap2);
button2->setIcon(icon);
button2->setIconSize(QSize(68,68));
button2->setFixedSize(pixmap2.size());
button2->setMask(pixmap2.mask());
QPixmap pixmap3("images/Calendar.png");
icon.addPixmap(pixmap3);
button3->setIcon(icon);
button3->setIconSize(QSize(68,68));
button3->setFixedSize(pixmap3.size());
button3->setMask(pixmap3.mask());
QPixmap pixmap4("images/GoogleVoice.png");
icon.addPixmap(pixmap4);
button4->setIcon(icon);
button4->setIconSize(QSize(68,68));
button4->setFixedSize(pixmap4.size());
button4->setMask(pixmap4.mask());
QPixmap pixmap5("images/AndroidMarket.png");
icon.addPixmap(pixmap5);
button5->setIcon(icon);
button5->setIconSize(QSize(68,68));
button5->setFixedSize(pixmap5.size());
button5->setMask(pixmap5.mask());
frame->show();
return app.exec();
}
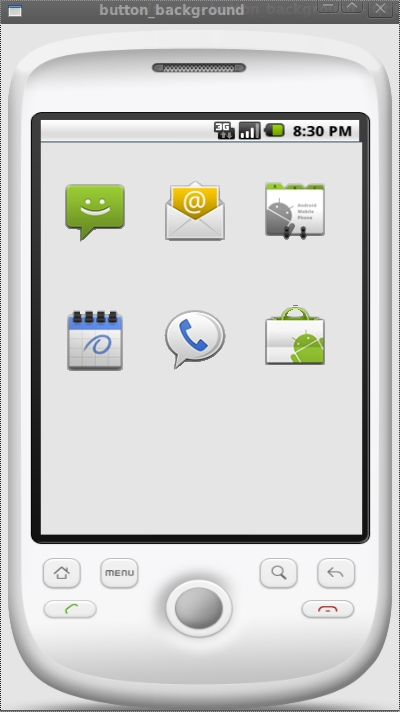
注:图标效果不错吧~_~
好了,今天就写到这里,以后有新的内容再补充。
补充,这样就可以让图片跟窗口一样大小了。
{
QApplication app(argc,argv);
QFrame *frame = new QFrame;
frame->resize(400,700);
QImage image1;
image1.load("images/frame1.jpg");
QImage image2 = image1.scaled(400,700);
QPalette palette;
palette.setBrush(frame->backgroundRole(),QBrush(image2));
frame->setPalette(palette);
frame->setMask(pixmap.mask()); //可以将图片中透明部分显示为透明的
frame->setAutoFillBackground(true);
frame->show();
return app.exec();
}
- QT 添加背景图片
- QT Creator 添加背景图片
- QT 添加程序背景图片
- Qt中添加背景图片
- QT 添加背景图片
- QT 给界面添加背景图片
- QT 对话框添加背景图片的方法
- Qt中添加背景图片的方法(转)
- Qt中添加背景图片的方法
- Qt中添加背景图片的方法(改)
- Qt中添加背景图片的方法
- qt中添加背景图片(stylesheet)
- Qt中添加背景图片的方法(转)
- Qt setStyleSheet 添加背景色/背景图片
- QT 添加背景图片,按钮不被覆盖
- QT给我们的窗口添加背景图片
- Qt中添加背景图片的方法(转)
- Qt中添加背景图片的方法
- 如何在Dialog中添加Edittext
- 简单说说SQL的优化(某篇的精简版).zz
- Linux-2.6.32.2内核在mini2440上的移植(八)---添加ADC驱动
- assert用法总结
- File实例:批量更改文件名
- QT 添加背景图片
- Linux的分区问题
- 智能手机太难用 24%想再启用旧手机
- cut命令详解
- 地图控件的基本用法
- qt布局(水平、垂直和Grid布局管理器)
- 密码的验证
- 专家详解“手机窃听”:夸大宣传并不神奇
- Ubuntu 中常用的命令