Android应用程序键盘(Keyboard)消息处理机制分析(二)
来源:互联网 发布:穆雅斓淘宝店铺链接 编辑:程序博客网 时间:2024/06/14 19:50
上接:Android应用程序键盘(Keyboard)消息处理机制分析(一)
-----
2. 应用程序注册键盘消息接收通道的过程分析
InputManager启动以后,就开始负责监控键盘输入事件了。当InputManager监控到键盘输入事件时,它应该把这个键盘事件分发给谁呢?当然是要把这个键盘消息分发给当前激活的Activity窗口了,不过,当前激活的Activity窗口还需要主动注册一个键盘消息接收通道到InputManager中去,InputManager才能把这个键盘消息分发给它处理。那么,当前被激活的Activity窗口又是什么时候去注册这个键盘消息接收通道的呢?在前面一篇文章Android应用程序启动过程源代码分析中,我们分析Android应用程序的启动过程时,在Step 33中分析到ActivityThread类的handleLaunchActivity函数中,我们曾经说过,当函数handleLaunchActivity调用performLaunchActivity函数来加载这个完毕应用程序的默认Activity后,再次回到handleLaunchActivity函数时,会调用handleResumeActivity函数来使这个Activity进入Resumed状态。在调用handleResumeActivity函数的过程中,ActivityThread会通过android.view.WindowManagerImpl类为该Activity创建一个ViewRoot实例,并且会通过调用ViewRoot类的setView成员函数把与该Activity关联的View设置到这个ViewRoot中去,而Activity正是通过ViewRoot类的setView成员函数来注册键盘消息接收通道的。
有了这些背影知识后,接下来,我们就可以从ViewRoot.setView函数开始分析应用程序注册键盘消息接收通道的过程了。首先看一下这个注册过程的序列图,然后再详细分析每一个步骤:
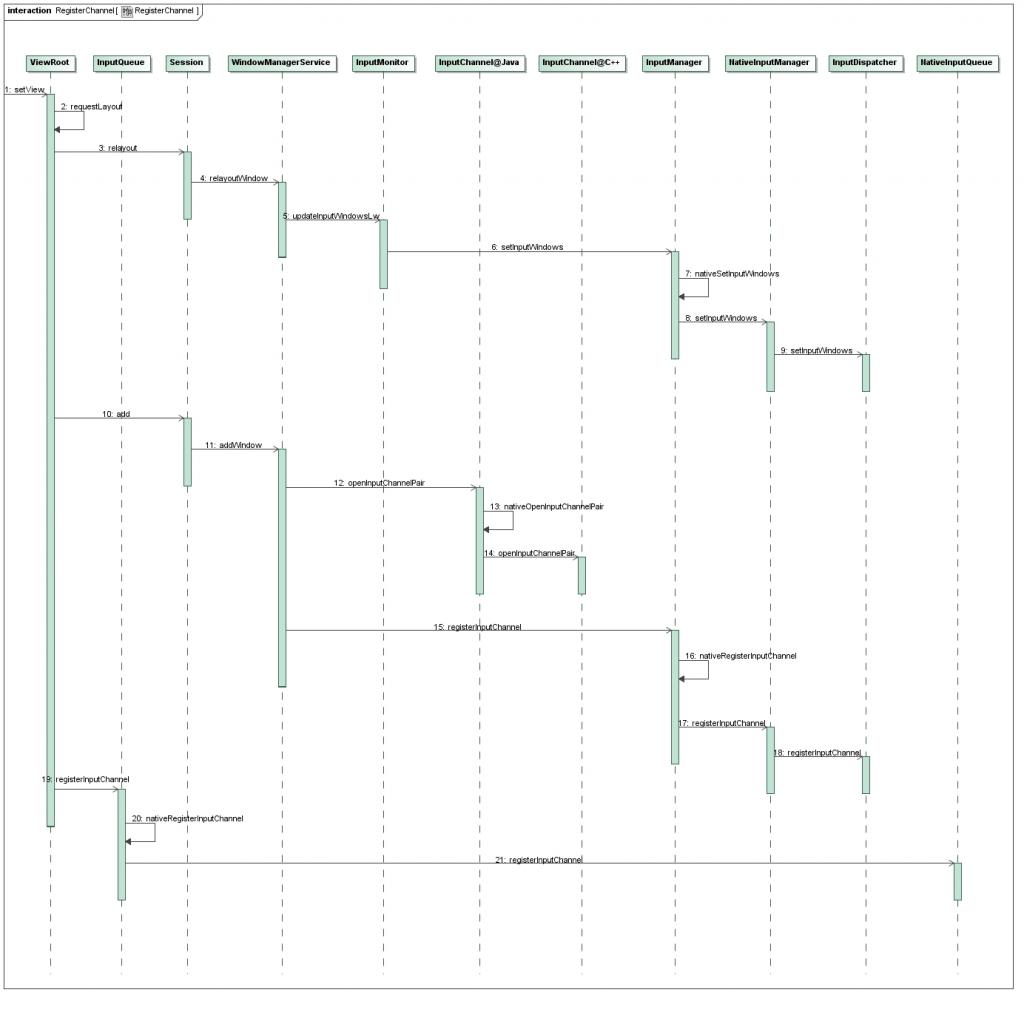
点击查看大图
Step 1. ViewRoot.setView
这个函数定义在frameworks/base/core/java/android/view/ViewRoot.java文件中:
- public final class ViewRoot extends Handler implements ViewParent,
- View.AttachInfo.Callbacks {
- ......
- public void setView(View view, WindowManager.LayoutParams attrs,
- View panelParentView) {
- ......
- synchronized (this) {
- if (mView == null) {
- ......
- // Schedule the first layout -before- adding to the window
- // manager, to make sure we do the relayout before receiving
- // any other events from the system.
- requestLayout();
- mInputChannel = new InputChannel();
- try {
- res = sWindowSession.add(mWindow, mWindowAttributes,
- getHostVisibility(), mAttachInfo.mContentInsets,
- mInputChannel);
- } catch (RemoteException e) {
- ......
- } finally {
- ......
- }
- ......
- if (view instanceof RootViewSurfaceTaker) {
- mInputQueueCallback =
- ((RootViewSurfaceTaker)view).willYouTakeTheInputQueue();
- }
- if (mInputQueueCallback != null) {
- mInputQueue = new InputQueue(mInputChannel);
- mInputQueueCallback.onInputQueueCreated(mInputQueue);
- } else {
- InputQueue.registerInputChannel(mInputChannel, mInputHandler,
- Looper.myQueue());
- }
- ......
- }
- }
- }
- }
这个函数中与注册键盘消息接收通道(InputChannel)相关的逻辑主要有三处,一是调用requestLayout函数来通知InputManager,这个Activity窗口是当前被激活的窗口,二是调用sWindowSession(WindowManagerService内部类Session的远程接口)的add成员函数来把键盘消息接收通道的一端注册在InputManager中,三是调用InputQueue的registerInputChannel成员函数来把键盘消息接收通道的另一端注册在本应用程序的消息循环(Looper)中。这样,当InputManager监控到有键盘消息时,就会先找到当前被激活的窗口,然后找到其在InputManager中对应的键盘消息接收通道,通过这个通道在InputManager中的一端来通知在应用程序消息循环中的另一端,就把键盘消息分发给当前激活的Activity窗口了。
在接下来的内容中,我们首先描述requestLayout函数是如何告诉InputManager当前的Activity窗口便是激活窗口的,接着再回过头来分析应用程序是如何把键盘消息接收通道的一端注册到InputManager中去的,最后分析应用程序是如何键盘消息接收通道的另一端注册到本应用程序的消息循环中去了。
Step 2. ViewRoot.requestLayout
这个函数定义在frameworks/base/core/java/android/view/ViewRoot.java文件中:
- public final class ViewRoot extends Handler implements ViewParent,
- View.AttachInfo.Callbacks {
- ......
- public void requestLayout() {
- ......
- mLayoutRequested = true;
- scheduleTraversals();
- }
- ......
- }
Step 3. WindowManagerService.Session.relayout
这个函数定义在frameworks/base/services/java/com/android/server/WindowManagerService.java 文件中:
- public class WindowManagerService extends IWindowManager.Stub
- implements Watchdog.Monitor {
- ......
- private final class Session extends IWindowSession.Stub
- implements IBinder.DeathRecipient {
- ......
- public int relayout(IWindow window, WindowManager.LayoutParams attrs,
- int requestedWidth, int requestedHeight, int viewFlags,
- boolean insetsPending, Rect outFrame, Rect outContentInsets,
- Rect outVisibleInsets, Configuration outConfig, Surface outSurface) {
- //Log.d(TAG, ">>>>>> ENTERED relayout from " + Binder.getCallingPid());
- int res = relayoutWindow(this, window, attrs,
- requestedWidth, requestedHeight, viewFlags, insetsPending,
- outFrame, outContentInsets, outVisibleInsets, outConfig, outSurface);
- //Log.d(TAG, "<<<<<< EXITING relayout to " + Binder.getCallingPid());
- return res;
- }
- ......
- }
- ......
- }
这个函数只是简单地调用WindowManagerService的成员函数relayoutWIndow来进一步处理。
Step 4. WindowManagerService.relayoutWIndow
这个函数定义在frameworks/base/services/java/com/android/server/WindowManagerService.java 文件中:
- public class WindowManagerService extends IWindowManager.Stub
- implements Watchdog.Monitor {
- ......
- public int relayoutWindow(Session session, IWindow client,
- WindowManager.LayoutParams attrs, int requestedWidth,
- int requestedHeight, int viewVisibility, boolean insetsPending,
- Rect outFrame, Rect outContentInsets, Rect outVisibleInsets,
- Configuration outConfig, Surface outSurface) {
- ......
- synchronized(mWindowMap) {
- ......
- mInputMonitor.updateInputWindowsLw();
- }
- ......
- }
- ......
- }
Step 5. InputMonitor.updateInputWindowsLw
这个函数定义在frameworks/base/services/java/com/android/server/WindowManagerService.java 文件中:
- public class WindowManagerService extends IWindowManager.Stub
- implements Watchdog.Monitor {
- ......
- final class InputMonitor {
- ......
- /* Updates the cached window information provided to the input dispatcher. */
- public void updateInputWindowsLw() {
- // Populate the input window list with information about all of the windows that
- // could potentially receive input.
- // As an optimization, we could try to prune the list of windows but this turns
- // out to be difficult because only the native code knows for sure which window
- // currently has touch focus.
- final ArrayList<WindowState> windows = mWindows;
- final int N = windows.size();
- for (int i = N - 1; i >= 0; i--) {
- final WindowState child = windows.get(i);
- if (child.mInputChannel == null || child.mRemoved) {
- // Skip this window because it cannot possibly receive input.
- continue;
- }
- ......
- // Add a window to our list of input windows.
- final InputWindow inputWindow = mTempInputWindows.add();
- ......
- }
- // Send windows to native code.
- mInputManager.setInputWindows(mTempInputWindows.toNullTerminatedArray());
- ......
- }
- ......
- }
- ......
- }
Step 6. InputManager.setInputWindows
这个函数定义在frameworks/base/services/java/com/android/server/InputManager.java文件中:
- public class InputManager {
- ......
- public void setInputWindows(InputWindow[] windows) {
- nativeSetInputWindows(windows);
- }
- ......
- }
Step 7. InputManager.nativeSetInputWindows
这个函数定义在frameworks/base/services/jni/com_android_server_InputManager.cpp 文件中:
- static void android_server_InputManager_nativeSetInputWindows(JNIEnv* env, jclass clazz,
- jobjectArray windowObjArray) {
- if (checkInputManagerUnitialized(env)) {
- return;
- }
- gNativeInputManager->setInputWindows(env, windowObjArray);
- }
Step 8. NativeInputManager.setInputWindows
这个函数定义在frameworks/base/services/jni/com_android_server_InputManager.cpp 文件中:
- void NativeInputManager::setInputWindows(JNIEnv* env, jobjectArray windowObjArray) {
- Vector<InputWindow> windows;
- jsize length = env->GetArrayLength(windowObjArray);
- for (jsize i = 0; i < length; i++) {
- jobject inputTargetObj = env->GetObjectArrayElement(windowObjArray, i);
- if (! inputTargetObj) {
- break; // found null element indicating end of used portion of the array
- }
- windows.push();
- InputWindow& window = windows.editTop();
- bool valid = populateWindow(env, inputTargetObj, window);
- if (! valid) {
- windows.pop();
- }
- env->DeleteLocalRef(inputTargetObj);
- }
- mInputManager->getDispatcher()->setInputWindows(windows);
- }
Step 9. InputDispatcher.setInputWindows
这个函数定义在frameworks/base/libs/ui/InputDispatcher.cpp文件中:
- void InputDispatcher::setInputWindows(const Vector<InputWindow>& inputWindows) {
- ......
- { // acquire lock
- AutoMutex _l(mLock);
- // Clear old window pointers.
- sp<InputChannel> oldFocusedWindowChannel;
- if (mFocusedWindow) {
- oldFocusedWindowChannel = mFocusedWindow->inputChannel;
- mFocusedWindow = NULL;
- }
- mWindows.clear();
- // Loop over new windows and rebuild the necessary window pointers for
- // tracking focus and touch.
- mWindows.appendVector(inputWindows);
- size_t numWindows = mWindows.size();
- for (size_t i = 0; i < numWindows; i++) {
- const InputWindow* window = & mWindows.itemAt(i);
- if (window->hasFocus) {
- mFocusedWindow = window;
- break;
- }
- }
- ......
- } // release lock
- ......
- }
这样,InputManager就把当前激活的Activity窗口保存在InputDispatcher中了,后面就可以把键盘消息分发给它来处理。
回到Step 1中的ViewRoot.setView函数中,接下来就调用下面语句来注册键盘消息接收通道的一端到InputManager中去:
- mInputChannel = new InputChannel();
- try {
- res = sWindowSession.add(mWindow, mWindowAttributes,
- getHostVisibility(), mAttachInfo.mContentInsets,
- mInputChannel);
- } catch (RemoteException e) {
- ......
- } finally {
- ......
- }
Step 10. WindowManagerService.Session.add
这个函数定义在frameworks/base/services/java/com/android/server/WindowManagerService.java 文件中:
- public class WindowManagerService extends IWindowManager.Stub
- implements Watchdog.Monitor {
- ......
- private final class Session extends IWindowSession.Stub
- implements IBinder.DeathRecipient {
- ......
- public int add(IWindow window, WindowManager.LayoutParams attrs,
- int viewVisibility, Rect outContentInsets, InputChannel outInputChannel) {
- return addWindow(this, window, attrs, viewVisibility, outContentInsets,
- outInputChannel);
- }
- ......
- }
- ......
- }
Step 11. WindowManagerService.addWindow
这个函数定义在frameworks/base/services/java/com/android/server/WindowManagerService.java 文件中:
- public class WindowManagerService extends IWindowManager.Stub
- implements Watchdog.Monitor {
- ......
- public int addWindow(Session session, IWindow client,
- WindowManager.LayoutParams attrs, int viewVisibility,
- Rect outContentInsets, InputChannel outInputChannel) {
- ......
- WindowState win = null;
- synchronized(mWindowMap) {
- ......
- win = new WindowState(session, client, token,
- attachedWindow, attrs, viewVisibility);
- ......
- if (outInputChannel != null) {
- String name = win.makeInputChannelName();
- InputChannel[] inputChannels = InputChannel.openInputChannelPair(name);
- win.mInputChannel = inputChannels[0];
- inputChannels[1].transferToBinderOutParameter(outInputChannel);
- mInputManager.registerInputChannel(win.mInputChannel);
- }
- ......
- }
- ......
- }
- ......
- }
- inputChannels[1].transferToBinderOutParameter(outInputChannel);
创建输入通道之前,WindowManagerService会为当前Activity窗口创建一个WindowState对象win,用来记录这个Activity窗口的状态信息。当创建这对输入管道成功以后,也会把其中的一个管道保存在这个WindowState对象win的成员变量mInputChannel中,后面要注销这个管道的时候,就是从这个WindownState对象中取回这个管道的:
- win.mInputChannel = inputChannels[0];
接下来我们就看一下InputChannel.openInputChannelPair函数的实现。
Step 12. InputChannel.openInputChannelPair
这个函数定义在frameworks/base/core/java/android/view/InputChannel.java文件中:
- public final class InputChannel implements Parcelable {
- ......
- /**
- * Creates a new input channel pair. One channel should be provided to the input
- * dispatcher and the other to the application's input queue.
- * @param name The descriptive (non-unique) name of the channel pair.
- * @return A pair of input channels. They are symmetric and indistinguishable.
- */
- public static InputChannel[] openInputChannelPair(String name) {
- ......
- return nativeOpenInputChannelPair(name);
- }
- ......
- }
Step 13. InputChannel.nativeOpenInputChannelPair
这个函数定义在frameworks/base/core/jni/android_view_InputChannel.cpp文件中:
- static jobjectArray android_view_InputChannel_nativeOpenInputChannelPair(JNIEnv* env,
- jclass clazz, jstring nameObj) {
- const char* nameChars = env->GetStringUTFChars(nameObj, NULL);
- String8 name(nameChars);
- env->ReleaseStringUTFChars(nameObj, nameChars);
- sp<InputChannel> serverChannel;
- sp<InputChannel> clientChannel;
- status_t result = InputChannel::openInputChannelPair(name, serverChannel, clientChannel);
- if (result) {
- LOGE("Could not open input channel pair. status=%d", result);
- jniThrowRuntimeException(env, "Could not open input channel pair.");
- return NULL;
- }
- // TODO more robust error checking
- jobject serverChannelObj = android_view_InputChannel_createInputChannel(env,
- new NativeInputChannel(serverChannel));
- jobject clientChannelObj = android_view_InputChannel_createInputChannel(env,
- new NativeInputChannel(clientChannel));
- jobjectArray channelPair = env->NewObjectArray(2, gInputChannelClassInfo.clazz, NULL);
- env->SetObjectArrayElement(channelPair, 0, serverChannelObj);
- env->SetObjectArrayElement(channelPair, 1, clientChannelObj);
- return channelPair;
- }
Step 14. InputChannel.openInputChannelPair
这个函数定义在frameworks/base/libs/ui/InputTransport.cpp文件中:
- status_t InputChannel::openInputChannelPair(const String8& name,
- sp<InputChannel>& outServerChannel, sp<InputChannel>& outClientChannel) {
- status_t result;
- int serverAshmemFd = ashmem_create_region(name.string(), DEFAULT_MESSAGE_BUFFER_SIZE);
- if (serverAshmemFd < 0) {
- ......
- } else {
- result = ashmem_set_prot_region(serverAshmemFd, PROT_READ | PROT_WRITE);
- if (result < 0) {
- ......
- } else {
- // Dup the file descriptor because the server and client input channel objects that
- // are returned may have different lifetimes but they share the same shared memory region.
- int clientAshmemFd;
- clientAshmemFd = dup(serverAshmemFd);
- if (clientAshmemFd < 0) {
- ......
- } else {
- int forward[2];
- if (pipe(forward)) {
- ......
- } else {
- int reverse[2];
- if (pipe(reverse)) {
- ......
- } else {
- String8 serverChannelName = name;
- serverChannelName.append(" (server)");
- outServerChannel = new InputChannel(serverChannelName,
- serverAshmemFd, reverse[0], forward[1]);
- String8 clientChannelName = name;
- clientChannelName.append(" (client)");
- outClientChannel = new InputChannel(clientChannelName,
- clientAshmemFd, forward[0], reverse[1]);
- return OK;
- }
- ......
- }
- ......
- }
- }
- }
- ......
- }
- InputChannel::InputChannel(const String8& name, int32_t ashmemFd, int32_t receivePipeFd,
- int32_t sendPipeFd) :
- mName(name), mAshmemFd(ashmemFd), mReceivePipeFd(receivePipeFd), mSendPipeFd(sendPipeFd) {
- ......
- }
具体来说,Server端和Client端的InputChannel分别是这样构成的:
Server Input Channel: ashmem - reverse(read) - forward(write)
Client Input Channel: ashmem - forward(read) - reverse(write)
前面我们在Android应用程序消息处理机制(Looper、Handler)分析一文中学习Android应用程序的消息处理机制时知道,管道可以用作进程间通信,其中一个进程在管道的读端等待新的内空可读,另一个进程在管道的写端写入新的内容以唤醒在管道读端等待的进程,这样就实现了进程间通信。在我们这个情景中,Client端可以在前向管道(forward pipe)的读端睡眠等待新的内容可读,而Server端可以通过向前向管道(forward pipe)的写端写入新的内容来唤醒Client端,同样,把前向管道(forward pipe)换成反向管道(reverse pipe),也能实现Client端唤醒Server端。在后面我们分析InputDispatcher分发键盘消息时,会看到它们的用法。
有了这些背景知识后,相信上面的openInputChannelPair的代码就容易理解了,这里就不再详述了。
创建好了这两个输入通道后,回到Step 11中的WindowManagerService.addWindow函数中,一方面它把刚才创建的Client端的输入通道通过outInputChannel参数返回到应用程序中:
- inputChannels[1].transferToBinderOutParameter(outInputChannel);
另一方面,它还要把刚才创建的Server端的输入通道注册到InputManager中:
- mInputManager.registerInputChannel(win.mInputChannel);
这个函数定义在frameworks/base/services/java/com/android/server/InputManager.java文件中:
- public class InputManager {
- ......
- /**
- * Registers an input channel so that it can be used as an input event target.
- * @param inputChannel The input channel to register.
- */
- public void registerInputChannel(InputChannel inputChannel) {
- if (inputChannel == null) {
- throw new IllegalArgumentException("inputChannel must not be null.");
- }
- nativeRegisterInputChannel(inputChannel, false);
- }
- ......
- }
Step 16. InputManager.nativeRegisterInputChannel
这个函数定义在frameworks/base/services/jni/com_android_server_InputManager.cpp 文件中:
- static void android_server_InputManager_nativeRegisterInputChannel(JNIEnv* env, jclass clazz,
- jobject inputChannelObj, jboolean monitor) {
- ......
- sp<InputChannel> inputChannel = android_view_InputChannel_getInputChannel(env,
- inputChannelObj);
- ......
- status_t status = gNativeInputManager->registerInputChannel(
- env, inputChannel, inputChannelObj, monitor);
- ......
- }
Step 17. NativeInputManager.registerInputChannel
这个函数定义在frameworks/base/services/jni/com_android_server_InputManager.cpp 文件中:
- status_t NativeInputManager::registerInputChannel(JNIEnv* env,
- const sp<InputChannel>& inputChannel, jobject inputChannelObj, bool monitor) {
- ......
- status = mInputManager->getDispatcher()->registerInputChannel(inputChannel, monitor);
- ......
- }
Step 18. InputDispatcher.registerInputChannel
这个函数定义在frameworks/base/libs/ui/InputDispatcher.cpp文件中:
- status_t InputDispatcher::registerInputChannel(const sp<InputChannel>& inputChannel, bool monitor) {
- ......
- { // acquire lock
- AutoMutex _l(mLock);
- if (getConnectionIndexLocked(inputChannel) >= 0) {
- LOGW("Attempted to register already registered input channel '%s'",
- inputChannel->getName().string());
- return BAD_VALUE;
- }
- sp<Connection> connection = new Connection(inputChannel);
- status_t status = connection->initialize();
- if (status) {
- LOGE("Failed to initialize input publisher for input channel '%s', status=%d",
- inputChannel->getName().string(), status);
- return status;
- }
- int32_t receiveFd = inputChannel->getReceivePipeFd();
- mConnectionsByReceiveFd.add(receiveFd, connection);
- if (monitor) {
- mMonitoringChannels.push(inputChannel);
- }
- mLooper->addFd(receiveFd, 0, ALOOPER_EVENT_INPUT, handleReceiveCallback, this);
- runCommandsLockedInterruptible();
- } // release lock
- return OK;
- }
道的读端描述符。回忆一下Step 14中的InputChannel.openInputChannelPair函数,我们创建了一个Server端的InputChannel,就是对应这里的inputChannel了,这个inputChannel的Receive Pipe Fd就是我们前面说的反向管道的读端描述符了。有了这个Receive Pipe Fd后,就以它作为Key值来把前面创建的Connection对象保存在InputDispatcher中,这样就基本完成键盘消息接收通道的注册了。但是,注册的工作还未完成,最后,还要把这个Receive Pipe Fd添加到InputDispatcher的成员变量mLooper中去,这里的成员变量mLooper的类型为Looper,我们在前面介绍InputManager的启动过程的Step 15中已经见过了,这里就不再详述了,不过这里仍然值得介绍一下它的addFd函数。
在前面一篇文章Android应用程序消息处理机制(Looper、Handler)分析中,我们在介绍到Android应用程序的消息循环一节时,曾经说过,在Looper类内部,会创建一个管道,然后Looper会睡眠在这个管道的读端,等待另外一个线程来往这个管道的写端写入新的内容,从而唤醒等待在这个管道读端的线程,除此之外,Looper还可以同时睡眠等待在其它的文件描述符上,因为它是通过Linux系统的epoll机制来批量等待指定的文件有新的内容可读的。这些其它的文件描述符就是通过Looper类的addFd成函数添加进去的了,在添加的时候,还可以指定回调函数,即当这个文件描述符所指向的文件有新的内容可读时,Looper就会调用这个hanldeReceiveCallback函数,有兴趣的读者可以自己研究一下Looper类的addFd函数的实现,它位于frameworks/base/libs/utils/Looper.cpp文件中。
分析到这里,Server端的InputChannel就注册完成了。回忆一下前面介绍InputManager启动过程的Step 14,这时InputDispatcherThread同时睡眠在InputDispatcher的成员变量mLooper内部的管道的读端以及这里的Server端InputChannel里面的反向管道的读端上,mLooper内部的管道的读端等待键盘事件的发生而被唤醒,而Server端InputChannel里面的反向管道的读端等待Client端InputChannel里面的反向管道的写端被写入新的内容而被唤醒。
Server端的InputChannel注册完成后,回到Step 11中的WindowManagerService.addWindow函数,接下来就是把Client端的InputChannel转换成addWindow的参数outInputChannel中,然后返回到Step 1中的ViewRoot.setView函数中,继续执行Client端的InputChannel的注册过程,即为应用程序这一侧注册键盘消息接收通道:
- if (view instanceof RootViewSurfaceTaker) {
- mInputQueueCallback =
- ((RootViewSurfaceTaker)view).willYouTakeTheInputQueue();
- }
- if (mInputQueueCallback != null) {
- mInputQueue = new InputQueue(mInputChannel);
- mInputQueueCallback.onInputQueueCreated(mInputQueue);
- } else {
- InputQueue.registerInputChannel(mInputChannel, mInputHandler,
- Looper.myQueue());
- }
这里的变量view一般不为RootViewSurfaceTaker的实例,因此,最后会执行下面语句:
- InputQueue.registerInputChannel(mInputChannel, mInputHandler,
- Looper.myQueue());
Step 19. InputQueue.registerInputChannel
这个函数定义在frameworks/base/core/java/android/view/InputQueue.java文件中:
- public final class InputQueue {
- ......
- public static void registerInputChannel(InputChannel inputChannel, InputHandler inputHandler,
- MessageQueue messageQueue) {
- ......
- synchronized (sLock) {
- ......
- nativeRegisterInputChannel(inputChannel, inputHandler, messageQueue);
- }
- }
- ......
- }
Step 20. InputQueue.nativeRegisterInputChannel
这个函数定义在frameworks/base/core/jni/android_view_InputQueue.cpp文件中:
- static void android_view_InputQueue_nativeRegisterInputChannel(JNIEnv* env, jclass clazz,
- jobject inputChannelObj, jobject inputHandlerObj, jobject messageQueueObj) {
- status_t status = gNativeInputQueue.registerInputChannel(
- env, inputChannelObj, inputHandlerObj, messageQueueObj);
- ......
- }
Step 21. NativeInputQueue.registerInputChannel
这个函数定义在frameworks/base/core/jni/android_view_InputQueue.cpp文件中:
- status_t NativeInputQueue::registerInputChannel(JNIEnv* env, jobject inputChannelObj,
- jobject inputHandlerObj, jobject messageQueueObj) {
- sp<InputChannel> inputChannel = android_view_InputChannel_getInputChannel(env,
- inputChannelObj);
- ......
- sp<Looper> looper = android_os_MessageQueue_getLooper(env, messageQueueObj);
- { // acquire lock
- AutoMutex _l(mLock);
- if (getConnectionIndex(inputChannel) >= 0) {
- LOGW("Attempted to register already registered input channel '%s'",
- inputChannel->getName().string());
- return BAD_VALUE;
- }
- uint16_t connectionId = mNextConnectionId++;
- sp<Connection> connection = new Connection(connectionId, inputChannel, looper);
- status_t result = connection->inputConsumer.initialize();
- if (result) {
- LOGW("Failed to initialize input consumer for input channel '%s', status=%d",
- inputChannel->getName().string(), result);
- return result;
- }
- connection->inputHandlerObjGlobal = env->NewGlobalRef(inputHandlerObj);
- int32_t receiveFd = inputChannel->getReceivePipeFd();
- mConnectionsByReceiveFd.add(receiveFd, connection);
- looper->addFd(receiveFd, 0, ALOOPER_EVENT_INPUT, handleReceiveCallback, this);
- } // release lock
- ......
- return OK;
- }
介绍到这里,应用程序注册键盘消息接收通道的过程就分析完成了。这个过程比较复杂,这里小结一下:
A. 即将会被激活的Activity窗口,会通知InputManager,它是当前激活的窗口,因此,一旦发生键盘事件的时候,InputManager就把这个键盘事件抛给这个Activity处理;
B. 应用程序会为这个Activity窗口和InputManager之间创建一个键盘消息接收通道,这个通道的一端由一个Server端的InputChannel构成,另一端由Client端的InputChannel构成,Server端的InputChannel注册在由InputManager所管理的InputDispatcher中,而Client端的InputChannel注册在由应用程序主线程的消息循环对象Looper中;
C. 注册在InputDispatcher中的InputChannel由一个反向管道的读端和一个前向管道的写端组成,而注册在应用程序主线程的消息循环对象Looper中的InputChannel由这个前向管道的读端和反向管道的写端组成,这种交叉结构使得当有键盘事件发生时,InputDispatcher可以把这个事件通知给应用程序。
应用程序注册好键盘消息接收通道后,接下来就开始分析InputManager分发键盘消息给应用程序的过程了。
----
- Android应用程序键盘(Keyboard)消息处理机制分析
- Android应用程序键盘(Keyboard)消息处理机制分析
- Android应用程序键盘(Keyboard)消息处理机制分析
- Android应用程序键盘(Keyboard)消息处理机制分析
- Android应用程序键盘(Keyboard)消息处理机制分析 .
- Android应用程序键盘(Keyboard)消息处理机制分析
- Android应用程序键盘(Keyboard)消息处理机制分析
- Android应用程序键盘(Keyboard)消息处理机制分析
- Android应用程序键盘(Keyboard)消息处理机制分析
- Android应用程序键盘(Keyboard)消息处理机制分析
- Android应用程序键盘(Keyboard)消息处理机制分析
- Android应用程序键盘(Keyboard)消息处理机制分析
- Android应用程序键盘(Keyboard)消息处理机制分析
- Android应用程序键盘(Keyboard)消息处理机制分析
- Android应用程序键盘(Keyboard)消息处理机制分析
- Android应用程序键盘(Keyboard)消息处理机制分析
- Android应用程序键盘(Keyboard)消息处理机制分析
- Android应用程序键盘(Keyboard)消息处理机制分析
- 英巴卡迪诺中国发布官方视频专栏
- 修改robots对网站的影响
- 精简八皇后问题
- o.boj 1059 PATULJCI
- php中require/include 包含相对路径的解决办法
- Android应用程序键盘(Keyboard)消息处理机制分析(二)
- 企业网站优化获得好排名的一些技巧
- Hadoop对Map执行框架的实现(TaskTracker端)
- kmp算法简述
- Joomla开发相关
- at切换命令
- 正则表达式
- Linux lcd 帧缓冲驱动详解
- 明晰软件架构与数据结构