好久没更新博客了,今天给大家分享一下Android中的资源与国际化的问题,通常我们新建一个Android工程,目录结构如下图所示: 我们主要看一下layout与values目录,layou
来源:互联网 发布:波士顿矩阵图案例 编辑:程序博客网 时间:2024/05/17 20:00
紧接上一篇巧妙运用ViewStub写出类似Tab选项卡(想怎么写tab就怎么写,横着写竖着写随你) ,上一篇耦合度实在是太高了(其实那个性能也不咋滴),饱受那一堆乱稻草捆绑在一起的痛苦,所以进行了一系列的改造。
第一步:首先你得了解TabHost和TabWidget, 将TabHost分为两个部分,一个是放内容的,还有一个就是放选项卡的,我们这里选项卡用TabWidget。TabHost的id应该写为
android:id="@android:id/tabhost",而不是以前的那个加号,这样可以直接在Activity里面通过getTabHost方法得到此TabHost对象。那如何才能将选项卡放在最底部呢,这其实很简单,还记得 RelativeLayout中android:layout_alignBottom 这个不,也就是说将TabWidget和选项卡内容放到RelativeLayout布局里,废话不多说了,看代码
- <?xml version="1.0" encoding="utf-8"?>
- <TabHost android:layout_width="fill_parent"
- android:layout_height="fill_parent"
- android:id="@android:id/tabhost"
- xmlns:android="http://schemas.android.com/apk/res/android"
- >
- <RelativeLayout
- android:layout_width="fill_parent"
- android:layout_height="fill_parent"
- android:orientation="vertical"
- android:padding="3dp"
- >
- <FrameLayout
- android:layout_width="fill_parent"
- android:layout_height="fill_parent"
- android:id="@android:id/tabcontent"
- android:layout_weight="1"
- >
- </FrameLayout>
- <TabWidget
- android:layout_width="fill_parent"
- android:layout_height="50dip"
- android:id="@android:id/tabs"
- android:layout_alignBottom = "@android:id/tabcontent"
- />
- </RelativeLayout>
- </TabHost>
以上xml代码可以通用哈,FrameLayout里用来放内容的,Tab的xml基本结构就这样搭好了,
第二步:接下来就是往Activity里面写点东东了,这个Activity必须要继承下TabActivity,要不然就算你setContentView了上面那个xml也没法通过getTabHost()获得布局中的tabHost。
然后通过getTabHost得到TabHost对象。我这里打算建立四个选项卡,newTabSpec 这是为你的每一个选项卡上面打上一个Tag,也就是标记标记而已,特殊情况下你可以通过这个来查找到你的选项卡。setIndicator就是在你的选项卡上设置一些内容,至于什么内容,你懂的,要么是文字,要么是图片,要么就是文字加图片,当然有时候复杂的话还会写上布局文件。我这里就放上一个图片吧,然后这个图片加上一些特效,懒得在xml写什么布局了,直接在代码写了,返回的是一个View对象,废话有点多,直接看代码吧
- private class TabView extends LinearLayout {
- ImageView imageView ;
- public TabView(Context c, int drawable, int drawableselec) {
- super(c);
- imageView = new ImageView(c);
- StateListDrawable listDrawable = new StateListDrawable();
- listDrawable.addState(SELECTED_STATE_SET, this.getResources()
- .getDrawable(drawableselec));
- listDrawable.addState(ENABLED_STATE_SET, this.getResources()
- .getDrawable(drawable));
- imageView.setImageDrawable(listDrawable);
- imageView.setBackgroundColor(Color.TRANSPARENT);
- setGravity(Gravity.CENTER);
- addView(imageView);
- }
上面的代码也就是自定义的一个View吧。
下面这个就是构建选项卡以及内容(选中的是第二个选项卡),我这里就把每个不同的选项卡内容分别放在不同的Activity里面,然后通过Tab来将这些Activity合并在一起,这样显得比较有层次感。
- @Override
- public void onCreate(Bundle savedInstanceState) {
- super.onCreate(savedInstanceState);
- requestWindowFeature(Window.FEATURE_NO_TITLE);
- setContentView(R.layout.main_tab);
- TabHost tabHost=getTabHost();
- TabView view = null;
- // 最近联系人
- view = new TabView(this, R.drawable.bg_tab_dial_normal, R.drawable.bg_tab_dial_normal);
- view.setBackgroundDrawable(this.getResources().getDrawable(R.drawable.selecttabbackground));
- TabSpec recentContactSpec=tabHost.newTabSpec("RecentContact");
- recentContactSpec.setIndicator(view);
- Intent recentContactIntent = new Intent(this, RecentContactActivity.class);
- recentContactSpec.setContent(recentContactIntent);
- // 联系人
- view = new TabView(this, R.drawable.bg_tab_contact_normal, R.drawable.bg_tab_contact_normal);
- view.setBackgroundDrawable(this.getResources().getDrawable(R.drawable.selecttabbackground));
- TabSpec contactBookSpec=tabHost.newTabSpec("ContactBook");
- contactBookSpec.setIndicator(view);
- Intent contactBookIntent = new Intent(this,ContactBookActivity.class);
- contactBookSpec.setContent(contactBookIntent);
- // 短信
- view = new TabView(this, R.drawable.bg_tab_sms_normal, R.drawable.bg_tab_sms_normal);
- view.setBackgroundDrawable(this.getResources().getDrawable(R.drawable.selecttabbackground));
- TabSpec smsMessageSpec = tabHost.newTabSpec("SmsMessage");
- smsMessageSpec.setIndicator(view);
- Intent smsMessageIntent = new Intent(this, SmsMessageActivity.class);
- smsMessageSpec.setContent(smsMessageIntent);
- //设置
- view = new TabView(this, R.drawable.bg_tab_setting_normal, R.drawable.bg_tab_setting_normal);
- view.setBackgroundDrawable(this.getResources().getDrawable(R.drawable.selecttabbackground));
- TabSpec settingSpec = tabHost.newTabSpec("Setting");
- settingSpec.setIndicator(view);
- Intent settingIntent = new Intent(this, SettingActivity.class);
- settingSpec.setContent(settingIntent);
- tabHost.addTab(recentContactSpec);
- tabHost.addTab(contactBookSpec);
- tabHost.addTab(smsMessageSpec);
- tabHost.addTab(settingSpec);
- tabHost.setCurrentTab(1);
- }
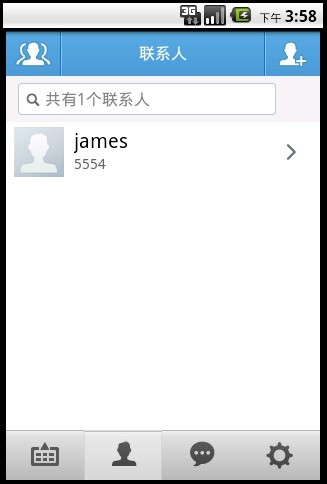
这个我没有写Demo,也就不提供详细的Demo了,不过还是截个图吧
- 好久没更新博客了,今天给大家分享一下Android中的资源与国际化的问题,通常我们新建一个Android工程,目录结构如下图所示: 我们主要看一下layout与values目录,layou
- 今天堂哥给我介绍了一个很好的博客,给大家分享一下
- 朋友今天问我一个面试题,我看了看,给大家分享一下
- 纠结了好久才弄得明白一点点的汉诺塔问题,现在把一些方程与大家分享一下!
- 今天看了一个利用MYeclipse进行Struts讲解的视频和大家分享一下
- 看了一下博客,发现好久没有更新了
- 好久没写博客了,纪念一下。
- 好久没更新了,检讨一下。。。
- 今天来给大家介绍一下Android的广播
- 好久没来了,测试一下现在的博客
- 今天老师给了我一个毕业设计课题,让我试着做,请大家看一下
- 今天在写程序中遇到的问题与大家分享一下
- 是谁剥夺了我们的智慧与能力(发泄一下)
- 微信多开6.0的软件,今天给大家分享一下
- 好久没有写博客了 今天来给大家分享一点小经验吧 关于 VirusTotal的扫毒经验分享
- 在学习autotools遇到一个问题:make没有按照VPATH给的目录进行搜索,请大家指导一下。
- 好久没写文章了,今天随意写一下
- 今天写了一个webservice的loadrunner脚步和大家分享一下
- 关于C++中for循环的问题
- Set-location:A positional parameter cannot be found that accepts argument 'Shell\Microsoft'.
- 电影优美语句分享(英与汉)
- HBase-0.90.4集群安装配置
- VB访问数据库的方案比较
- 好久没更新博客了,今天给大家分享一下Android中的资源与国际化的问题,通常我们新建一个Android工程,目录结构如下图所示: 我们主要看一下layout与values目录,layou
- 利用正则表达式验证手机或电话号码
- 巧妙运用ViewStub写出类似Tab选项卡(想怎么写tab就怎么写,横着写竖着写随你)
- 探秘ListView的ConvertView以及ViewHolder原理
- 《算法艺术与信息学竞赛》题目-提交方式对照表
- oracle在存储过程中执行DDL语句
- AS3 库资源 很多非常有用的类库
- 初探java和matlab混合编程
- VC++与Matlab混合编程之一:调用Matlab引擎