Zebra-VTYSH源码分析和改造(二):深入代码
来源:互联网 发布:2016年淘宝商家数量 编辑:程序博客网 时间:2024/05/21 08:01
分析Zebra-VTYSH的源码,首先从main函数开始,在ztysh-main.c中找到main函数,来进一步分析流程执行如下图所示:

在平时的使用中我们会发现,配置的时候有很多的视图(View),每个视图中有不同的命令可供用户输入进行配置。
这里,根据源码,视图可以认为是Node,而每一个命令称为element,他们之间的结构如下图所示:
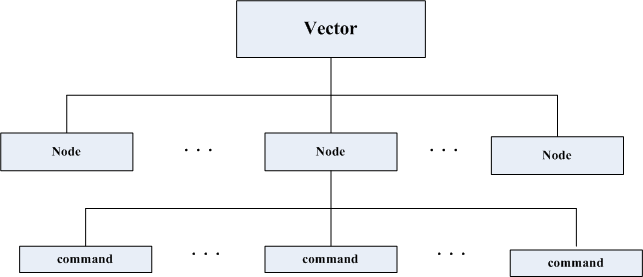
如图中所示,用到的数据结构如下:
/* struct for vector */struct _vector { unsigned int max;/* max number of used slot */ unsigned int alloced;/* number of allocated slot */ void **index;/* index to data */};/* Node which has some commands and prompt string and configuration function pointer . */struct cmd_node { /* Node index. */ enum node_type node; /* Prompt character at vty interface. */ char *prompt; /* Is this node's configuration goes to vtysh ? */ int vtysh; /* Node's configuration write function */ int (*func) (struct vty *); /* Vector of this node's command list. */ vector cmd_vector;};/* Structure of command element. */struct cmd_element { char *string;/* Command specification by string. */ int (*func) (struct cmd_element *, struct vty *, int, char **); char *doc;/* Documentation of this command. */ int daemon; /* Daemon to which this command belong. */ vector strvec;/* Pointing out each description vector. */ int cmdsize;/* Command index count. */ char *config;/* Configuration string */ vector subconfig;/* Sub configuration string */};
下面我们所要做的事情就是在node和element中添加我们自己的命令,如果一切顺利,稍加处理就可以在图一中的最后一步也就是loop循环中的vtysh_execute函数中来实现我们的执行过程了。
- Zebra-VTYSH源码分析和改造(二):深入代码
- Zebra-VTYSH源码分析和改造
- Zebra-VTYSH源码分析和改造(序)
- Zebra-VTYSH源码分析和改造(一):Zebra软件架构
- Zebra-VTYSH源码分析和改造(三):添加定制命令
- zebra代码简单分析
- zebra代码简单分析
- zebra线程管理源码简析(二)
- (1) quagga源码分析--大内总管zebra
- zebra命令行编写(二)
- Zebra命令模式分析(二) - 实践
- Zebra命令模式分析(二) - 实践
- Zebra命令模式分析(二)[补]
- zebra 命令定义的代码分析(DEFUN)
- 4、Volley解析(二),源码的深入分析一,缓存线程和网络请求线程
- 深入解析RxJava源码(二)Observable转换原理分析
- (2) quagga源码分析--路由信息处理zebra-rib
- 深入java String拼接和StringBuffer、StringBuilder(分析源码)
- Enchanted Keyfinder-查看、提取windows、office的密钥
- 实现联系人列表滑动显示提示信息 以及弹出选择菜单
- 多线程及java5的线程并发库
- Windows xp中FTP站点的设置
- 性能优化篇
- Zebra-VTYSH源码分析和改造(二):深入代码
- 利用服务实现电话监听
- 曦力音视频转换专家-免费全能视频转换器(支持GPU加速)
- ORA-30556错误
- 写给新手 iOS 5.0.1完美越狱教程
- 实现多线程下载文件
- 正则表达式分析/提取XML/XHTML标签属性
- unbuntu下的软件安装方式
- 网络基础题