WinCE OpenGL绘制立方体和纹理贴图
来源:互联网 发布:cf卡镜像软件 编辑:程序博客网 时间:2024/04/27 11:26
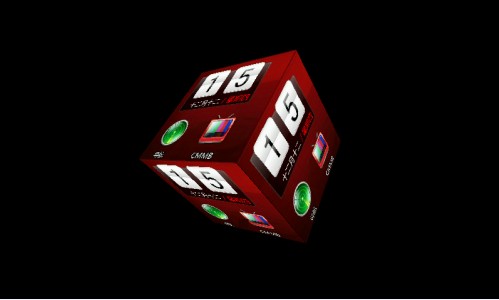
最近工作之余,开始学习OpenGL, 想到WINCE也是支持OpenGL的,只不过是嵌入式的OpenGL ES。于是尝试写了一个WINCE下的OpenGL测试程序,实现了绘制立方体和纹理。效果图如下:
需要注意的是,WINCE系统上开发OpenGL程序需具备以下条件:
1. 处理器的支持,嵌入式处理器需支持3D加速渲染(测试使用的是Telichips 8901);
2. WINCE内核的支持,定制内核时需添加OpenGL ES相关组件。
以下是具体的参考代码:
/********************************************************************filename: WinceOpenGLDemo.cppcreated:2011-01-05author:firehoodpurpose:利用OpenGL ES实现了绘制立方体和纹理效果*********************************************************************/// WinceOpenGLDemo.cpp : 定义应用程序的入口点。//#include "stdafx.h"#include "WinceOpenGLDemo.h"#include <windows.h>#include <commctrl.h>#include "ImgLoader.h"// OpenGL ES Includes #include <GLES/gl.h>#include <GLES/glext.h>#include <EGL/egl.h>#include <EGL/eglext.h>// OpenGL lib#pragma comment(lib, "OpenGlLib\\libGLESv1_CM.lib") #pragma comment(lib, "OpenGlLib\\libEGL.lib")// 全局变量:HINSTANCEg_hInst;// 当前实例TCHAR szAppName[] = L"OpenGLES"; /*The application name and the window caption*/CImgLoader g_Image;// OpenGL variables EGLDisplay glesDisplay; // EGL display EGLSurface glesSurface; // EGL rendering surface EGLContext glesContext; // EGL rendering context GLuint texture[6] = {0}; // 立方体定点坐标GLshort vertices[] = { -1,-1,1, 1,-1,1, 1,1,1, -1,1,1, -1,-1,-1, -1,1,-1, 1,1,-1, 1,-1,-1, -1,1,-1, -1,1,1, 1,1,1, 1,1,-1, -1,-1,-1, 1,-1,-1, 1,-1,1, -1,-1,1, 1,-1,-1, 1,1,-1, 1,1,1, 1,-1,1, -1,-1,-1, -1,-1,1, -1,1,1, -1,1,-1}; // 各个面纹理坐标GLshort texCoords[] = { 0,0,1,0,1,1,0,1, 0,0,1,0,1,1,0,1, 0,0,1,0,1,1,0,1, 0,0,1,0,1,1,0,1, 0,0,1,0,1,1,0,1, 0,0,1,0,1,1,0,1, }; // 三角形索引数据GLbyte indices1[] = { 0,1,3,2, 0,0,0,0, 0,0,0,0, 0,0,0,0, 0,0,0,0, 0,0,0,0 }; GLbyte indices2[] = { 0,0,0,0, 4,5,7,6, 0,0,0,0, 0,0,0,0, 0,0,0,0, 0,0,0,0 }; GLbyte indices3[] = { 0,0,0,0, 0,0,0,0, 8,9,11,10, 0,0,0,0, 0,0,0,0, 0,0,0,0 }; GLbyte indices4[] = { 0,0,0,0, 0,0,0,0, 0,0,0,0, 12,13,15,14, 0,0,0,0, 0,0,0,0}; GLbyte indices5[] = { 0,0,0,0, 0,0,0,0, 0,0,0,0, 0,0,0,0, 16,17,19,18, 0,0,0,0}; GLbyte indices6[] = { 0,0,0,0, 0,0,0,0, 0,0,0,0, 0,0,0,0, 0,0,0,0, 20,21,23,22};// 此代码模块中包含的函数的前向声明:ATOMMyRegisterClass(HINSTANCE, LPTSTR);BOOLInitInstance(HINSTANCE, int);LRESULT CALLBACKWndProc(HWND, UINT, WPARAM, LPARAM);BOOL InitOGLES(HWND hWnd);void CreateSurface();BOOL LoadTexture(LPCTSTR lpFileName,GLuint *id);void Render();void Clean();int WINAPI WinMain(HINSTANCE hInstance, HINSTANCE hPrevInstance, LPTSTR lpCmdLine, int nCmdShow){MSG msg;// 执行应用程序初始化:if (!InitInstance(hInstance, nCmdShow)) {return FALSE;}BOOL done = FALSE;// 主消息循环:while(!done) { if(PeekMessage(&msg,NULL,0,0,PM_REMOVE)) { if(msg.message==WM_QUIT) done = TRUE; else { TranslateMessage(&msg); DispatchMessage(&msg); } } else{Render();};} return (int) msg.wParam;}//// 函数: MyRegisterClass()//// 目的: 注册窗口类。//// 注释://ATOM MyRegisterClass(HINSTANCE hInstance, LPTSTR szWindowClass){WNDCLASS wc;wc.style = CS_HREDRAW | CS_VREDRAW;wc.lpfnWndProc = WndProc;wc.cbClsExtra = 0;wc.cbWndExtra = 0;wc.hInstance = hInstance;wc.hIcon = LoadIcon(hInstance, MAKEINTRESOURCE(IDI_WINCEOPENGLDEMO));wc.hCursor = 0;wc.hbrBackground = (HBRUSH) GetStockObject(NULL_BRUSH);wc.lpszMenuName = 0;wc.lpszClassName = szWindowClass;return RegisterClass(&wc);}//// 函数: InitInstance(HINSTANCE, int)//// 目的: 保存实例句柄并创建主窗口//// 注释://// 在此函数中,我们在全局变量中保存实例句柄并// 创建和显示主程序窗口。//BOOL InitInstance(HINSTANCE hInstance, int nCmdShow){ HWND hWnd; g_hInst = hInstance; // 将实例句柄存储在全局变量中 if (!MyRegisterClass(hInstance, szAppName)) { return FALSE; } hWnd = CreateWindow(szAppName,szAppName,WS_VISIBLE, 0,0,::GetSystemMetrics(SM_CXSCREEN),::GetSystemMetrics(SM_CYSCREEN),NULL,NULL,hInstance,NULL); if (!hWnd) { return FALSE; } if(!InitOGLES(hWnd)){printf("InitOGLES failed\n");return FALSE;}CreateSurface(); ShowWindow(hWnd, SW_SHOW); UpdateWindow(hWnd); return TRUE;}//// 函数: WndProc(HWND, UINT, WPARAM, LPARAM)//// 目的: 处理主窗口的消息。//// WM_COMMAND- 处理应用程序菜单// WM_PAINT- 绘制主窗口// WM_DESTROY- 发送退出消息并返回////LRESULT CALLBACK WndProc(HWND hWnd, UINT message, WPARAM wParam, LPARAM lParam){ PAINTSTRUCT ps; HDC hdc; switch (message) { case WM_CREATE: break; case WM_PAINT: hdc = BeginPaint(hWnd, &ps); // TODO: 在此添加任意绘图代码... EndPaint(hWnd, &ps); break; case WM_DESTROY:{Clean();PostQuitMessage(0);} break; default: return DefWindowProc(hWnd, message, wParam, lParam); } return 0;}BOOL InitOGLES(HWND hWnd){ EGLint matchingConfigs; EGLint majorVersion = 0; EGLint minorVersion = 0; glesDisplay = eglGetDisplay(GetDC(hWnd)); //Ask for an available display if( glesDisplay == EGL_NO_DISPLAY || eglGetError() != EGL_SUCCESS ) return FALSE; EGLConfig *configs_list; EGLint num_configs; // Display initialization (we don't care about the OGLES version numbers) if( eglInitialize( glesDisplay, &majorVersion, &minorVersion) == EGL_FALSE) {printf("eglInitialize failed, eglGetError = 0x%04x\n",eglGetError());return FALSE; }// find out how many configurations are supported if ( eglGetConfigs( glesDisplay, NULL, 0, &num_configs)==EGL_FALSE || eglGetError() != EGL_SUCCESS ) return FALSE; configs_list = (EGLConfig*) malloc(num_configs * sizeof(EGLConfig)); if (configs_list == NULL) return FALSE; // Get Configurations if( eglGetConfigs( glesDisplay, configs_list, num_configs, &num_configs)== EGL_FALSE || eglGetError() != EGL_SUCCESS ) return FALSE; // Obtain the first configuration with a depth buffer of 16 bits EGLint attrs[] = {EGL_RED_SIZE, 5,EGL_GREEN_SIZE, 6,EGL_BLUE_SIZE, 5,EGL_DEPTH_SIZE, 16,EGL_NONE};if (!eglChooseConfig(glesDisplay, attrs, configs_list, num_configs, &matchingConfigs)) { return eglGetError(); } // If there isn't any configuration enough good if (matchingConfigs < 1) return FALSE; /*eglCreateWindowSurface creates an onscreen EGLSurface and returns a handle to it. Any EGL rendering context created with a compatible EGLConfig can be used to render into this surface.*/ glesSurface = eglCreateWindowSurface(glesDisplay, configs_list[0], hWnd, 0); if(!glesSurface) return FALSE; // Let's create our rendering context glesContext=eglCreateContext(glesDisplay, configs_list[0], 0, 0); if(!glesContext) return FALSE; //Now we will activate the context for rendering eglMakeCurrent(glesDisplay, glesSurface, glesSurface, glesContext); /*Remember: because we are programming for a mobile device, we cant use any of the OpenGL ES functions that finish in 'f', we must use the fixed point version (they finish in 'x'*/ glClearColorx(0, 0, 0, 0); glShadeModel(GL_SMOOTH); RECT rc; GetWindowRect(hWnd, &rc); UINT width = rc.right - rc.left;UINT height = rc.bottom - rc.top;// 设置OpenGL场景的大小 glViewport(rc.left, rc.top, width, height); // 设置投影矩阵 glMatrixMode(GL_PROJECTION); glLoadIdentity();// 投影变换(透视投影)float ratio = (float) width / height; glFrustumf(-ratio, ratio, -1, 1, 2, 10);//glOrthox(FixedFromInt(-50),FixedFromInt(50), FixedFromInt(-50), FixedFromInt(50), FixedFromInt(-50), FixedFromInt(50));// 选择模型观察矩阵 glMatrixMode(GL_MODELVIEW); // 重置模型观察矩阵 glLoadIdentity(); return TRUE; }void CreateSurface() { glDisable(GL_DITHER); // 告诉系统对透视进行修正 glHint(GL_PERSPECTIVE_CORRECTION_HINT, GL_FASTEST); // 黑色背景 glClearColor(0, 0, 0, 0); // 启用阴影平滑 glShadeModel(GL_SMOOTH); // 设置深度缓存glClearDepthf(1.0f); // 启用深度测试 glEnable(GL_DEPTH_TEST); // 所作深度测试的类型glDepthFunc(GL_LEQUAL); // 启用2D纹理glEnable(GL_TEXTURE_2D); // 加载纹理LoadTexture(_T("\\NAND2\\OpenGlRes\\1.png"),&texture[0]);LoadTexture(_T("\\NAND2\\OpenGlRes\\1.png"),&texture[1]);LoadTexture(_T("\\NAND2\\OpenGlRes\\1.png"),&texture[2]);LoadTexture(_T("\\NAND2\\OpenGlRes\\1.png"),&texture[3]);LoadTexture(_T("\\NAND2\\OpenGlRes\\1.png"),&texture[4]);LoadTexture(_T("\\NAND2\\OpenGlRes\\1.png"),&texture[5]);}void Render(){static float rotation = 0;// 清除屏幕和深度缓存 glClear(GL_COLOR_BUFFER_BIT | GL_DEPTH_BUFFER_BIT); glMatrixMode(GL_MODELVIEW); // 重置当前的模型观察矩阵 glLoadIdentity(); // 坐标变换glTranslatef(0.0f, 0.0f, -5.0f); // 设置旋转 glRotatef(rotation++, 0.0f, 1.0f, 0.0f); glRotatef(rotation++, 1.0f, 0.0f, 0.0f); glEnableClientState(GL_VERTEX_ARRAY); glEnableClientState(GL_TEXTURE_COORD_ARRAY); glVertexPointer(3, GL_SHORT, 0, vertices); glTexCoordPointer(2, GL_SHORT, 0, texCoords); // 绘制立方体并绑定纹理glBindTexture(GL_TEXTURE_2D, texture[0]);glDrawElements(GL_TRIANGLE_STRIP, 4, GL_UNSIGNED_BYTE, indices1); glBindTexture(GL_TEXTURE_2D, texture[1]);glDrawElements(GL_TRIANGLE_STRIP, 8, GL_UNSIGNED_BYTE, indices2); glBindTexture(GL_TEXTURE_2D, texture[2]);glDrawElements(GL_TRIANGLE_STRIP, 12, GL_UNSIGNED_BYTE, indices3); glBindTexture(GL_TEXTURE_2D, texture[3]);glDrawElements(GL_TRIANGLE_STRIP, 16, GL_UNSIGNED_BYTE, indices4); glBindTexture(GL_TEXTURE_2D, texture[4]);glDrawElements(GL_TRIANGLE_STRIP, 20, GL_UNSIGNED_BYTE, indices5); glBindTexture(GL_TEXTURE_2D, texture[5]);glDrawElements(GL_TRIANGLE_STRIP, 24, GL_UNSIGNED_BYTE, indices6); glDisableClientState(GL_TEXTURE_COORD_ARRAY); glDisableClientState(GL_VERTEX_ARRAY); eglSwapBuffers(glesDisplay, glesSurface); }void Clean(){ if(glesDisplay) { eglMakeCurrent(glesDisplay, NULL, NULL, NULL); if(glesContext) eglDestroyContext(glesDisplay, glesContext); if(glesSurface) eglDestroySurface(glesDisplay, glesSurface); eglTerminate(glesDisplay); }} BOOL LoadTexture(LPCTSTR lpFileName,GLuint *id){if(!g_Image.Load(lpFileName))return FALSE;// 创建纹理glGenTextures(1, id);// 绑定纹理glBindTexture(GL_TEXTURE_2D, *id);glTexParameteri(GL_TEXTURE_2D, GL_TEXTURE_MIN_FILTER, GL_NEAREST);glTexParameteri(GL_TEXTURE_2D, GL_TEXTURE_MAG_FILTER, GL_NEAREST); glTexImage2D(GL_TEXTURE_2D, 0, GL_RGB, g_Image.Width(), g_Image.Height(), 0, GL_RGB, GL_UNSIGNED_BYTE, g_Image.GetBmpImage()); g_Image.Free();return TRUE;}
以下实现了一个文件加载类,用以将外部图片资源转化成绘制纹理时所需的位图数据。参考代码如下:
/********************************************************************filename: CImgLoader.hcreated:2011-01-05author:firehoodpurpose:文件加载类,将外部图片资源转化成绘制纹理时所需的位图数据 图片格式支持bmp、png、jpg.*********************************************************************/#pragma onceclass CImgLoader{public:CImgLoader(void);~CImgLoader(void);public:// 加载图片资源BOOL Load(LPCTSTR lpFileName);// 获取位图数据unsigned char* GetBmpImage(void);// 释放图片资源void Free();// 获取图像宽度int Width();// 获取图像高度int Height();private:int m_Width; // 图像宽度int m_Height; // 图像高度unsigned char *m_pImage; // 指向图像数据的指针};
/********************************************************************filename: CImgLoader.cppcreated:2011-01-05author:firehoodpurpose:文件加载类,将外部图片资源转化成绘制纹理时所需的位图数据 图片格式支持bmp、png、jpg.*********************************************************************/#include "StdAfx.h"#include "ImgLoader.h"// IImage Includer#include <imaging.h>#include <initguid.h>#include <imgguids.h> // IImage lib#pragma comment(lib, "Imaging.lib")CImgLoader::CImgLoader(void){m_pImage = NULL;m_Width = 0;m_Height = 0;}CImgLoader::~CImgLoader(void){}// 加载图片资源BOOL CImgLoader::Load(LPCTSTR lpFileName){IImagingFactory *pImgFactory = NULL;IImage *pImage = NULL;IBitmapImage *pBmpImg = NULL;// CoInitializeEx(NULL, COINIT_MULTITHREADED);if (!SUCCEEDED(CoCreateInstance(CLSID_ImagingFactory, NULL, CLSCTX_INPROC_SERVER, IID_IImagingFactory, (void **) &pImgFactory))) return FALSE;if (!SUCCEEDED(pImgFactory->CreateImageFromFile(lpFileName, &pImage))) return FALSE;// 获取图像大小信息ImageInfo ImgInfo;pImage->GetImageInfo(&ImgInfo);m_Width = ImgInfo.Width;m_Height = ImgInfo.Height;if (FAILED(pImgFactory->CreateBitmapFromImage(pImage,m_Width,m_Height,PixelFormat24bppRGB,InterpolationHintDefault,&pBmpImg))){return FALSE;}RECT rect = {0,0,m_Width,m_Height};BitmapData *BmpData = new BitmapData;if (FAILED(pBmpImg->LockBits(&rect,ImageLockModeRead|ImageLockModeWrite,PixelFormat24bppRGB,BmpData))){return FALSE;}int line = BmpData->Stride;LPBYTE lpData, lpLine, lpCurPixel; lpData = lpLine = (LPBYTE)BmpData->Scan0; // 获取BMP位图实际值的地址指针// 若为Bottom-Up(从下到上)的位图,则指向buffer的结尾// 若为Top-Down(从上到下)的位图,则指向buffer的开头// int nBytesPP = nBPP >> 3; // 左移三位即除以8,获取图像每像素字节数m_pImage = new unsigned char[m_Width * m_Height * 3];memset(m_pImage, 0, m_Width * m_Height * 3);if(m_pImage == NULL)return FALSE;if (line>0){int pos = m_Width * m_Height * 3-1;for(int i = 0; i<m_Height; i++) // 行{lpLine = lpData + i * line; // 获取图像每一行地址指针for(int j = m_Width-1; j>-1; j--) // 列{lpCurPixel = lpLine + j * 3; // 获取每行每像素地址指针m_pImage[pos--] = *lpCurPixel ; // Rm_pImage[pos--] = *(lpCurPixel + 1); // Gm_pImage[pos--] = *(lpCurPixel + 2); // B}}}else{int pos = 0 ;for(int i = m_Height-1; i>-1; i--) // 行{lpLine = lpData + i * line; // 获取图像每一行地址指针for(int j = 0; j<m_Width; j++) // 列{lpCurPixel = lpLine + j * 3; // 获取每行每像素地址指针m_pImage[pos++] = *(lpCurPixel + 2); // Rm_pImage[pos++] = *(lpCurPixel + 1); // Gm_pImage[pos++] = *lpCurPixel; // B}}}if (FAILED(pBmpImg->UnlockBits(BmpData))){return FALSE;}delete BmpData;pBmpImg = NULL;pImage->Release(); pImgFactory->Release(); return TRUE;}// 获取图片数据unsigned char* CImgLoader::GetBmpImage(void){return m_pImage;}// 获取图像宽度int CImgLoader::Width(){return m_Width;}// 获取图像高度int CImgLoader::Height(){return m_Height;}// 释放图片资源void CImgLoader::Free(){if(m_pImage){delete []m_pImage;m_pImage = NULL;}}
- WinCE OpenGL绘制立方体和纹理贴图
- opengl 绘制简单的带纹理贴图的立方体
- opengl绘制纹理立方体
- OpenGL纹理贴图 旋转的立方体
- OpenGL ES绘制3D纹理贴图
- 立方体纹理贴图代码
- 简单立方体纹理贴图
- OPENGL 纹理贴图 旋转立方体(Nehe glut版)
- OpenGL es纹理贴图显示空白立方体解决
- android opengl es添加纹理,绘制立方体纹理,立方体使用不同纹理
- OpenGL显示中文和旋转立方体贴图
- OpenGL立方体贴图
- opengl es 不同系统版本立方体纹理贴图显示空白立方体 问题解决
- Android OpenGL ES绘制透明纹理立方体(未解决)
- OpenGL_ES|WinCE纹理贴图的方式绘制字符串
- OpenGL纹理贴图 JPEG纹理
- OpenGL纹理贴图 JPEG纹理
- OpenGL ES纹理贴图
- 高质量c++(指针参数是如何传递内存的?)
- Compile Android on Fedora 15 X86_64
- QTP通过命令行打开IE
- iphone-common-codes-ccteam源代码 CCTableTipView.h
- Windows Filtering Platform 结构和简介
- WinCE OpenGL绘制立方体和纹理贴图
- delphi2010中使用pchar时E2010 Incompatible types: 'Char' and 'AnsiChar' 错误的处理
- iphone-common-codes-ccteam源代码 CCTableTipView.m
- hibernate中的多对一关联关系
- 【GTK】信号量(signal)大全
- ORACLE 变量的定义和使用
- contentObserver 监视数据库
- 腾讯vs百度(转)
- js面向对象思想|三角形和矩形的周长面积