聊天气泡sms
来源:互联网 发布:gif调色软件 编辑:程序博客网 时间:2024/04/29 03:35
iPhone用户对内置的短信应用程序并不陌生以,它用一个超可爱的气泡方式显示短信,如图1。

图1
但是,这种创新的UI功能并没有开放给iPhone开发者,因此如果你想开发一款类似的app,你必须自己实现它。我命名这种UI叫着BubbleUI,它以聊天的方式显示信息。一个很好的例子就是你开发一款聊天app,两人聊天的内容用气泡显示。
本文我将向大家介绍开发类似sms应用程序的详细步骤。
准备气泡图片
首先,你需要像气泡的图片。我用是图2这张图片。

图2
如果细心的朋友可能发现内置的短信应用它的气泡大小不是固定的,它根据字的多少而变化。因此,我们的消息气泡应能相应的扩展与收缩。在不影响气泡外貌的情况下最简单的方法就是将它分成9个小图片,像图3那样。

图3
如果你想扩展气泡的高度,只需要在垂直方向上将中间一排的图片简单的延伸(如图4的左图)。如果你想扩展气泡的宽度,只需要在水平方向上将中间一列的图片简单的延伸(如图4右图)。
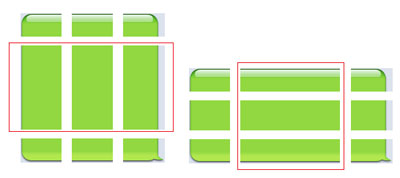
图4
要显示的消息就覆盖在气泡上面就行了。
在此提醒大家,如果你想减少工作量,你可以不用将图片分成9张小图片,而只需要将整张气泡延伸。但这也要看你用的气泡图片样式,如果只一张矩图图片,那么延伸整张图片是最简单的方法。
创建工程
现在你知道生成消息气泡的方法,那进一步是创建代码工程。开启xcode并新建一个View-based(iphone)工程,并名命为BubbleUI。在Resources目录新建一个名叫icons的组。并把上面说到的9张小图拖到Icons分组中,如图5。
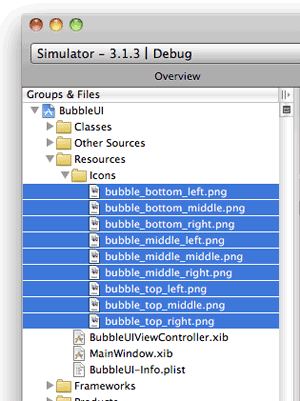
图5
双击BubbleUIViewController.xib激活interfaceBuilder(xcode3 中xcode与IB是分开的,xcode4中内置了IB).在View中添加一个TextFild,一个Round Rect Button,一个Table View,如图6。
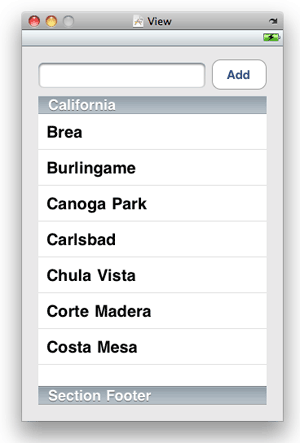
图6
我选择了Table View去展现消息气泡。这是因为它可以滚动,用户可以容易地看到所有消息,并且每一个消息气泡就是一个cell。这样你就可以在TableView自定义每个消息占用空间。
选中Table View的属性查看器,并设置如图7所示。
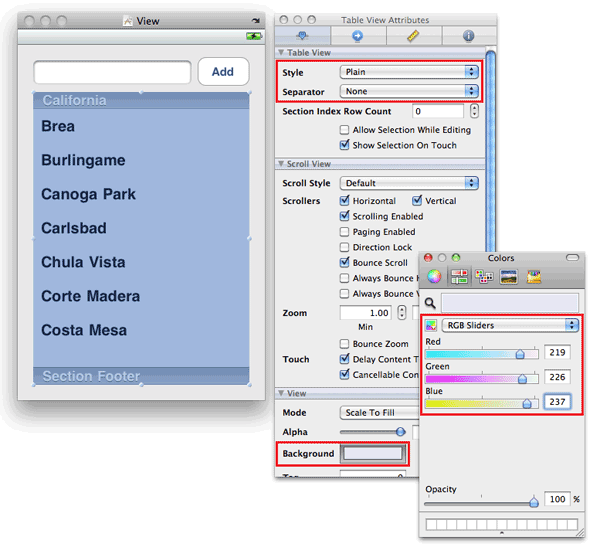
图7
设置背景色为亮蓝(RGB值为219,226,237),这个色与我所使用的气片图片更搭配。Separator属性设为none是为了隐藏TableView每排的分隔线,这样一来就不像是TableView了。
下一步,设置View的背景色,使其与Table View更协调,如图8
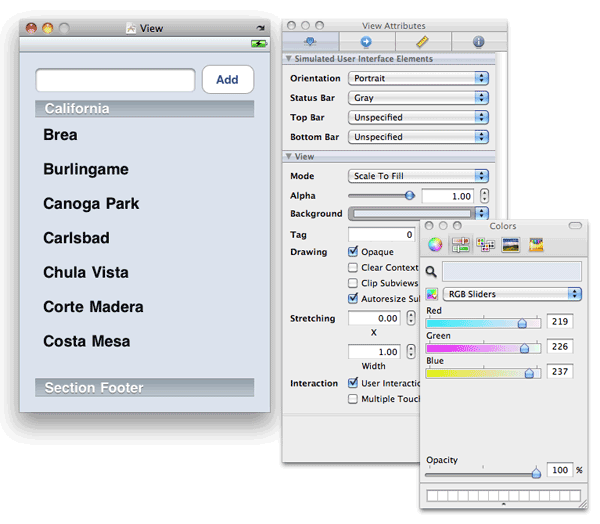
图8
修改BubbleUIViewController.h的代码如下:
- #import
<UIKit/UIKit.h> -
- @interface
BubbleUIViewController : UIViewController { -
//---add this--- -
IBOutlet UITextField *itemName; -
IBOutlet UITableView *tableView; -
//-------------- - }
-
- //---add
this--- - @property
(nonatomic, retain) UITextField *itemName; - @property
(nonatomic, retain) UITableView *tableView; -
- -(IBAction)
doneEditing:(id) sender; - -(IBAction)
btnAdd:(id) sender; - //--------------
-
- @end
回到IB, 设置Table View的数据源与代理为File's Owner item.并前联变量tableView 到Table View, 如图9.
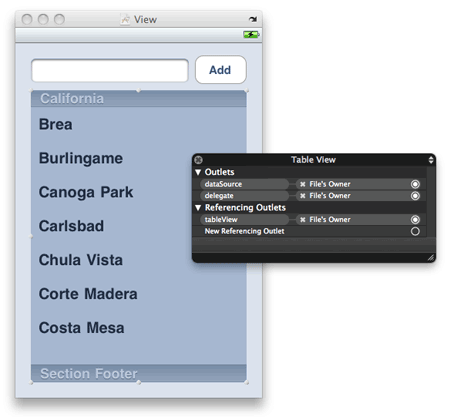
图9
下一步,连接Text Field view的事件Did End OnExit到响应方法doneEditing:上,并连接输出口到itemName,如图10.
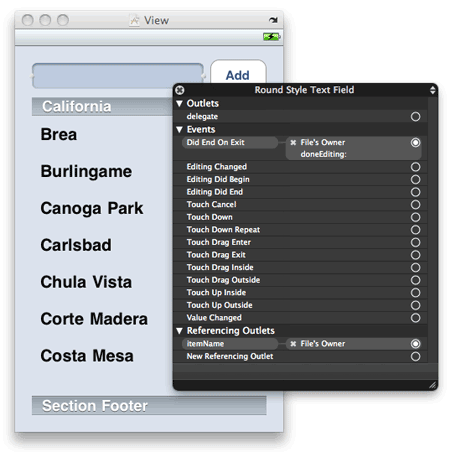
图10
最后,连接圆形button的事件Touch UpInside到响应方法btnAdd:,如图11
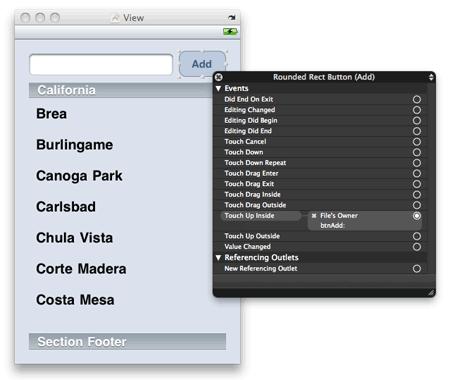
图11
在BubbleUIViewController.m中,添加如下代码。
首先,声明一些变量与常量:
- #import
"BubbleUIViewController.h" -
- @implementation
BubbleUIViewController -
- //---add
this--- - @synthesize
itemName; - @synthesize
tableView; -
- NSMutableArray
*listOfMessages; - NSMutableArray
*dateOfMessages; -
- static
CGFloat constFONTSIZE = 14.0; - static
int const DATELABEL_TAG = 1; - static
int const MESSAGELABEL_TAG = 2; - static
int const IMAGEVIEW_TAG_1 = 3; - static
int const IMAGEVIEW_TAG_2 = 4; - static
int const IMAGEVIEW_TAG_3 = 5; - static
int const IMAGEVIEW_TAG_4 = 6; - static
int const IMAGEVIEW_TAG_5 = 7; - static
int const IMAGEVIEW_TAG_6 = 8; - static
int const IMAGEVIEW_TAG_7 = 9; - static
int const IMAGEVIEW_TAG_8 = 10; - static
int const IMAGEVIEW_TAG_9 = 11; -
- int
bubbleFragment_width, bubbleFragment_height; - int
bubble_x, bubble_y; - //--------------
响应方法doneEditing:实现如下:
- -(IBAction)
doneEditing9id) sender { -
[sender resignFirstResponder]; - }
在viewDidLoad中初始化各种变量与数组:
- -
( void)viewDidLoad{ -
-
//---add this--- -
//---location to display the bubble fragment--- -
bubble_x = 10; -
bubble_y = 20; -
-
//---size of the bubble fragment--- -
bubbleFragment_width = 56; -
bubbleFragment_height = 32; -
-
//---contains the messages--- -
listOfMessages = [[NSMutableArray alloc] init]; -
-
//---contains the date for each message--- -
dateOfMessages = [[NSMutableArray alloc] init]; -
-
//---add a message--- -
[listOfMessages addObject:@"Hello there!" ]; -
[dateOfMessages addObject:[NSString stringWithFormat:@"%@",[NSDate date]]]; -
//-------------- -
-
[super viewDidLoad]; - }
设置Table View的sections数量为1:
- -
(NSInteger)numberOfSectionsInTableV iew:(UITableView *)tableView { -
return 1; - }
listOfMessages包括了所有要显示的消息,因此Table View的排数就是数组的元素个数:
- -
(NSInteger)tableView:(UITableView *)tableView -
numberOfRowsInSection:(NSInteger)section { -
return [listOfMessages count]; - }
为了简单,所有的消息气泡都用固定的宽度,差不多是图片的3倍大小。所有要显示的消息也受限于该长度。左右各25像素的边缘。因此,只需要计算要显示字符串的需要高度。用下面代码就可以解决问题:
- //---calculate
the height for the message--- - -(CGFloat)
labelHeight:(NSString *) text { -
CGSize maximumLabelSize = CGSizeMake((bubbleFragment_width * 3) - 25,9999); -
CGSize expectedLabelSize = [text sizeWithFont:[UIFont systemFontOfSize: FONTSIZE] -
constrainedToSize:maximumLabelSize -
lineBreakMode:UILineBreakModeWordWrap]; -
return expectedLabelSize.height; - }
上面这个方法输入参数为一个字符串,然后根据规定长度计算所占空间的高度。由于TableView每一排显示一个消息气泡,每一个消息气泡高度不一样,那就要设置每一排的高度。能过下面代码可以办到:
- //---returns
the height for the table view row--- - -
(CGFloat)tableView:(UITableView *)tableView - heightForRowAtIndexPath:(NSIndexPath
*)indexPath { -
-
int labelHeight = [self labelHeight:[listOfMessages -
objectAtIndex:indexPath.row]]; -
labelHeight -= bubbleFragment_height; -
if (labelHeight<0) labelHeight = 0; -
-
return (bubble_y + bubbleFragment_height * 2 + labelHeight) + 5; - }
最有挑占的部份就是把要显示的气泡消息交给TableView显示出来。让我们先来总览代码,我等一下再介绍之。这是该方法全部代码:
- -
(UITableViewCell *)tableView:(UITableView *)tableView -
cellForRowAtIndexPath:(NSIndexPath *)indexPath { -
-
static NSString "Cell";*CellIdentifier = @ -
-
//---add this--- -
UILabel* dateLabel = nil; -
UILabel* messageLabel = nil; -
UIImageView *imageView_top_left = nil; -
UIImageView *imageView_top_middle = nil; -
UIImageView *imageView_top_right = nil; -
-
UIImageView *imageView_middle_left = nil; -
UIImageView *imageView_middle_right = nil; -
UIImageView *imageView_middle_middle = nil; -
-
UIImageView *imageView_bottom_left = nil; -
UIImageView *imageView_bottom_middle = nil; -
UIImageView *imageView_bottom_right = nil; -
//-------------- -
-
UITableViewCell *cell = [tableView -
dequeueReusableCellWithI dentifier:CellIdentifier]; -
-
if (cell == nil) { -
cell = [[[UITableViewCell alloc] initWithFrame:CGRectZero -
reuseIdentifier:CellIdentifier] -
autorelease]; -
-
//---add this--- -
//---date--- -
dateLabel = [[[UILabel alloc] init] autorelease]; -
dateLabel.tag = DATELABEL_TAG; -
[cell.contentView addSubview: dateLabel]; -
-
//---top left--- -
imageView_top_left = [[[UIImageView alloc] init] autorelease]; -
imageView_top_left.tag = IMAGEVIEW_TAG_1; -
[cell.contentView addSubview: imageView_top_left]; -
-
//---top middle--- -
imageView_top_middle = [[[UIImageView alloc] init] autorelease]; -
imageView_top_middle.tag = IMAGEVIEW_TAG_2; -
[cell.contentView addSubview: imageView_top_middle]; -
-
//---top right--- -
imageView_top_right = [[[UIImageView alloc] init] autorelease]; -
imageView_top_right.tag = IMAGEVIEW_TAG_3; -
[cell.contentView addSubview: imageView_top_right]; -
-
//---middle left--- -
imageView_middle_left = [[[UIImageView alloc] init] autorelease]; -
imageView_middle_left.tag = IMAGEVIEW_TAG_4; -
[cell.contentView addSubview: imageView_middle_left]; -
-
//---middle middle--- -
imageView_middle_middle = [[[UIImageView alloc] init] autorelease]; -
imageView_middle_middle.tag = IMAGEVIEW_TAG_5; -
[cell.contentView addSubview: imageView_middle_middle]; -
-
//---middle right--- -
imageView_middle_right = [[[UIImageView alloc] init] autorelease]; -
imageView_middle_right.tag = IMAGEVIEW_TAG_6; -
[cell.contentView addSubview: imageView_middle_right]; -
-
//---bottom left--- -
imageView_bottom_left = [[[UIImageView alloc] init] autorelease]; -
imageView_bottom_left.tag = IMAGEVIEW_TAG_7; -
[cell.contentView addSubview: imageView_bottom_left]; -
-
//---bottom middle--- -
imageView_bottom_middle = [[[UIImageView alloc] init] autorelease]; -
imageView_bottom_middle.tag = IMAGEVIEW_TAG_8; -
[cell.contentView addSubview: imageView_bottom_middle]; -
-
//---bottom right--- -
imageView_bottom_right = [[[UIImageView alloc] init] autorelease]; -
imageView_bottom_right.tag = IMAGEVIEW_TAG_9; -
[cell.contentView addSubview: imageView_bottom_right]; -
-
//---message--- -
messageLabel = [[[UILabel alloc] init] autorelease]; -
messageLabel.tag = MESSAGELABEL_TAG; -
[cell.contentView addSubview: messageLabel]; -
-
//---set the images to display for each UIImageView--- -
imageView_top_left.image = -
[UIImage imageNamed:@"bubble_top_left.png"]; -
imageView_top_middle.image = -
[UIImage imageNamed:@"bubble_top_middle.png"]; -
imageView_top_right.image = -
[UIImage imageNamed:@"bubble_top_right.png"]; -
-
imageView_middle_left.image = -
[UIImage imageNamed:@"bubble_middle_left.png"]; -
imageView_middle_middle.image = -
[UIImage imageNamed:@"bubble_middle_middle.png"]; -
imageView_middle_right.image = -
[UIImage imageNamed:@"bubble_middle_right.png"]; -
-
imageView_bottom_left.image = -
[UIImage imageNamed:@"bubble_bottom_left.png"]; -
imageView_bottom_middle.image = -
[UIImage imageNamed:@"bubble_bottom_middle.png"]; -
imageView_bottom_right.image = -
[UIImage imageNamed:@"bubble_bottom_right.png"]; -
-
} else { -
//---reuse the old views--- -
dateLabel = (UILabel*)[cell.contentView viewWithTag: DATELABEL_TAG]; -
messageLabel = (UILabel*)[cell.contentView viewWithTag: MESSAGELABEL_TAG]; -
-
imageView_top_left = -
(UIImageView*)[cell.contentView viewWithTag: IMAGEVIEW_TAG_1]; -
imageView_top_middle = -
(UIImageView*)[cell.contentView viewWithTag: IMAGEVIEW_TAG_2]; -
imageView_top_right = -
(UIImageView*)[cell.contentView viewWithTag: IMAGEVIEW_TAG_3]; -
-
imageView_middle_left = -
(UIImageView*)[cell.contentView viewWithTag: IMAGEVIEW_TAG_4]; -
imageView_middle_middle = -
(UIImageView*)[cell.contentView viewWithTag: IMAGEVIEW_TAG_5]; -
imageView_middle_right = -
(UIImageView*)[cell.contentView viewWithTag: IMAGEVIEW_TAG_6]; -
-
imageView_bottom_left = -
(UIImageView*)[cell.contentView viewWithTag: IMAGEVIEW_TAG_7]; -
imageView_bottom_middle = -
(UIImageView*)[cell.contentView viewWithTag: IMAGEVIEW_TAG_8]; -
imageView_bottom_right = -
(UIImageView*)[cell.contentView viewWithTag: IMAGEVIEW_TAG_9]; -
} -
-
//---calculate the height for the label--- -
int labelHeight = [self labelHeight:[listOfMessages objectAtIndex:indexPath.row]]; -
labelHeight -= bubbleFragment_height; -
if (labelHeight<0) labelHeight = 0; -
-
//---you can customize the look and feel for the date for each message here--- -
dateLabel.frame = CGRectMake(0.0, 0.0, 200, 15.0); -
dateLabel.font = [UIFont boldSystemFontOfSize: FONTSIZE]; -
dateLabel.textAlignment = UITextAlignmentLeft; -
dateLabel.textColor = [UIColor darkGrayColor]; -
dateLabel.backgroundColor = [UIColor clearColor]; -
-
//---top left--- -
imageView_top_left.frame = -
CGRectMake(bubble_x, bubble_y, bubbleFragment_width, bubbleFragment_height); -
//---top middle--- -
imageView_top_middle.frame = -
CGRectMake(bubble_x + bubbleFragment_width, bubble_y, -
bubbleFragment_width, bubbleFragment_height); -
//---top right--- -
imageView_top_right.frame = -
CGRectMake(bubble_x + (bubbleFragment_width * 2), bubble_y, -
bubbleFragment_width, bubbleFragment_height); -
//---middle left--- -
imageView_middle_left.frame = -
CGRectMake(bubble_x, bubble_y + bubbleFragment_height, -
bubbleFragment_width, labelHeight); -
//---middle middle--- -
imageView_middle_middle.frame = -
CGRectMake(bubble_x + bubbleFragment_width, bubble_y + bubbleFragment_height, -
bubbleFragment_width, labelHeight); -
//---middle right--- -
imageView_middle_right.frame = -
CGRectMake(bubble_x + (bubbleFragment_width * 2), -
bubble_y + bubbleFragment_height, -
bubbleFragment_width, labelHeight); -
//---bottom left--- -
imageView_bottom_left.frame = -
CGRectMake(bubble_x, bubble_y + bubbleFragment_height + labelHeight, -
bubbleFragment_width, bubbleFragment_height ); -
//---bottom middle--- -
imageView_bottom_middle.frame = -
CGRectMake(bubble_x + bubbleFragment_width, -
bubble_y + bubbleFragment_height + labelHeight, -
bubbleFragment_width, bubbleFragment_height); -
//---bottom right--- -
imageView_bottom_right.frame = -
CGRectMake(bubble_x + (bubbleFragment_width * 2), -
bubble_y + bubbleFragment_height + labelHeight, -
bubbleFragment_width, bubbleFragment_height ); -
-
//---you can customize the look and feel for each message here--- -
messageLabel.frame = -
CGRectMake(bubble_x + 10, bubble_y + 5, -
(bubbleFragment_width * 3) - 25, -
(bubbleFragment_height * 2) + labelHeight - 10); -
-
messageLabel.font = [UIFont systemFontOfSize:FONTSIZE]; -
messageLabel.textAlignment = UITextAlignmentCenter; -
messageLabel.textColor = [UIColor darkTextColor]; -
messageLabel.numberOfLines = 0; //---display multiple lines--- -
messageLabel.backgroundColor = [UIColor clearColor]; -
messageLabel.lineBreakMode = UILineBreakModeWordWrap; -
-
dateLabel.text = [dateOfMessages objectAtIndex:indexPath.row]; -
messageLabel.text = [listOfMessages objectAtIndex:indexPath.row]; -
//-------------- -
-
return cell; - }
这个方法看起来很长,但是读起来却是一目了然。下面的伪代码展示它的主要逻辑:
- if
(cell == nil) { -
//---create and instantiate all the Label and UIImageView views--- -
//---then add them to the cell--- -
-
} else { -
//---reuse the old views previously added to the cell--- -
} -
//---customize the size, font, etc of all the views in the cell---
其实就是由UIImageView与LabelView构造成了消息气泡.
- messageLabel.tag
= MESSAGELABEL_TAG;
当你要重复用view的时候,你只需要像下面一样的方法就可以得到它:
- messageLabel
= (UILabel*)[cell.contentView viewWithTag: MESSAGELABEL_TAG];
当用户点击了add按钮,就需要将消息加入到listOfMessages这个数组中,并通知TableView重新加载。相应的你也要把当前时间加到dateOfMessage这个数组当中:
- //---add
a message to the table view--- - -(IBAction)
btnAdd:(id) sender { -
[listOfMessages addObject:itemName.text]; -
[dateOfMessages addObject:[NSString stringWithFormat:@"%@",[NSDate date]]]; -
[self.tableView reloadData]; - }
最后, release这两个数组:
- -
( void)dealloc{ -
[listOfMessages release]; -
[dateOfMessages release]; -
[super dealloc]; - }
按Commond+R在iPhone模拟器上运行,图12是程序的最终效果:
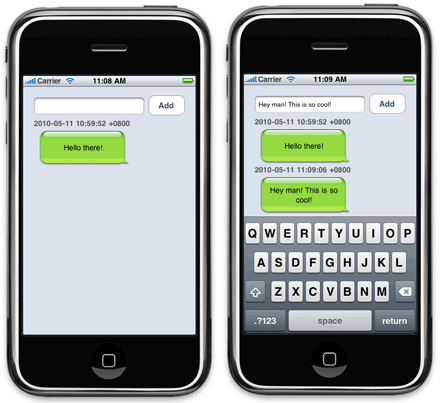
图12
总结
在本文中,你可以学到如何创建一个smsUI风格的应用程序。你可以修改代码,可以修改气泡的颜色,形状与大小。最重要的是,它可以让你的应用程序更加有趣,更具人性化。
- 聊天气泡sms
- 气泡聊天
- iPhone SMS气泡UI
- iPhone SMS气泡UI .
- android聊天气泡
- 高仿微信气泡聊天
- iPhone 聊天气泡
- 聊天气泡效果实现
- iOS 气泡聊天效果
- 高仿微信气泡聊天
- APP气泡聊天框
- android实现气泡聊天
- QQ聊天气泡
- iOS制作聊天气泡
- 聊天对话气泡-字体自适应气泡宽度
- 仿微信聊天气泡效果实现
- 仿微信聊天气泡效果实现
- 仿微信聊天气泡效果实现
- UIView有shadow
- 关于如何解决silverlight安装错误:提示消息ID1603
- animation的xml定义中的android:interpolator属性
- MYSQL常用语法
- 送给入门新手----关于tableview 初级和高级
- 聊天气泡sms
- ChartDirector 5.0 for python 笔记【4】Multi-Depth Pie Chart
- SearchBar深度解析--这个比较早了 最近版sdk 有的方法不能用了 参考下吧
- OpenFlow(效果图)中文实用详解
- 简单号码分配器的实现分析
- Android Loop&Handle学习总结
- 改变键盘的颜色
- 黑马程序员_String类
- NSNavgationController自定义切换画面(传送参数)
