Centos 5.7 上LVS+piranha负载均衡及双机热备配置方式
来源:互联网 发布:pr视频剪辑软件下载 编辑:程序博客网 时间:2024/04/26 16:18
参考:http://www.ibm.com/developerworks/cn/linux/cluster/l-lvsinst/index.html
http://wenku.baidu.com/view/7dd134630b1c59eef8c7b4f8.html
安装包下载:
LVS:
在kernel里已经包含了这个安装包,我们可以验证:
(http://kb.linuxvirtualserver.org/wiki/Compiling_ipvsadm_on_different_Linux_distributions)
Red Hat Enterprise Linux 3 (or CentOS 3) kernel has already included the IPVS patch, so that we do not need to build the kernel image with IPVS support ourselves.
[root@penguin root]# modprobe ip_vs[root@penguin root]# cat /proc/net/ip_vsIP Virtual Server version 1.0.8 (size=65536)Prot LocalAddress:Port Scheduler Flags -> RemoteAddress:Port Forward Weight ActiveConn InActConn
ipvsadm 下载:(没有用官网下载的src的版本,这个需要有内核代码还需要自己再编译,所以就没用)
(http://rpm.pbone.net/index.php3)
You have chosen search in content of rpms.
Display 1 - 2 hits of 2. Search took 0.01 seconds.
Search results for ipvsadm :
CentOS 5 ftp.centos.org/5.7/os/x86_64/CentOS/ipvsadm-1.24-13.el5.x86_64.rpmCentOS 5 ftp.centos.org/5.7/os/i386/CentOS/ipvsadm-1.24-13.el5.i386.rpm
piranha 下载:
(http://rpm.pbone.net/index.php3?stat=3&search=piranha&srodzaj=3&dist[]=55)
Search for rpm name in category: CentOS 5
Display 1 - 2 hits of 2. Search took 0.02 seconds.
Search results for piranha :
CentOS 5
ftp.centos.org/5.7/os/x86_64/CentOS/piranha-0.8.4-22.el5.x86_64.rpm
CentOS 5
ftp.centos.org/5.7/os/i386/CentOS/piranha-0.8.4-22.el5.i386.rpm
http://bbs.linuxtone.org/thread-1096-1-1.html
LVS + piranha 之NAT配置
VIP : 192.168.18.240
LoadBalance: eth0: 192.168.18.241
eth1: 10.10.10.241
BackUp: eth0: 192.168.18.242
eth1: 10.10.10.242
Real Server1: 10.10.10.243
RealServer2: 10.10.10.244
Gateway : 10.10.10.241(10.10.10.242)
1. 安装piranha和ipvsadm
2. 设置piranha密码
piranha-passwd
3. 启动piranha-gui
service piranha-gui start
4. 配置LVS
http://192.168.18.241:3636
具体配置过程不详述
附上配置文件
vim /etc/sysconfig/ha/lvs.cf
- serial_no = 14
- primary = 192.168.18.241
- service = lvs
- backup_active = 1
- backup = 192.168.18.242
- heartbeat = 1
- heartbeat_port = 539
- keepalive = 6
- deadtime = 18
- network = nat
- nat_router = 10.10.10.241 eth1
- nat_nmask = 255.255.255.0
- debug_level = NONE
- monitor_links = 0
- virtual webserv {
- active = 1
- address = 192.168.18.240 eth0:1
- vip_nmask = 255.255.255.0
- port = 80
- send = "GET / HTTP/1.0\r\n\r\n"
- expect = "HTTP"
- use_regex = 0
- load_monitor = none
- scheduler = wlc
- protocol = tcp
- timeout = 6
- reentry = 15
- quiesce_server = 0
- server node1 {
- address = 10.10.10.243
- active = 1
- weight = 50
- }
- server node2 {
- address = 10.10.10.244
- active = 1
- weight = 50
- }
- }
6. 分别在LB和BackUp上启用数据转发
# vi /etc/sysctl.conf
net.ipv4.ip_forward = 1
#sysctl -p
7. 启动RealServer上httpd服务
8. 启动LB和Backup上pulse
#service pulse start
9. 测试
LVS + piranha 之DR配置
OS : centos4.6
VIP : 192.168.18.200
LoadBalance: 192.168.18.241
BackUp: 192.168.18.242
Real Server1: 192.168.18.243
RealServer2: 192.168.18.244
Gateway : 192.168.18.1
1. 安装piranha和ipvsadm
2. 设置piranha密码
piranha-passwd
3. 启动piranha-gui
service piranha-gui start
4. 配置LVS
http://192.168.18.241:3636
具体配置过程不详述
附上配置文件
vim /etc/sysconfig/ha/lvs.cf
- serial_no = 16
- primary = 192.168.18.241
- service = lvs
- backup_active = 1
- backup = 192.168.18.242
- heartbeat = 1
- heartbeat_port = 539
- keepalive = 6
- deadtime = 18
- network = direct
- debug_level = NONE
- monitor_links = 0
- virtual webserv {
- active = 1
- address = 192.168.18.240 eth0:1
- vip_nmask = 255.255.255.0
- port = 80
- send = "GET / HTTP/1.0\r\n\r\n"
- expect = "HTTP"
- use_regex = 0
- load_monitor = none
- scheduler = wrr
- protocol = tcp
- timeout = 6
- reentry = 15
- quiesce_server = 0
- server node1 {
- address = 192.168.18.243
- active = 1
- weight = 50
- }
- server node2 {
- address = 192.168.18.244
- active = 1
- weight = 50
- }
- }
5. 将配置文件copy至Backup相应目录下
6. 分别在LB和BackUp上启用数据转发
# vi /etc/sysctl.conf
net.ipv4.ip_forward = 1
#sysctl -p
7. 配置RealServer
- #ifconfig lo:0 192.168.18.240 broadcast 192.168.18.240 netmask 255.255.255.255 up
- #route add -host 192.168.18.240 dev lo:0
关闭ARP广播响应
- #echo 1 > /proc/sys/net/ipv4/conf/all/arp_ignore
- #echo 2 > /proc/sys/net/ipv4/conf/all/arp_announce
- #echo 1 > /proc/sys/net/ipv4/conf/tunl0/arp_ignore
- #echo 2 > /proc/sys/net/ipv4/conf/tunl0/arp_announce
8. 启动RealServer上httpd服务
9. 启动LB和Backup上pulse
- #service pulse start
10. 测试
来源: http://www.askwan.com/read.php?104
LVS + piranha 之Tunnel配置
VIP : 192.168.18.200
LoadBalance: 192.168.18.241
BackUp: 192.168.18.242
Real Server1: 192.168.18.243
RealServer2: 192.168.18.244
1. 安装piranha和ipvsadm
2. 设置piranha密码
piranha-passwd
3. 启动piranha-gui
service piranha-gui start
4. 配置LVS
http://192.168.18.241:3636
具体配置过程不详述
附上配置文件
vim /etc/sysconfig/ha/lvs.cf
- serial_no = 14
- primary = 192.168.18.241
- service = lvs
- backup_active = 1
- backup = 192.168.18.242
- heartbeat = 1
- heartbeat_port = 539
- keepalive = 6
- deadtime = 18
- network = tunnel
- debug_level = NONE
- monitor_links = 0
- virtual webserv {
- active = 1
- address = 192.168.18.240 eth0:1
- vip_nmask = 255.255.255.0
- port = 80
- send = "GET / HTTP/1.0\r\n\r\n"
- expect = "HTTP"
- use_regex = 0
- load_monitor = none
- scheduler = wrr
- protocol = tcp
- timeout = 6
- reentry = 15
- quiesce_server = 0
- server node1 {
- address = 192.168.18.243
- active = 1
- weight = 50
- }
- server node2 {
- address = 192.168.18.244
- active = 1
- weight = 50
- }
- }
6. 分别在LB和BackUp上启用数据转发
# vi /etc/sysctl.conf
net.ipv4.ip_forward = 0
修改为
net.ipv4.ip_forward = 1
#sysctl -p
7. 配置RealServer
创建IP Tunnel
- # ifconfig tunl0 192.168.18.240 netmask 255.255.255.255 broadcast 192.168.18.240 up
- # route add -host 192.168.18.240 dev tunl0
- #echo 1 > /proc/sys/net/ipv4/conf/all/arp_ignore
- #echo 2 > /proc/sys/net/ipv4/conf/all/arp_announce
- #echo 1 > /proc/sys/net/ipv4/conf/tunl0/arp_ignore
- #echo 2 > /proc/sys/net/ipv4/conf/tunl0/arp_announce
9. 启动LB和Backup上pulse
#service pulse start
10. 测试
///////////////////////////////////////////////////////////////////////
http://rfyimcool.blog.51cto.com/1030776/674179
NAT模式
实验环境:
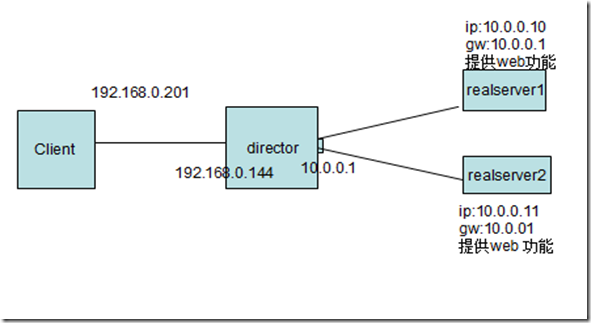
1.实验模拟通过192.168.0.144 向外提供服务
2.通过director接受和响应用户的请求,通过director的LVS功能,把用户的
请求通过realserver来真正的处理
3.realserver 提供web处理功能
4.拓扑图如下
一、配置realserver (两台realserver配置相同,以realserver1为例)
- 配置ip和对应的网关
1) ip配置
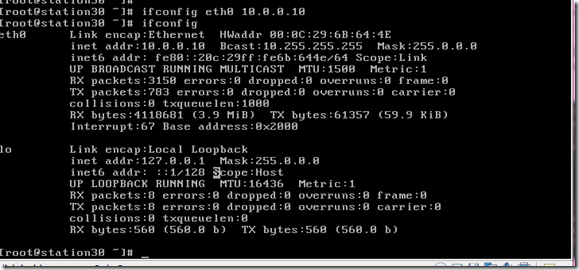
2)网关配置

3) 测试连通性


2. 安装配置apache
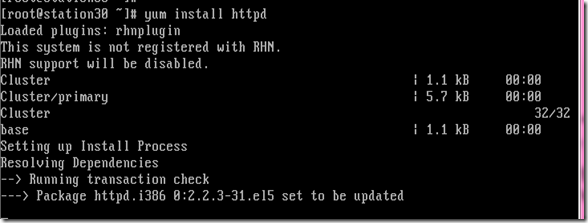
1)安装
2)添加网页 (为了测试两个realserver上的web提供不同的网页内容)
#vim /var/www/html/index.html 添加如下内容

realserver2 为“test for realserver2”
3) 启动apache

4)内部测试
#elinks 10.0.0.10

#elinks 10.0.0.11

二、配置 director
1)配置ip
#ifconfig eth0 10.0.0.1 (不在测试,上边测试过了)
#ifconfig eth1 192.168.0.144
2)打开本机的路由转发功能
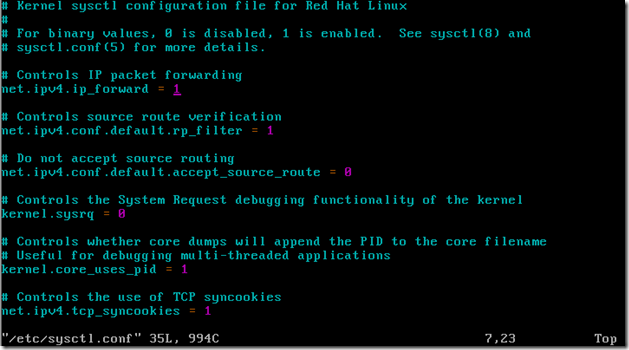
临时修改:

永久修改: #vim /etc/sysctl.conf , 把net.ipv4.ip_forward = 0 中的 0 改为 1
3) 安装和配置ipvsadm
安装:

配置:
1)添加规则 (这里使用rr算法,下面测试时会测试i其他算法,管理算法的介绍,上篇博客有)

2)添加realserver

三、测试
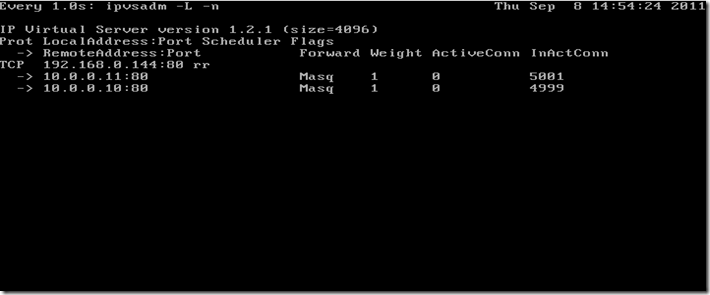
1、rr算法测试 (请求的页面会轮巡的改变)


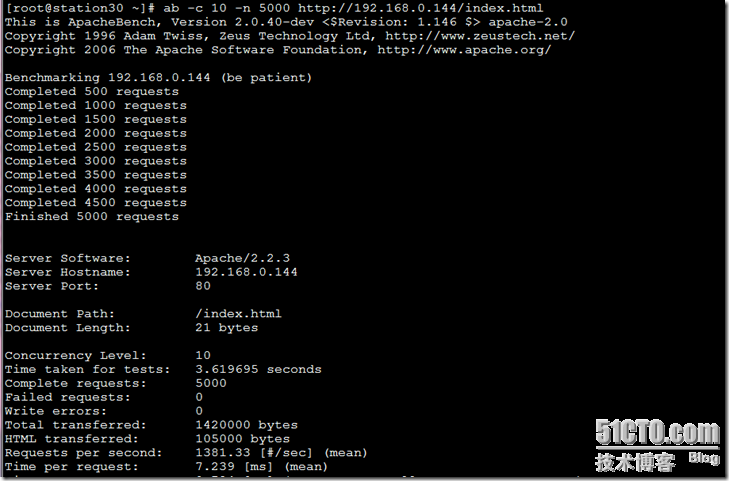
压力测试:
使用命令: #ab –c 10 –n 5000 http://192.168.0.144/index.html
响应速度: Requests per second: 1713.12 [#/sec] (mean) ##每秒1713 次
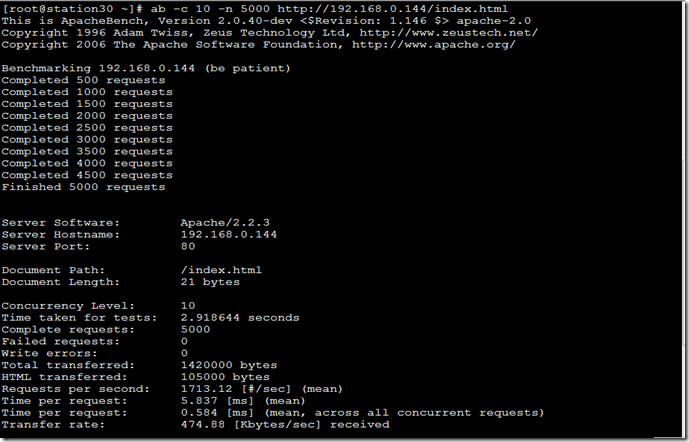
测试统计
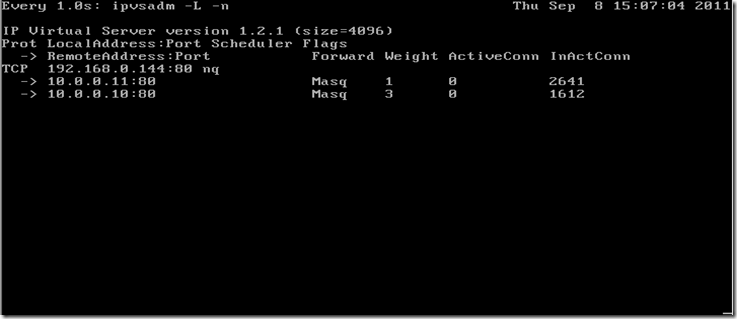
使用命令: #watch –n 1 'ipvsadm –L –n' #两台realserver的响应数基本上是1:1
2、wlc 算法测试
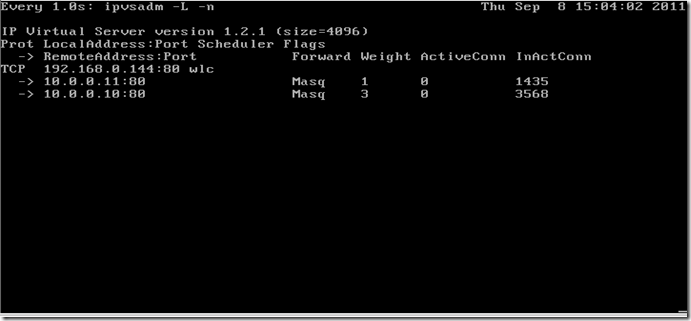
1)修改ipvsadm 的使用算法和权重值

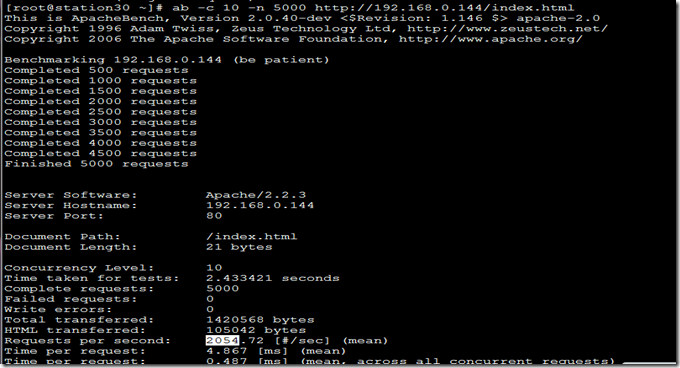
2)压力测试
响应速度:每秒2000次左右
3)测试统计: 比例接近权重值之比3:1
3 nq 算法测试
1)修改算法
2)压力测试 响应速度:1400次左右
3)测试统计
////////////////////////////////////////////////////////////
以下是本人实际配置过程。
要求:网络中有四台服务器,一台是LVS,另外两台里面分别包含http+connection manager服务,最后一台是openfire+mysql服务器。
下面简述如何配置LVS,可以对两台http+cm的服务器进行负载,http服务和cm服务可以建立成两个virtual server,只是使用不同端口就可以了。
配置方法是使用LVS的NAT结构进行配置,方法如下:
1,因为是NAT模式,所以LVS服务器需要两块网卡,我使用的是虚拟机,虚拟两块网卡。其他几台服务器都是真机。几台服务器上面全部跑CENTOS5.7操作系统。
2,LVS这台虚拟机服务器,可以利用vmware虚拟两块网卡,两个网卡的连接方式,一个是bridge的,一个是nat的,这样就可以把两个网卡放在不同网段了。
ifconfig 后eth0是172.20.0.43, 255.255.252.0; eth1是192.168.146.133, 255.255.252.0
3,在lvs服务器上安装ipvsadm,piranha两个软件,然后命令行输入ipvsadm,会打印出版本信息。
4,/etc/init.d/piranha-gui start 开启piranha配置界面
5,/usr/sbin/piranha-password xxxx 在这里设置piranha登录密码
6,在浏览器中http://127.0.0.1:3636 进入piranha登录界面,用户名是piranha,密码就是刚才设置那个。
7,写一下网络结构图
LVS服务器:eth0: 172.20.0.43
eth1: 192.168.146.133
VIP: 192.168.146.168(eth1:1)
http+cm-1: eth0: 172.20.0.65
gateway:172.20.0.43
http+cm-2: eth0: 172.20.0.62
geteway:172.20.0.43
8,开始配置piranha,在GLOBAL SETTINGS页,primary server public IP: 192.168.146.133
use network type: nat
nat router ip: 172.20.0.43
nat router netmask:255.255.252.0
nat router device: eth0
9, 在VIRTUAL SERVER页配置中,添加第一个virtual server.
name: lvs-http
application port:80
protocol: tcp
virtual ip address: 192.168.146.168
virtual ip network mask: 255.255.252.0
device: eth1:1
scheduling: round robin
persistence:28800
然后添加两个real server
name: http1
address:172.20.0.65
weight:1
name: http2
address:172.20.0.62
weight:1
10, 在VIRTUAL SERVER页配置中,添加第二个virtual server.
name: lvs-cm
application port:5222
protocol: tcp
virtual ip address: 192.168.146.168
virtual ip network mask: 255.255.252.0
device: eth1:1
scheduling: round robin
persistence:1000000000000000000000
然后添加两个real server
name: cm1
address:172.20.0.65
weight:1
name: cm2
address:172.20.0.62
weight:1
11, 各个页面都用active点开,看到server都是up的状态。
12,这部很关键,关掉LVS服务器的防火墙,把整个防火墙都disable掉就可以了,不然是没办法路由成功的。
13,/etc/init.d/pulse start
14, vi /etc/sysctl.conf, 把net.ipv4.ip_forward=0改为1
15,这时需要到两台real server上配置默认网关,一定要配对,不然路由不到
route add default gw 172.20.0.43
route del default gw 172.20.0.1(本来默认网关是这个,所以需要删掉)
16,这时就可以测试一下了,来到LVS上CONTROL/MONITORING主页,点击update information now,看看打印出的状态是否满意。
如果有问题,还可以用ipvsadm -L -n来查看。
17,我在配的时候,就发现按照以上配完以后,系统并不能给我满意的结果,最后还是我手动敲命令解决的。命令是:
ipvsadm -A -t 192.168.146.168:80 -s rr 添加一台虚拟服务器
ipvsadm -a -t 192.168.146.168:80 -r 172.20.0.65 -m 添加一台real server
ipvsadm -a -t 192.168.146.168:80 -r 172.20.0.62 -m 添加一台real server
ipvsadm -L -n
ipvsadm -A -t 192.168.146.168:5222 -s rr 添加一台虚拟服务器
ipvsadm -a -t 192.168.146.168:5222 -r 172.20.0.65 -m 添加一台real server
ipvsadm -a -t 192.168.146.168:5222 -r 172.20.0.62 -m 添加一台real server
ipvsadm -L -n
这时才完成了两台的添加。
18。测试:在clientPC上浏览器输入http://192.168.146.168,结果正常打开两个real server上某一台的网页。
在clientPC上,启动spark聊天软件,输入用户名密码,主机域名就写ip:192.168.146.168,然后正常登录聊天。
- Centos 5.7 上LVS+piranha负载均衡及双机热备配置方式
- Piranha配置lvs负载均衡
- LVS+keepalived+nginx实现双机热备负载均衡
- LVS+Keepalived实现负载均衡和双机热备
- LVS+KeepAlived搭建双机热备负载均衡
- LVS+keepalived实现双机热备和负载均衡
- LVS+Keepalived实现负载均衡和双机热备
- LVS+PIRANHA实现负载均衡
- 负载均衡和双机热备
- 负载均衡和双机热备
- 双机热备与负载均衡区别
- 双机热备与负载均衡区别
- 双机热备与负载均衡区别
- Nginx负载均衡+keepalived双机热备
- keepalived+nginx双机热备+负载均衡
- ] keepalived+nginx双机热备+负载均衡
- keepalived+nginx双机热备+负载均衡
- keepalived+nginx双机热备+负载均衡
- 读写属性文件
- 关于webservice
- 文档管理的安全性问题
- Creating Custom Exceptions in .NET
- 正则表达式学习指南(一)----入门简介
- Centos 5.7 上LVS+piranha负载均衡及双机热备配置方式
- spring 3.1 mvc 例子浅谈[aop事务](2)
- C++模拟XML解析
- [sql server]存储过程事务
- Jquery iframe 状态监听
- apache通过mod_proxy连接jetty
- 不确定性原理的前世今生 · 数学篇(一)
- js中常用字符串的检查(使用正则表达式)
- linq top


