Jquery Mobile设计Android通讯录
来源:互联网 发布:中影化妆培训 知乎 编辑:程序博客网 时间:2024/05/01 01:35
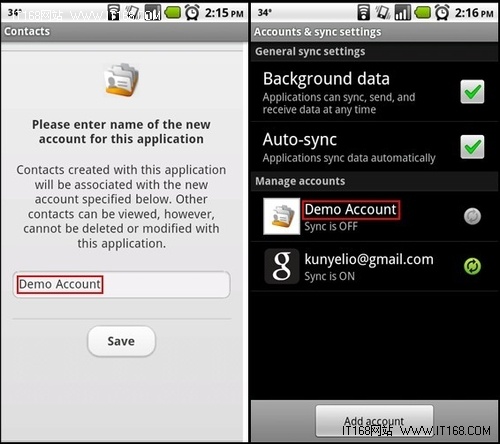
下面来看下如何新创建通讯录帐号。用户只需要输入自己的姓名,点保存按钮。其中该部分的代码是在ListPage.html中可以找到,代码如下:
<html>
...
<body>
<!-- Container Page -->
<div data-role="page" data-theme="c" id="containerPage">
...
<!-- Create Account -->
<div data-role="header" id="hdrAccount" data-nobackbtn="true" data-theme="c">
<h1>Create Account</h1>
</div>
<div data-role="content" id="contentAccount" data-theme="c">
<div align="CENTER"><img src="img/contacts-master-bgd.png"></div>
<div align="CENTER"><h4>Please enter name of the new account for this application</h4></div>
<div align="CENTER">Contacts created with this application will be associated with the new account specified below.
Other contacts can be viewed, however, cannot be deleted or modified with this application.</div>
<div align="CENTER" id="accountDiv" data-role="fieldcontain">
<input id="accountName" type="text" />
</div>
<div align="CENTER">
<a href="javascript:createAccount();return false;" data-role="button"
data-inline="true">Save</a>
</div>
...
</div>
<div data-role="footer" id="ftrAccount" data-theme="c"></div>
</div> <!-- Container Page Ends Here -->
...
<script>
...
function createAccount(){
showProgress();
contactSupport.createAccount($('#accountName').val(),'ListPage.html');
}
...
</script>
· 我们把创建帐号这个页面放在页面容器中,这个页面有自己的头部,内容content部分和页脚部分。
· 当点SAVE按钮时,将会调用Javasccript中的createAccount()方法。
· 在Javasccript中的createAccount()方法中,获得用户的输入的帐号名,即使用
'#accountName').val()获得其值,然后通过调用后端Android Java应用中的createAccount方法去保存帐户名。跟后端Android Java的交互,在本系列的第一篇教程中有提到,如果不大清楚,请查看第一篇教程。
下面看下后端的Android Java应用中的createAccount方法如何编写。
import android.accounts.AccountManager;
import android.accounts.Account;
...
public class ContactsActivity extends Activity {
...
private String accountType = null;
...
public void onCreate(Bundle savedInstanceState) {
...
accountType = "com.jquerymobile.demo.contact";
...
}
public void createAccount(String accountN, String displayPage){
if(accountN != null && !"".equals(accountN)){
accountName = accountN;
AccountManager.get(this).addAccountExplicitly(new Account(accountName,accountType), "dummyPassword", null);
}
loadPage(displayPage);
}
...
}
下面讲解下这段代码:
· 实际上帐号的创建是通过android.accounts.AccountManager类去创建的。Android2.0中加入了一个新的包android.accounts,该包主要包括了集中式的账户管理API,用以安全地存储和访问认证的令牌和密码,比如,我们的手机存在多个账户,每个账户下面都有不同的信息,甚至每个账户都可以与不同的服务器之间进行数据同步(例如,手机账户中的联系人可以是一个Gmail账户中的通讯录,可联网进行同步更新)。
这里首先通过AccountManager.get()获得了它的一个实例,接着调用其addAccountExplicitly方法,创建了一个新的帐号,和密码(这里的密码默认是dummyPassword),当帐号创建完后,将回调HTML页面,这里通过loadPage方法去加载回调HTML页面。
.为了能调用Android API中的创建帐号的功能,必须在
AndroidManifest.xml中进行如下设置,声明一个intent-filter:
<intent-filter>
<action android:name="android.accounts.AccountAuthenticator"/>
</intent-filter>
.除此之外,必须在meta-data中声明帐号验证器如下:
<meta-data
android:name="android.accounts.AccountAuthenticator"
android:resource="@xml/authenticator" />
Finally, the res/xml/authenticator.xml configuration file (which is value of the android:resourceattribute above) should have an element named account-authenticator where value ofandroid:accountType attribute is set to com.jquerymobile.demo.contact. Note that this is value of theaccountType in ContactsActivity. Summarizing the discussion, first look at the highlighted section inAndroidManifest.xml. 这里,用android:resource的值,指出了要在res/xml下配置一个验证配置文件authenticator.xml,文件如下:
<?xml version="1.0" encoding="utf-8"?>
<account-authenticator xmlns:android="http://schemas.android.com/apk/res/android"
android:accountType="com.jquerymobile.demo.contact"
android:icon="@drawable/icon"
android:smallIcon="@drawable/icon"
android:label="@string/app_name"
/>
其中的android:accountType指出了要验证的帐号的实体类为com.jquerymobile.demo.contact。最后我们综合看下修改后的AndroidManifest.xml如下:
<?xml version="1.0" encoding="utf-8"?>
<manifest xmlns:android="http://schemas.android.com/apk/res/android"
package="com.jquerymobile.demo.contact"
android:versionCode="1"
android:versionName="1.0">
<uses-permission android:name="android.permission.READ_CONTACTS"/>
<uses-permission android:name="android.permission.WRITE_CONTACTS"/>
<uses-permission android:name="android.permission.GET_ACCOUNTS" />
<uses-permission android:name="android.permission.AUTHENTICATE_ACCOUNTS" />
<application android:debuggable="true" android:icon="@drawable/icon"
android:label="@string/app_name">
<service
android:name=".authentication.AuthenticationService"
android:exported="true">
<intent-filter>
<action android:name="android.accounts.AccountAuthenticator" />
</intent-filter>
<meta-data android:name="android.accounts.AccountAuthenticator"
android:resource="@xml/authenticator" />
</service>
<activity android:name=".ContactsActivity"
android:configChanges="orientation|keyboardHidden"
android:label="@string/app_name">
<intent-filter>
<action android:name="android.intent.action.MAIN" />
<category android:name="android.intent.category.LAUNCHER" />
</intent-filter>
</activity>
</application>
</manifest>
在文件中用uses-permission分别设置了帐号的读写或校验的权限,并且声明了帐号的管理服务实现类为com.jquerymobile.demo.contact. authentication.AuthenticationService,在这个类中,将编写一些关于帐号管理操作的业务逻辑。这个帐号业务管理器被定义为Android中的一个服务,代码如下:
package com.jquerymobile.demo.contact.authentication;
import android.app.Service;
import android.content.Intent;
import android.os.IBinder;
public class AuthenticationService extends Service {
public IBinder onBind(Intent intent) {
return null;
}
}