進階AlertView運用 - 登入設計

来源:互联网 发布:广电网络电视没有信号 编辑:程序博客网 时间:2024/04/28 22:29


UIAlertViewDelegate, UIAlertView, CGRect, willPresentAlertView, CGRectMake
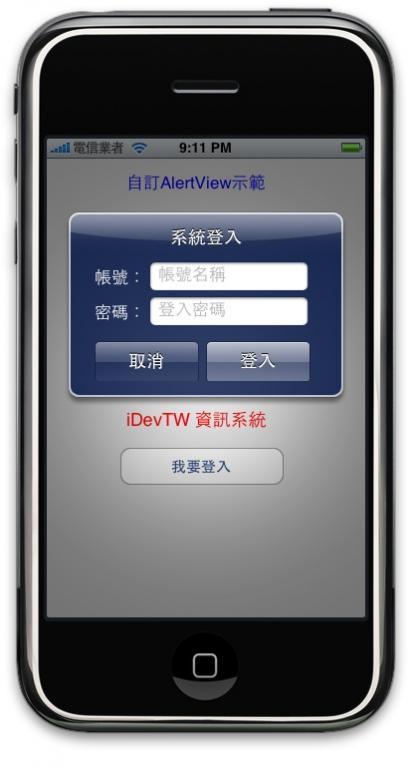
說明:示範如何利用AlertView來製作系統登入的介面

示範:
 

程式碼:
CustomAlertViewViewController.h
  1. #import <UIKit/UIKit.h>

  2. //記得加入UIAlertViewDelete
  3. @interface CustomAlertViewViewController :UIViewController<UIAlertViewDelegate> {
  4.     UIAlertView *myAlertView;
  5. }

  6. @property (nonatomic,retain) UIAlertView *myAlertView;

  7. -(IBAction) buttonPressed:(id)sender;

  8. @end
複製代碼
CustomAlertViewViewController.m
  1. -(IBAction) buttonPressed:(id)sender{
  2.     myAlertView=[[UIAlertView alloc] initWithTitle:@"系統登入" message:nil delegate:self cancelButtonTitle:@"取消" otherButtonTitles:@"登入",nil];
  3.     [myAlertView show];
  4.     [myAlertView release];
  5.     
  6. }

  7. - (void)willPresentAlertView:(UIAlertView *)alertView
  8. {
  9.         CGRect frame = alertView.frame;
  10.         if( alertView==myAlertView )
  11.         {
  12.                 frame.origin.y -= 120;
  13.                 frame.size.height += 80;
  14.                 alertView.frame = frame;
  15.                 for( UIView * view in alertView.subviews )
  16.                 {
  17.             //列舉alertView中所有的物件
  18.                         if( ![view isKindOfClass:[UILabel class]] )
  19.                         {
  20.             //若不UILable則另行處理
  21.                 if (view.tag==1)
  22.                 {
  23.                 //處理第一個按鈕,也就是 CancelButton
  24.                            CGRect btnFrame1 =CGRectMake(30, frame.size.height-65, 105, 40);
  25.                                 view.frame = btnFrame1;
  26.                
  27.                 } else if  (view.tag==2){
  28.                 //處理第二個按鈕,也就是otherButton    
  29.                     CGRect btnFrame2 =CGRectMake(142, frame.size.height-65, 105, 40);
  30.                     view.frame = btnFrame2;               
  31.                 }
  32.                         }
  33.                 }
  34.                 
  35.         //加入自訂的label及UITextFiled
  36.         UILabel *lblaccountName=[[UILabel alloc] initWithFrame:CGRectMake( 30, 50,60, 30 )];;
  37.         lblaccountName.text=@"帳號:";
  38.         lblaccountName.backgroundColor=[UIColor clearColor];
  39.         lblaccountName.textColor=[UIColor whiteColor];
  40.         
  41.         UITextField *accoutName = [[UITextField alloc] initWithFrame: CGRectMake( 85, 50,160, 30 )];   
  42.         accoutName.placeholder = @"帳號名稱";
  43.         accoutName.borderStyle=UITextBorderStyleRoundedRect;
  44.         
  45.         
  46.         UILabel *lblaccountPassword=[[UILabel alloc] initWithFrame:CGRectMake( 30, 85,60, 30 )];;
  47.         lblaccountPassword.text=@"密碼:";
  48.         lblaccountPassword.backgroundColor=[UIColor clearColor];
  49.         lblaccountPassword.textColor=[UIColor whiteColor];
  50.         
  51.         UITextField *accoutPassword = [[UITextField alloc] initWithFrame: CGRectMake( 85, 85,160, 30 )];   
  52.         accoutPassword.placeholder = @"登入密碼";
  53.         accoutPassword.borderStyle=UITextBorderStyleRoundedRect;
  54.         //輸入的資料以星號顯示(密碼資料)
  55.         accoutPassword.secureTextEntry=YES;
  56.         
  57.              [alertView addSubview:lblaccountName];
  58.                 [alertView addSubview:accoutName];         
  59.         [alertView addSubview:lblaccountPassword];
  60.                 [alertView addSubview:accoutPassword];
  61.         }
  62. }

  63. - (void)dealloc {
  64.     [myAlertView release];
  65.     [super dealloc];
  66. }
複製代碼
原创粉丝点击