Build Cloud Storage: S3 APIs on OpenStack Swift
来源:互联网 发布:matlab接口与编程 编辑:程序博客网 时间:2024/05/23 19:17
Build Cloud Storage: S3 APIs on OpenStack Swift
http://www.buildcloudstorage.com/2011/11/s3-apis-on-openstack-swift.html
DISCLAIMER: The views expressed here are my own and don't necessarily represent my employer Emulex's positions, strategies or opinions.
In the last blog http://bit.ly/u5PqEx, I described how I installed a 6 node Swift cluster on a set of EC2 machines. I mentioned that Swift is the only production-ready open-source software available to build your own S3 like cloud storage (there are other alternative technologies that merit observation such as CEPH to see how they mature). So it is only logical that we try putting S3 APIs on top of the Swift cluster. The reason I am such a big fan of S3 APIs is that the API is a de-facto standard for cloud storage. Numerous applications utilize the S3 API and creating a storage system that exposes this API provides instant interoperability with those applications.
Fortunately, the Diablo version of OpenStack Swift comes with optional S3 APIs that can be enabled. Let's enable and then test-drive the S3 APIs.
Read also: http://docs.openstack.org/diablo/openstack-object-storage/admin/content/configuring-openstack-object-storage-with-s3_api.html
Server Operations
1. Log into the proxy server. Modify proxy-server.conf file in /etc/swift as follows. Changes in bold:
[pipeline:main]pipeline = healthcheck cache swift3 swauth proxy-server
[filter:swift3]
use = egg:swift#swift3
use = egg:swift#swift3
2. Restart the proxy server:
sudo swift-init proxy restart
That's it, we're done on the server side!
Access Swift with S3 APIs from Windows
3. Now we go back to our client machine. Let's first try accessing our S3 cloud storage cluster from Windows. Fire up CyberDuck and use this step (substitute with your hostname) to access:
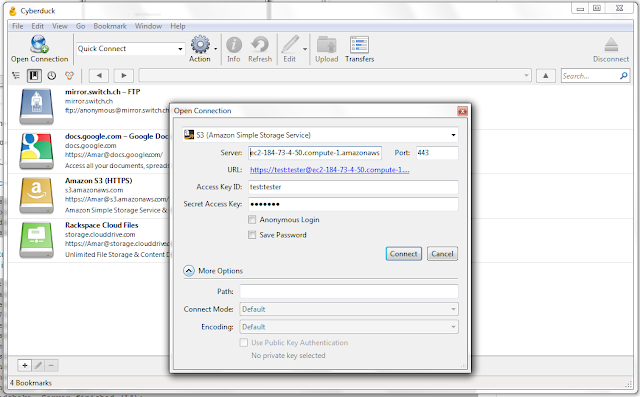 CyberDuck Accessing S3 APIs on top of SwiftAccess Swift with S3 APIs from Linux
4. Now let's try accessing our S3 cluster from a Linux machine. First let's try using s3curl. First install S3curl from http://aws.amazon.com/code/128 onto your Linux client machine.
5. Modify s3curl.pl with your hostname similar to follows:
my @endpoints = ( 'ec2-184-73-4-50.compute-1.amazonaws.com' );
6. Let's access our storage system using s3curl. Substitute with your hostname:
# Get a listing of buckets
./s3curl.pl --id 'test:tester' --key 'testing' --get -- -k -v -s https://ec2-184-73-4-50.compute-1.amazonaws.com
# Get a listing of myfiles bucket
/s3curl.pl --id 'test:tester' --key 'testing' --get -- -k -v -s https://ec2-184-73-4-50.compute-1.amazonaws.com/myfiles
# Get an object from the myfiles bucket
# Add an object in the new bucket
./s3curl.pl --id 'test:tester' --key 'testing' --put ./s3curl.pl -- -k -v -s https://ec2-184-73-4-50.compute-1.amazonaws.com/AnotherBucket/s3curl.pl
# Get the object back with a new name
./s3curl.pl --id 'test:tester' --key 'testing' --get -- -k -v -s https://ec2-184-73-4-50.compute-1.amazonaws.com/AnotherBucket/s3curl.pl >s3curl.pl.copy
# Delete the newly created object
./s3curl.pl --id 'test:tester' --key 'testing' --del -- -k -v -s https://ec2-184-73-4-50.compute-1.amazonaws.com/AnotherBucket/s3curl.pl
# Check to see that the object is indeed deleted
./s3curl.pl --id 'test:tester' --key 'testing' --get -- -k -v -s https://ec2-184-73-4-50.compute-1.amazonaws.com/AnotherBucket
# Delete the newly created bucket
./s3curl.pl --id 'test:tester' --key 'testing' --get -- -k -v -s https://ec2-184-73-4-50.compute-1.amazonaws.com
# Get a listing of myfiles bucket
/s3curl.pl --id 'test:tester' --key 'testing' --get -- -k -v -s https://ec2-184-73-4-50.compute-1.amazonaws.com/myfiles
# Get an object from the myfiles bucket
./s3curl.pl --id 'test:tester' --key 'testing' --get -- -k -v -s https://ec2-184-73-4-50.compute-1.amazonaws.com/myfiles/anotherexample.txt
# Create a new bucket
# Create a new bucket
./s3curl.pl --id 'test:tester' --key 'testing' --put /dev/null -- -k -v -s https://ec2-184-73-4-50.compute-1.amazonaws.com/AnotherBucket
# Add an object in the new bucket
./s3curl.pl --id 'test:tester' --key 'testing' --put ./s3curl.pl -- -k -v -s https://ec2-184-73-4-50.compute-1.amazonaws.com/AnotherBucket/s3curl.pl
# Get the object back with a new name
./s3curl.pl --id 'test:tester' --key 'testing' --get -- -k -v -s https://ec2-184-73-4-50.compute-1.amazonaws.com/AnotherBucket/s3curl.pl >s3curl.pl.copy
# Delete the newly created object
./s3curl.pl --id 'test:tester' --key 'testing' --del -- -k -v -s https://ec2-184-73-4-50.compute-1.amazonaws.com/AnotherBucket/s3curl.pl
# Check to see that the object is indeed deleted
./s3curl.pl --id 'test:tester' --key 'testing' --get -- -k -v -s https://ec2-184-73-4-50.compute-1.amazonaws.com/AnotherBucket
# Delete the newly created bucket
./s3curl.pl --id 'test:tester' --key 'testing' --del -- -k -v -s https://ec2-184-73-4-50.compute-1.amazonaws.com/AnotherBucket
# Check to see that the bucket is indeed deleted
# Check to see that the bucket is indeed deleted
./s3curl.pl --id 'test:tester' --key 'testing' --get -- -k -v -s https://ec2-184-73-4-50.compute-1.amazonaws.com
8. Let's try it out. Replace the hostname with your hostname:
akapadia@ubuntu:~/boto-2.1.0$ python
# Create a new bucket - backup
# Create an object in the new bucket backup
from boto.s3.connection import S3Connection
from boto.s3.key import Key
import sys
from boto.s3.connection import OrdinaryCallingFormat
from boto.s3.prefix import Prefix
conn = S3Connection(aws_access_key_id='test:tester',aws_secret_access_key='testing',host='ec2-184-73-4-50.compute-1.amazonaws.com',calling_format=OrdinaryCallingFormat())
bucket = conn.get_bucket('myfiles')
# List all buckets
rs = conn.get_all_buckets()
for b in rs:
print b.name
rs = conn.get_all_buckets()
for b in rs:
print b.name
# Get a listing of myfiles bucket
bucket = conn.get_bucket('myfiles')
rs = bucket.list()
for key in rs:
print key.name
bucket = conn.get_bucket('myfiles')
rs = bucket.list()
for key in rs:
print key.name
# Create a new bucket - backup
bucket = conn.create_bucket('backup')
# List all buckets to make sure it got created
rs = conn.get_all_buckets()
for b in rs:
print b.name
print b.name
# Create an object in the new bucket backup
k = Key(bucket)
k.key = 'tobject'
k.set_contents_from_string('This is a test of S3')
# Get the object back
b = conn.get_bucket('backup')
k = Key(b)
k.key = 'tobject'
k.get_contents_as_string()
b = conn.get_bucket('backup')
k = Key(b)
k.key = 'tobject'
k.get_contents_as_string()
That's all for now. Pretty amazing, with Swift we can now build our own Amazon S3 like Storage!
- Build Cloud Storage: S3 APIs on OpenStack Swift
- Build Cloud Storage: Installing an OpenStack Swift cluster on EC2
- Openstack swift支持s3 api
- Implementing OpenStack Cinder with NetApp Storage on the Rackspace Private Cloud Software
- OpenStack Object Storage(Swift)
- openstack Storage 组件 Swift 和 Cinder
- OpenStack: Storage 组件 Swift 和 Cinder(转)
- 发现 OpenStack: Storage 组件 Swift 和 Cinder
- keystonelight with swift3 the s3 middleware for OpenStack Swift.
- openstack on centos 7.1(block storage)
- openstack on centos 7.1(Object Storage)
- swift+s3
- Deploying Cloud Foundry on OpenStack using BOSH
- cloud storage
- Install Seafile Secure Cloud Storage on CentOS 7
- OpenStack Object Storage(Swift)架构、原理及特性
- OpenStack Storage
- Amazon Simple Storage Service(S3)
- Ext (给自己看的)
- android UI进阶之用gallery实现可滑动的Tab
- (译)如何使用cocos2d制作一个滑动图片游戏(Slide Image Game):第一部分
- 如何部署包含水晶报表的程序(参考)
- jsp运行原理
- Build Cloud Storage: S3 APIs on OpenStack Swift
- android UI进阶之实现listview的分页加载
- 程序设计与数据库结构的粒度
- 乐观心态,人生路上的冠军
- STL基本容器: string、vector、list、deque、set、map
- spring mvc 基础笔记
- SL4A中android可以调用的方法(1)
- 前端必备:jQuery 1.7.1API手册
- 当Shell遇上了NodeJS