spring+hibernate+freemarker+jQuery 登录注册例子
来源:互联网 发布:php基础考试题 编辑:程序博客网 时间:2024/04/29 05:51
学习一个新内容时,会在往上找一些例子,但是,有些例子好像不完整,有的sql建表语句没有,有时候没有jar包,我感觉,对于初学者有很大障碍,所以,我先把项目的目录结构放出来,然后放上sql建表语句,最后放上源码:
目录结构:
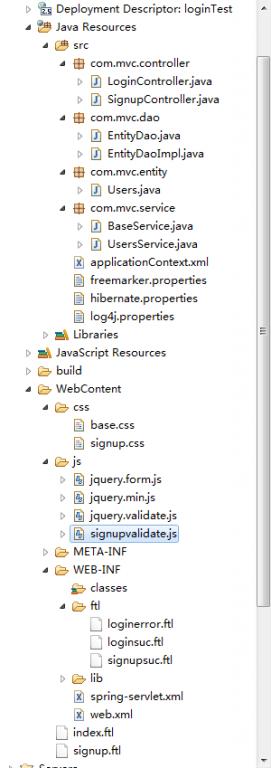
2.建表语句:
mysql数据库,test库:
create table 'users'(id int(10) unsigned not null auto_increment,name varchar(45) not null,psw varchar(45) not null,email varchar(32) default null,primary key(id))
spring MVC的思想以及注解功能,可以扮演struts的角色完成业务逻辑的处理,同时spring提供了freemarker模板和hibernate的接口,所以,freemarker作前台展示,hibernate做后台数据库处理.jQuery实现注册的验证,例子中还用jQuery的ajax来验证登录的用户名和密码是否正确,在本页显示返回的信息.
一.首先是在web.xml中引入spring的配置:
<?xml version="1.0" encoding="UTF-8"?><web-app xmlns:xsi="http://www.w3.org/2001/XMLSchema-instance" xmlns="http://java.sun.com/xml/ns/javaee" xmlns:web="http://java.sun.com/xml/ns/javaee/web-app_2_5.xsd" xsi:schemaLocation="http://java.sun.com/xml/ns/javaee http://java.sun.com/xml/ns/javaee/web-app_2_5.xsd" id="WebApp_ID" version="2.5"> <display-name>loginTest</display-name> <context-param> <param-name>contextConfigLocation</param-name> <param-value>classpath:applicationContext*.xml</param-value> </context-param> <listener> <listener-class>org.springframework.web.context.ContextLoaderListener</listener-class> </listener> <servlet> <servlet-name>spring</servlet-name> <servlet-class>org.springframework.web.servlet.DispatcherServlet</servlet-class> <load-on-startup>1</load-on-startup> </servlet> <servlet-mapping> <servlet-name>spring</servlet-name> <url-pattern>*.do</url-pattern> </servlet-mapping> <welcome-file-list> <welcome-file>index.ftl</welcome-file> </welcome-file-list></web-app>
二.spring-servlet.xml配置,在这里配置freemarker:
<?xml version="1.0" encoding="UTF-8"?> <beans xmlns="http://www.springframework.org/schema/beans" xmlns:xsi="http://www.w3.org/2001/XMLSchema-instance" xmlns:p="http://www.springframework.org/schema/p" xmlns:context="http://www.springframework.org/schema/context" xsi:schemaLocation="http://www.springframework.org/schema/beans http://www.springframework.org/schema/beans/spring-beans-3.0.xsd http://www.springframework.org/schema/aop http://www.springframework.org/schema/aop/spring-aop-3.0.xsd http://www.springframework.org/schema/tx http://www.springframework.org/schema/tx/spring-tx-3.0.xsd http://www.springframework.org/schema/context http://www.springframework.org/schema/context/spring-context-3.0.xsd"> <context:annotation-config /> <!-- 把标记了@Controller注解的类转换为bean --> <context:component-scan base-package="com.mvc.controller" /> <!-- 启动Spring MVC的注解功能,完成请求和注解POJO的映射 --> <bean class="org.springframework.web.servlet.mvc.annotation.AnnotationMethodHandlerAdapter" /> <!-- 对模型视图名称的解析,即在模型视图名称添加前后缀 --> <!-- 设置freeMarker的配置文件路径 --><bean id="freemarkerConfiguration" class="org.springframework.beans.factory.config.PropertiesFactoryBean"><property name="location" value="classpath:freemarker.properties"/></bean><!-- 配置freeMarker的模板路径 --><bean id="freemarkerConfig" class="org.springframework.web.servlet.view.freemarker.FreeMarkerConfigurer"><!--property name="freemarkerSettings" ref="freemarkerConfiguration"/--><property name="templateLoaderPath"><value>/WEB-INF/ftl/</value></property><property name="freemarkerVariables"><map><entry key="xml_escape" value-ref="fmXmlEscape" /></map></property></bean><bean id="fmXmlEscape" class="freemarker.template.utility.XmlEscape"/><!-- 配置freeMarker视图解析器 --><!-- FreeMarker视图解析 如返回student。。在这里配置后缀名ftl和视图解析器。。--> <bean id="viewResolver" class="org.springframework.web.servlet.view.freemarker.FreeMarkerViewResolver"> <property name="viewClass" value="org.springframework.web.servlet.view.freemarker.FreeMarkerView"></property> <property name="suffix" value=".ftl" /> <property name="contentType" value="text/html;charset=utf-8" /> <property name="exposeRequestAttributes" value="true" /> <property name="exposeSessionAttributes" value="true" /> <property name="exposeSpringMacroHelpers" value="true" /> </bean> <!-- fm --> </beans>三.applocationContext.xml配置,配置hibernate:
<?xml version="1.0" encoding="UTF-8"?><beans xmlns="http://www.springframework.org/schema/beans"xmlns:aop="http://www.springframework.org/schema/aop" xmlns:context="http://www.springframework.org/schema/context"xmlns:p="http://www.springframework.org/schema/p" xmlns:tx="http://www.springframework.org/schema/tx"xmlns:xsi="http://www.w3.org/2001/XMLSchema-instance"xsi:schemaLocation=" http://www.springframework.org/schema/beans http://www.springframework.org/schema/beans/spring-beans-3.0.xsdhttp://www.springframework.org/schema/context http://www.springframework.org/schema/context/spring-context-3.0.xsdhttp://www.springframework.org/schema/aop http://www.springframework.org/schema/aop/spring-aop-3.0.xsdhttp://www.springframework.org/schema/tx http://www.springframework.org/schema/tx/spring-tx-3.0.xsd"><context:annotation-config /><context:component-scan base-package="com.mvc" /> <!-- 自动扫描所有注解该路径 --><context:property-placeholder location="classpath:/hibernate.properties" /><bean id="sessionFactory"class="org.springframework.orm.hibernate3.annotation.AnnotationSessionFactoryBean"><property name="dataSource" ref="dataSource" /><property name="hibernateProperties"><props><prop key="hibernate.dialect">${dataSource.dialect}</prop><prop key="hibernate.hbm2ddl.auto">${dataSource.hbm2ddl.auto}</prop><prop key="hibernate.hbm2ddl.auto">update</prop></props></property><property name="packagesToScan"><list><value>com.mvc.entity</value><!-- 扫描实体类,也就是平时所说的model --></list> </property></bean><bean id="transactionManager"class="org.springframework.orm.hibernate3.HibernateTransactionManager"><property name="sessionFactory" ref="sessionFactory" /><property name="dataSource" ref="dataSource" /></bean><bean id="dataSource"class="org.springframework.jdbc.datasource.DriverManagerDataSource"><property name="driverClassName" value="${dataSource.driverClassName}" /><property name="url" value="${dataSource.url}" /><property name="username" value="${dataSource.username}" /><property name="password" value="${dataSource.password}" /></bean><!-- Dao的实现 --><bean id="entityDao" class="com.mvc.dao.EntityDaoImpl"> <property name="sessionFactory" ref="sessionFactory" /></bean><tx:annotation-driven transaction-manager="transactionManager" /><tx:annotation-driven mode="aspectj"/> <aop:aspectj-autoproxy/> </beans>四.以上的配置都读取两个properties文件,一个是hibernate的,一个是freemarker的:
hibernate.properties:
dataSource.password=111111dataSource.username=rootdataSource.databaseName=testdataSource.driverClassName=com.mysql.jdbc.DriverdataSource.dialect=org.hibernate.dialect.MySQL5DialectdataSource.serverName=localhost:3306dataSource.url=jdbc:mysql://localhost:3306/testdataSource.properties=user=${dataSource.username};databaseName=${dataSource.databaseName};serverName=${dataSource.serverName};password=${dataSource.password}dataSource.hbm2ddl.auto=updatefreemarker.properties:
tag_syntax=auto_detecttemplate_update_delay=2default_encoding=UTF-8output_encoding=UTF-8locale=zh_CNdate_format=yyyy-MM-ddtime_format=HH:mm:ssdatetime_format=yyyy-MM-dd HH:mm:ss
五.到现在为止,各个框架应该都配置好了.就剩下jquery,下载下来放到js文件夹.例子中还用到了验证,所以,还需要jquery.validate.js文件.
六.对于逻辑处理和数据处理部分,将工具性的方法放到BaseService.java中,这样,每个不同的应用就可以直接用里面的方法,传不同参数就可以实现.
BaseService.java:
package com.mvc.service;import java.util.List;import org.springframework.beans.factory.annotation.Autowired;import org.springframework.stereotype.Service;import org.springframework.transaction.annotation.Transactional;import com.mvc.dao.EntityDao;@Servicepublic class BaseService {@Autowiredprivate EntityDao entityDao;@Transactionalpublic List<Object> getAllList(String tableSimpleName){StringBuffer sff = new StringBuffer();sff.append("select a from ").append(tableSimpleName).append(" a ");List<Object> list = entityDao.createQuery(sff.toString());return list;}/** * find the list of entity by where conditions * @param tableSimpleName * @param columns * @param values * @return list */public List<Object> findByWhere(String tableSimpleName,String[] columns,String[] values){StringBuffer sb = new StringBuffer();sb.append("select a from ").append(tableSimpleName).append( " a where ");if(columns.length==values.length){for(int i = 0; i < columns.length; i++){sb.append("a.").append(columns[i]).append("='").append(values[i]).append("'");if(i < columns.length-1){sb.append(" and ");}}List<Object> list = entityDao.createQuery(sb.toString());return list.size()>0?list:null;}else{return null;}}/** * save * @param obj */public void save(Object obj){entityDao.save(obj);}/** * delete * @param obj */public void delete(Object obj){entityDao.delete(obj);}/** * update * @param obj */public void update(Object obj){entityDao.update(obj);}}UserService.java:
package com.mvc.service;import java.util.List;import org.springframework.beans.factory.annotation.Autowired;import org.springframework.stereotype.Service;import org.springframework.transaction.annotation.Transactional;@Servicepublic class UsersService extends BaseService {@Autowired@Transactionalpublic List<Object> getAllList(){List<Object> list = getAllList("com.mvc.entity.Users");return list;}public boolean isExist(String username, String password){List<Object> list = findByWhere("com.mvc.entity.Users", new String[]{"user","psw"}, new String[] {username,password});return list!=null?true:false;}}六.对于controller,如果用过struts的应该不难理解:
LoginController.java:
package com.mvc.controller;import javax.servlet.http.HttpServletRequest;import org.apache.commons.logging.Log;import org.apache.commons.logging.LogFactory;import org.springframework.beans.factory.annotation.Autowired;import org.springframework.stereotype.Controller;import org.springframework.ui.Model;import org.springframework.ui.ModelMap;import org.springframework.web.bind.annotation.RequestMapping;import org.springframework.web.bind.annotation.RequestParam;import org.springframework.web.bind.annotation.ResponseBody;import com.mvc.service.UsersService;@Controllerpublic class LoginController {protected final transient Log log = LogFactory.getLog(LoginController.class);@Autowiredprivate UsersService usersService;public LoginController(){}@RequestMapping("/login.do")public String load(HttpServletRequest request,ModelMap modelMap){String username = request.getParameter("username");String password = request.getParameter("password");boolean isExist = usersService.isExist(username, password);if(isExist){modelMap.addAttribute("username", username);return "loginsuc";}return "loginerror";}//jQuery ajax check up/@RequestMapping("/check.do")public @ResponseBody String check( @RequestParam(value = "username", required = true) String username, @RequestParam(value = "password", required = true) String password, Model model) { // boolean isExist = usersService.isExist(username, password);String info = new String();if(isExist){info = "yes";}else{info = "no";} return info; }}Users.java
package com.mvc.entity;import java.io.Serializable;import javax.persistence.Basic;import javax.persistence.Column;import javax.persistence.Entity;import javax.persistence.GeneratedValue;import javax.persistence.GenerationType;import javax.persistence.Id;import javax.persistence.Table;@Entity@Table(name = "users")public class Users implements Serializable {private static final long serialVersionUID = 1L;@Id@Basic(optional = false)@GeneratedValue(strategy = GenerationType.IDENTITY)@Column(name = "id", nullable = false)private Integer id;@Column(name = "name")private String user;@Column(name = "psw")private String psw;@Column(name = "email")private String email;public Integer getId() {return id;}public void setId(Integer id) {this.id = id;}public String getUser() {return user;}public void setUser(String user) {this.user = user;}public String getPsw() {return psw;}public void setPsw(String psw) {this.psw = psw;}public String getEmail() {return email;}public void setEmail(String email) {this.email = email;}}八.前台index.ftl用到了ajax方法来验证用户米和密码是否正确:
index.ftl:
<!DOCTYPE html PUBLIC "-//W3C//DTD XHTML 1.0 Transitional//EN" "http://www.w3.org/TR/xhtml1/DTD/xhtml1-transitional.dtd"><html xmlns="http://www.w3.org/1999/xhtml"><head><meta http-equiv="Content-Type" content="text/html; charset=utf-8" /><html><head> <title>login page</title></head><script type="text/javascript" src="js/jquery.min.js"></script> <script type="text/javascript"> $(document).ready(function check () { //判断用户名是否为空 $("#username").blur("click", function () {// var username = $("#username").val(); //获取用户名文本框的值 if (username == null || username == "") {//验证是否为空 $("#msg1").html("Username cannot be empty"); } else { $("#msg1").html(""); } }); //判断密码是否为空 $("#password").blur("click", function () {//绑定文本框失去焦点事件 var password = $("#password").val(); //获取用户名文本框的值 if (password == null || password == "") {//验证是否为空 $("#msg2").html("Password cannot be empty"); } else { $("#msg2").html(""); } }); }); function check() { $(function() { $.post("check.do", { username: $("#username").val(), password: $("#password").val() }, function(data){ $("#info").replaceWith('<div id="info">'+ data + '</div>'); }); });}</script> <form method="post"> <div id="info"></div> <table style="width: 700px; border: 1px #346086 solid;"> <tr> <td style="height: 30px; width: 170px;"> </td> <td> </td> </tr> <tr> <td style="text-align: right; height: 30px;"><label style="color: #ff0000"> * </label>username:</td> <td><input type="text" name="username" id="username" style="width: 200px;" /></td> <td width="400" id="msg1" style="color: #ff0000"></td> </tr> <tr> <td style="text-align: right; height: 30px;"><label style="color: #ff0000"> * </label>password:</td> <td><input type="text" name="password" id="password" style="width: 200px;" /></td> <td width="400" id="msg2" style="color: #ff0000"></td> </tr> <tr> <td> </td> <td><input type="button" id="button" value="check" onclick="check()" /></td> <td ></td> </tr> <tr> <td style="height: 30px;"> </td> <td> </td> </tr> </table> </form> <script type="text/javascript"> </script> </body></html>九.signupvalidate.js是注册时候的表单验证:
$(document).ready(function() {// validate signup form on keyup and submit$("#signupForm").validate({rules: {username: {required: true,minlength: 2},password: {required: true,minlength: 5},confirm_password: {required: true,minlength: 5,equalTo: "#password"},email: {required: true,email: true},messages: {username: {required: "Please provide a password",minlength: "Your password must be at least 2 characters long"},password: {required: "Please provide a password",minlength: "Your password must be at least 5 characters long"},confirm_password: {required: "Please provide a password",minlength: "Your password must be at least 5 characters long",equalTo: "Please enter the same password as above"},email: "Please enter a valid email address",}}});});总的来说就是这样的.
源码放上来,我是在eclipse中测试的.
LoginTest.rar
- spring+hibernate+freemarker+jQuery 登录注册例子
- Hibernate实现登录注册小例子
- 登录和注册(struts2+hibernate+spring)
- Spring shiro + bootstrap + jquery.validate 登录、注册
- Struts2,Spring,jquery实现的登录例子
- spring hibernate struts2 SSH用户注册小例子
- 用SPRING+STRUTS+HIBERNATE实现注册与登录
- Spring mvc+hibernate+freemarker(实战)
- Spring mvc+hibernate+freemarker(实战)
- Spring mvc+hibernate+freemarker(实战)
- Spring mvc+hibernate+freemarker(实战)
- 一步步搭建Spring+Spring MVC+Hibernate系统框架+登录与注册功能
- freemarker注册全局spring bean变量
- jquery 登录/注册弹出层
- jQuery实现登录注册验证
- 登录注册常用JQuery逻辑
- hibernate+spring+struts例子
- struts&hibernate&spring例子
- SSH1环境搭建及示例(二)
- The Details About Syntax of gcc as and ld
- eclipse窗口显示配置
- 10 条建议让你创建更好的 jQuery 插件
- PING 丢包 故障解决思路
- spring+hibernate+freemarker+jQuery 登录注册例子
- udf手动导出提权
- sql server 备份清除历史文件作业
- 从一个微型例子看“C/C++的内存分配机制”和“数组变量名与指针变量名”
- windows下安装多个mysql
- postgresql 查找某年某月的所有日子的资料
- 你会Flex吗?
- asp.net-mvc验证码 asp.net-mvc c#验证码
- 正则"\b" 查找字符边距关于连字符的问题