如何用SplitViewController控件
来源:互联网 发布:3d max mac中文版下载 编辑:程序博客网 时间:2024/04/28 07:16
如何用SplitViewController控件
在苹果公司推出iPad以后,基于iPad的大画面,同时提供了在iPhone不支持的多个新的ViewController,其中一个就是SplitViewController。
但是从苹果公司提供资料以及网上的各种信息来看,似乎无法在TabBar中使用SplitViewController,在IB中也只能设置Tab为ViewController或者TableViewController。
网上有很多人讨论这个课题,本人也在开发一个软件时希望某一个Tab中能使用SplitViewController,经过多方研究,终于找到在Tab中实现SplitViewController的方法,在网上介绍后已被国外的开发者采用,请看一个德国开发者的作品http://itunes.apple.com/de/app/jugendsprache-worterbuch-der/id39920639mt=8,现将此法介绍给大家共享。
根据使用者的爱好和编程熟练度可以分成两种做法,其一是以IB为主编程为辅的方法,其二是完全编程方法,下面将介绍前一种方法。
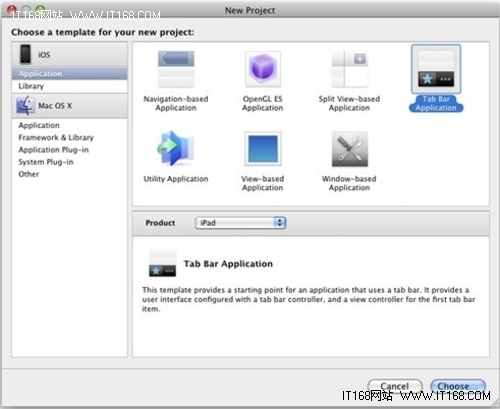
第一步:使用xCode的SplitView模版生成一个新项目并编译保存。
第二步:再用xCode的TabBar模版作为你的新项目并编译保存,假设项目名为SplitInTabBarAppDelegate
第三步:在第二步的项目中加一个新Tab
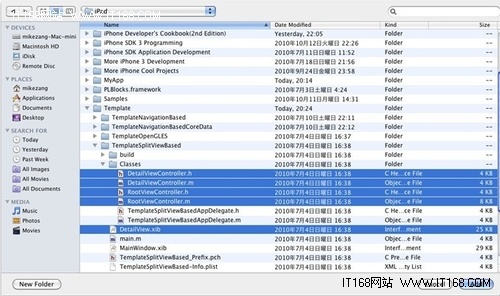
第四步:把第一步生成的项目中的RootViewController.*, DetailViewController.*等文件复制到第二步的项目中
第五步:在SplitInTabBarAppDelegate.h中加入下面的代码:
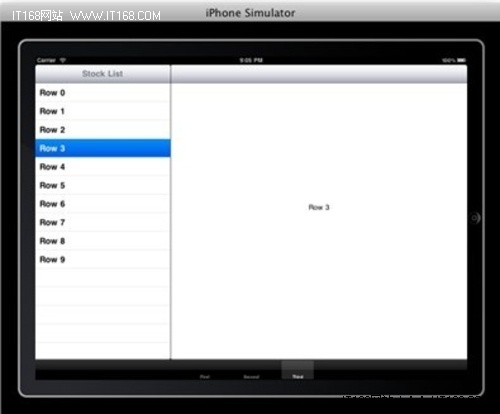
第七步:现在编译第二步的项目就会看到下面的结果。
但是从苹果公司提供资料以及网上的各种信息来看,似乎无法在TabBar中使用SplitViewController,在IB中也只能设置Tab为ViewController或者TableViewController。
网上有很多人讨论这个课题,本人也在开发一个软件时希望某一个Tab中能使用SplitViewController,经过多方研究,终于找到在Tab中实现SplitViewController的方法,在网上介绍后已被国外的开发者采用,请看一个德国开发者的作品http://itunes.apple.com/de/app/jugendsprache-worterbuch-der/id39920639mt=8,现将此法介绍给大家共享。
根据使用者的爱好和编程熟练度可以分成两种做法,其一是以IB为主编程为辅的方法,其二是完全编程方法,下面将介绍前一种方法。
第一步:使用xCode的SplitView模版生成一个新项目并编译保存。

第二步:再用xCode的TabBar模版作为你的新项目并编译保存,假设项目名为SplitInTabBarAppDelegate
第三步:在第二步的项目中加一个新Tab

第四步:把第一步生成的项目中的RootViewController.*, DetailViewController.*等文件复制到第二步的项目中
第五步:在SplitInTabBarAppDelegate.h中加入下面的代码:
#import
@class RootViewController;
@class DetailViewController;
@interface SplitInTabBarAppDelegate : NSObject {
UIWindow *window;
UITabBarController *tabBarController;
UISplitViewController *splitViewController;
RootViewController *rootViewController;
DetailViewController *detailViewController;
}
@property (nonatomic, retain) IBOutlet UIWindow *window;
@property (nonatomic, retain) IBOutlet UITabBarController *tabBarController;
@property (nonatomic, retain) IBOutlet UISplitViewController *splitViewController;
@property (nonatomic, retain) IBOutlet RootViewController *rootViewController;
@property (nonatomic, retain) IBOutlet DetailViewController *detailViewController;
@end
第六步:在SplitInTabBarAppDelegate.m中加入下面的代码
#import "SplitInTabBarAppDelegate.h"
#import "RootViewController.h"
#import "DetailViewController.h"
@implementation SplitInTabBarAppDelegate
@synthesize window;
@synthesize tabBarController;
@synthesize splitViewController;
@synthesize rootViewController;
@synthesize detailViewController;
#pragma mark -
#pragma mark Application lifecycle
-(void) makeSplitViewController {
NSMutableArray *controllers = [NSMutableArray arrayWithArray:tabBarController.viewControllers];
int index = 0;
for (UIViewController *controller in tabBarController.viewControllers) {
if (index == 2) {
detailViewController = [[DetailViewController alloc] initWithNibName:@"DetailView" bundle:nil];
rootViewController = [[RootViewController alloc] initWithStyle:UITableViewStylePlain];
rootViewController.detailViewController = detailViewController;
rootViewController.navigationItem.title = @"List";
UINavigationController *nav = [[[UINavigationController alloc] initWithRootViewController:rootViewController] autorelease];
splitViewController = [[UISplitViewController alloc] init];
splitViewController.tabBarItem = controller.tabBarItem;
splitViewController.viewControllers = [NSArray arrayWithObjects:nav, detailViewController, nil];
splitViewController.delegate = detailViewController;
[controllers replaceObjectAtIndex:index withObject:splitViewController];
}
index++;
}
tabBarController.viewControllers = controllers;
}
- (BOOL)application:(UIApplication *)application didFinishLaunchingWithOptions:(NSDictionary*)launchOptions {
// Override point for customization after app launch.
[self makeSplitViewController];
// Add the tab bar controller's current view as a subview of the window
[window addSubview:tabBarController.view];
[window makeKeyAndVisible];
return YES;
}
- (void)splitViewController: (UISplitViewController*)svc willHideViewController:(UIViewController*)aViewController withBarButtonItem:(UIBarButtonItem*)barButtonItem forPopoverController: (UIPopoverController*)pc {
UIBarButtonItem *first = nil;
if (toolbar.items.count > 0) {
first = [toolbar.items objectAtIndex:0];
}
if (![first.title isEqual:barButtonItem.title]) {
barButtonItem.title = @"Root List";
NSMutableArray *items = [[toolbar items] mutableCopy];
[items insertObject:barButtonItem atIndex:0];
[toolbar setItems:items animated:YES];
[items release];
self.popoverController = pc;
}
}
第七步:现在编译第二步的项目就会看到下面的结果。

- 如何用SplitViewController控件
- 如何用代码动态添加控件
- 如何用VB实现半透明控件
- 如何用wgui控件创建菜单
- 如何用VB写安全控件
- 如何用ATL创建ActiveX控件
- 学习如何用VS2010创建ocx控件
- 如何用js控制控件是否可用
- 如何用vc(atl)编写安全的控件
- 如何用Delphi编写自己的可视化控件
- 如何用VB写安全控件(从MSDN引用)
- 聊天主题:如何用C#定制个性化的界面控件
- 如何用Delphi编写自己的可视化控件
- 如何用Delphi编写自己的可视化控件
- 如何用服务器的image控件实现图片上传御览
- C++Builder如何用MSComm控件进行二进制方式通信?
- 如何用C#实现控件的自由拖动
- 如何用Delphi编写自己的可视化控件
- widget中使用动画效果
- C++笔试题
- CSS命名规范和CSS书写规范
- java连接mySQL数据库
- TOAD中查看执行计划(Explain Plan)
- 如何用SplitViewController控件
- 电子病历系统功能规范(试行)
- 汽车诊断简介
- java的读取方式
- 阿里软件资深架构师李战谈:开发者的人品问题
- Android模拟器学framework和driver之battery & backlight-----7. backlight in jni
- 软件项目开发流程(转)
- Android源码编译工具集
- 软件正在吞噬整个世界