android中九宫格布局的实现
来源:互联网 发布:建筑工程表格软件 编辑:程序博客网 时间:2024/04/29 12:41
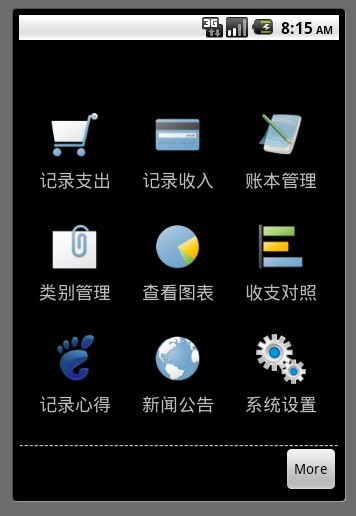
前段时间研究了下android中九宫格布局的实现。纵观现在的应用程序,九宫格是非常常见的一种布局方式。很多优秀的手机应用程序都采用了这一布局。下面就android中九宫格布局方式的实现和大家做一个简单的介绍。
首先是main.xml的布局方式如下:
- <?xml version="1.0" encoding="utf-8"?>
- <!--主界面的布局-->
- <RelativeLayout
- xmlns:android="http://schemas.android.com/apk/res/android"
- android:orientation="vertical"
- android:layout_width="fill_parent"
- android:layout_height="fill_parent"
- >
- <RelativeLayout
- android:id="@+id/MainActivityrlTwo"
- android:layout_width="fill_parent"
- android:layout_height="45dp"
- >
- </RelativeLayout>
- <GridView
- android:id="@+id/MainActivityGrid"
- android:layout_width="fill_parent"
- android:layout_height="wrap_content"
- android:numColumns="3"
- android:columnWidth="50dp"
- android:layout_below="@+id/MainActivityrlTwo"
- android:layout_marginTop="5dp"
- />
- <RelativeLayout
- android:id="@+id/MainActivityrlThree"
- android:layout_width="fill_parent"
- android:layout_height="60dp"
- android:layout_alignParentBottom="true"
- >
- <TextView
- android:id="@+id/tvLineBottom"
- android:layout_width="fill_parent"
- android:layout_height="wrap_content"
- android:text="@string/line_default"
- />
- <Button
- android:id="@+id/btmore_MainActivity"
- android:layout_alignParentRight="true"
- android:layout_alignParentBottom="true"
- android:layout_width="wrap_content"
- android:layout_height="wrap_content"
- android:text="More"
- />
- </RelativeLayout>
- </RelativeLayout>
--------------------------------------------------------------------------------------------------
其次就是每一格九宫格的布局方式:
- <?xml version="1.0" encoding="utf-8"?>
- <!--九宫格每一格的布局-->
- <LinearLayout
- xmlns:android="http://schemas.android.com/apk/res/android"
- android:orientation="vertical"
- android:layout_width="fill_parent"
- android:layout_height="fill_parent"
- >
- <ImageView
- android:id="@+id/MainActivityImage"
- android:layout_width="50dp"
- android:layout_height="50dp"
- android:layout_gravity="center_horizontal"
- />
- <TextView
- android:id="@+id/MainActivityText"
- android:layout_width="wrap_content"
- android:layout_height="wrap_content"
- android:layout_gravity="center_horizontal"
- android:textSize="18sp"
- android:lines="1"
- android:layout_marginTop="8dp"
- />
- </LinearLayout>
--------------------------------------------------------------------------------------------------
最后就是adapter的编写:
- public class ImageAdapter extends BaseAdapter {
- private Context context;
- public ImageAdapter(Context context) {
- this.context=context;
- }
- private Integer[] images = {
- //九宫格图片的设置
- R.drawable.icon_1,
- R.drawable.icon_2,
- R.drawable.icon_3,
- R.drawable.icon_4,
- R.drawable.icon_5,
- R.drawable.icon_6,
- R.drawable.icon_7,
- R.drawable.icon_8,
- R.drawable.icon_9,
- };
- private String[] texts = {
- //九宫格图片下方文字的设置
- "记录支出",
- "记录收入",
- "账本管理",
- "类别管理",
- "查看图表",
- "收支对照",
- "记录心得",
- "新闻公告",
- "系统设置",
- };
- //get the number
- @Override
- public int getCount() {
- return images.length;
- }
- @Override
- public Object getItem(int position) {
- return position;
- }
- //get the current selector's id number
- @Override
- public long getItemId(int position) {
- return position;
- }
- //create view method
- @Override
- public View getView(int position, View view, ViewGroup viewgroup) {
- ImgTextWrapper wrapper;
- if(view==null) {
- wrapper = new ImgTextWrapper();
- LayoutInflater inflater = LayoutInflater.from(context);
- view = inflater.inflate(R.layout.item, null);
- view.setTag(wrapper);
- view.setPadding(15, 15, 15, 15); //每格的间距
- } else {
- wrapper = (ImgTextWrapper)view.getTag();
- }
- wrapper.imageView = (ImageView)view.findViewById(R.id.MainActivityImage);
- wrapper.imageView.setBackgroundResource(images[position]);
- wrapper.textView = (TextView)view.findViewById(R.id.MainActivityText);
- wrapper.textView.setText(texts[position]);
- return view;
- }
- }
- class ImgTextWrapper {
- ImageView imageView;
- TextView textView;
- }
--------------------------------------------------------------------------------------------------
当然最后的最后就是你得自己准备九张漂亮的图片啦!
九宫格的主界面大功告成!如果还有什么疑问可以留言哈…欢迎交流
本人QQ:523072842
本文出自 “这一秒不放弃” 博客,请务必保留此出处http://jackxlee.blog.51cto.com/2493058/674409
- android中九宫格布局的实现
- 对于android九宫格布局的实现
- 实现Android九宫格布局的代码
- iphone开发中九宫格的界面布局的实现
- iphone开发中九宫格的界面布局的实现
- android开发中的九宫格布局的实现
- Android gridview实现简单的九宫格布局
- android中九宫格布局与gridview
- 九宫格布局实现
- 九宫格主页布局的实现
- android九宫格的实现
- android的九宫格实现
- android 九宫格的实现
- 【Android】九宫格的实现
- GridView实现九宫格布局
- GirdLayout布局实现九宫格
- android gridview 九宫格布局
- Android 偷梁换柱!!!带你实现修改shareSDK九宫格布局,去除阴影的动画。
- Magento设计人员手册目录
- Magento学习资源
- 黑马程序员_基础学习笔记(6)
- Broadcast Receiver
- 野狼2
- android中九宫格布局的实现
- 谈谈网上购物的乐趣
- 坚决的执行源于明确的目标超强的实力坚持的耕耘而非碌碌无为的口号
- vs2010中的shader syntax highlight
- 第4周-任务1-三角形类
- 第4周-任务2-一个项目,多个文件
- opencv排错总结
- 创业者要具备哪些个人条件?
- jqm(jquery mobile)开发手记