Android模拟手机拨号器
来源:互联网 发布:单片机和plc哪个贵 编辑:程序博客网 时间:2024/05/04 19:20
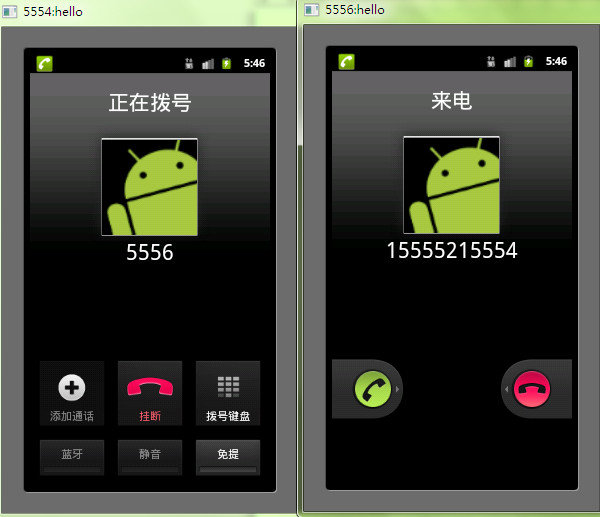
Android的手机模拟器自带有拨号功能,我们先试试自带的拨号功能。我们启动两个Android 2.3.3版本的模拟器。你有没有注意每个模拟器左上角有一个这样的 ,只不过数字不同,这究竟是什么含义呢?每个模拟器将会被绑定到“192.168.1.1”这个本地IP上,而后面的“5556”则是他的端口号,所以这个模拟器的唯一标识地是:“192.168.1.1:5556”,所以,这个端口号可以当作是我们的手机号。只要明白了这个,就不会困惑“没有手机号怎么拨打呢?”
打开手机号是“5554”的模拟器,输入“手机号”5556,点击“拨打键”,两个手机则实现通话了:
下面我们自己开发自己的手机拨号器。
●新建Android开发工程
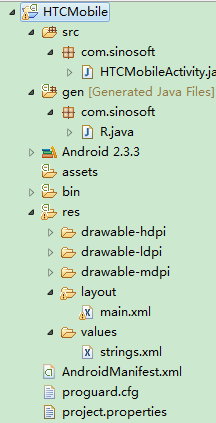
新建项目HTCMobile,选择Android 的版本是2.3.3,项目结构如下所示:
●编写strings.xml文件
- <?xml version="1.0"encoding="utf-8"?>
- <resources>
- <string name="hello">Hello World,HTCMobileActivity!</string>
- <string name="app_name">HTC拨号器</string>
- <string name="mobile_name" >请输入手机号</string>
- <string name="call">拨打此号</string>
- </resources>
- 这个文件主要用来定义字符串和数值
- ●编写main.xml文件
- 在项目的res/layout目录下找到此文件
- <?xml version="1.0"encoding="utf-8"?>
- <LinearLayout xmlns:android="http://schemas.android.com/apk/res/android"
- android:layout_width="fill_parent"
- android:layout_height="fill_parent"
- android:orientation="vertical" >
- <TextView
- android:layout_width="fill_parent"
- android:layout_height="wrap_content"
- android:text="@string/mobile_name" />
- <EditText
- android:id="@+id/phoneNo"
- android:layout_width="fill_parent"
- android:layout_height="wrap_content"
- />
- <Button
- android:id="@+id/cllPhone"
- android:layout_width="wrap_content"
- android:layout_height="wrap_content"
- android:text="@string/call"/>
- </LinearLayout>
此文件主要设置布局文件,类似于我们的html页面文件,在eclipse中我们可以点击文件编辑区的“Graphical Layout”预览效果:

●编写HTCMobileMobileActivity.java文件
- packagecom.sinosoft;
- importandroid.app.Activity;
- importandroid.content.Intent;
- importandroid.net.Uri;
- importandroid.os.Bundle;
- importandroid.view.View;
- importandroid.widget.Button;
- import android.widget.EditText;
- publicclass HTCMobileActivity extends Activity {
- /** Called when the activity is firstcreated. */
- @Override
- public void onCreate(BundlesavedInstanceState) {
- super.onCreate(savedInstanceState);
- setContentView(R.layout.main);
- super.onCreate(savedInstanceState);
- setContentView(R.layout.main);
- Button button=(Button)findViewById(R.id.cllPhone);
- button.setOnClickListener(newView.OnClickListener() {
- public void onClick(Viewv) {
- // TODOAuto-generated method stub
- EditTextphonenoTest=(EditText) findViewById(R.id.phoneNo); //获得文本框对象
- Stringphoneno=phonenoTest.getText().toString(); //获得输入的手机号码
- if((phoneno!=null)&&(!"".equals(phoneno.trim()))){
- Intent intent=newIntent(Intent.ACTION_CALL,Uri.parse("tel:"+phoneno)); //tel:前缀不要写错,用于创建一个拨打电话的意图
- startActivity(intent);//发送意图
- }
- }
- });
- }
- }
具体解释详见注释
●申请拨号权限
由于我们是拨打手机系统中的拨号器,因此我们要申请拨打电话的权利,修改AndroidManiFest.xml文件,加入一句:
<uses-permissionandroid:name="android.permission.CALL_PHONE" />
即可,如下所示:
- <?xml version="1.0"encoding="utf-8"?>
- <manifest xmlns:android="http://schemas.android.com/apk/res/android"
- package="com.sinosoft"
- android:versionCode="1"
- android:versionName="1.0" >
- <uses-sdk android:minSdkVersion="10"/>
- <uses-permission android:name="android.permission.CALL_PHONE" />
- <application
- android:icon="@drawable/ic_launcher"
- android:label="@string/app_name" >
- <activity
- android:name=".HTCMobileActivity"
- android:label="@string/app_name" >
- <intent-filter>
- <action android:name="android.intent.action.MAIN" />
- <category android:name="android.intent.category.LAUNCHER" />
- </intent-filter>
- </activity>
- </application>
- </manifest>
好了,准备工作做完了,开始运行项目,在模拟器里输入另一个模拟器的“手机号码”

点击“拨打此号”按钮时,就会出现用自带拨号器拨打电话的那一幕!
这是本人学习的结果,欢迎转载,欢迎交流,但转载务必给出本文章的链接地址:http://blog.csdn.net/youqishini/article/details/7366375,谢谢~
- Android模拟手机拨号器
- Android学习笔记(4)---模拟手机拨号器
- android手机拨号器实现
- 实验三Android手机拨号器开发
- Android 手机拨号
- Android 调用手机拨号,短信
- axure学习:tab切换,模拟android拨号
- 【android】调用系统拨号器进行拨号
- 《Android------拨号器》
- android拨号器...
- android 电话拨号器
- Android电话拨号器
- android电话拨号器
- android电话拨号器
- Android电话拨号器
- android电话拨号器
- android自制拨号器
- Android电话拨号器
- linux内核同步方式--自旋锁
- Js函数加括号、不加括号
- Java 日期类算法 转(转载)
- linux内核同步方式--信号量
- 行为驱动开发: Cucumber的目录结构和执行过程
- Android模拟手机拨号器
- 使用javascript的RegExp对象(正则)
- 玩转pandaboard之u-boot的编译及代码结构
- QRegExp
- 【单元复习】之标日初级下册第七、八单元
- Linux socket之connect不要想当然
- javascript中的继承
- Android ---模拟手机发送短信
- 有没有谁做过完整的ptf上传下载