EFM32片内外设--RTC+EM3
来源:互联网 发布:js对象如何获取属性 编辑:程序博客网 时间:2024/04/30 00:01
在接触下来的大多数低功耗系统中,客户一般都会将EFM32设置到EM2的模式,并且在EM2模式下,设置一个RTC或者LETimer。用于周期性的唤醒MCU来处理一些响应。但是如果这个定时的时间是一个不太精确的时间间隔的话,我们甚至可以使用ULFRCO作为这个定时时钟,进而可以将MCU进入EM3的状态。
查看TG,LG,GG的时钟树可以知道,LFA,LFB是可以选择ULFRCO的,而Gecko却不可以。因此这个Demo不支持Gecko。而查看在Reference Manual,对于ULFRCO的描述也仅仅只有一句话:ULFRCO (Ultra Low Frequency RC Oscillator) is a separate 1 kHz RC oscillator that also runs in EM3。
硬件:TG STK
软件例程:基于TG STK的emode的例程,对emode.c进行了一些简化。
效果:大约每5秒钟,LCD会显示大约1秒钟。由ULFRCO驱动的RTC来唤醒MCU。
代码:
#include <stdint.h>
#include <stdbool.h>
#include <stdio.h>
#include "efm32.h"
#include "efm32_cmu.h"
#include "efm32_emu.h"
#include "efm32_gpio.h"
#include "efm32_rtc.h"
#include "efm32_lcd.h"
#include "efm32_chip.h"
#include "segmentlcd.h"
#include "rtc.h"
#include "trace.h"
static volatile int msCountDown;
volatile uint32_t msTicks; /* counts 1ms timeTicks */
/* Local prototypes */
void Delay(uint32_t dlyTicks);
void gpioSetup(void);
/**************************************************************************//**
* @brief SysTick_Handler
* Interrupt Service Routine for system tick counter
*****************************************************************************/
void SysTick_Handler(void)
{
msTicks++; /* increment counter necessary in Delay()*/
}
/**************************************************************************//**
* @brief Delays number of msTick Systicks (typically 1 ms)
* @param dlyTicks Number of ticks to delay
*****************************************************************************/
void Delay(uint32_t dlyTicks)
{
uint32_t curTicks;
curTicks = msTicks;
while ((msTicks - curTicks) < dlyTicks) ;
}
/**************************************************************************//**
* @brief Main function
*****************************************************************************/
int main(void)
{
const int msDelay = 100;
/* Chip errata */
CHIP_Init();
/* Enable GPIO in CMU */
CMU_ClockEnable(cmuClock_GPIO, true);
/* Setup SysTick Timer for 1 msec interrupts */
if (SysTick_Config(SystemCoreClockGet() / 1000)) while (1) ;
/* Initialize LCD controller */
SegmentLCD_Init(false);
/* Run countdown for user to select energy mode */
msCountDown = 4000; /* milliseconds */
while (msCountDown > 0)
{
SegmentLCD_Write("EM3+RTC");
SegmentLCD_Number(msCountDown);
Delay(msDelay);
msCountDown -= msDelay;
}
/* Disable components, reenable when needed */
SegmentLCD_Disable();
RTC_Enable(false);
/* EM3 + RTC - only briefly wake up to reconfigure every ~5 seconds */
while (1)
{
/* Disable LFB clock select */
CMU->LFCLKSEL &= ~(_CMU_LFCLKSEL_LFB_MASK);
/* This RTC_Setup will configure LFCLK A as ULFRCO */
RTC_Setup(cmuSelect_ULFRCO);
RTC_Trigger(5000, NULL);
/* Sleep in EM3, wake up on RTC trigger */
EMU_EnterEM3(false);
/* SegmentLCD_Init will configure LFCLK A as LFRCO */
SegmentLCD_Init(false);
SegmentLCD_Write("ULFRCO");
Delay(1000);
SegmentLCD_Disable();
}
}
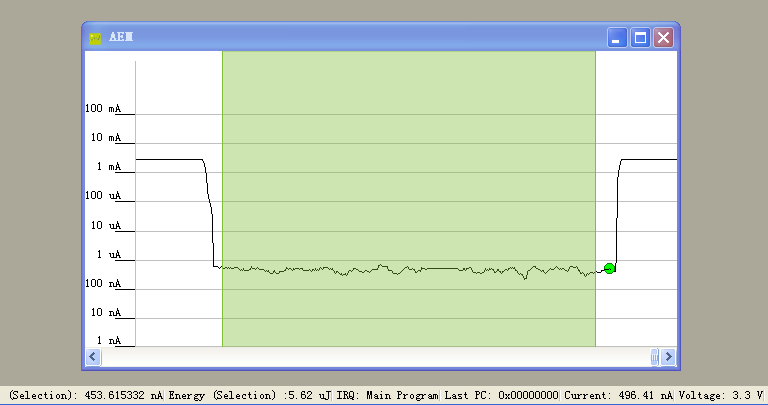
由于MCU进入了EM3模式,因此在stand by的时候,会获得更好的低功耗效果。在运行RTC的情况下,平均电流大约为500uA。
在用energyAware Profiler 进行电流测量的结果如下:
- EFM32片内外设--RTC+EM3
- EFM32片内外设 -- Systick
- EFM32片内外设 -- DWT
- EFM32片内外设---USART2
- EFM32片内外设--AES基本介绍
- EFM32片内外设--AES ECB例程
- EFM32片内外设--DAC之tips
- EFM32片内外设--LETimer Free Mode
- EFM32片内外设--ADC 基本例程
- EFM32片内外设--LEUart抖动误差
- EFM32片内外设--LCD Bitband操作
- EFM32片内外设--TFT 汉字字库
- EFM32片内外设--MSC Device information
- EFM32片内外设--RMU基本操作
- EFM32片内外设--WDT基本操作
- EFM32片内外设--LCD之动画
- EFM32片内外设--GPIO EM4唤醒
- EFM32片内外设--VCMP 基本操作
- android判断当前设备的支持哪些Feature
- FFF Warm Up Contest 8 - Asia 2011 Assembled [iSea]
- Windows XP SP3 远程桌面连接到Windows 7/Windows Server 2008/Vista
- B-树及B+树
- 酷壳陈皓:如何学好C语言
- EFM32片内外设--RTC+EM3
- MyQuery 快速开发平台-配置实现开发架构
- Exercise 2: Comments And Pound Characters
- Android: Android Light Sensor HOWTO
- X文件的导出系列1——静态模型
- Android: android sensors, HAL范例
- 基于NOR flash和ramdisk文件系统的应用
- 编程实现计算机硬件温度探测极其控制风扇转速总结
- Windows杂记