在 Linux 系统中安装Load Generator ,并在windows 调用
来源:互联网 发布:unity3d开发的游戏案例 编辑:程序博客网 时间:2024/04/30 02:35
由于公司需要测试系统的最大用户承受能力,所以需要学习使用loadrunner。在安装的时候碰到了不少问题,所以写下此文章总结遇到的问题以及解决方案,希望能帮到大家。也希望大家转载注明出处。
Winsows 的Loadrunner 安装就不多讲了,这个太容易了。
以下是Linux 中安装 Load Generator 说明:
Linux 系统版本:CentOS5.4
Load Generator 版本 : Load Generator 11
安装步骤如下:
1. 到HP官网下载Load Generator 安装文件 Software,_Load_Generator_11.00_T7330-15010.iso
2.确保系统安装了c++ , gclib 相关工具(我的系统在安装前已经安装了gclib ,所以还不知道没装这个会发生什么问题)
3. 在Windows 系统下将Software,_Load_Generator_11.00_T7330-15010.iso 解压出来会有三个文件夹(HP , Linux , Solaris),这三个文件夹是相关系统的安装包。请根据你的系统选择对应的文件夹copy到 要安装的Linux 系统中。为什么要使用这种解压后copy的原因是因为我根据网上的方法copy iso 文件到Linux 系统中并使用挂载的方式进行安装,碰到了很多问题,所以使用这种方式,这可是我原创的哦。我是copy到/home/LoadRunner/目录下
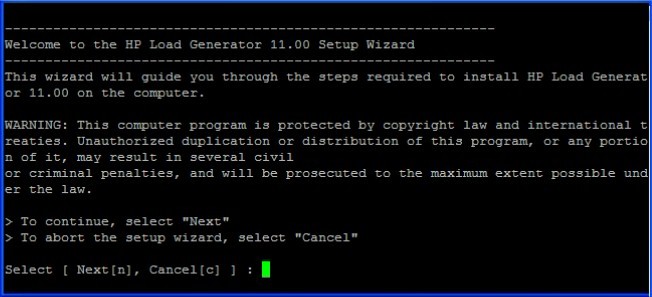
4. 紧跟着就是安装了,只需要执行指令/home/LoadRunner/Linux/installer.sh 会出现如下图中的安装向导欢迎界面,选择Next [n] 即可。
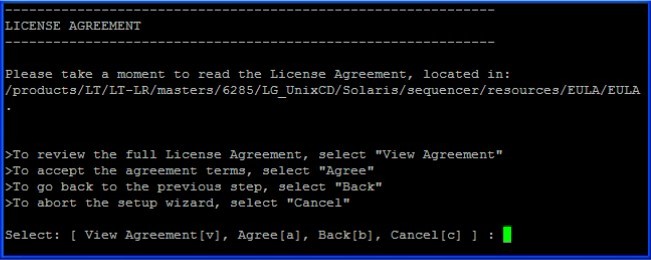
5. 出现下图许可协议界面,也只需点击Agree [a],当然你可以选择View Agreement [v] 查看协议的详细内容
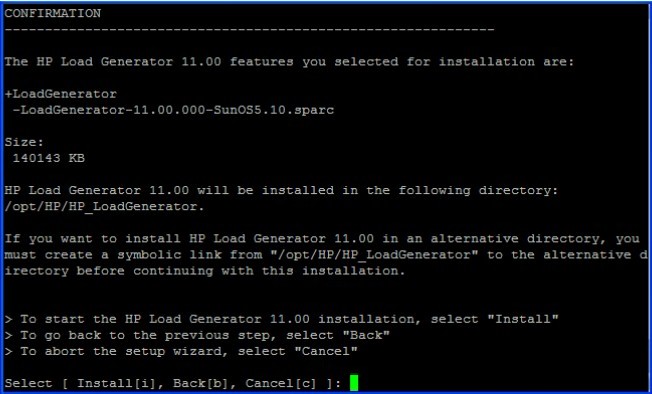
6. 出现确认安装界面,选择Install [i] 即可
7. 出现安装界面如下图

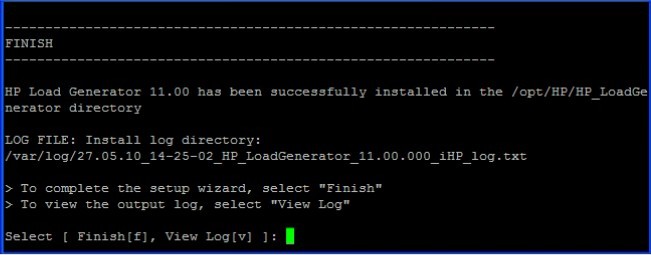
8. 完成安装,选择Finish [f] 即可,恭喜你安装成功
9. 紧跟着就是配制环境了,网上有说要配置env.csh 的,但我安装后env.csh 已经默认配置好了,这里也将的默认配置文件分享一下
setenv PRODUCT_DIR /opt/HP/HP_LoadGenerator
setenv M_LROOT $PRODUCT_DIR
if ( `uname` == SunOS ) then
setenv LD_LIBRARY_PATH ${M_LROOT}/bin
else if ( `uname` == Linux ) then
setenv LD_LIBRARY_PATH ${M_LROOT}/bin
else if ( `uname` == AIX ) then
setenv LIBPATH ${M_LROOT}/bin
else if ( `uname` == HP-UX ) then
setenv SHLIB_PATH ${M_LROOT}/bin
endif
setenv PATH ${M_LROOT}/bin:$PATH
10 .除了上文中讲到的还需要在/root/.bashrc文件中添加如下配制,保存修改后注销用户重用登录
export PRODUCT_DIR=/opt/HP/HP_LoadGenerator
export M_LROOT=$PRODUCT_DIR
export LD_LIBRARY_PATH=${M_LROOT}/bin
export PATH=${M_LROOT}/bin:$PATH
11 . Load Generator会安装到/opt/HP/HP_LoadGenerator目录下,我也是使用默认的。进行/opt/HP /HP_LoadGenerator/bin 目录执行./verify_generator (不能使用root用户,至于为什么还不清楚) 检查安装是否成功,如果成功会有以下信息,
===================================================
HP
Vuser Environment Verification Utility
===================================================
Product: LoadRunner 11.0
Version: 11.0.0.8866
Build: 8866
localhost.localdomain:
verify_generator...OK
verify_generator...OK
verify_generator...OK
Don't forget to make sure that the name of the controller machine
is also in .rhosts
Verify $M_LROOT ...Failed
_____It was not possible to set the $M_LROOT from
_____the shell dot files. One of several things might be happening:
_____1) $M_LROOT is not set at all in the shell dot files.
_____2) There is some error in the shell dot files which stops their execution
_____ before it sets $M_LROOT.
_____3) There is conditional code in the shell dot files (most likely related to
_____ interactive and non interactive shells) and $M_LROOT is set
_____ only in one of the sections.
_____Aborting virtual user tests on host localhost.localdomain
verify_generator...OK
_______________________________________________
Summary:
________
Vuser Host localhost.localdomain: Failed
这些Failed 我都忽略了,因为这些Failed并不影响运行。我很希望哪位大虾看过此文章后能在此回复解释一下这些Failed可以解决吗?
上面是正确的信息,我刚开始的时候遇到了下面这些提示,注意其实这些提示都很直观,缺少了 libstdc++.so.5 , 安装就可以了。调用 yum install libstdc++.so.5 .安装后再调用 ./verify_generator 就可以看到上面的信息了。
===================================================
HP
Vuser Environment Verification Utility
===================================================
Product: LoadRunner 11.0
Version: 11.0.0.8866
Build: 8866
localhost.localdomain:
/opt/HP/HP_LoadGenerator/bin/lrv/chk_thread_lmt: error while loading shared libraries: libstdc++.so.5: cannot open
shared object file: No such file or
directory
/opt/HP/HP_LoadGenerator/bin/lrv/limithost: line 134: [: : integer expression expected
/opt/HP/HP_LoadGenerator/bin/lrv/chk_sems_lmt: error while loading shared libraries: libstdc++.so.5: cannot open
shared object file: No such file or d
irectory
/opt/HP/HP_LoadGenerator/bin/lrv/limithost: line 154: [: : integer expression expected
verify_generator...OK
verify_generator...OK
verify_generator...OK
Warning: The file .rhosts does not exist in the home directory of the user.
Verify $M_LROOT ...Failed
_____It was not possible to set the $M_LROOT from
_____the shell dot files. One of several things might be happening:
_____1) $M_LROOT is not set at all in the shell dot files.
_____2) There is some error in the shell dot files which stops their execution
_____ before it sets $M_LROOT.
_____3) There is conditional code in the shell dot files (most likely related to
_____ interactive and non interactive shells) and $M_LROOT is set
_____ only in one of the sections.
_____Aborting virtual user tests on host localhost.localdomain
verify_generator...OK
_______________________________________________
Summary:
________
Vuser Host localhost.localdomain: Failed
12 . 启动 Load Generator ,在安装的bin目录下输入 ./m_daemon_setup start 即可开户服务了 (不能使用root 用户启动)
13 . 修改防火墙策略,对54345端口开放,或者直接关闭防火墙(不建议直接关闭)
讲到这里安装步骤就完,现在讲如何在Windows 系统下启用 刚才安装的Load Generator
1. 打开Controller 的Load Generator 。 点击 场景--> Load Generator
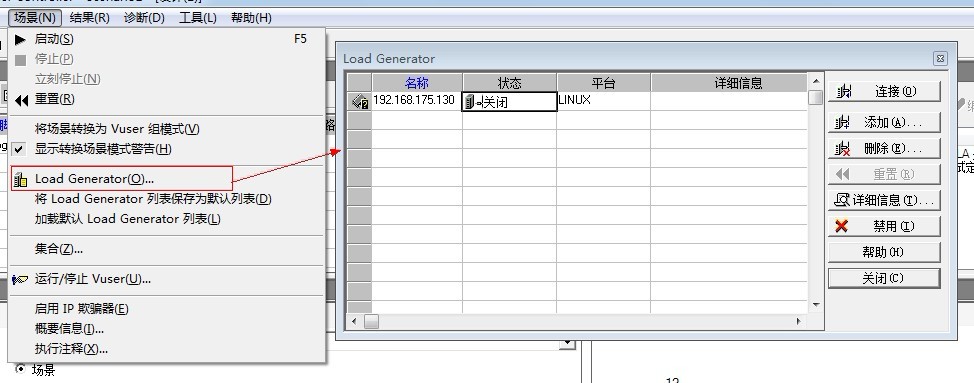
2. 添加一个Load Generator 。点击 添加--> 输入名称(名称即ip)--> 选择平台 --> 点击更多 --> 点击 Unix 环境 --> 勾选“不使用RSH” --> 确定

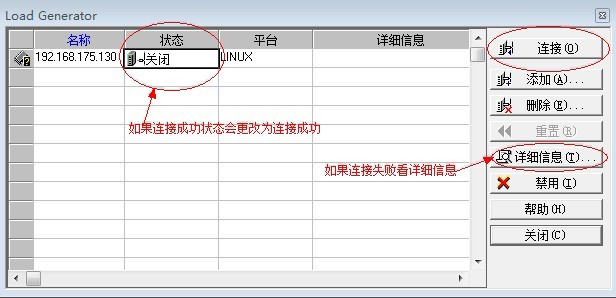
3. 添加后测试连接,如果显示连接成功就功造成了,连接时如果有其它问题建议大家多思考,注意那些连接不成功的提前。我个人觉得LoadRunner 在提示之方面做的比较好,出了问题基本上看提示就知道问题在哪里。祝大家一切顺利。
转自:http://www.blogjava.net/qileilove/archive/2012/03/14/371861.html
- 在 Linux 系统中安装Load Generator ,并在windows 调用
- 在 Linux 系统中安装Load Generator ,并在windows 调用
- 在 Linux 系统中安装Load Generator ,并在windows 调用
- 在 Linux 系统中安装Load Generator ,并在windows 调用
- 在 Linux 系统中安装Load Generator ,并在windows 调用
- 在 Linux 系统中安装Load Generator ,并在windows 调用
- 在windows中借助vmware安装linux系统
- 【MySQL】在windows系统中安装压缩版MySQL并修改root可以在远程访问
- 如何在Windows窗体中调用系统调色板对话框,并获取用户所选择的颜色?
- 如何在windows安装linux系统
- 在windows系统下安装Linux虚拟机
- 在Windows上安装Linux系统
- 在windows系统下安装Linux
- windows安装使用SQLlite并在C#调用SQLlite开发
- 在windows系统中安装hadoop
- 在windows系统中安装hadoop
- 在 Windows 系统中安装 SSH 服务
- 在windows系统中安装hadoop
- Linux 获取其他程序返回值
- MySQL中的describe关键字
- iOS4中将UINavigationController的view作为subview时viewDidDisappear不触发
- 分布式系统漫谈一 —— Google三驾马车: GFS,mapreduce,Bigtable
- 毕业之后的路
- 在 Linux 系统中安装Load Generator ,并在windows 调用
- 【黑马程序员】多线程学习日记1
- android软件更新方法初探
- as 和 is的区别
- 中国传媒大学数字信号处理精品课程
- windows多线程
- mysql的JDBC连接
- HDU 1010 Tempter of the Bone
- 【Linux 驱动】第五章 并发和竞态