Java与Flex学习笔记(5)----Flex与Java通信之HttpService方式
来源:互联网 发布:淘宝网修改密码 编辑:程序博客网 时间:2024/05/20 10:54
Flex用RemoteObject方式与Java通信是最常用的方式,这是一种最直观的方式。当然Flex也可以用HttpService与服务器类如servlet通信,这也是本次学习的重点。
这次学习是在上节的基础上进行的。本节学习用到的LoginEvent.as,LoginModule.mxml文件代码如上节所示。
好了,新建一个servlet类LoginServlet.java,代码如下所示:
package com.yqsn.servlet; import java.io.IOException;import java.io.PrintWriter; import javax.servlet.ServletException;import javax.servlet.http.HttpServlet;import javax.servlet.http.HttpServletRequest;import javax.servlet.http.HttpServletResponse; public class LoginServlet extends HttpServlet { @Override protected void service(HttpServletRequest req, HttpServletResponse resp) throws ServletException, IOException { // TODO Auto-generatedmethod stub req.setCharacterEncoding("utf-8"); resp.setCharacterEncoding("utf-8"); PrintWriter out=resp.getWriter(); String username=req.getParameter("username"); String passworld=req.getParameter("passworld"); //System.out.println(username+":"+passworld); if(username.equals("admin")&& passworld.equals("123")){ out.print(true); }else{ out.print(false); } }}
这个servlet在web.xml中的配置如下所示:
<servlet> <servlet-name>LoginServlet</servlet-name> <servlet-class>com.yqsn.servlet.LoginServlet</servlet-class> </servlet><servlet-mapping> <servlet-name>LoginServlet</servlet-name> <url-pattern>/LoginServlet</url-pattern> </servlet-mapping>
将MyEclipse切换到flash视图,新建一个application文件HttpServiceDemo.mxml,代码如下所示:
<?xmlversion="1.0" encoding="utf-8"?><s:Application xmlns:fx="http://ns.adobe.com/mxml/2009" xmlns:s="library://ns.adobe.com/flex/spark" xmlns:mx="library://ns.adobe.com/flex/mx" minWidth="955" minHeight="600"> <fx:Script> <![CDATA[ import com.flex.ases.LoginEvent; import com.flex.ases.LoginMess; import com.flex.module.LoginModule; import mx.controls.Alert; import mx.managers.PopUpManager; import mx.rpc.events.FaultEvent; import mx.rpc.events.ResultEvent; private var loginModule:LoginModule=new LoginModule(); [Bindable] private var username:String; [Bindable] private varpassworld:String; protected function login_clickHandler(event:MouseEvent):void { // TODOAuto-generated method stub PopUpManager.addPopUp(loginModule,this,true); PopUpManager.centerPopUp(this.loginModule); loginModule.addEventListener(LoginEvent.LOGIN_EVENT,loginHander); } public function loginHander(event:LoginEvent):void{ //varobj:Object=event.loginMess as Object; username=event.loginMess['username']; passworld=event.loginMess['passworld']; httpServiceSend.send(); } protected function httpServiceSend_faultHandler(event:FaultEvent):void { // TODOAuto-generated method stub Alert.show(event.fault.message as String,"提示"); } protected function httpServiceSend_resultHandler(event:ResultEvent):void { // TODOAuto-generated method stub var result:Boolean=event.result as Boolean; if(result){ Alert.show(username+",欢迎您回来!","提示"); aaa.text=username+",欢迎您回来!"; login.label=""; bbb.text=""; }else{ Alert.show("对不起,用户名或密码不存在!","提示"); } //Alert.show("成功了!"); } ]]> </fx:Script> <fx:Declarations> <!-- Place non-visualelements (e.g., services, value objects) here --> <s:HTTPService id="httpServiceSend" url="http://localhost:8000/JavaAndFlexDemo/LoginServlet" useProxy="false"fault="httpServiceSend_faultHandler(event)"result="httpServiceSend_resultHandler(event)" > <s:request > <username>{username}</username> <passworld>{passworld}</passworld> </s:request> </s:HTTPService> </fx:Declarations> <s:Label x="200" y="150" width="182" height="27" fontSize="18" id="aaa" text="您还没有登陆,现在就" verticalAlign="middle"/> <mx:LinkButton x="393" y="150" width="57" height="27" label="登陆" id="login" fontSize="18"click="login_clickHandler(event)"/> <s:Label x="459" y="150" width="37" height="27" id="bbb" fontSize="18" text="吧!" verticalAlign="middle"/></s:Application>
从代码中我们可以看出,我们先定义一个HttpServlet发送请求httpServiceSend,然后通过下面这种方式存值:
<s:request > <username>{username}</username> <passworld>{passworld}</passworld> </s:request>这种方式很简单,我们在后台通过request. getParameter(“参数名”)取值就可以了,当然我们也可以在loginHander(event:LoginEvent)函数中通过下面方式存值并发送请求:
public functionloginHander(event:LoginEvent):void{ //varobj:Object=event.loginMess as Object; username=event.loginMess['username']; passworld=event.loginMess['passworld']; var obj:Object=new Object; obj.username=username; obj.passworld=passworld; httpServiceSend.send(obj); }
运行结果是一样的,你可以试试。
好了,程序算是完成了,现在开始验收结果。
打开服务器并部署项目,运行felx页面RemoteObjectDemo.mxml,如下所示:
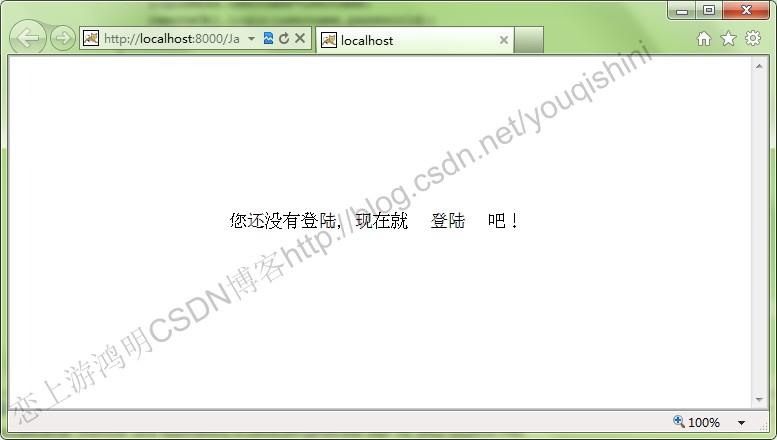
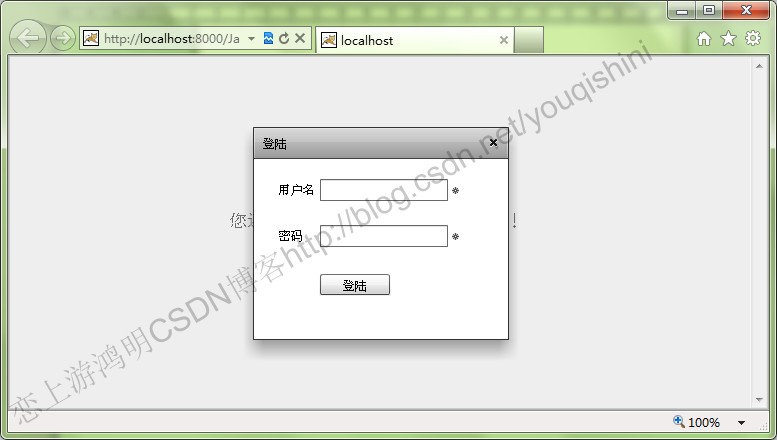
当我们点击“登陆”按钮后,弹出module页面,如下所示:
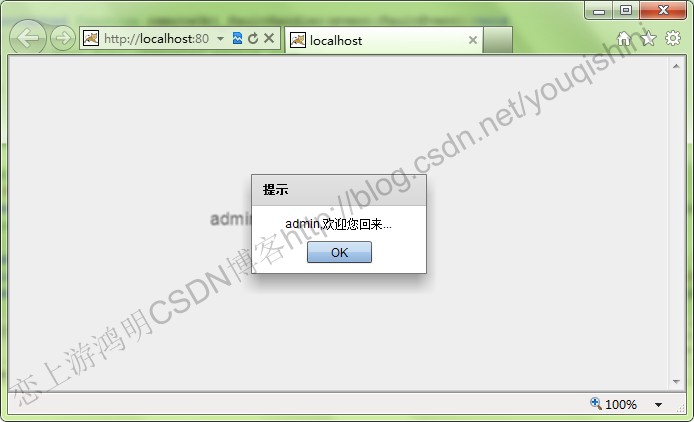
当我们输入的用户名和密码都正确时则提示你登陆正确:
输入错误则提示你输入不正确:
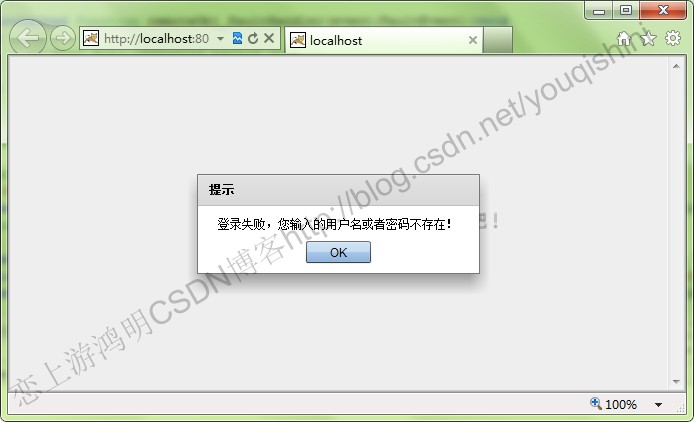
可以看出,我们输入的用户名与密码已经用httpservice方式发送到后台并且成功接受了并将结果返回给前台了。
好了,就学习这么多,下节将学习WebService方式。
原创文章,转载请注明出处:http://www.it161.com/article/webDetail?articleid=140111230433
更多原创文章,请访问:http://www.it161.com/
- Java与Flex学习笔记(5)----Flex与Java通信之HttpService方式
- Java与Flex学习笔记(4)----Flex与Java通信之RemoteObject方式
- Java与Flex学习笔记(21)----Flex与Java通信方式之WebService
- flex与java通信三:httpService
- Flex中HTTPService与java后台通信
- flex通过HTTPService与java通信例子
- RPC通信之HTTPService(Java-flex)
- Flex与java交互方法之HttpService
- FLEX与HttpService通信
- Flex HttpService 方式与java交互(json数据类型)
- flex中httpservice与java后台交互的两种传值方式
- flex中httpservice与java后台交互的两种传值方式
- flex中httpservice与java后台交互的两种传值方式
- flex中httpservice与java后台交互的两种传值方式
- flex中httpservice与java后台交互的两种传值方式
- Flex 与 servlet 通信(Httpservice)
- Java与Flex学习笔记(15)----Flex中的Application与Module间的通信
- java与flex通信
- 多线程-thread
- poj1564-这样的判重,hash都得折服
- 在linux AS5.4 64bit 安装CRS时,执行root.sh时报错
- 机房收费系统总结
- 文件上传与下载————>struts
- Java与Flex学习笔记(5)----Flex与Java通信之HttpService方式
- Java java.util.date 与 java.sql.date 区别和转换
- 开机速度调整命令大全 LOGO
- cocos2d-x游戏实例(28)-简易动作游戏(6)
- 数据结构基础系列——单链表的实现
- 链接服务器的 OLE DB 访问接口 "SQLNCLI" 无法启动分布式事务 OLE DB 提供程序 'SQLOLEDB' 无法启动分布式事务
- 数据泵expdp
- Exchange 2003 升级到Exchange 2010 之Exchange 2010 SP2安装!
- div垂直居中的N种方法