MFC List Box
来源:互联网 发布:淘宝琴国乐器 编辑:程序博客网 时间:2024/05/18 09:53
A list box presents a list of items to choose from. Each item displays on a line:
The user makes a selection by clicking in the list. Once clicked, the item or line on which the mouse landed becomes highlighted, indicating that the item is the current choice. Once an item is selected, to make a different selection, the user would click another. The user can also press the up and down arrow keys to navigate through the list and make a selection.
As far as item selection is concerned, there are two types of list boxes: single selection and multiple selection.
One of the main reasons for using a list box is to display a list of items to the user. Sometimes the list would be very large. If the list is longer than the available space on the control, the operating system would provide a scroll bar that allows the user to navigate up and down to access all items of the list. Therefore, you will have the option of deciding how many items to display on the list.
![]() Practical Learning: Introducing List Boxes
Practical Learning: Introducing List Boxes
- Start Microsoft Visual Studio
- To start a new application, on the main menu, click File -> New Project...
- In the middle list, click MFC Application and change the Name to MeasuesOfCenter1
- In the first page of the wizard, click Next
- In the second page of the wizard, click Dialog Based and click Next
- Click Finish
Creating a List Box
To include a list box in your application, from the Toolbox, you can click the List Box button![]() and click on a parent window. After visually adding the control, if you intend to refer to it in your code, you should create a member variable for it.
and click on a parent window. After visually adding the control, if you intend to refer to it in your code, you should create a member variable for it.
The MFC list box is based on the CListBox class. Therefore, if you want to programmatically create a list box, declare aCListBox variable or pointer using its constructor. To initialize the control, call itsCreate() member function. Its syntax is:
virtual BOOL Create(DWORD dwStyle, const RECT& rect, CWnd* pParentWnd, UINT nID);
Here is an example:
BOOL CExerciseDlg::OnInitDialog(){ CDialogEx::OnInitDialog(); // Set the icon for this dialog. The framework does this automatically // when the application's main window is not a dialog SetIcon(m_hIcon, TRUE);// Set big icon SetIcon(m_hIcon, FALSE);// Set small icon // TODO: Add extra initialization here CListBox *m_SimpleList = new CListBox; m_SimpleList->Create(WS_CHILD | WS_VISIBLE, CRect(20, 20, 120, 120), this, 0x118); return TRUE; // return TRUE unless you set the focus to a control}A newly added list box appears as a rectangular empty box with a white background.
![]() Practical Learning: Creating a List Box
Practical Learning: Creating a List Box
- Design the dialog box as follows:
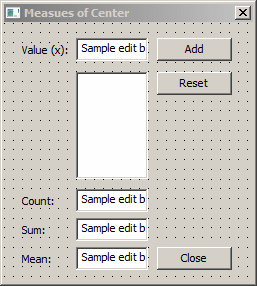 ControlCaptionIDAlign TextStatic Text
 Value (x): Edit Box
 IDC_VALUERightButton
 AddIDC_ADD List Box
 IDC_VALUES ButtonResetIDC_RESET Static TextCount: Edit Box IDC_COUNTRightStatic TextSum: Edit Box IDC_SUMRightStatic Text
 Mean: Edit Box IDC_MEAN ButtonCloseIDCANCEL
 - Right-click each of the edit controls and click Add Variable...
- Create the variables as follows:
IDCategoryTypeNameIDC_VALUEValuedoublem_ValueIDC_VALUESControlCListBoxm_ValuesIDC_COUNTValueintm_CountIDC_SUMValuedoublem_SumIDC_MEANValuedoublem_Mean - In the Class View, expand the project and, in the top part, double-click CMeasuresOfCenter1Dlg
- Declare a CList variable named Values and that takes double as parameter:
// MeasuesOfCenter1Dlg.h : header file//#pragma once#include "afxwin.h"// CMeasuesOfCenter1Dlg dialogclass CMeasuesOfCenter1Dlg : public CDialogEx{// Constructionpublic:CMeasuesOfCenter1Dlg(CWnd* pParent = NULL);// standard constructor// Dialog Dataenum { IDD = IDD_MEASUESOFCENTER1_DIALOG };protected:virtual void DoDataExchange(CDataExchange* pDX);// DDX/DDV support// Implementationprotected:HICON m_hIcon;// Generated message map functionsvirtual BOOL OnInitDialog();afx_msg void OnPaint();afx_msg HCURSOR OnQueryDragIcon();DECLARE_MESSAGE_MAP()public:double m_Value;CListBox m_Values;int m_Count;double m_Sum;double m_Mean;private:CArray<double, double> Values;}; - To execute and preview the dialog box, press F5
- Close the dialog box and return to your programming environment
Operations on a List Box
Adding a String to a List Box
After creating a list box, you can add items to it. This is done by calling theAddString() member function of the CListBox class. Its syntax is:
int AddString(LPCTSTR lpszItem);
This member function expects a null-terminated string as argument and adds this argument to the control. To add more items, you must call this member function for each desired item. Here is an example:
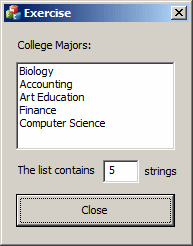
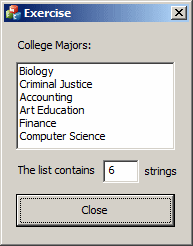
BOOL CExerciseDlg::OnInitDialog(){ CDialogEx::OnInitDialog(); // Set the icon for this dialog. The framework does this automatically // when the application's main window is not a dialog SetIcon(m_hIcon, TRUE);// Set big icon SetIcon(m_hIcon, FALSE);// Set small icon // TODO: Add extra initialization here m_CollegeMajors.AddString(L"Biology"); m_CollegeMajors.AddString(L"Accounting"); m_CollegeMajors.AddString(L"Art Education"); m_CollegeMajors.AddString(L"Finance"); m_CollegeMajors.AddString(L"Computer Science"); return TRUE; // return TRUE unless you set the focus to a control}The items of a list box are arranged as a zero-based array. The top item has an index of zero. The second item as an index of 1, etc. Although the items seem to be added randomly to the list, their new position depends on whether the list is sorted or not. If the list is sorted, each new item is added to its alphabetical position. If the list is not sorted, each item is added on top of the list as if it were the first item. The other items are then "pushed down".
The Number of Strings in a List Box
At any time, if you want to know the number of items that a list box holds, call theGetCount() member function of the CListBox class. Its syntax is:
int GetCount() const;
This member function simply returns a count of the items in the list. Here is an example of calling it:
BOOL CExerciseDlg::OnInitDialog(){ CDialogEx::OnInitDialog(); // Set the icon for this dialog. The framework does this automatically // when the application's main window is not a dialog SetIcon(m_hIcon, TRUE);// Set big icon SetIcon(m_hIcon, FALSE);// Set small icon // TODO: Add extra initialization here m_CollegeMajors.AddString(L"Biology"); m_CollegeMajors.AddString(L"Accounting"); m_CollegeMajors.AddString(L"Art Education"); m_CollegeMajors.AddString(L"Finance"); m_CollegeMajors.AddString(L"Computer Science"); m_Count = m_CollegeMajors.GetCount(); UpdateData(FALSE); return TRUE; // return TRUE unless you set the focus to a control}This would produce:
![]() Practical Learning: Populating a List Box
Practical Learning: Populating a List Box
- On the main menu, click Project -> Class Wizard...
- In the Class Name combo box, select CMeasuresOfCenter1Dlg.
Click Methods - Click Add Method...
- Set the Return Type to void
- Set the Function Name to ShowValues
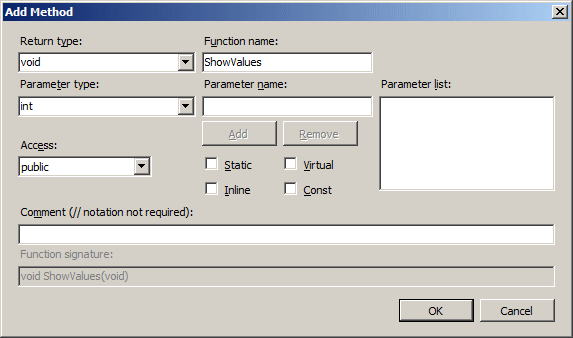
- Click OK
- Click Commands
- In the Commands list, click IDC_ADD
- Click Add Handler...
- Accept the suggested name of the function and click OK
- Click Edit Code
- Implement the event as follows:
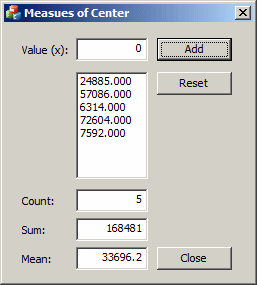
void CMeasuesOfCenter1Dlg::ShowValues(void){UpdateData();double Sum = 0, Mean, Median;CString strValue;// Check the values in the collectionfor(int i = 0; i < Values.GetCount(); i++){ // Calculate the sum of values Sum += Values[i]; // Since the value is a double, first convert it to a CString, ... strValue.Format(_T("%.3f"), Values[i]); // then add the string to the list box m_Values.AddString(strValue);}// Calculate the averageMean = Sum / Values.GetCount();// Display the values in the edit boxesm_Count = m_Values.GetCount();m_Sum = Sum;m_Mean = Mean;UpdateData(FALSE);}void CMeasuesOfCenter1Dlg::OnClickedAdd(){// TODO: Add your control notification handler code hereUpdateData();// Get the new value and store it in the collectionValues.Add(m_Value);// Reset the Value edit boxm_Value = 0;UpdateData(FALSE);// Display the valuesShowValues();}
Inserting a String Into a List Box
Inserting a string consists of putting inside the list in a position of your choice. To support this operation, theCListBox class is equipped with the InsertString() member function whose syntax is:
int InsertString(int nIndex, LPCTSTR lpszItem);
The lpszItem argument is the string to be added to the list. ThenIndex argument specifies the new position in the zero-based list. Here is an example:
BOOL CExerciseDlg::OnInitDialog(){ CDialogEx::OnInitDialog(); // Set the icon for this dialog. The framework does this automatically // when the application's main window is not a dialog SetIcon(m_hIcon, TRUE);// Set big icon SetIcon(m_hIcon, FALSE);// Set small icon // TODO: Add extra initialization here m_CollegeMajors.AddString(L"Biology"); m_CollegeMajors.AddString(L"Accounting"); m_CollegeMajors.AddString(L"Art Education"); m_CollegeMajors.AddString(L"Finance"); m_CollegeMajors.AddString(L"Computer Science"); m_CollegeMajors.InsertString(1, L"Criminal Justice"); m_Count = m_CollegeMajors.GetCount(); UpdateData(FALSE); return TRUE; // return TRUE unless you set the focus to a control}This would produce:
If you pass it as 0, the lpszItem item would be made the first in the list. If you pass it as -1,lpszItem would be added at the end of the list, unless the list is empty.
Deleting a String From a List Box
To delete an item from the list, pass its index to the DeleteString() member function of the CListBox class. Its syntax is:
int DeleteString(UINT nIndex);
For example, to delete the second item of the list, pass a 1 value to this member function.
Clearing a List Box
If you want to delete all items of the control, call the ResetContent() member function of the CListBox class. Its syntax is:
void ResetContent();
This member function simply dismisses the whole content of the list box.
![]() Practical Learning: Resetting a List Box
Practical Learning: Resetting a List Box
- Call the CListBox::ResetContent() member function at the beginning of the ShowValues() member function:
void CMeasuesOfCenter1Dlg::ShowValues(void){ UpdateData(); double Sum = 0, Mean, Median; CString strValue; // Clear the list box before populating it with strings from the collection m_Values.ResetContent(); // Check the values in the collection for(int i = 0; i < Values.GetCount(); i++) {// Calculate the sum of valuesSum += Values[i];// Since the value is a double, first convert it to a CString, ...strValue.Format(_T("%.3f"), Values[i]);// then add the string to the list boxm_Values.AddString(strValue); } // Calculate the average Mean = Sum / Values.GetCount(); // Display the values in the edit boxes m_Count = m_Values.GetCount(); m_Sum = Sum; m_Mean = Mean; UpdateData(FALSE);} - To execute, press F5
- Type each of the following values and click Add after each: 72604,7592, 6314, 57086, 24885
- Close the dialog box and return to your programming environment
Selecting an Item From a List Box
Once a list has been created, you and your users can use its items. For example, to select an item, the user clicks it. To programmatically select an item (on a list box that allows only single selections), call theSetCurSel() member function of the CListBox class. Its syntax is:
int SetCurSel(int nSelect);
The nSelect argument specifies the item to select. To select the fourth item from a list box, you can pass thenSelect argument with a value of 3. Here is an example:
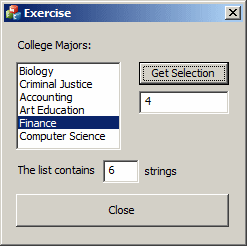
BOOL CExerciseDlg::OnInitDialog(){ CDialogEx::OnInitDialog(); // Set the icon for this dialog. The framework does this automatically // when the application's main window is not a dialog SetIcon(m_hIcon, TRUE);// Set big icon SetIcon(m_hIcon, FALSE);// Set small icon // TODO: Add extra initialization here m_CollegeMajors.AddString(L"Biology"); m_CollegeMajors.AddString(L"Accounting"); m_CollegeMajors.AddString(L"Art Education"); m_CollegeMajors.AddString(L"Finance"); m_CollegeMajors.AddString(L"Computer Science"); m_CollegeMajors.InsertString(1, L"Criminal Justice"); m_CollegeMajors.SetCurSel(3); m_Count = m_CollegeMajors.GetCount(); UpdateData(FALSE); return TRUE; // return TRUE unless you set the focus to a control}If an item is selected in the list and you want to find out which one, you can call theGetCurSel() member function of the CListBox class. Its syntax is:
int GetCurSel() const;
Here is an example of calling it:
void CExerciseDlg::OnBnClickedGetSelection(){// TODO: Add your control notification handler code herem_Selected = m_CollegeMajors.GetCurSel();UpdateData(FALSE);}This would produce:
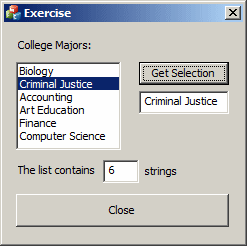
As you can see, the CListBox::GetCurSel() member function returns the index of the string that was selected. If you want to get the actual string, you can call theGetText() member function of the CListBox class. It is overloaded with two versions whose syntaxes are:
int GetText(int nIndex, LPTSTR lpszBuffer) const;void GetText(int nIndex, CString& rString) const;
The first argument represents the index of the item whose string you want to find out. The second argument is the returned string. Here is an example that returns a CString value by using the second version of the function:
void CExerciseDlg::OnBnClickedGetSelection(){ // TODO: Add your control notification handler code here m_CollegeMajors.GetText(m_CollegeMajors.GetCurSel(), m_Selected); UpdateData(FALSE);}Here is an example of running it:
Characteristics of a List Box
Single Selection of Items
After creating the list box, the user can select an item by clicking it in the list. The newly selected item becomes highlighted. Here is an example:

If the user clicks another item, the previous one looses its highlighted color and the new item becomes highlighted.
By default, the user can select only one item at a time. The ability to select one or more items is controlled by the Selection property in the Properties window:

The default value of the Selection field is Single. If you don't want the user to be able to select any item from the list, you have two main alterrnatives. If you set the Selection property to None, when the user clicks an item, a rectangle is drawn around the item but the highlighted color is not set. Alternatively, you can create the control with the Disabled property set to True.
Multiple-Selection
If you want the user to be able to select more than one item, at design time, set the Selection property to Multiple. If you are programmatically creating the control, add theLBS_MULTIPLESEL style. When a list box is created with the Multiple Selection option, to select an item, the user would click it. To select an additional item, the user can click it subsequently. If the user clicks an item that is highlighted, meaning it was already selected, the item becomes selected, loosing its highlighted color. The user can continue using this feature to build the desired list.
Extended Selection
Microsoft Windows allows a user to select items in a list box (in fact on many other list-based controls or views) by using a combination of mouse click and the keyboard. To select items in a range, the user can press and hold Shift, then click an item from the other range and release Shift. All items between both clicks would be selected. To select items at random, the user can press and hold Ctrl. Then click each desired item, which creates a series of cumulative selections. Here is an example:

To provide this ability, at design time, you can set the Selection property to Extended. If you are programmatically creating the list box, add theLBS_EXTENDEDSEL style to it.
Sorting a List Box
When building the list of items of a list box, by default, the items are rearranged in alphabetical order. Even if you add an item to an already created list, the new item is added to the right order. This arrangement means that the list is sorted. If you want the items to keep their position as they are added, set the Sort property to True. The ability to sort a list box or not is controlled by theLBS_SORT style.
It is important to remember that the list box treats its items as strings. Therefore, if your list box contains numeric values or dates (or times) and you sort it, the result may not appear incremental.
List Box Messages and Events
In order to use the list box as a control, it must first receive focus. This can be visible by either the first item having a rectangle drawn around it or at least on the items being selected. When the list box receives focus, it sends theLBN_SETFOCUS notification message. On the other hand, once the user clicks another control or another application, the list box loses focus and consequently sends theLBN_KILLFOCUS notification message.
As clicking is the most performed action on a list box, when the user clicks an item, it becomes selected. If the user clicks another item of a non-Multiple Selection list box, as the selection is going to be changed, theLBN_SELCHANGE notification message is sent. If the selection is cancelled, theLBN_SELCANCEL notification message is sent.
If the user double-clicks an item in the list box, theLBN_DBLCLK notification message is sent.
- MFC List Box
- MFC LIST BOX
- MFC控件(4):List Box
- MFC控件使用之 List Box
- MFC中List box的用法
- C++ MFC combo box和list control控件的使用
- C++ MFC combo box和list control控件的使用
- C++ MFC combo box和list control控件的使用
- mfc中通过触发List Box 控件来显示图片
- C++ MFC combo box和list control控件的使用
- List Box/Check List Box
- MFC控件使用说明(combo box Button Check Box Radio Button List Control Edit Box Hot Key IP Address....)
- MFC控件使用说明(combo box Button Check Box Radio Button List Control Edit Box Hot Key IP Address)
- MFC控件使用说明(combo box Button Check Box Radio Button List Control Edit Box Hot Key IP Address....)
- MFC控件使用说明(combo box Button Check Box Radio Button List Control Edit Box Hot Key IP Address....)
- MFC控件使用说明(combo box Button Check Box Radio Button List Control Edit Box Hot Key IP Address....)
- mfc Combo Box有关
- MFC COMBO BOX
- win7+64位+Oracle+11g+64位下使用PLSQL+Developer+的解决办法
- 网络安全笔记之防火墙
- 自己编译Android gdbserver(解决运行 gdbserver时 Segmentation fault 问题)
- DataTable 数据 使用自带函数 快速检索数据
- 南京理工大学MBA2012秋季拟录取名单的公告
- MFC List Box
- 网络安全笔记之VPN关键技术
- Centos6.0安装Oracle11g
- 重学数据结构之算法2.7
- Android游戏开发之横竖屏的切换
- Android TextView中文字通过SpannableString来设置超链接、颜色、字体等属性
- win7+64位+Oracle+11g+64位下使用PLSQL+Developer+的解决办法
- 8位单片机 16位 32位区别?
- error C2533: 构造函数不能有返回类型,类定义时不要丢了分号