Android Map Api 使用和开发(1) 添加地图和界面
来源:互联网 发布:asp数据库管理网页 编辑:程序博客网 时间:2024/05/21 07:46
最近正在做和地图相关的项目,想记录和整理一下的这方面的内容发出来,既是自己整理总结,也是和别人分享经验。
做过android 地图相关项目的同学估计都会有一些相同的需求,这些需求在android 上谷歌自己做的地图软件都做得很好,很多人想模仿参考来做,比如:
1、弹出浮动的搜索框,并能搜索地址并定位
2、长按地图出现当前位置的泡泡(popup),泡泡里有标题和内容,有详细地址和详细信息
3、自动定位到当前位置
4、显示各种图层
这么多需求不是一下子都能做出来的,而且做好了也不容易。
那这篇先写一些怎么把google地图添加到android程序中,还有把主界面显示做一下。
先看下主界面出来的效果:
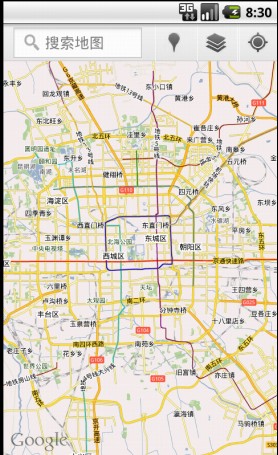
这张图怎么样? 是不是长得和Google自己的地图软件一样啊,这个其实是我模仿做出来的,咱们山寨有力量,这点模仿算不了什么。
那开始进入代码阶段吧 。
一、申请key
网上有不少教你怎么添加地图的教程,我这里就不啰嗦太多了 ,简单的说一下
首先需要申请Android Map API Key,因为我们现在只要是进行测试熟悉Google map api的应用,所以可以使用Debug版的证明书即可
在不同的操作系统中,keystore位于如下位置:
· Windows Vista: C:/Users//.android/debug.keystore
· Windows XP: C:/Documents and Settings//.android/debug.keystore
· OS X and Linux: ~/.android/debug.keystore
最后打开申请Key的网站:申请链接。
也可以参考这篇文章去申请Key :http://hb.qq.com/a/20110221/000009.htm
那到这里就假设拿到了Key了。
二、main.xml layout
我直接把mail.xml全贴出来,上面加注释就好了
- <?xml version="1.0" encoding="utf-8"?>
- <LinearLayout xmlns:android="http://schemas.android.com/apk/res/android"
- android:layout_width="fill_parent" android:layout_height="fill_parent"
- android:orientation="vertical">
- <LinearLayout
- android:layout_width="fill_parent" android:layout_height="wrap_content"
- android:orientation="horizontal" android:background="@drawable/searchbg">
- <!-- 这个就是搜索按钮了,你别看它想个输入框,其实是个button -->
- <Button android:id="@+id/search" android:background="@drawable/searchbtn"
- android:layout_marginLeft="12dp"
- android:layout_marginTop="5dp"
- android:layout_width="150dp"
- android:layout_height="35dp"
- android:hint="搜索地图"
- android:textSize="17sp"
- android:singleLine="true"
- android:gravity="center_vertical"
- android:textColor="#000000"/>
- <!-- 下面是三个图片按钮了,看效果图就知道是哪三个按钮了 -->
- <ImageButton android:background="@drawable/maptitlebtn" android:layout_marginLeft="15dp"
- android:id="@+id/pointwhat" android:src="@drawable/pointwhat"
- android:layout_width="wrap_content"
- android:layout_height="wrap_content"
- />
- <ImageButton android:background="@drawable/maptitlebtn" android:layout_marginLeft="5dp"
- android:id="@+id/layer" android:src="@drawable/layer"
- android:layout_width="wrap_content"
- android:layout_height="wrap_content"
- />
- <ImageButton android:background="@drawable/maptitlebtn" android:layout_marginLeft="5dp"
- android:id="@+id/loction" android:src="@drawable/loction"
- android:layout_width="wrap_content"
- android:layout_height="wrap_content"
- />
- </LinearLayout>
- <TableLayout android:layout_width="fill_parent" android:layout_height="fill_parent"
- android:orientation="vertical"
- >
- <TableRow android:layout_weight="1">
- <!-- 这里才是重点,放置map的地方 -->
- <com.google.android.maps.MapView
- xmlns:android="http://schemas.android.com/apk/res/android"
- android:id="@+id/map_view"
- android:layout_width="fill_parent"
- android:layout_height="fill_parent"
- android:clickable="true"
- android:enabled="true"
- android:apiKey="0yRjCrET3v9ZkAhfn3wkRNzBPI_gHpkvx1iWT7g" />
- </TableRow>
- <TableRow>
- </TableRow>
- </TableLayout>
- </LinearLayout>
里面的key要替换成你自己申请到的Key,要不然map在软件里出不来。
三 ,AndroidManifest.xml 文件怎么写?
最重要的是加上权限
<uses-permission android:name="android.permission.INTERNET" />
<uses-permission android:name="android.permission.ACCESS_NETWORK_STATE"/>
<uses-permission android:name="android.permission.ACCESS_COARSE_LOCATION"/>
<uses-permission android:name="android.permission.ACCESS_FINE_LOCATION"/>
还有这句话,加上android map的库。
<uses-library android:name="com.google.android.maps" />
- <?xml version="1.0" encoding="utf-8"?>
- <manifest xmlns:android="http://schemas.android.com/apk/res/android"
- package="com.android.fzmap"
- android:versionCode="1"
- android:versionName="1.0">
- <uses-sdk android:minSdkVersion="7" />
- <uses-permission android:name="android.permission.INTERNET" />
- <uses-permission android:name="android.permission.ACCESS_NETWORK_STATE"/>
- <uses-permission android:name="android.permission.ACCESS_COARSE_LOCATION"/>
- <uses-permission android:name="android.permission.ACCESS_FINE_LOCATION"/>
- <application android:icon="@drawable/icon" android:label="@string/app_name">
- <uses-library android:name="com.google.android.maps" />
- <activity android:name="FzMapActivity" android:screenOrientation="portrait"
- android:label="@string/app_name">
- <intent-filter>
- <action android:name="android.intent.action.MAIN" />
- <category android:name="android.intent.category.LAUNCHER" />
- </intent-filter>
- </activity>
- </application>
- </manifest>
四、FzMapActivity
到这里就剩下 Activity的显示了。 这个Activity要继承MapActivity,不然你会死的很难看的。
不啰嗦,直接上代码
- package com.android.fzmap;
- import java.util.List;
- import android.graphics.Point;
- import android.graphics.drawable.Drawable;
- import android.location.Location;
- import android.os.Bundle;
- import android.util.Log;
- import android.view.View;
- import android.view.View.OnClickListener;
- import android.view.Window;
- import android.widget.ImageButton;
- import android.widget.TextView;
- import com.android.fzmap.map.FzLocationManager;
- import com.android.fzmap.map.FzLocationManager.LocationCallBack;
- import com.android.fzmap.map.MyItemizedOverlay;
- import com.google.android.maps.GeoPoint;
- import com.google.android.maps.MapActivity;
- import com.google.android.maps.MapController;
- import com.google.android.maps.MapView;
- import com.google.android.maps.Overlay;
- import com.google.android.maps.OverlayItem;
- public class FzMapActivity extends MapActivity implements LocationCallBack ,OnClickListener{
- /** Called when the activity is first created. */
- private final String TAG = "FzMapActivity";
- public MapView mapView;
- public MapController mMapCtrl;
- public View popView;
- private Drawable myLocationDrawable;
- private FzLocationManager fzLocation;
- private MyItemizedOverlay myLocationOverlay;
- private List<Overlay> mapOverlays;
- private OverlayItem overlayitem = null;
- ImageButton loction_Btn;
- ImageButton layer_Btn;
- ImageButton pointwhat_Btn;
- @Override
- public void onCreate(Bundle savedInstanceState) {
- super.onCreate(savedInstanceState);
- requestWindowFeature(Window.FEATURE_NO_TITLE);
- setContentView(R.layout.main);
- loction_Btn = (ImageButton)findViewById(R.id.loction);
- layer_Btn = (ImageButton)findViewById(R.id.layer);
- pointwhat_Btn = (ImageButton)findViewById(R.id.pointwhat);
- loction_Btn.setOnClickListener(this);
- layer_Btn.setOnClickListener(this);
- pointwhat_Btn.setOnClickListener(this);
- myLocationDrawable = getResources().getDrawable(R.drawable.point_where);
- myLocationOverlay = new MyItemizedOverlay(myLocationDrawable,this);
- mapView = (MapView) findViewById(R.id.map_view);
- mapView.setBuiltInZoomControls(true);
- mapView.setClickable(true);
- mMapCtrl = mapView.getController();
- mapOverlays = mapView.getOverlays();
- //以北京市中心为中心
- GeoPoint cityLocPoint = new GeoPoint(39909230, 116397428);
- mMapCtrl.animateTo(cityLocPoint);
- mMapCtrl.setZoom(12);
- FzLocationManager.init(FzMapActivity.this.getApplicationContext() , FzMapActivity.this);
- fzLocation = FzLocationManager.getInstance();
- initPopView();
- }
- private void initPopView(){
- if(null == popView){
- popView = getLayoutInflater().inflate(R.layout.overlay_popup, null);
- mapView.addView(popView, new MapView.LayoutParams(
- MapView.LayoutParams.WRAP_CONTENT,
- MapView.LayoutParams.WRAP_CONTENT, null,
- MapView.LayoutParams.BOTTOM_CENTER));
- popView.setVisibility(View.GONE);
- }
- }
- @Override
- protected boolean isRouteDisplayed() {
- // TODO Auto-generated method stub
- return false;
- }
- @Override
- public void onCurrentLocation(Location location) {
- Log.d(TAG, "onCurrentLocationy");
- GeoPoint point = new GeoPoint(
- (int) (location.getLatitude() * 1E6),
- (int) (location.getLongitude() * 1E6));
- overlayitem = new OverlayItem(point, "当前位置", "");
- mMapCtrl.setZoom(16);
- myLocationOverlay.addOverlay(overlayitem);
- mapOverlays.add(myLocationOverlay);
- mMapCtrl.animateTo(point);
- }
- @Override
- public void onClick(View v) {
- switch (v.getId()) {
- case R.id.loction:
- {
- Location location = fzLocation.getMyLocation();
- GeoPoint point = new GeoPoint(
- (int) (location.getLatitude() * 1E6),
- (int) (location.getLongitude() * 1E6));
- overlayitem = new OverlayItem(point, "当前位置", "");
- mMapCtrl.setZoom(16);
- myLocationOverlay.addOverlay(overlayitem);
- mapOverlays.add(myLocationOverlay);
- mMapCtrl.animateTo(point);
- }
- break;
- default:
- break;
- }
- }
- }
重点说一下的是这几行
mapView = (MapView) findViewById(R.id.map_view);
mapView.setBuiltInZoomControls(true); //这个把地图设置成可缩放
mapView.setClickable(true);、//地图可点
mMapCtrl = mapView.getController();//获得控制器
mapOverlays = mapView.getOverlays();
//以北京市中心为中心
GeoPoint cityLocPoint = new GeoPoint(39909230, 116397428);
mMapCtrl.animateTo(cityLocPoint);//移动这个点为中心的地图区域
mMapCtrl.setZoom(12);//设置地图当前等级大小
这里面有写代码可能是重复,可能是废弃的,还没做整理,也有的是后面要用到的。
五、图片资源
这个先给个截图吧

这些是最上面看到的截图用到的资源,自己可以用PS抠图。 我都这么干的。
- Android Map Api 使用和开发(1) 添加地图和界面
- Android Map Api 使用和开发(1) 添加地图和界面
- Android Map Api 使用和开发(1) 添加地图和界面
- Android Map Api 使用和开发(1) 添加地图和界面
- Android Map Api 使用和开发(1) 添加地图和界面
- Android Map Api 使用和开发(1) 添加地图和界面
- Android Map Api 使用和开发(1) 添加地图和界面
- Android Map Api 使用和开发(1) 添加地图和界面
- Android Map Api 使用和开发(2) 定位我的位置、地图弹出泡泡、通过经纬度获取地址
- Android Map Api 使用和开发(2) 定位我的位置、地图弹出泡泡、通过经纬度获取地址
- Android Map Api 使用和开发(2) 定位我的位置、地图弹出泡泡、通过经纬度获取地址
- Android Map Api 使用和开发(2) 定位我的位置、地图弹出泡泡、通过经纬度获取地址
- Android Map Api 使用和开发(2) 定位我的位置、地图弹出泡泡、通过经纬度获取地址
- Android Map Api 使用和开发(2) 定位我的位置、地图弹出泡泡、通过经纬度获取地址
- 使用Google Map Api在Android平台上开发地图应用1
- 百度地图开发API之加载地图和添加地图控件
- 百度地图开发API之加载地图和添加地图控件
- Google Map开发系列(一)——谷歌地图API密钥(API Key)的解读和使用技巧
- javascript事件汇总
- MySQL字符集分析与乱码解决
- Linux connect的TCP连接方式源码实现
- Spring的bean属性配置
- PHP文件下载(考虑到各种格式)
- Android Map Api 使用和开发(1) 添加地图和界面
- vmware产品介绍
- 数据类型
- android JNI编程 一些技巧
- Extjs 之 viewport
- WebView自适应屏幕宽度
- 设计模式16——Memento设计模式
- 收藏PHP常用函数
- Android Map Api 使用和开发(2) 定位我的位置、地图弹出泡泡、通过经纬度获取地址