How To Install LAMP (Linux, Apache, MySQL, PHP) On Ubuntu 11.04/11.10/12.04
来源:互联网 发布:海拉尔二中分尸案 知乎 编辑:程序博客网 时间:2024/05/22 17:22
How To Install LAMP (Linux, Apache, MySQL, PHP) On Ubuntu 11.04/11.10/12.04
Do you like this story?
 If you develop web applications and scripts, it will be nice testing them locally in your own computer before launching them online. This will require the installation of a webserver on your computer.
LAMP (Linux, Apache, MySQL, PHP) is one of the easiest and perfect environment where you can test all your PHP codes. In this tutorial, we will help you install the LAMP webserver on Ubuntu 12.04/11.10; can also be installed on older distributions of Ubuntu (11.04/10.10/10.04).
LAMP Installation
The LAMP webserver can be installed easily with this command (the caret (^) is required, don't exclude it):
sudo apt-get install lamp-server^
During the installation, you will be asked to enter a new root password for the MySQL database, submit it and press Enter:

Testing Apache
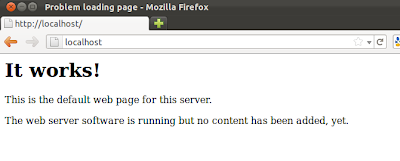
Launch your web browser (Firefox, Google Chrome, etc.) and open one of these addresses:
http://localhost/
or
http://127.0.0.1/
If you get this page, then Apache is started:
sudo /etc/init.d/apache2 restart
Then give it another try.
Testing PHP
Let's now test PHP. You need to create an empty PHP file in /var/www and insert this snippet of code into it:
<?php phpinfo(); ?>
You can easily do it with these two commands via the terminal:
echo "<?php phpinfo(); ?>" | sudo tee /var/www/test.php
sudo /etc/init.d/apache2 restart
Then open this address:
http://localhost/test.php
You should see a page like this:

Since you are using the LAMP webserver locally, your MySQL database must uses the same IP address of your localhost which is: 127.0.0.1. Via the Terminal, run this command to verify it:
cat /etc/hosts | grep localhost
Here is the correct output you must get:
~$ cat /etc/hosts | grep localhost
127.0.0.1 localhost
::1 ip6-localhost ip6-loopback
Also verify that the bind address is set correctly by running this command:
cat /etc/mysql/my.cnf | grep bind-address
You should get this output:
~$ cat /etc/mysql/my.cnf | grep bind-address
bind-address = 127.0.0.1
If you get a different IP address, then edit the my.cnf file with this command:
sudo gedit /etc/mysql/my.cnf
Search for the line containing "bind-address" and correct its address by replacing it with 127.0.0.1.
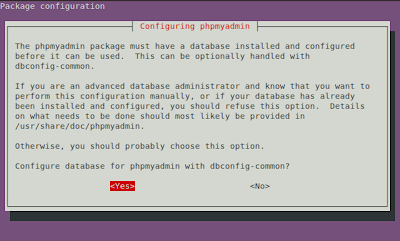
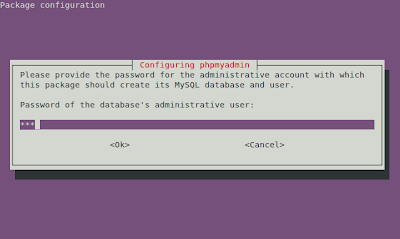
phpMyAdmin Installation
If you want an easy GUI for managing your MySQL databases, you can installphpMyAdmin with this command:
sudo apt-get install libapache2-mod-auth-mysql phpmyadmin
During the installation you will be asked to select a web server that will be configured automatically to run phpMyAdmin. Select apache2 using your spacebar and press Enter:

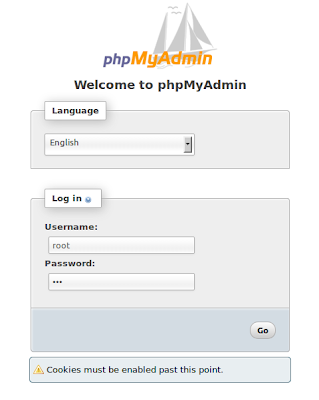
http://localhost/phpmyadmin/
Login to phpMyAdmin using root as username and the password you created earlier:

Removing LAMP & phpMyAdmin
To uninstall the LAMP web server and phpMyAdmin, open the terminal and run this command:
for pkg in `dpkg -l *apache* *mysql* phpmyadmin | grep ^ii | awk '{ print $2 }'`; do sudo apt-get -y purge --auto-remove $pkg; done;
That's it!
- How To Install LAMP (Linux, Apache, MySQL, PHP) On Ubuntu 11.04/11.10/12.04
- How To Install Linux, Apache, MySQL, PHP (LAMP) stack on Ubuntu 14.04
- How To Install Linux, Apache, MySQL, PHP (LAMP) stack on Ubuntu 16.04
- How To Install Linux, Apache, MySQL, PHP (LAMP) stack on Debian
- How To Install Linux, Apache, MySQL, PHP (LAMP) stack On CentOS 6
- How to install LAMP (Apache/PHP/MySQL)?
- how to install apache, PHP and MySQL on Linux
- how to install apache, PHP and MySQL on Linux 2
- how to install apache, PHP and MySQL on Linux 3
- How to Install LAMP (Apache 2.4, MySQL 5.6, and PHP 5.4) on CentOS/RHEL 7
- How to install LAMP (Apache, PHP and MySQL in Linux) using Yum
- How to install LAMP (Apache, PHP and MySQL in Linux) using Yum
- How To Install Linux, nginx, MySQL, PHP (LEMP) stack on Ubuntu 12.04
- How to install and configure Apache, PHP, MySql and phpMyadmin on ubuntu
- How to Install Apache, MySQL, PHP, and phpMyAdmin on FreeBSD
- How To Install MySQL on Ubuntu 16.04
- How To Install WordPress with LAMP on Ubuntu 16.04
- How To Install WordPress with LAMP on Ubuntu 16.04
- 在ubuntu上安装LAMP
- %1 Is Not a Valid Win32 Application
- Tablelayout 属性详解
- 学习HTML5不可错过的12家国外网站
- mfc 绘制 圆形按钮 继承CButton
- How To Install LAMP (Linux, Apache, MySQL, PHP) On Ubuntu 11.04/11.10/12.04
- Ubuntu 12.04的人工小帮手HUD介绍
- .Net 4.5中的HttpClient试用
- 达芬奇数字媒体片上系统的架构和 Linux 启动过程
- Linux Notification chain学习
- Java时间日期格式转换 格式化后的日期解析成时间戳
- hdu 4197 Popping Balloons
- 滑动条:
- 关于修改虚拟机内存,和开启“硬件加速